
Salesforce Shopify Connector and integration
Shopify and Salesforce Integration are taking the e-Commerce & CRM platform to new heights. Now dealing with e-Commerce unlimited data is much easier than ever before.
Shopify Salesforce Connector acts as a bridge between Shopify and Salesforce. It enhances the features of e-commerce and CRM platforms with a service-first approach.
This application allows admins to easily synchronize Customers, Collections, Products, and orders to Salesforce CRM, which will help them track sales and growth trends.
Note: Another key point is that you need to install in Salesforce Org from AppExchnage: eShopSync For Shopify
Note: If you don’t have an awesome Shopify store, You can get it from here: Create a Shopify store
Features
- Provides a unified Salesforce platform to manage both e-Commerce and CRM data.
- Multi-store-oriented integration to enhance the management of e-Commerce data more efficiently.
- Real-time synchronization for Collections, Products, Customers, and Orders from Shopify to Salesforce.
- Effective utilization of multiple Shopify stores in a single Salesforce CRM.
- Synchronize e-Commerce data at the Salesforce end to avail CRM benefits.
- Salesforce Centric configuration concept to avail hassle-free environment.
- Synchronization of Collections from Shopify to Salesforce end.
- Orders and Product synchronization to manage Inventory effectively.
- Customer synchronization as Accounts and Contacts at the Salesforce end.
- Interactive design with the user interface at Salesforce end adding on effective data utilization
- Synchronization Of variant as a Product from Shopify to salesforce end.
- In the Object Settings, there is an option Variant as a Product, by enabling its feature. All the Variants under the Products in Shopify would synchronize as a Specific Product at the Salesforce end.
Note: The variant would synchronize as a Product to the salesforce end once you have deleted all Shopify products from the Salesforce end.
Features(Paid)
- Export data from Salesforce to Shopify (Contact us for price)
- Multicurrency feature (Contact us for price)
- Meta fields Mapping (Contact us for price)
- Multi-store functionality (Contact us for price)
How to Install Salesforce Shopify Connector :
Installation & Setup at Salesforce’s end
Once you install eShopSync For Shopify from AppExchange. Follow the steps below to complete the setup:-
- Go to Setup then in Quick Find Search for Users
- After that, Users click on the Permission Sets option
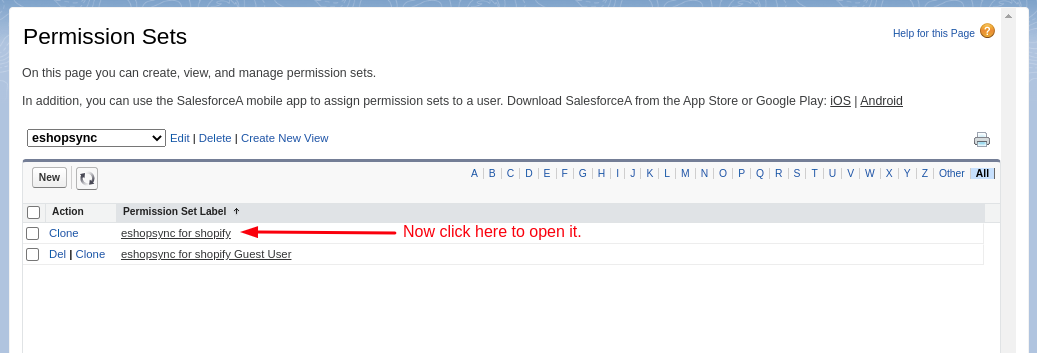
- The Permission Sets screen opens up
- Go to eShopSync for Shopify and click on it.
- Further, click on the Manage Assignments button.
- Select the Add Assignments option.

- During assigning permission sets, tick mark the user’s checkbox.
- Click on the Assign button to assign the permission sets.

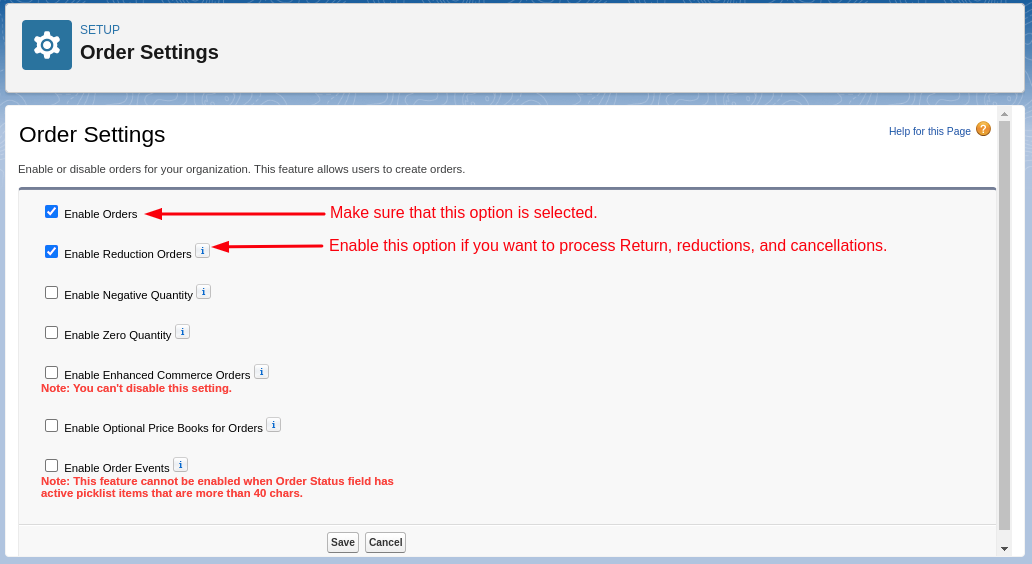
- Now In Quick Find type Order and then click on the Order settings
- If the Order was not enabled, then enable it by tick mark Enable Orders. You would not able to create and sync the Order and the error would appear at the Shopify end.
- The Feature of the Reduction Order is supported by the application so tick mark Enable Reduction Orders. It would allow a user to reduce orders that are activated. But it must be activated on both ends.
Create a Site in Salesforce ( To achieve a Real-time Synchronization Feature)
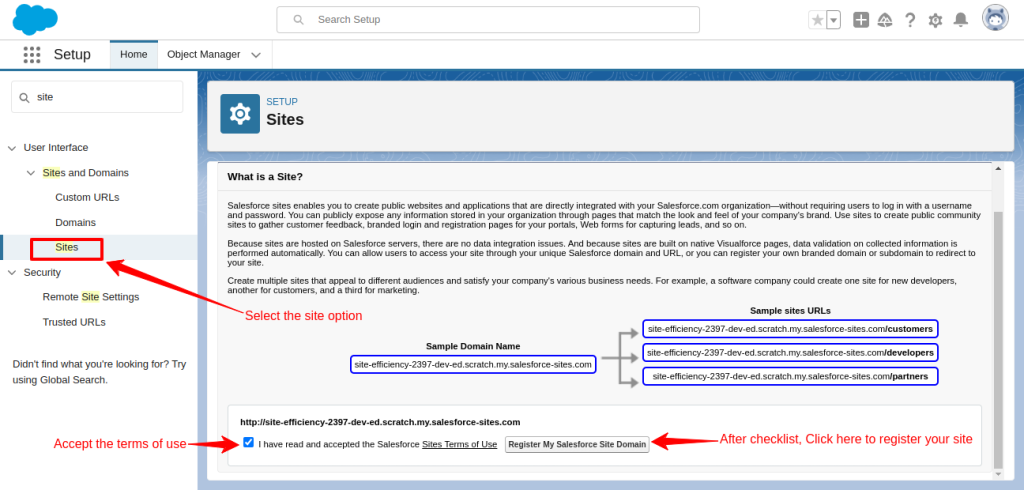
- To create a site in Salesforce, search for Sites in the quick action bar. When you are on the Sites page, accept the Salesforce site’s terms of use.
(Remember you have to only accept the site’s terms of use when you’re registering for the first time.)
-
Click on the New button to create the site.

-
Fill in the details of the site here.
- After that, click on the magnification icon in front of the active site homepage.
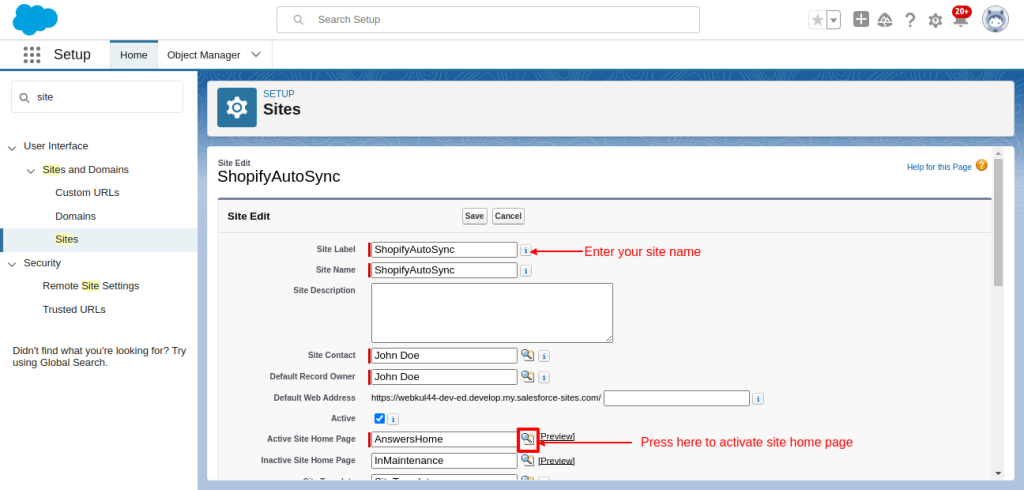
- A new window will open, select the below result to the active site homepage.
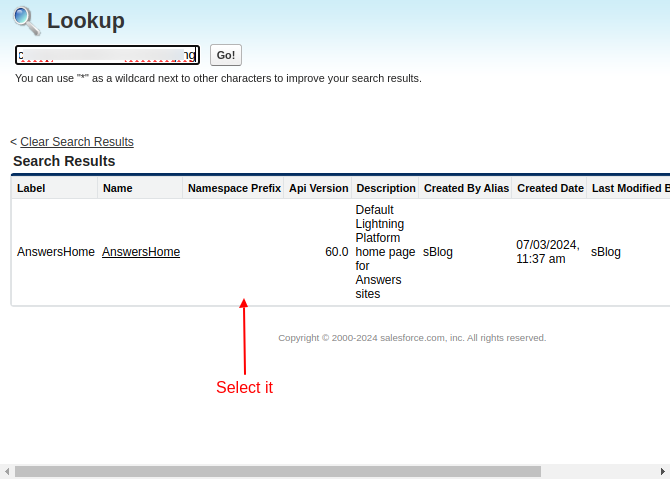
-
Scroll down and save the changes.
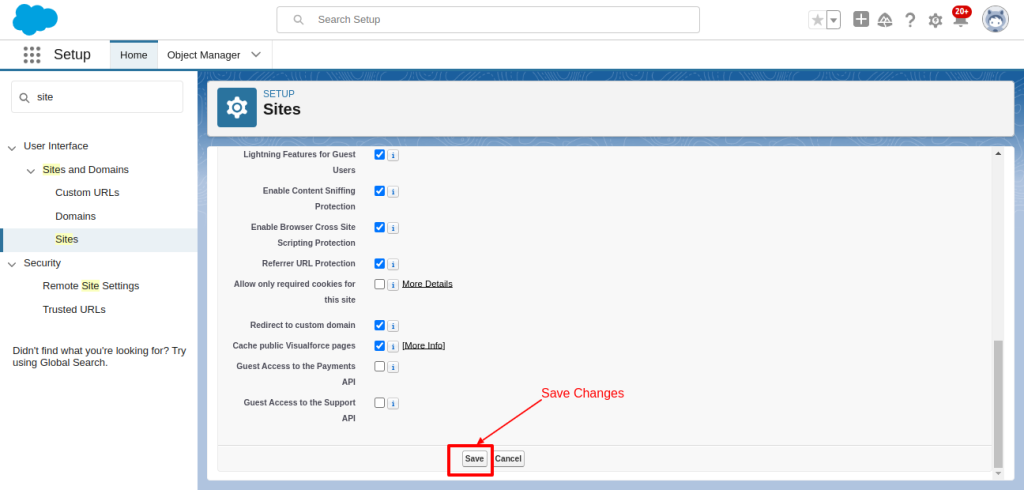
-
Afterwards, on the next page, click on the Public Access Settings button.
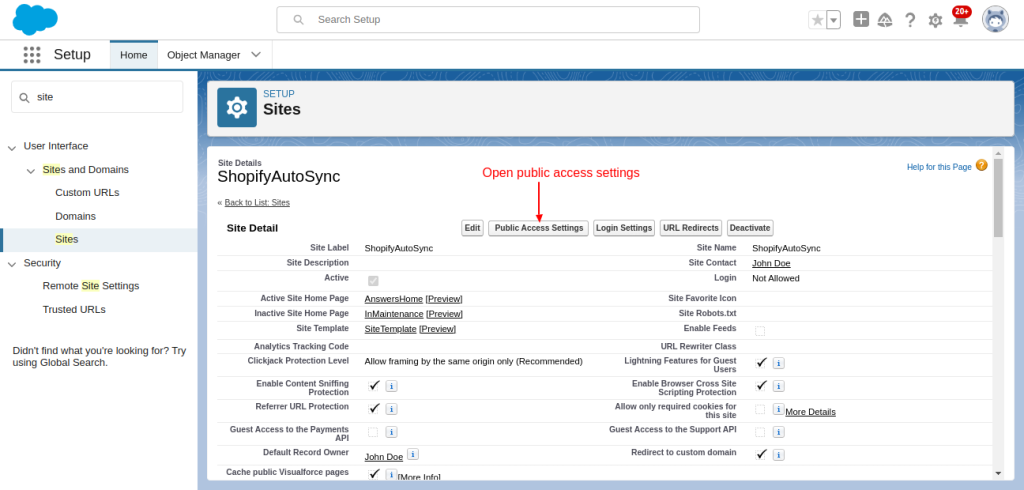
-
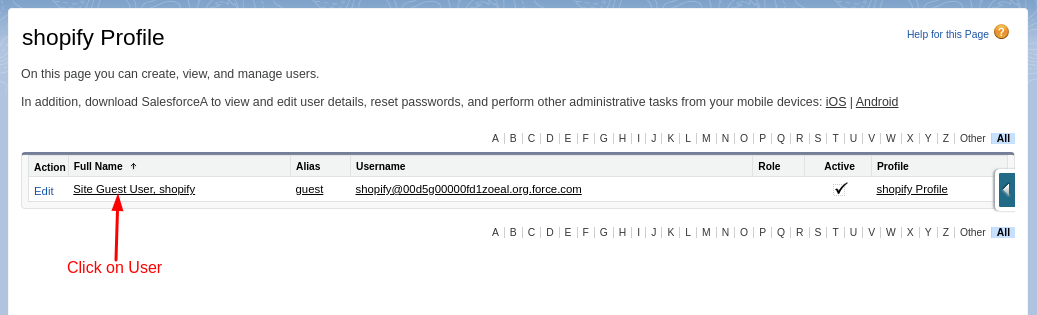
Click on the View User Button then you will be on the Shopify Profile page.
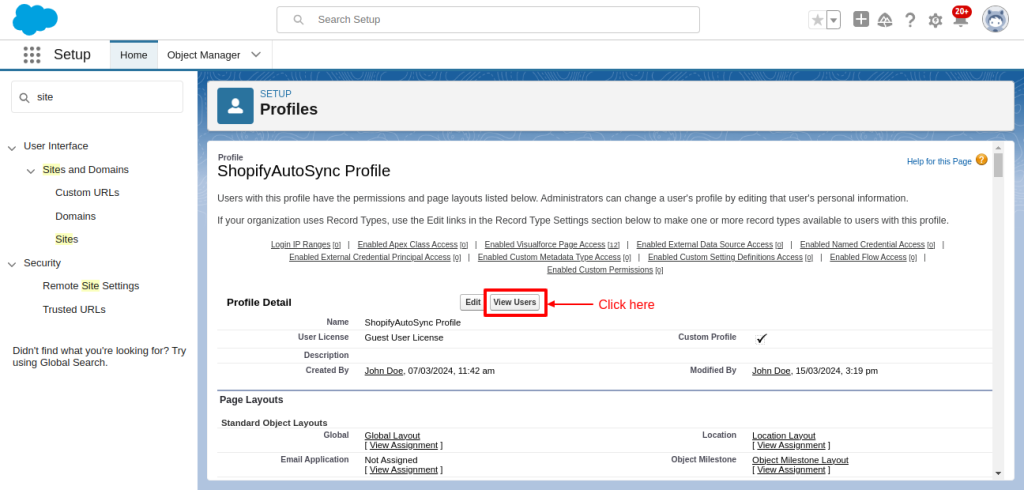
-
Here, you have to open the user by clicking on the user name below.
- Further, In the Users window, click on the option Permission Set Assignments.

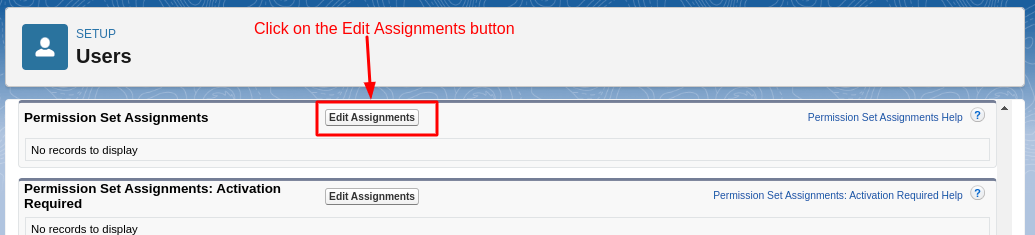
- Finally, add permission sets to enable the permission set box and click on the Save button to enable it.

How to Make a Custom App in Shopify?
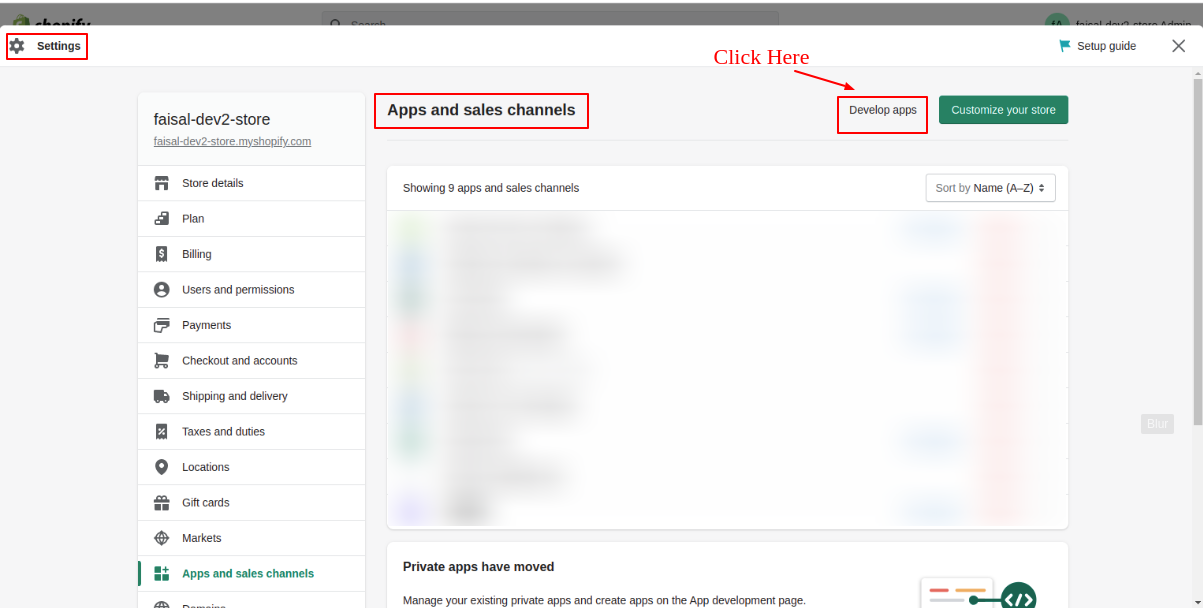
- In Shopify, Go to the Settings.
- Then click on Apps and Sales Channels.
- Further, you have to click on the Develop App button to create a new App.
- The App Form opens up on your screen.
- Enter the App Name according to you.
- Select App Developer from the drop-down list.
- Click on the button Create app and then it creates the app.

- After creating the app, configure the Admin API
- For this, click on the button Configure Admin API scope

- Provide the following scope permissions mentioned in the table below. You can also give another permission according to your requirements.
| Scopes | Write | Read |
|---|---|---|
| Assigned fulfillment orders | write_assigned_fulfillment_orders | read_assigned_fulfillment_orders |
| Custom_fulfillment_services | write_custom_fulfillment_services | read_custom_fulfillment_services |
| Customers | write_customers | read_customers |
| Discounts | write_discounts | read_discounts |
| Draft orders | write_draft_orders | read_draft_orders |
| Fulfillment services | write_fulfillments | read_fulfillments |
| Gift cards | write_gift_cards | read_gift_cards |
| Inventory | write_inventory | read_inventory |
| Locations | write_locations | read_locations |
| Merchant-managed fulfillment orders | write_merchant_managed_ fulfillment_orders |
read_merchant_managed_ fulfillment_orders |
| Order editing | write_order_edits | read_order_edits |
| Orders | write_orders | read_orders |
| Payment terms | write_payment_terms | read_payment_terms |
| Price rules | write_price_rules | read_price_rules |
| Product feeds | write_product_feeds | read_product_feeds |
| Product listings | write_product_listings | read_product_listings |
| Products | write_products | read_products |
| Purchase options | write_purchase_options | read_purchase_options |
| Returns | write_returns | read_returns |
| Shipping | write_shipping | read_shipping |
| Shop locales | write_locales | read_locales |
| Third-party fulfillment orders | write_third_party_fulfillment_orders | read_third_party_fulfillment_orders |
- Then click on the Save button.
- After saving settings, finally, go to the API credentials Tab and click on the Install app button.
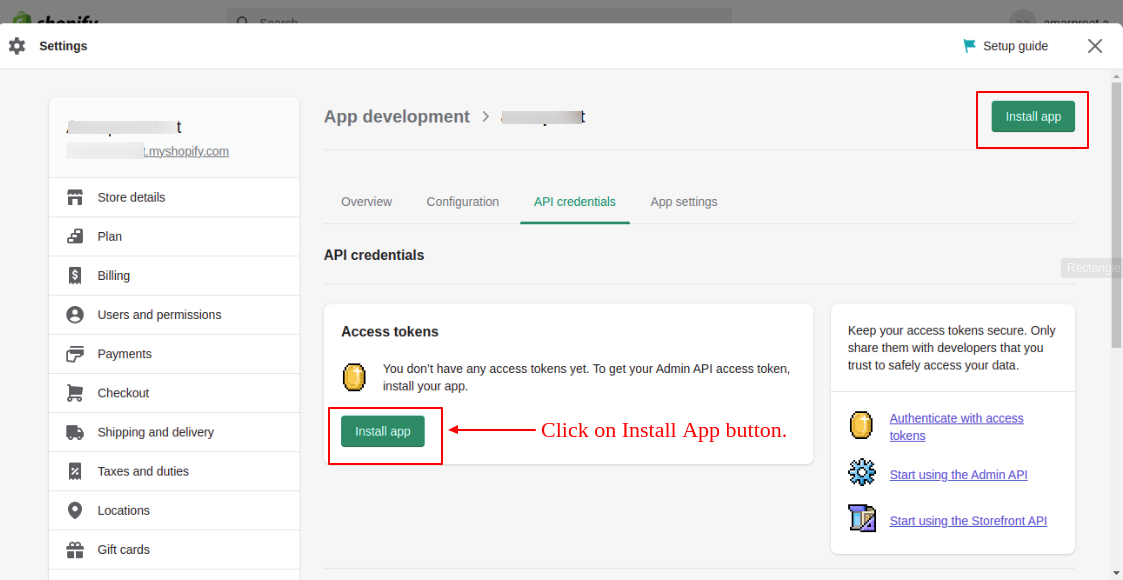
NOTE: When you are done with the app installation, you will get an access token that can be revealed once only. So copy and paste it into the text file to save it with you in a secure place.
How to Configure The Salesforce Shopify Connector?
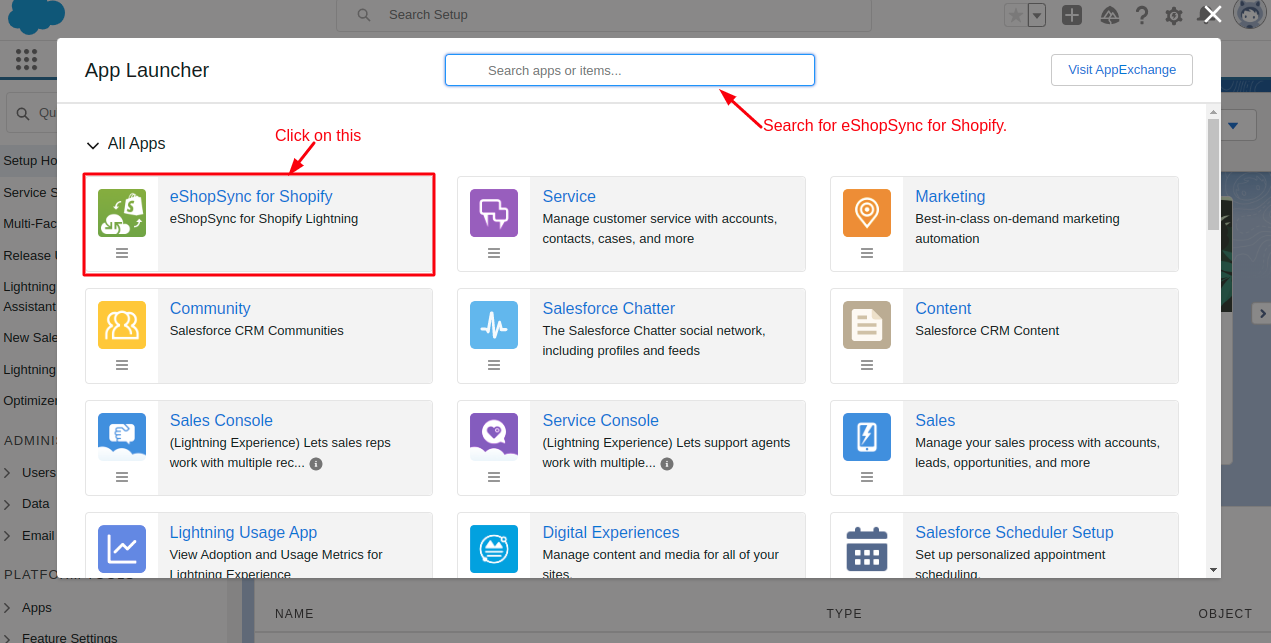
Go to the App menu, search for eShopSync for Shopify, and click on it to open.
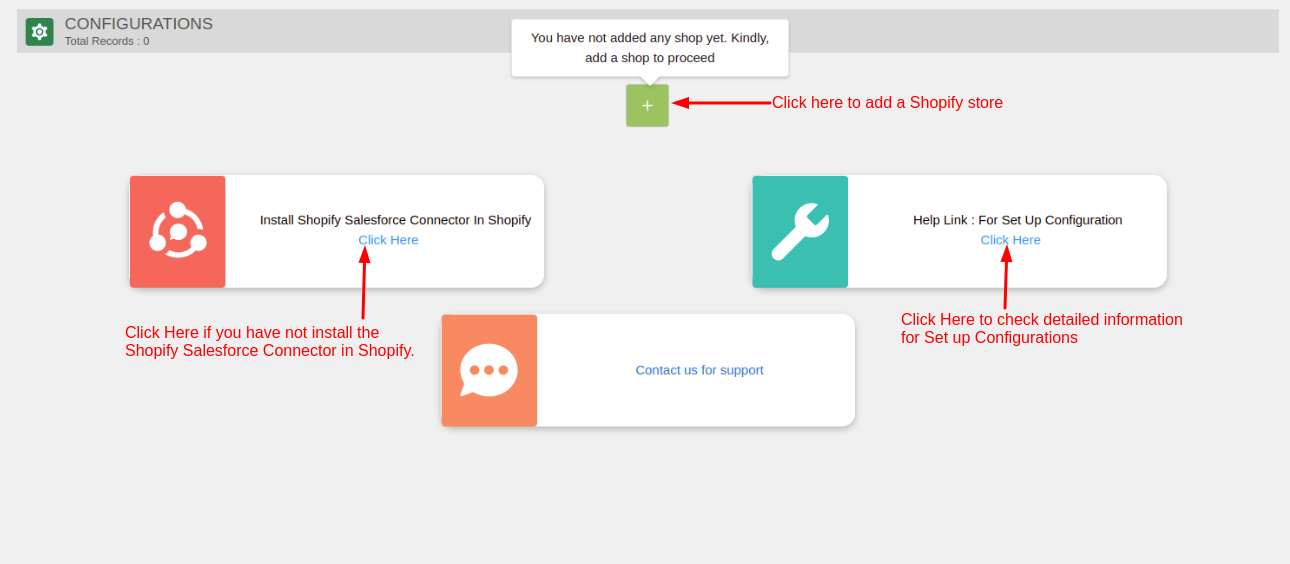
After that, you will see no open store window. Here you have to add your Shopify store. Click on the Add button.
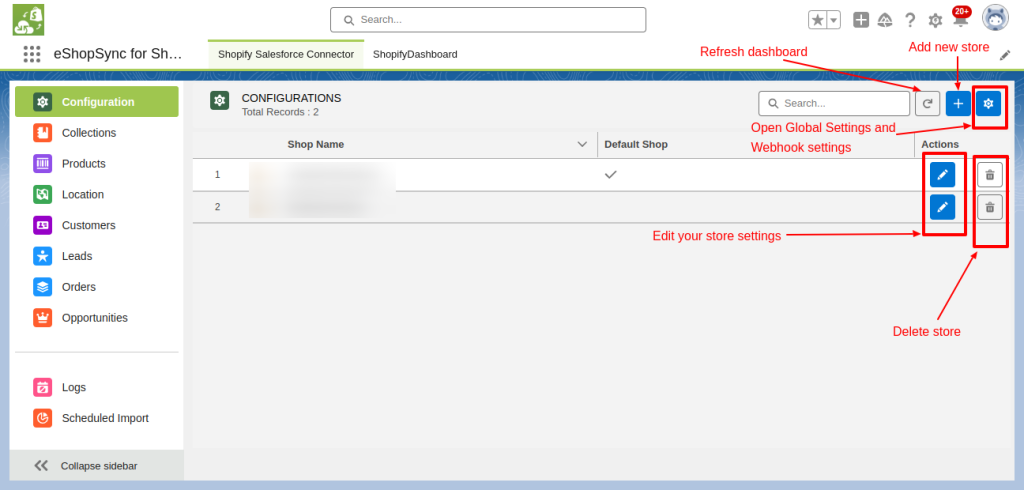
When you are done with adding the store to Salesforce then your store will be shown on this window.
Here you can find your stores. If you have added multiple stores then make a default store on which you are working. Delete any store by clicking on the delete icon in front of the store.
You can also edit your store settings. Select your store and click on the edit button then, a new window will open.
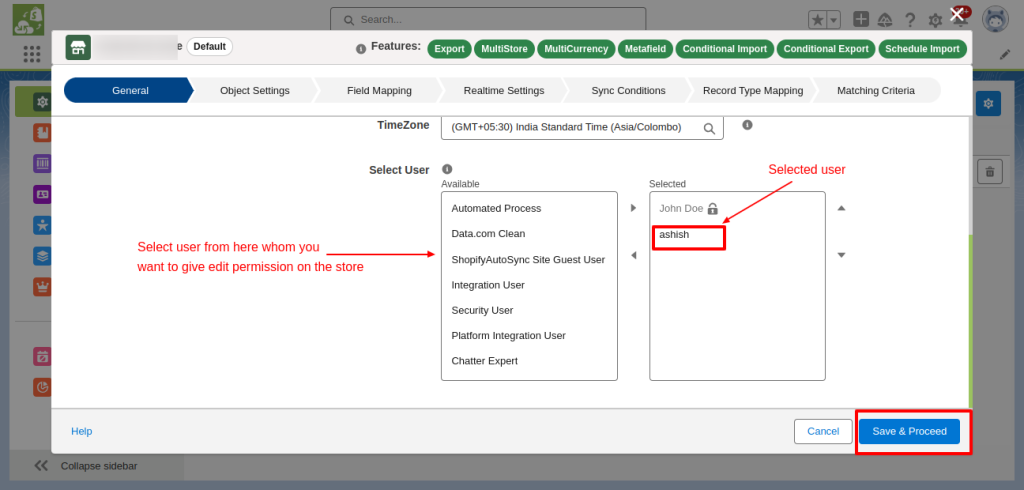
General Settings
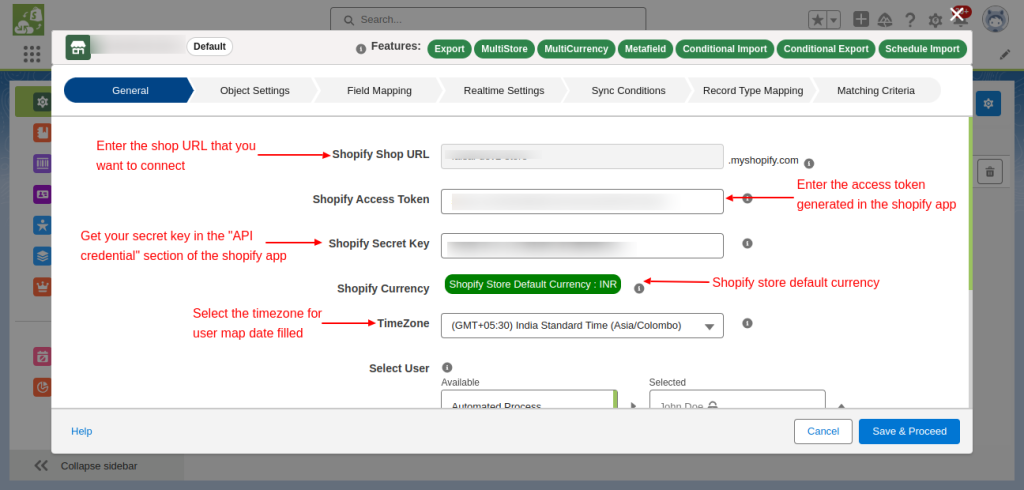
Fields in General Settings are:-
- Shopify Shop URL- Provide the shop URL of Shopify that you want to connect with Salesforce.
- Shopify Access Token- You have to enter the token that is generated in the Shopify app.
- Shopify Currency- For multi-currency connect with the eShopSync consultant team.
- Shopify Secret Key- Get your Shopify secret key in the API Credential section of the Shopify custom application.
- TimeZone- Choose the timezone for the map data fields of Shopify.
- Select User- Give permissions to users, so they can configure easily on their own.
Click on ‘Save and Proceed’ to save changes.
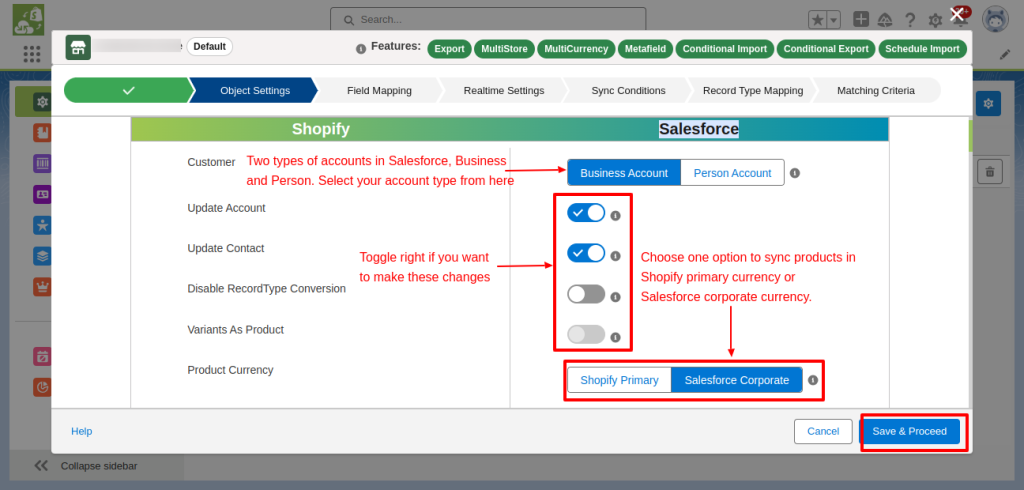
Object Settings
In the Object settings, there is an option to Variant a product by enabling its feature.
All the variants under the Products in Shopify would synchronize as a specific product at the Salesforce end. It is the 2nd tab in Configuration Setup. Click on it to configure its settings.
- Variant Synchronized as a Product.
- Note: Variants Would Synchronize as a product to the Salesforce end then you are not able to change it until you have deleted all the Shopify Products from the Salesforce end and vice-versa.
Some fields in Object Settings are as follows:-
- Customer Account Type- There are two types of accounts in Salesforce Person and Business. Choose an account that you want to create in Salesforce. Know more about Person and Business Accounts in Salesforce.
- Update Account- Tickmark the checkbox if you want to update your account whenever Shopify orders are synced.
- Update Contact- Shopify customers sync as Contacts into Salesforce. Enable it to update your contact whenever a Shopify customer syncs.
- Disable Record Type conversion- To disable record Type conversion account or contact, tickmark the checkbox.
- Variants as Product- Once you sync Variants as Products, you cannot remove it until you delete the store and then add it again. Vice-a-versa.
- Product Currency- You can choose your product currency as Shopify primary or Salesforce corporate currency.
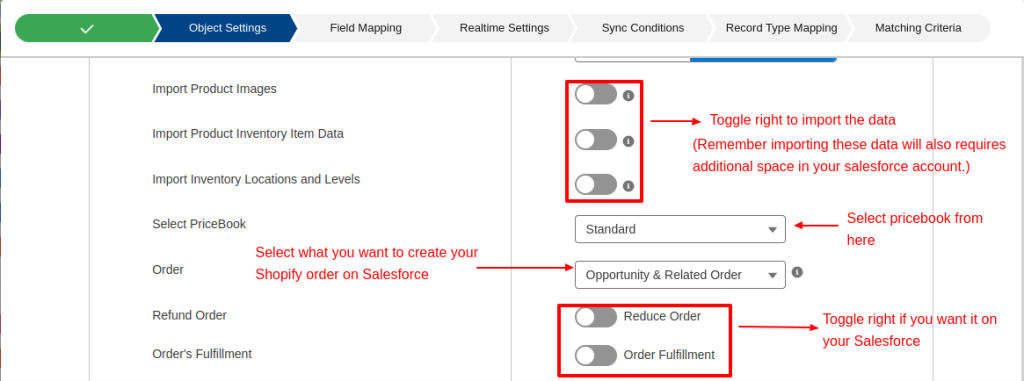
- Sync Product Images- It takes most of the salesforce resources to sync images. Your Shopify product images got synced into Notes and Attachments of products in Salesforce.
- Sync Product Inventory Item Data- If you want to sync data such as country HS code then, enable this option.
- Sync Inventory Locations and Levels- Enable if you like to sync levels and locations of inventory.
- Select Pricebook- Select Pricebooks to store the prices of the products.
- Order- Choose the option for what you want to create in Salesforce.
- Refund Order- Enable to sync refund order data.
- Order Fulfillment- Sync order fulfillment status data.
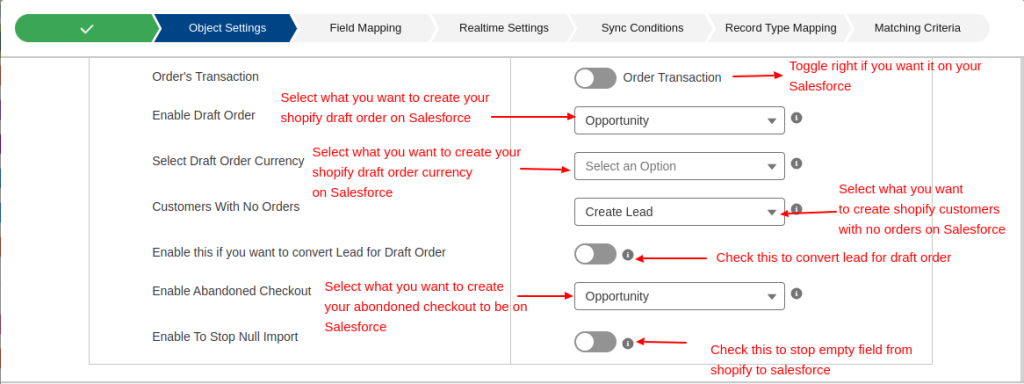
- Order Transaction- Enabling this will create order transaction data.
- Enable Draft Order- Select the option for the draft orders that you want to create to put your Shopify draft orders in Salesforce.
- Select Draft Order Currency- Select your preferred currency for the draft orders
- Customers with No Orders- Select the option for these types of customers, and what kind of category you want to create in Salesforce.
- Enable Abandoned Checkout- Select the option for the kind of checkout you want for Abandoned Checkout.
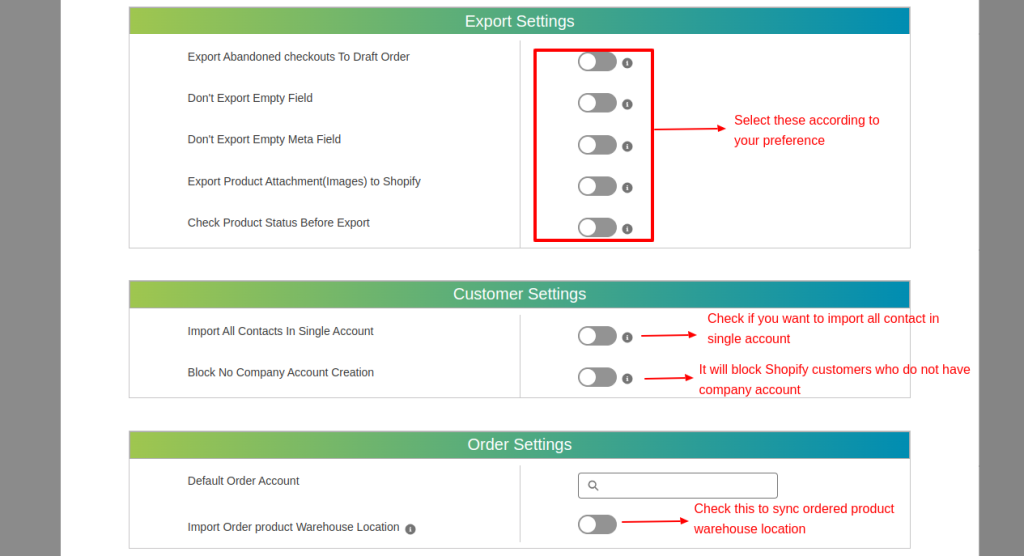
- Export settings- Likewise, check the settings according to your preferences.
- Export Abandoned checkouts To Draft Order
- Don’t Export Empty Field
- Don’t Export Empty Meta Field
- Export Product Attachments (Images) to Shopify
- Check Product Status Before Export
- Customer Settings- Similarly, you can check them according to your preferences.
- Order Settings- Check if you want to sync the ordered product warehouse location to Salesforce.
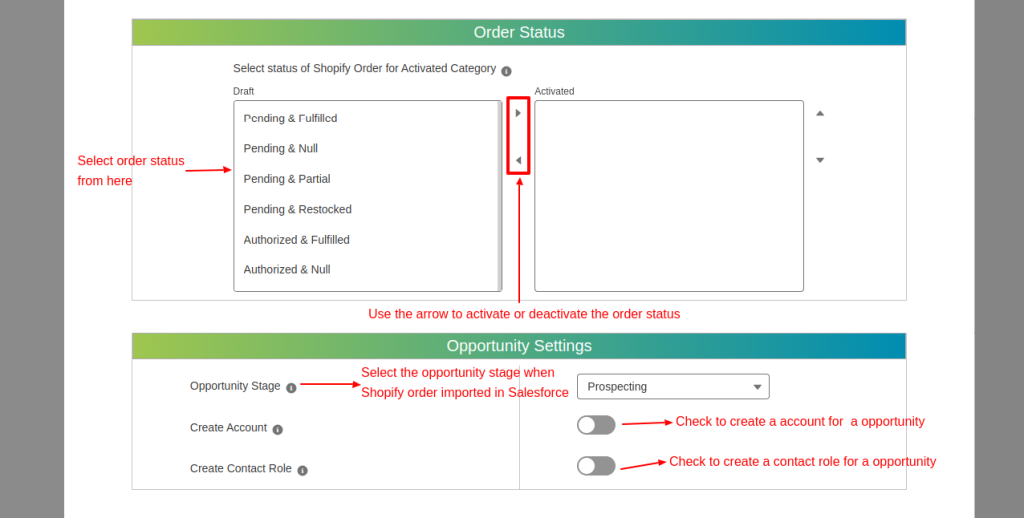
- Order Status- Select order status from the given box for the activated category based on Shopify order fulfillment status accordingly.
- Opportunity Settings- Choose the opportunity stage of the order according to when they will be imported in Salesforce.
- Check to create an account and contact role according to your preferences.
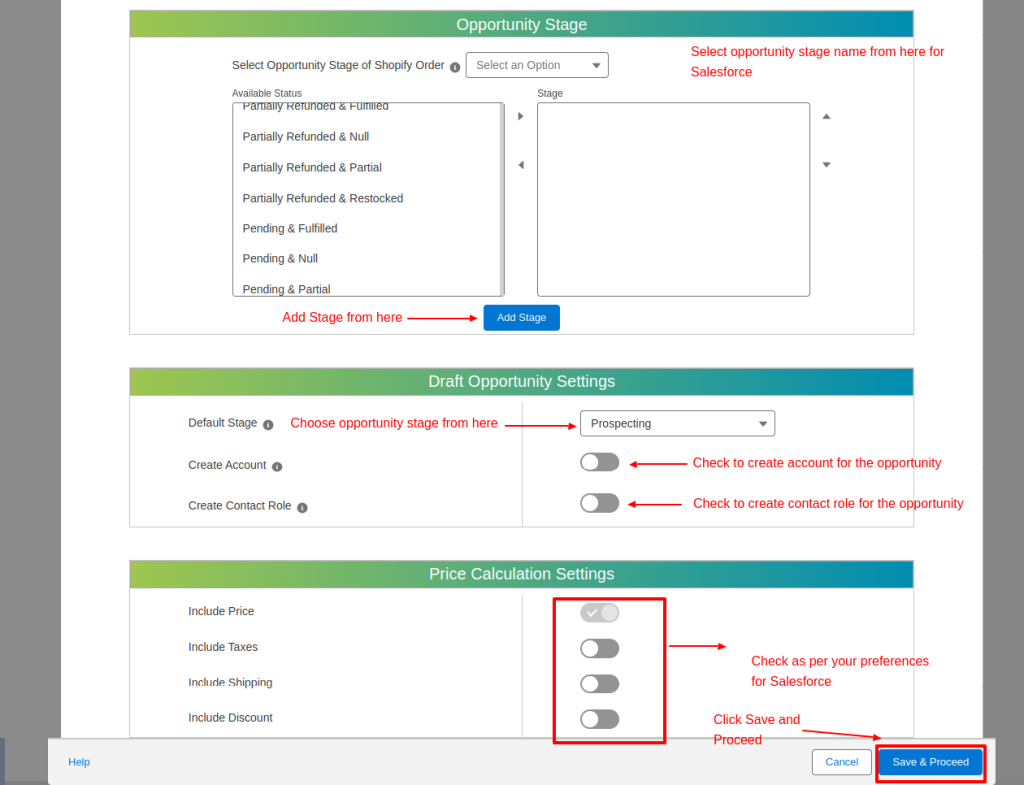
Opportunity Stage- In short, you can select the opportunity stage name for the Shopify order in Salesforce.
Draft Opportunity Settings- Choose the Opportunity Stage when a Shopify Order will Imported as a Salesforce Draft Opportunity.
You can check the create account and create a contact role according to your preferences.
Price Calculation Settings- Check the below settings as per your preferences for Salesforce.
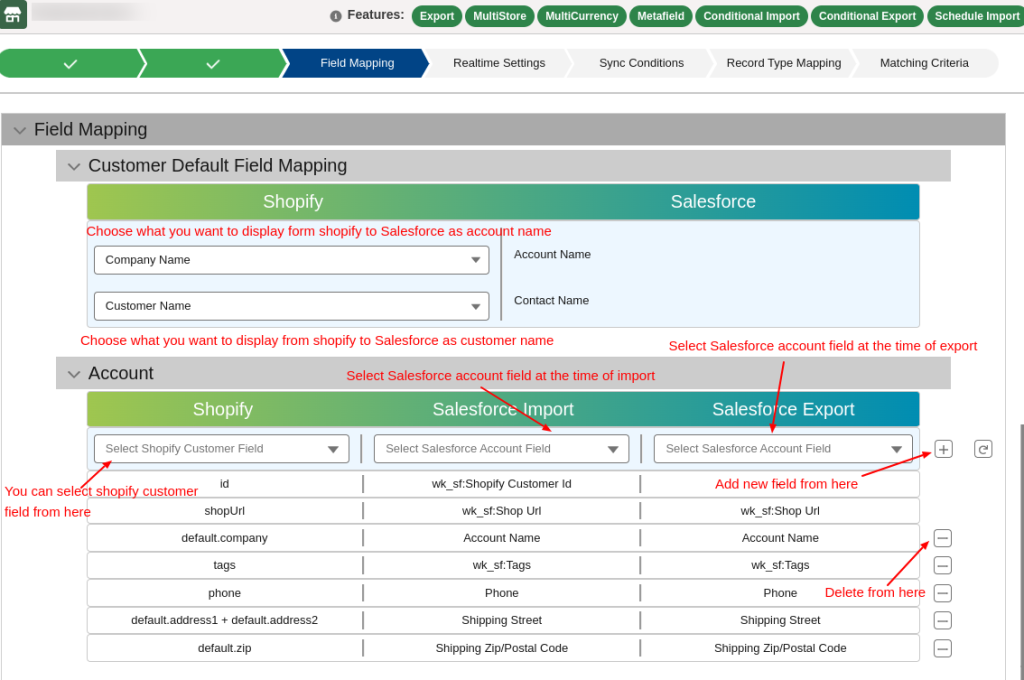
Field Mapping
Map the standard fields of Shopify to the Salesforce end with the compatible data type. In other words, to sync data in the correct format you are required to map the fields accordingly.
This syncs Shopify field data to the Salesforce field properly without any problem.
- In the same way, the fields that you have to map are as follows:-
- Customer Default Field Mapping
- Account Field Mapping
- Contact Field Mapping
- Lead Field Mapping
- Product Field Mapping
- Product Variant Field Mapping
- Order Field Mapping
- Order Product Field Mapping
- Opportunity Field Mapping
- Opportunity Product Field Mapping
- Customer Settings
- Order Settings
- Opportunity Settings
- Draft Opportunity Settings
- Price Calculation Settings.
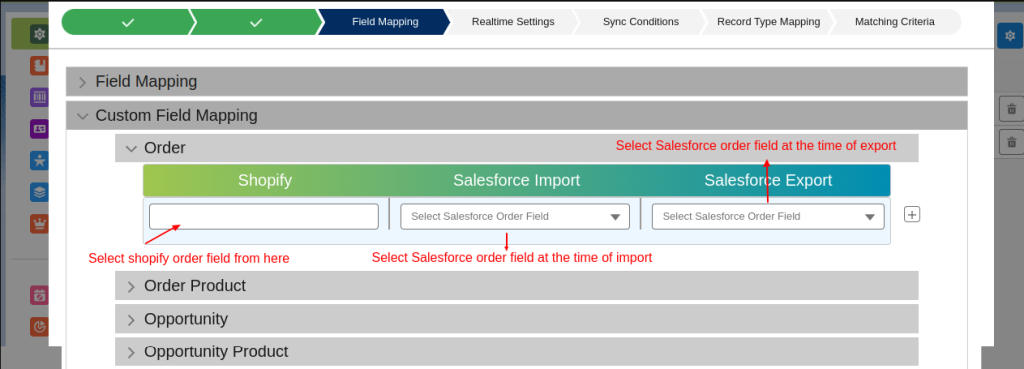
Custom Field Mapping: In this case, mention the custom field name of Shopify and then choose the field from Salesforce to map the custom fields properly.
This helps to sync the data properly without having any issues.
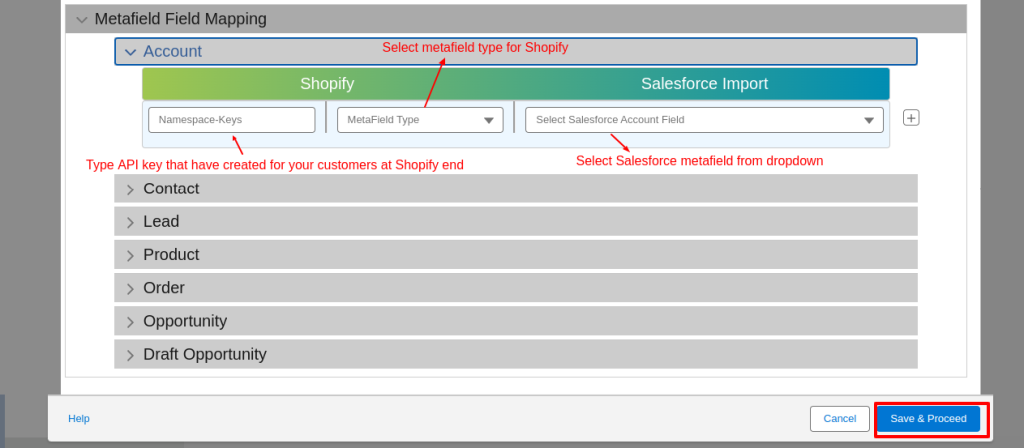
Meta Field Mapping: The following field mapping that you have to map in meta field mapping are:
- Account Metafields Field Mapping
- Contact Metafields Field Mapping
- Product Metafields Field Mapping
- Order Metafields Field Mapping
- Opportunity Metafields Field Mapping
- Draft Opportunity Metafields Field Mapping
After that, click on the Save & Proceed button.
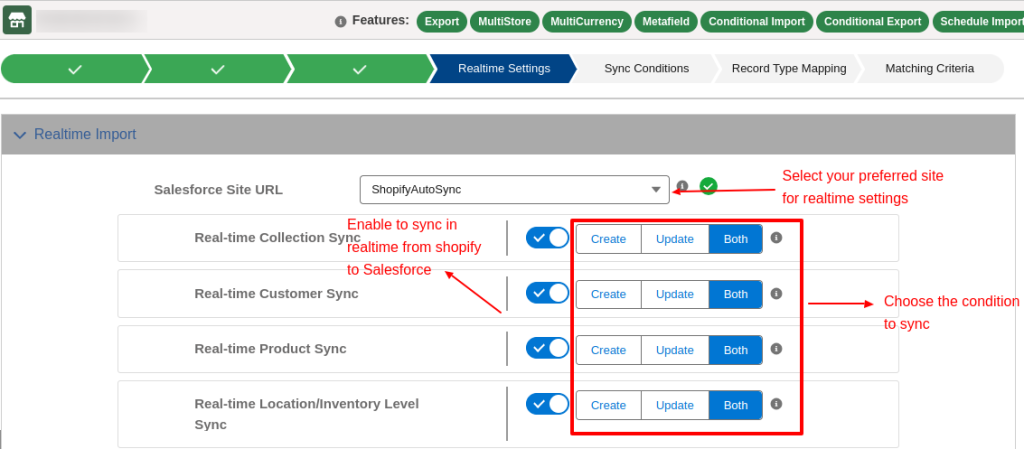
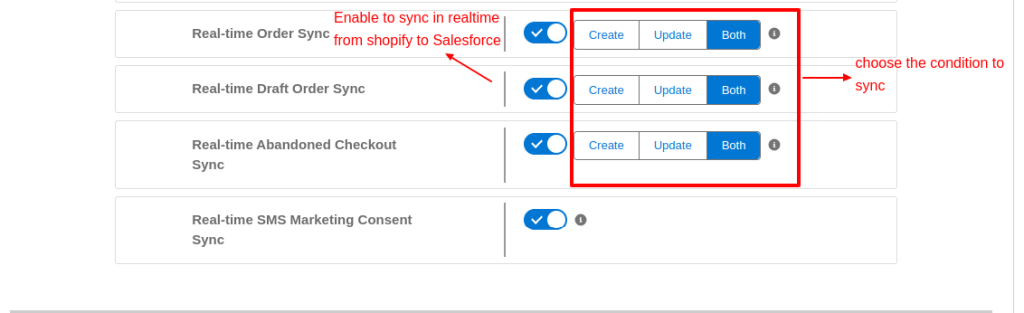
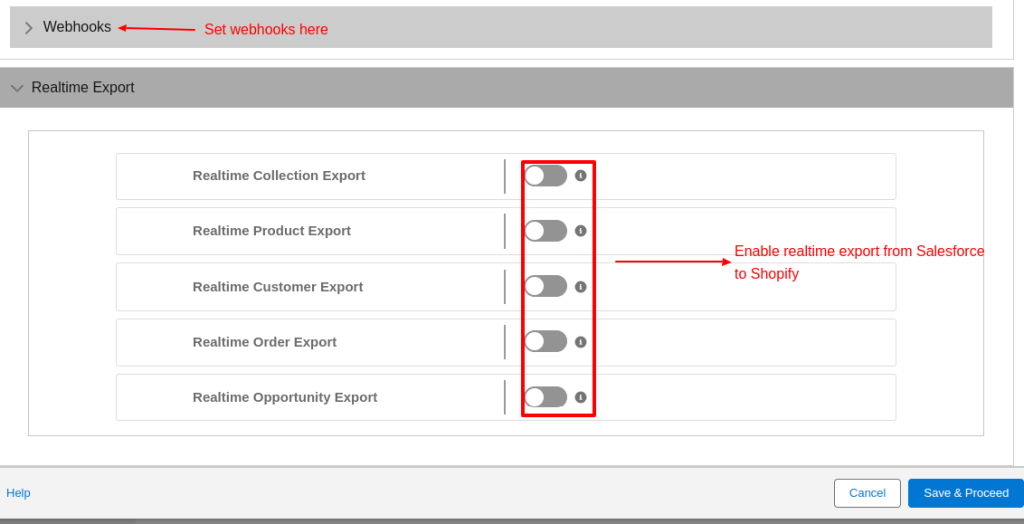
Realtime Settings
Create a site on Salesforce before jumping into the Realtime settings. For a detailed guide check out this blog on creating a site in Salesforce.
Further, In Realtime Settings you can select your preferred Salesforce site URL to sync and import data from Shopify to Salesforce.
You can create webhooks and also export data from Salesforce to Shopify.
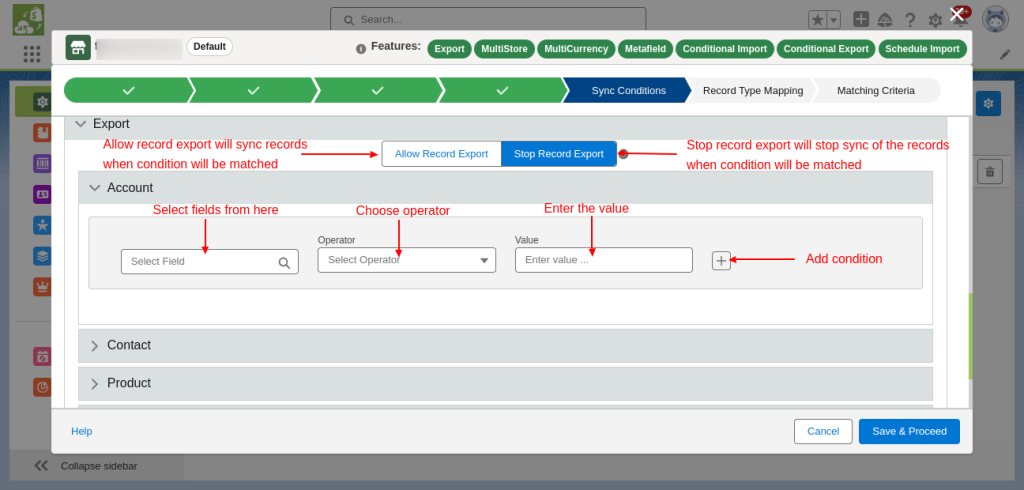
Sync Condition
Besides in Sync Condition, you can import data from Shopify to Salesforce when the condition set by you is validated.
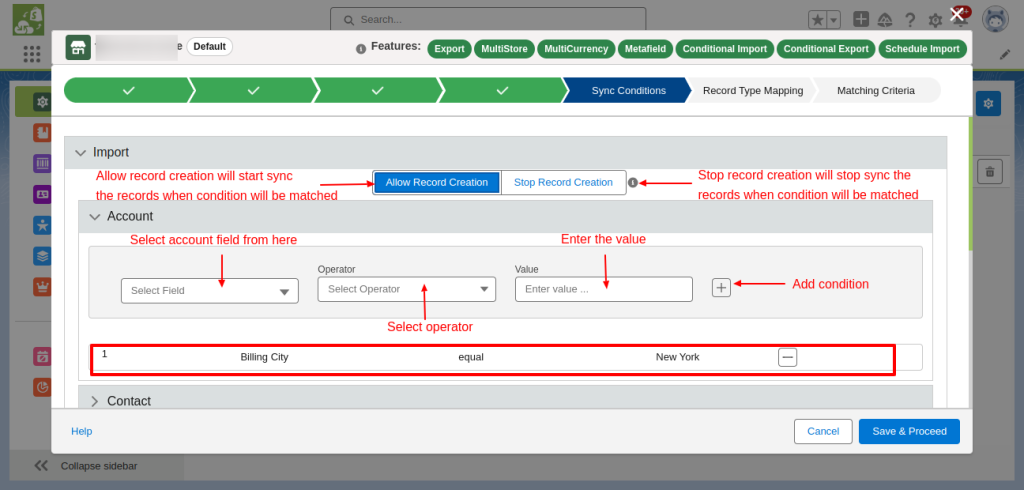
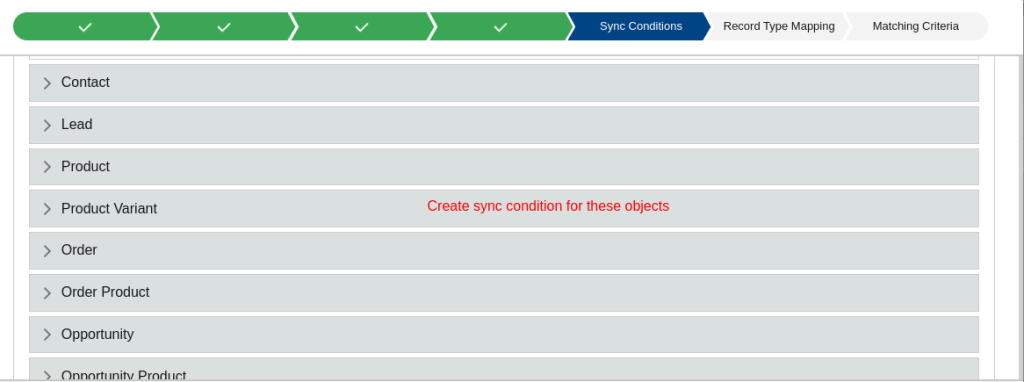
You can also sync data from Salesforce to Shopify when the required conditions are met.
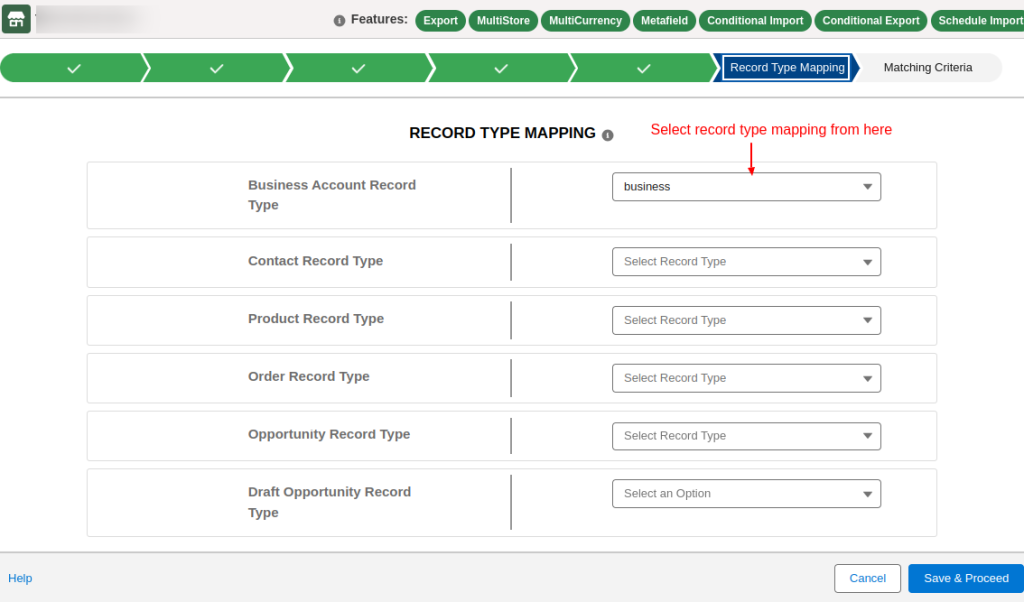
Record Type Mapping
A record type is a way to group many records of one type for an object. On the other hand record type mapping, here will sync your records as per the record type selected by you.
For record type mapping you have to fill these fields that are listed here:-
- Account Record Type
- Contact Record Type
- Order Record Type
- Opportunity Record Type
- Draft Order Record Type
- Draft Opportunity Record Type
After that, click on the Save & Proceed button.
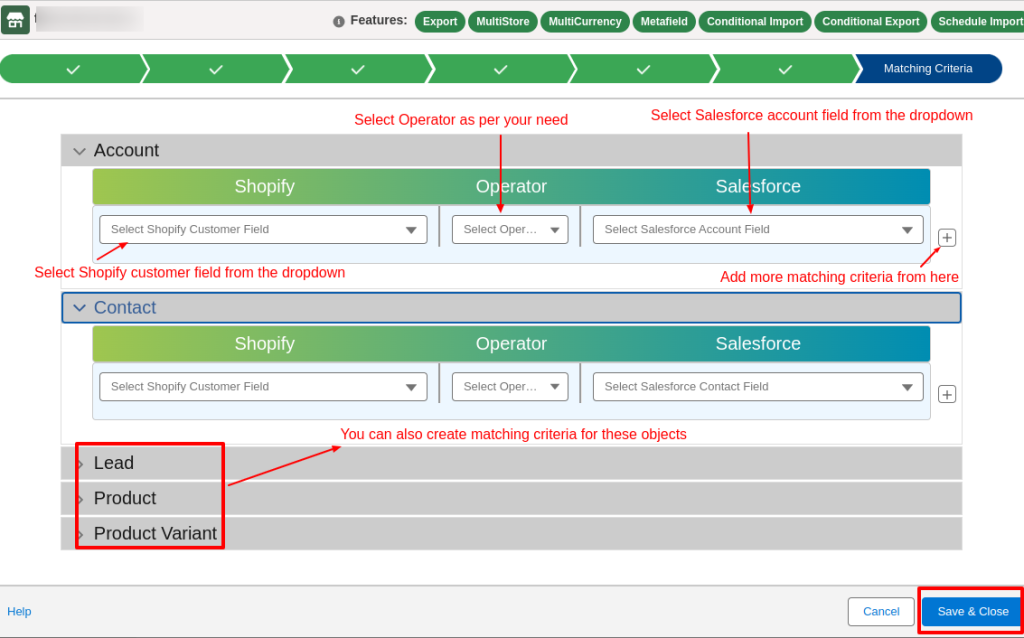
Matching Criteria
You can Compare Records and detect duplicates. Matching criteria help us look for duplicates among records with the same match key.
Furthermore, It defines how closely the new or edited field matches the same field on an existing record.
The fields you have to match under matching criteria are as follows:-
- Account Matching Criteria
- Contact Matching Criteria
- Product Matching Criteria
- Lead Matching Criteria.
On the other hand, the matching criteria are done by using operators such as:-
- Equals
- Contains
- Start with
- End with.
Finally, this completes the installation and setup process of the connector. Now, you may proceed to sync Collections, Products, Customers, and Orders.
After configuring the Salesforce Shopify Connector integration, hence save and close the window.
Note: Generally, the basic functionality of syncing Shopify to Salesforce can enhance all the Products, Orders, Customers, and Collections.
Moreover, the other functionality that would come with the additional customized features.
Salesforce Shopify Connector Global Settings?
In the dashboard, for configuration, you click on the edit button, similarly for accessing global settings click on the gear icon on the top right-hand side.
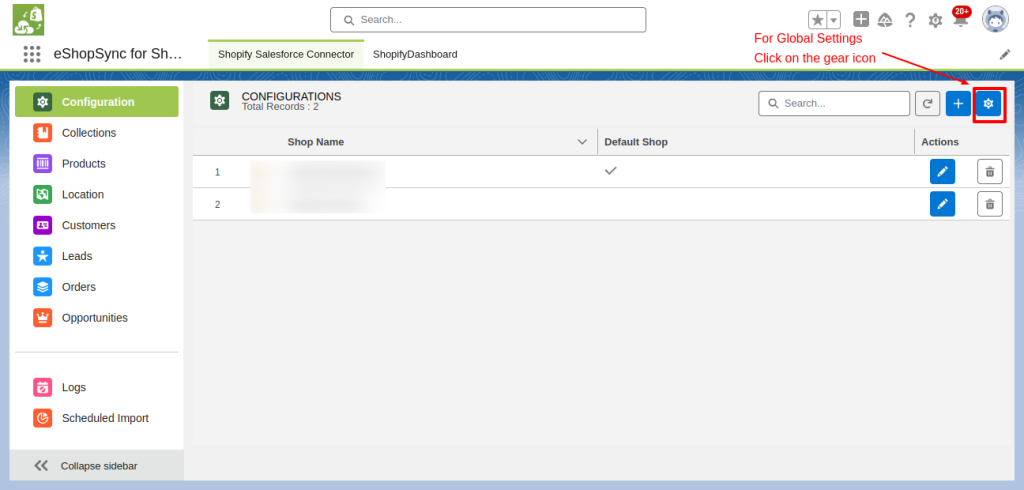
- When you click the global setting button, a popup window will open on your screen. Here, you can find different tabs.
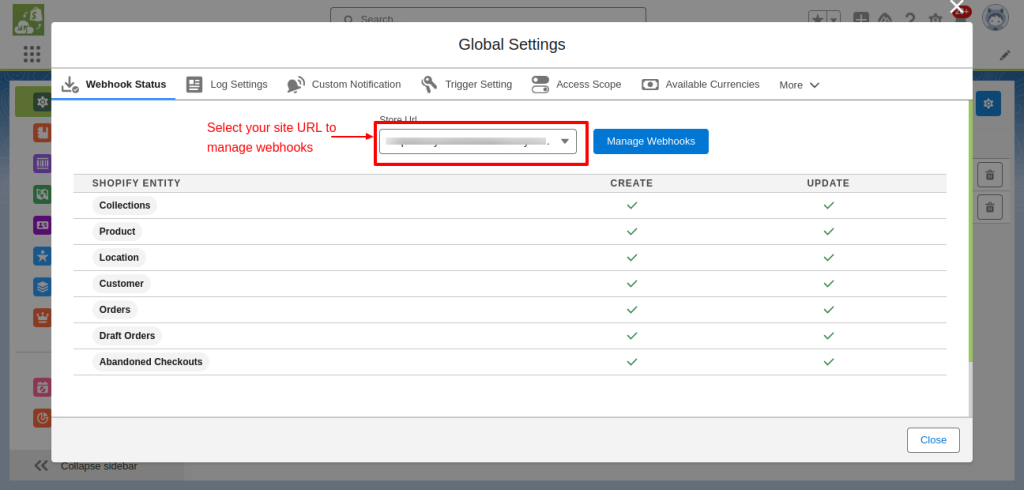
- Select any tab to change the settings. As I have shown in the image below the webhook tab where you can manage your webhooks.
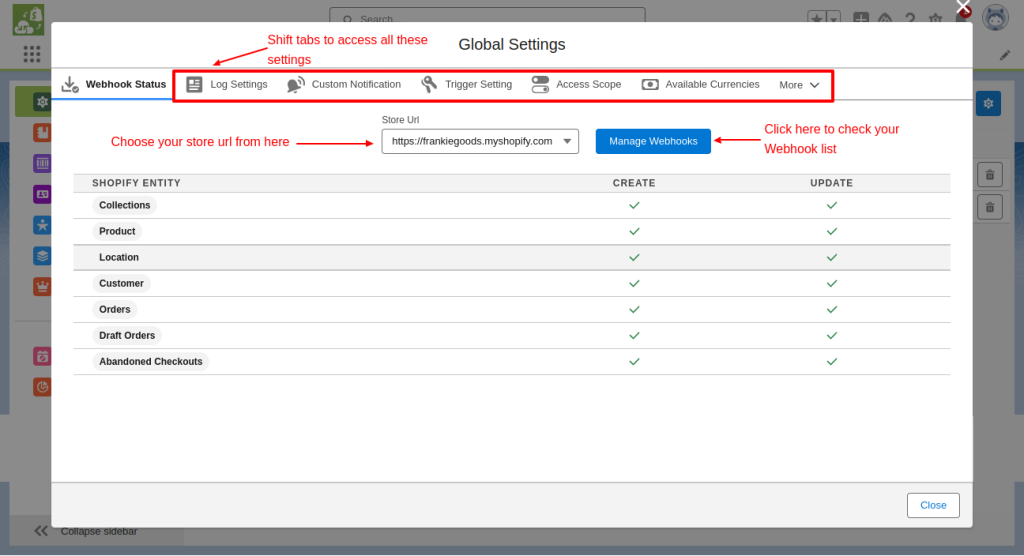
In Webhook Status, you must remember to choose the Shop URL to check their Webhook status.
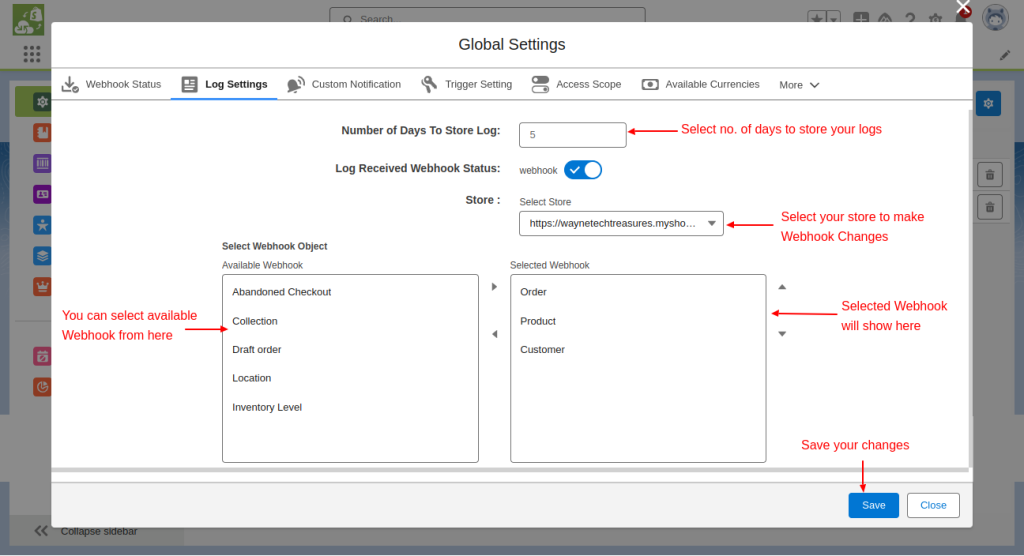
- Click on Log Settings and mention the number of days to save your shop logs.
- Enable the Webhook toggle then select the shop URL.
- After that, choose its objects and then click on the Save button.
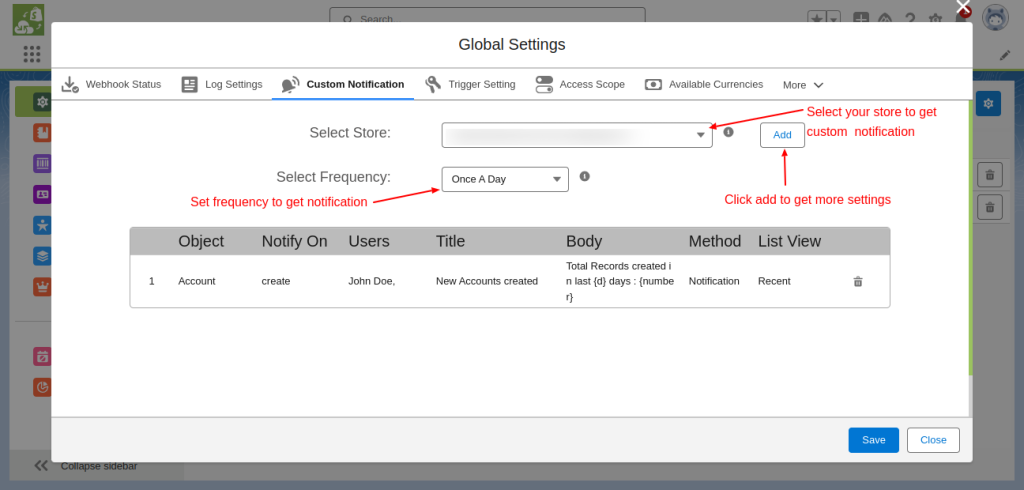
Now, go to the custom notification to add a custom notification for your store. Click on ‘Add’ to add more settings.
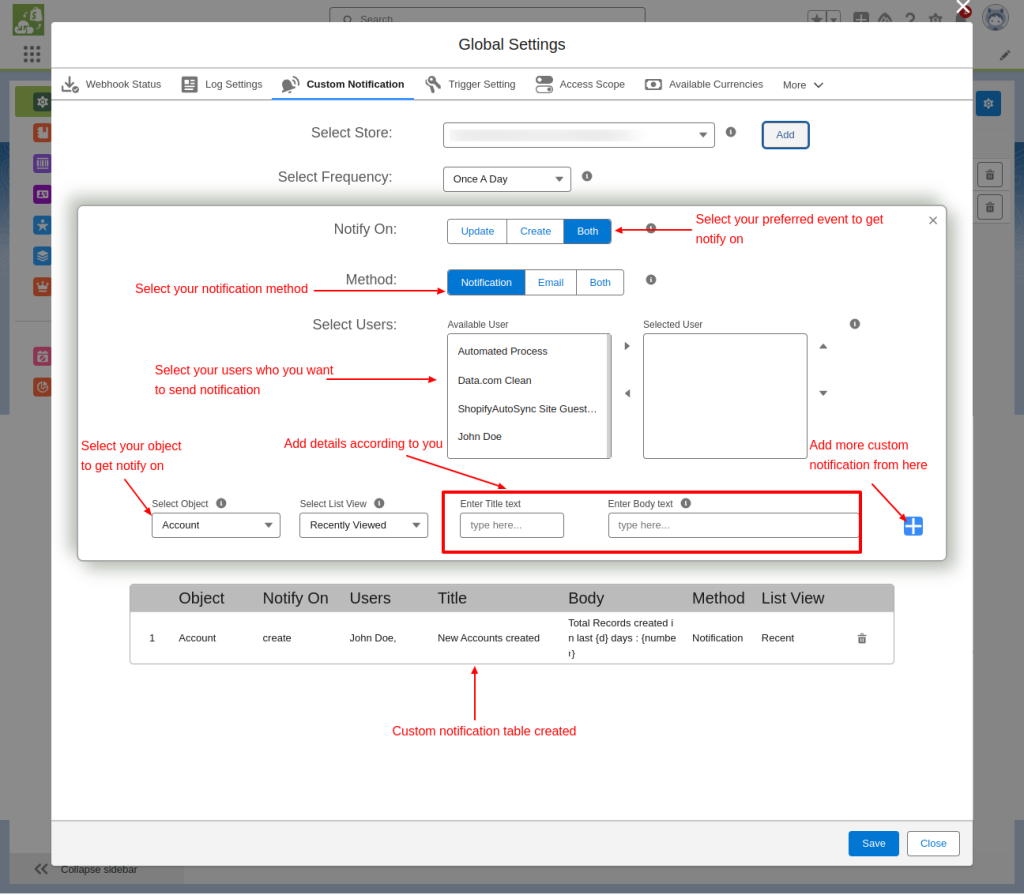
When you click on the Add button, more settings will pop up for creating custom notifications for your store.
- You can select the event for notification.
- Add users for custom notifications.
- And, can also add a new custom notification table.
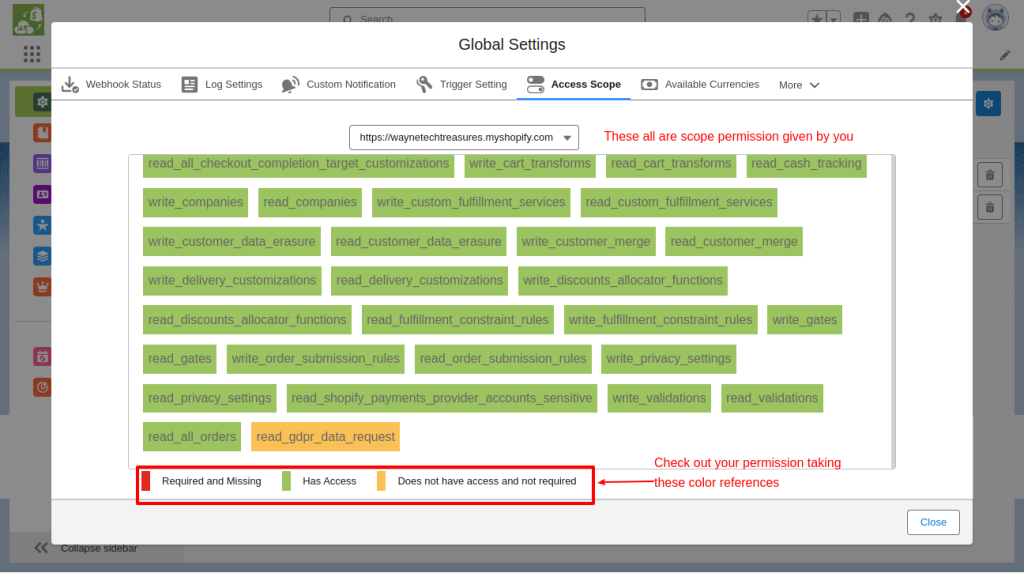
In the ‘access scope’ tab you can find all the scope permissions you have given. If there is any permission that is required and missing then it will show you in red color.
Seeing that you can give the required permission in your Shopify store.
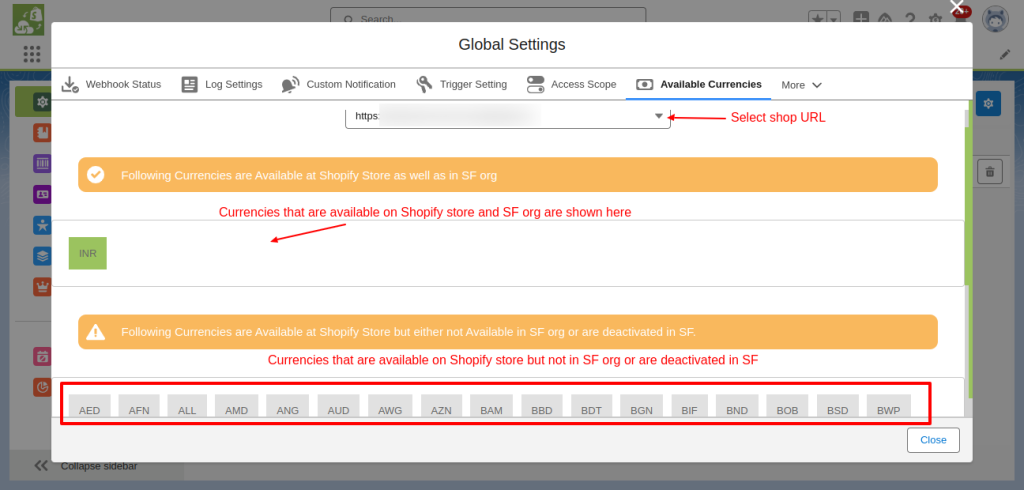
You can find available currencies for your Shopify and Salesforce in the ‘Available Currencies’ tab.
Note: If you want to enable the multicurrency feature on our connector then, you can contact us.
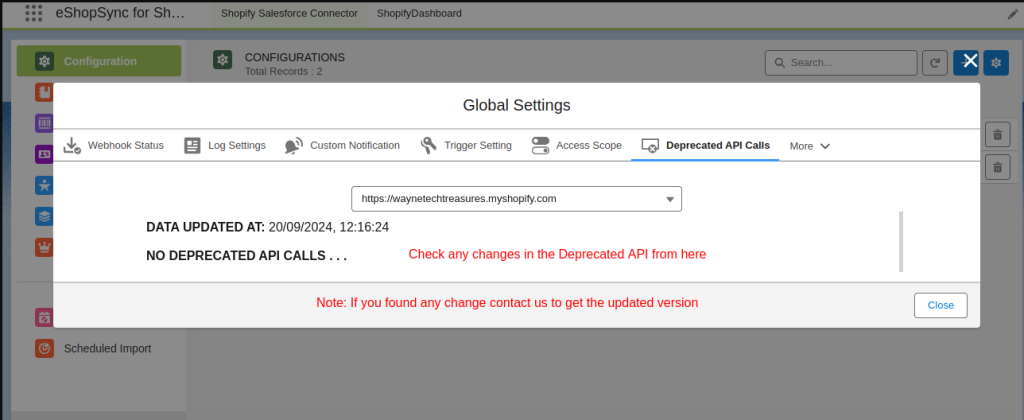
Click on more and you will find Deprecated API. If there is any update in the API then, you can see it in the ‘Depreciated API Calls’.
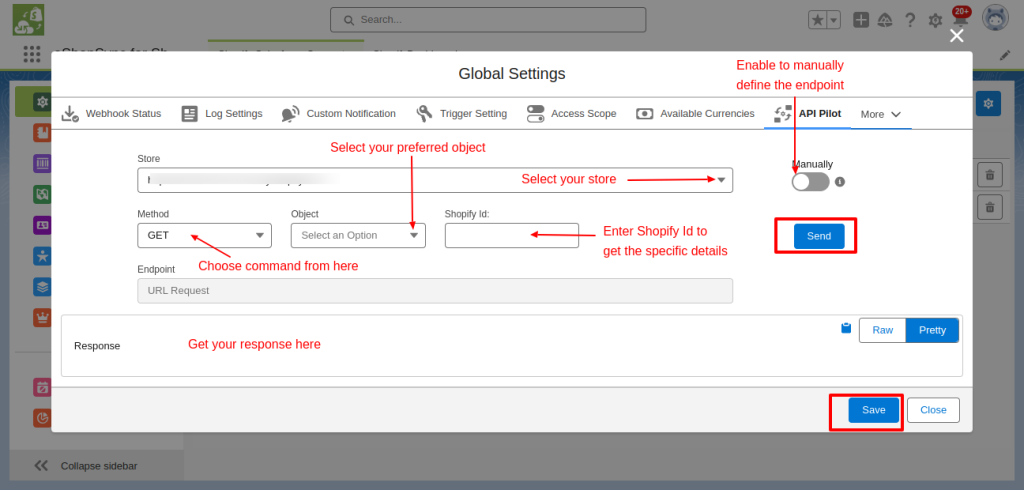
You will also find the API Pilot tab, It works as Postman. It enables you to get data from API to explore, debug, and test.
Synchronization Process
During the Synchronization process, there are types of synchronizations that can be done to sync collections, products, orders, customers, warehouses, opportunities, and logs.
The types of synchronization are as follows:-
- Default Store- Select the store whenever you do a manual sync to import your data from Shopify to Salesforce.
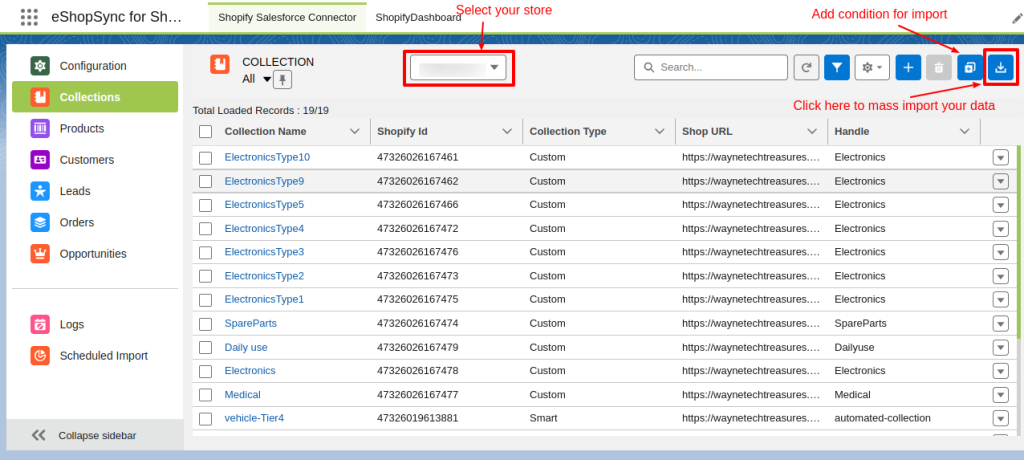
When there is a new record in Salesforce and you want to export it to Shopify then also you have to choose the default Shopify store in which you want to sync your data. - Mass Import- You can import all your data that is shown on your screen in one go by clicking on the mass import button that is on the right side of the Conditional Sync toggle button.(Remember if you select any field in the object and then click on the import button. The data will be imported only for the selected field. In this case, you will not be able to mass import.)
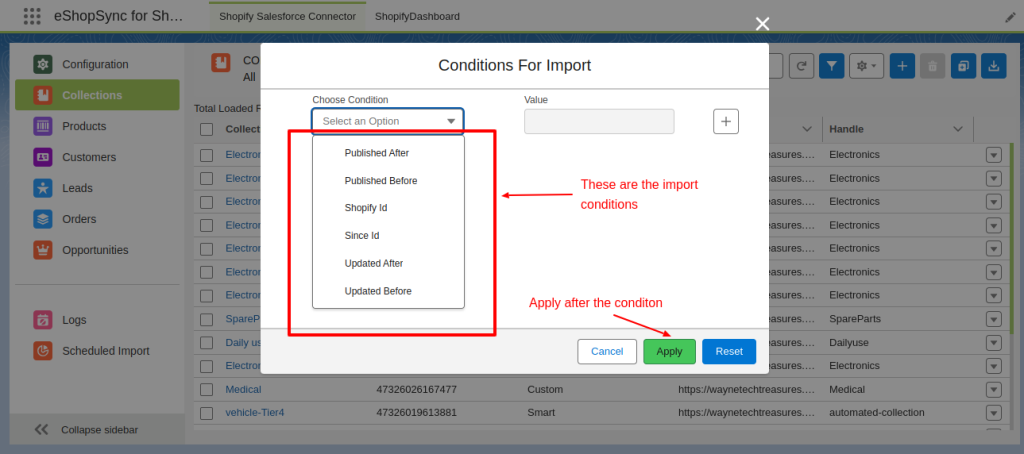
- Conditional Sync- This is a sync that you can do based on different conditions that can be done in everything except the warehouse and Logs.
The options in conditional sync are as follows:-
- Update After- You can sync products, customers, warehouses, orders, collections, and opportunities that are updated after the date that you have mentioned.
- Update Before- You can sync products, customers, warehouses, orders, collections, and opportunities that are updated before the date that you have mentioned.
- If you have entered the dates in both fields of “Update After” and “Update Before” then the data synced that lies in between these dates.
- Published After- You can sync products, customers, warehouses, orders, collections, and opportunities that are published after the date that you have mentioned.
- Published Before- You can sync products, customers, warehouses, orders, collections, and opportunities that are published before the date that you have mentioned.
- If you have entered the dates in both fields of “Published After” and “Published Before” then the data that lies in between these dates is synced.
- Since ID- If you mention the Since ID then it syncs all the data that is shown after that ID. The Since ID is mentioned at the last of the product URL.
- Shopify ID- Every record in Shopify has a unique ID. So if you know that ID then you can mention it to sync the data accordingly.
In Orders and Opportunities, 2 types of entities are “Order” and “Draft Order”.From this, you have to choose anyone and then provide the required information for conditional sync.
The options for Sync Orders and Sync Opportunities are listed here:-
- Update After- You can sync products, customers, orders, collections, and opportunities that are updated after the date that you have mentioned.
- Update Before- You can sync products, customers, orders, collections, and opportunities that are updated before the date that you have mentioned.
- If you have entered the dates in both fields of “Update After” and “Update Before” then the data synced that lies in between these dates.
- Processed After- You can sync orders and opportunities that are processed after the date that you have mentioned.
- Processed Before- You can sync orders and opportunities that are processed before the date that you have mentioned.
- If you have entered the dates in both fields of “Processed After” and “Processed Before” then the data synced that lies in between these dates.
- Status- This field is common for both entities. In this, you have to choose the option from the drop-down list that the status of an order must be open, closed, canceled, or any.
- Financial Status- This field is only in the Order entity. In this, you have to choose the option from the drop-down list that the financial status of the order must be paid, unpaid, authorized, refunded, etc to sync the data.
- Fulfillment Status- This field is only in the Order entity. In this, you have to choose the option from the drop-down list that the fulfillment status the of order must be Shipped Parcel, unshipped, or any to sync the data.
- Since ID- If you mention the SInce ID then it syncs all the data that is shown after that ID. The Since ID is mentioned at the last of the product URL.
- Shopify ID- Every record in Shopify has a unique ID. So if you know that ID then you can mention it to sync the data accordingly.

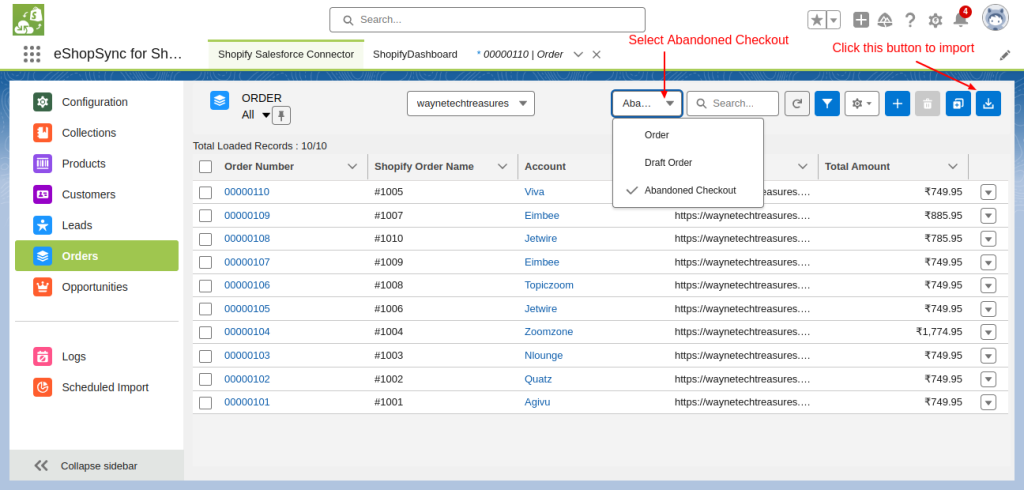
Sync Abandoned Cart
At first, click on the dropdown section to Sync Abandoned Cart and select Abandoned Checkout. Start syncing data by clicking on the import button.
When the sync is completed then, it shows a message on your screen.
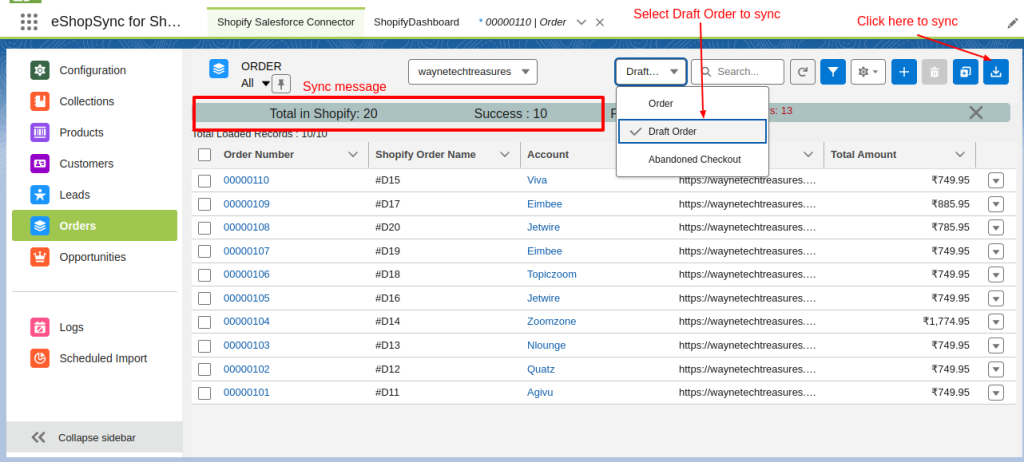
Sync Draft Orders
Select the draft order from the dropdown section, then click on the mass import button.
It processes the synchronizations and shows a completed message on your screen when done.
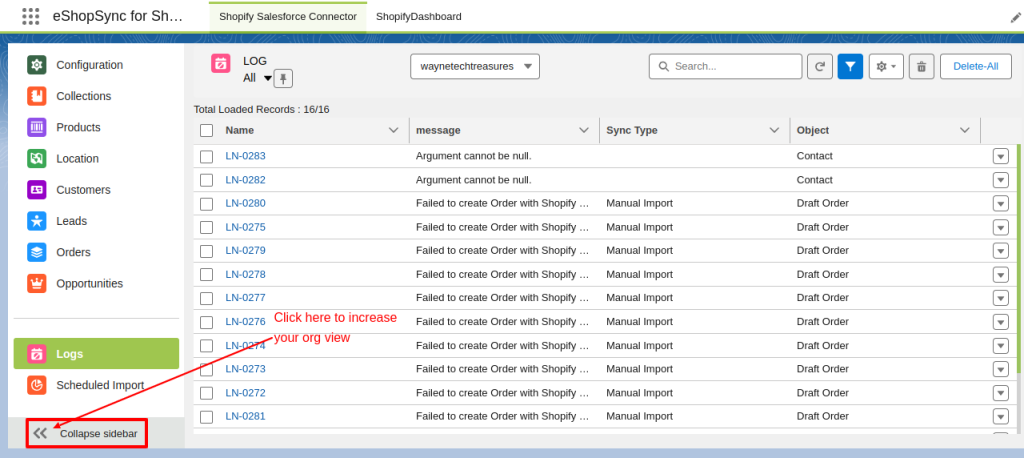
Increase the size of your Org
In the bottom left corner, there is a button named ‘collapse sidebar’. Click on it to increase the size of your org.
What are the actions that you can perform?
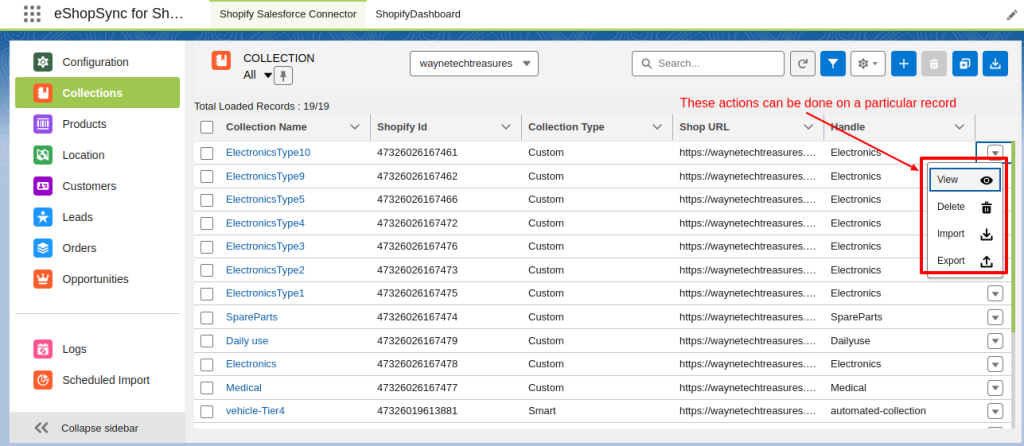
The common actions are as follows:-
- View- Firstly, click on the View icon to see the specific record at the Shopify end with details.
- Delete- Secondly, delete the icon to delete that particular record.
- Import- Import icon to do a specific import or update the record.
- Export- Finally, the Export icon to export or sync that record.
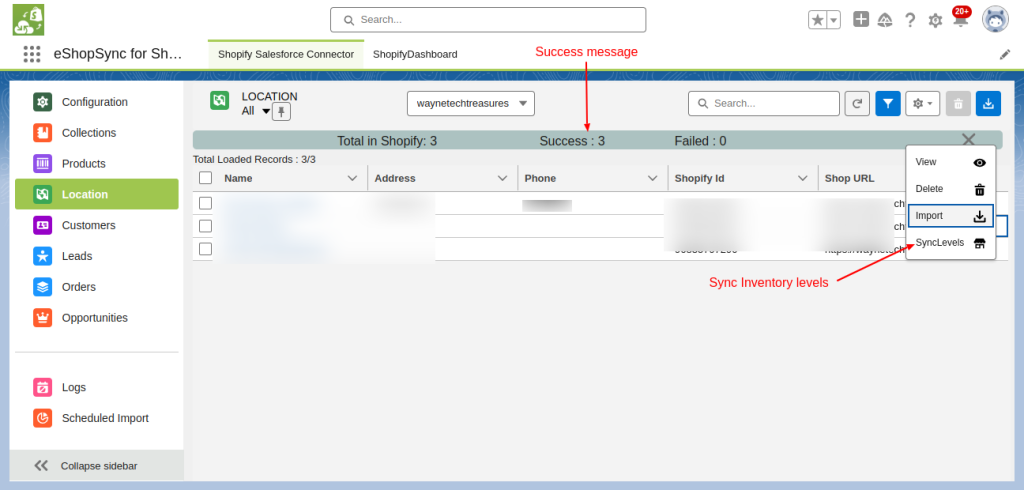
In the Location and Products section, you get the action of inventory level sync. So the details of all the actions are as follows:-
- View- Click on the View icon to see the specific record at Shopify end with details.
- Delete- Click on the Delete icon to delete that particular record.
- Import- Click on the Import icon to do a specific import or update the record.
Inventory Sync- Moreover, click on the inventory sync icon to sync your level of inventory of that particular Warehouse or product.
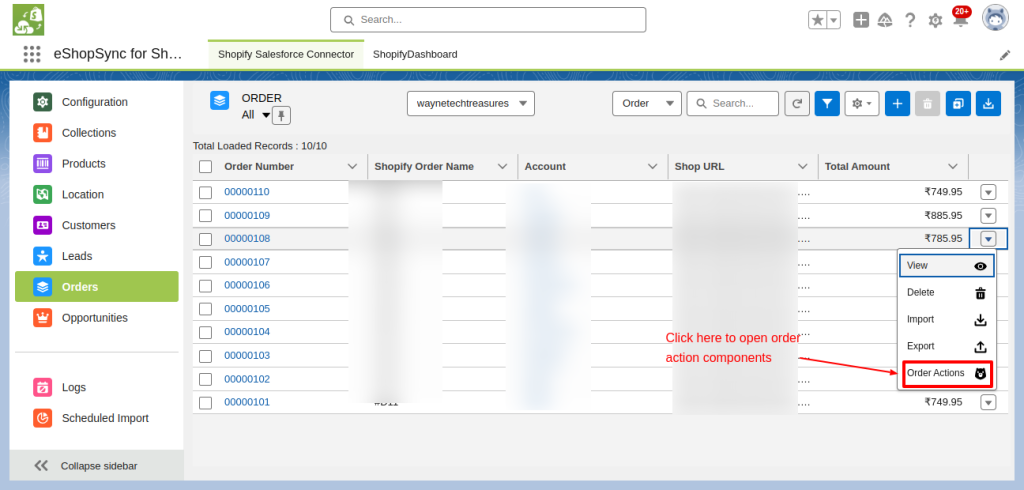
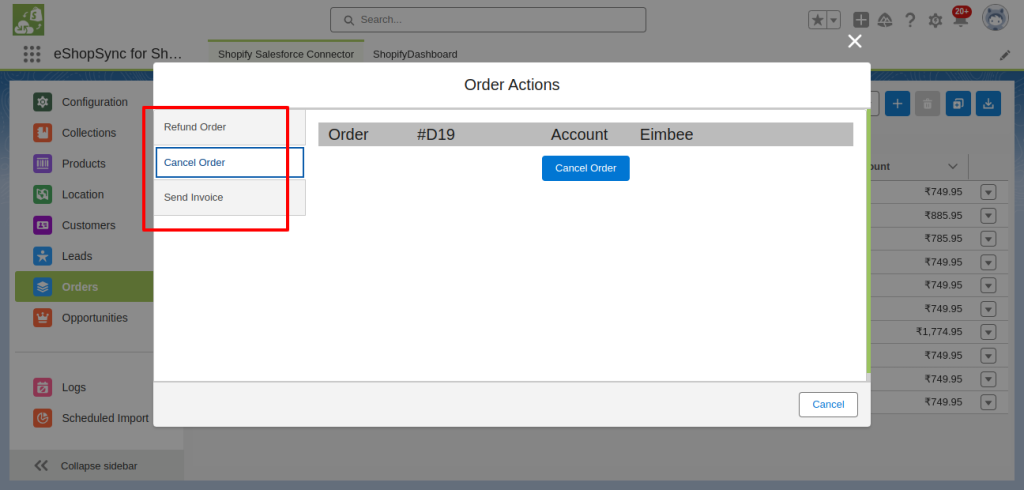
When you click on the order section, you will find a new action named order actions in the dropdown. This can help you refund, cancel, or send an invoice.
How to Use the Gear Icon in Salesforce Shopify Connector?
Use the gear icon in the given image to use the object data according to your needs. We will also discuss each setting related to the gear icon. Let’s dive in.
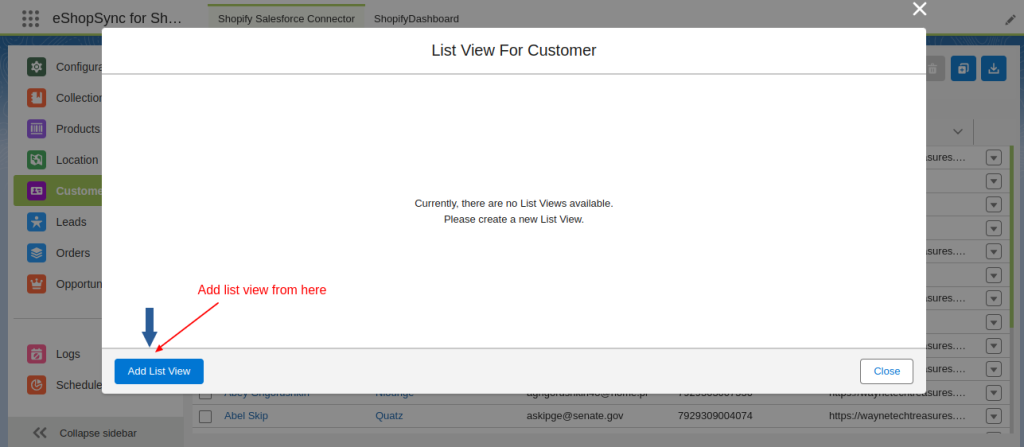
List Views
List view enables you to view an object’s record in a filtered list. You can create different custom list views according to your needs. To create a list view, click on add list view.

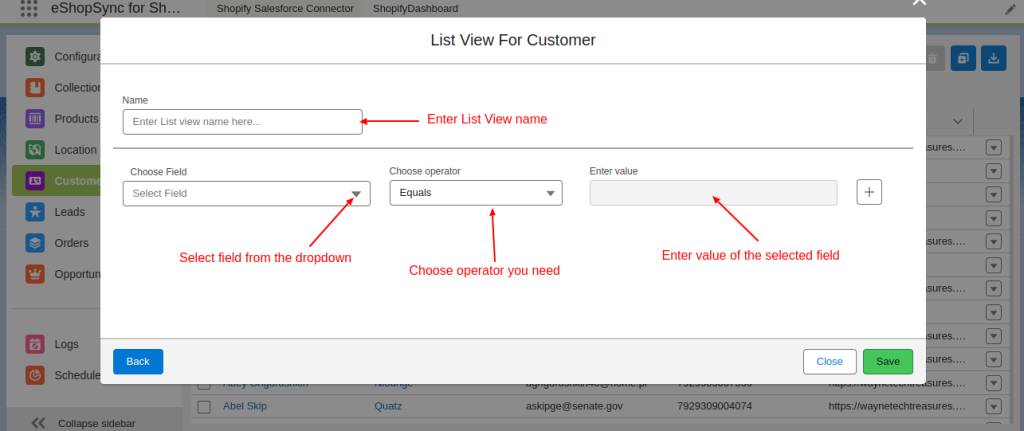
Then, In this window, click the button in the below image.
Further, enter the details as per your preferences and save the list view.
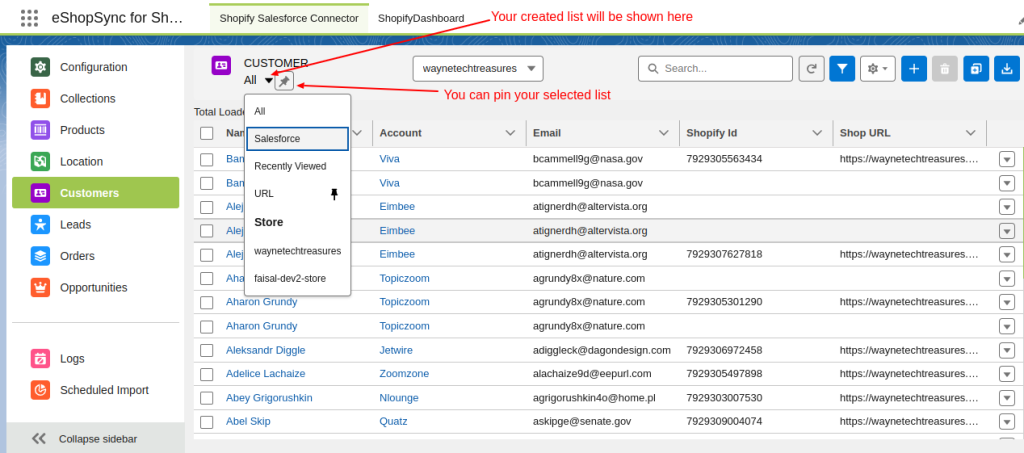
To find filter records from your created list, click on the dropdown section and choose your preferred list.
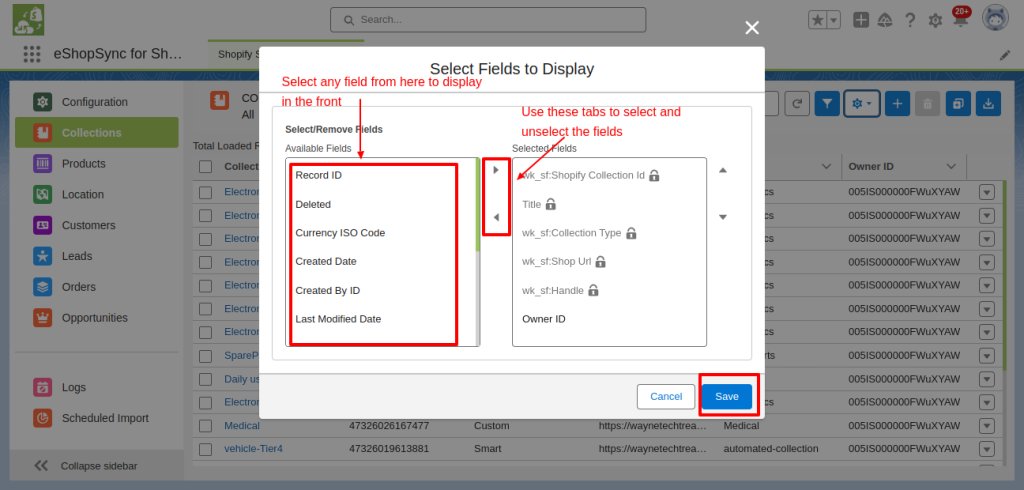
Select Fields to Display
This action enables you to select a field related to the objects and show the selected field data in front.
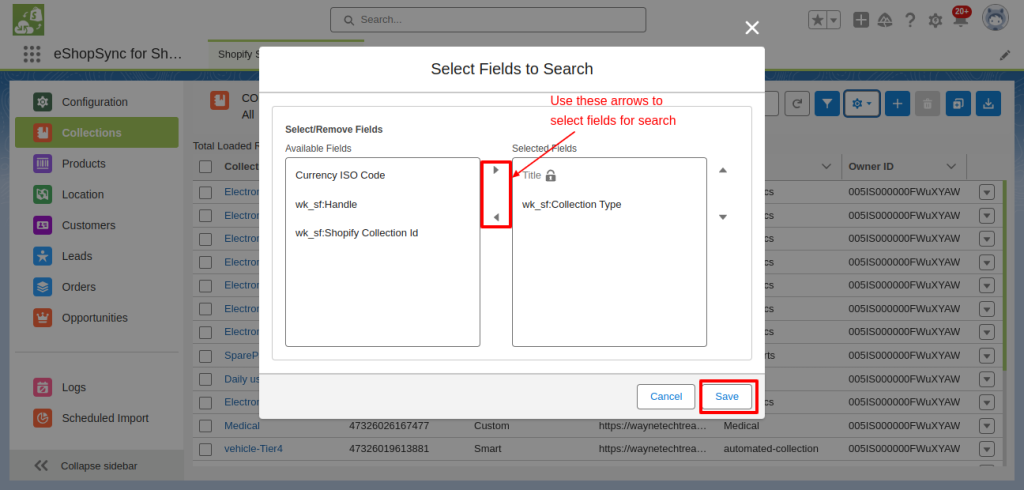
Select Fields to Search
When you select some specific field to search in an object. This allows you to find the data related to that field easily.
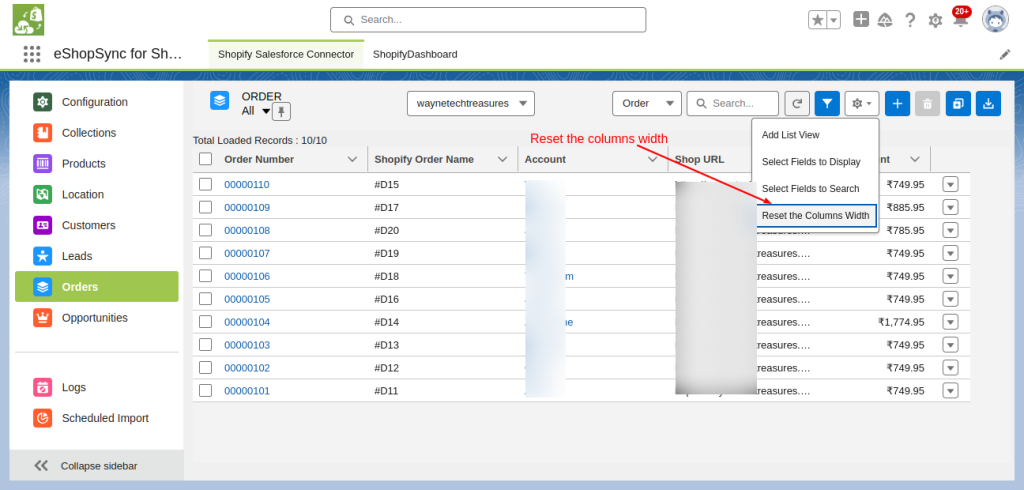
Reset the Column Width
If you have changed the column’s width, in this case, this option will restore the column’s default width.
How to Create Quick Action at the Salesforce end?
Quick Actions can be custom and easily created by users in Salesforce which helps users to simplify their workflow.
With this, users can save time to access the information in an easier manner. You can create quick actions for Shopify entities and Salesforce pages as well.
For Shopify entities, you can create only entity-specific quick actions that are mentioned here:-
- Product- Import, Export, Inventory management
- Account- Import, Export
- Contact- Import, Export
- Order- Import, Export, Order fulfillment, Order Refund
- Opportunity- Import, Export, Order fulfillment


The processes to create Quick Action buttons are as follows:-
- On the Salesforce Dashboard, click on Object Manager
- Choose any Object in which you want to create the Quick Action
- Then from the left navigation panel, click on the Buttons, Links, and Actions option
- Click on the New Action that is on the top right side of the screen
- Enter the Action Information:-
- Action Type- Lightning Component
- Lightning Component- Select the lightning component
- Label- Type name of Action
- Then click on the Save button
- Again, click on Object Manager
- Then choose the Same object you choose before
- Click on Page Layout from the left navigation panel.
- Select the Page layout according to your business on which you want to create the Quick Action
- Now choose option Mobile and Lightning Actions option
- Drag and drop your quick action button in the Salesforce Mobile and Lightning Experience Actions
- Click the Save button from the top left side of the Account Layout window.
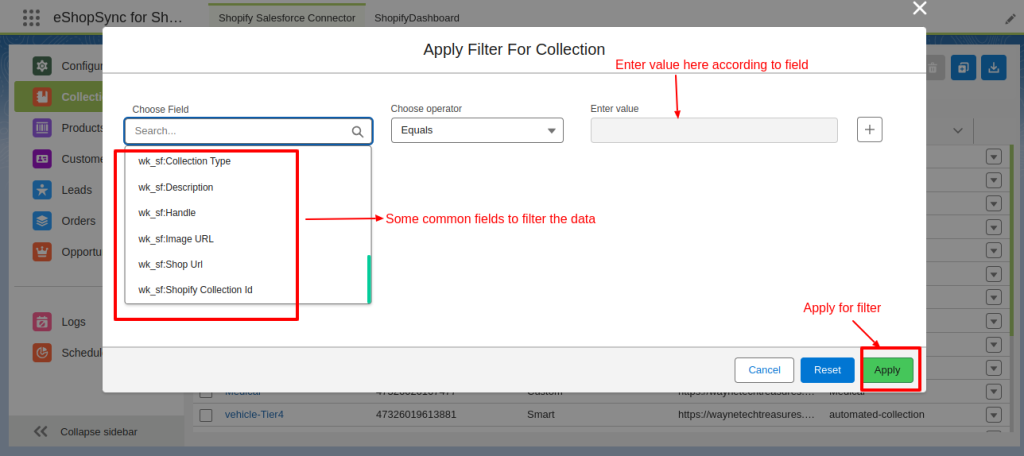
What are the fields available to filter the data?
You can apply the filter to see the specific data. For that, you have to provide the information of some required fields to filter the sync data.
Shortly, these fields may differ from option to option in the navigation panel.
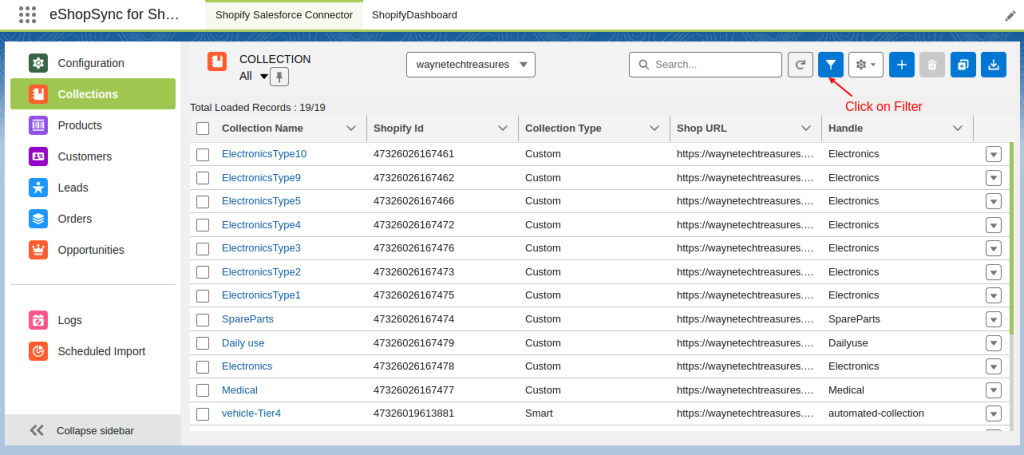
- You can filter the data in different objects according to their related fields. Here is the list of options that you get in Filter:-
- Shop URL- Choose the store URL on which you are working and you want to filter its data.
- Collection Type- Choose the collection type so it filters and shows all the data related to that collection type. This field is available in Collection Sync only.
- Field Name- Choose the fields for which field(s) you want to filter data. You can choose multiple fields.
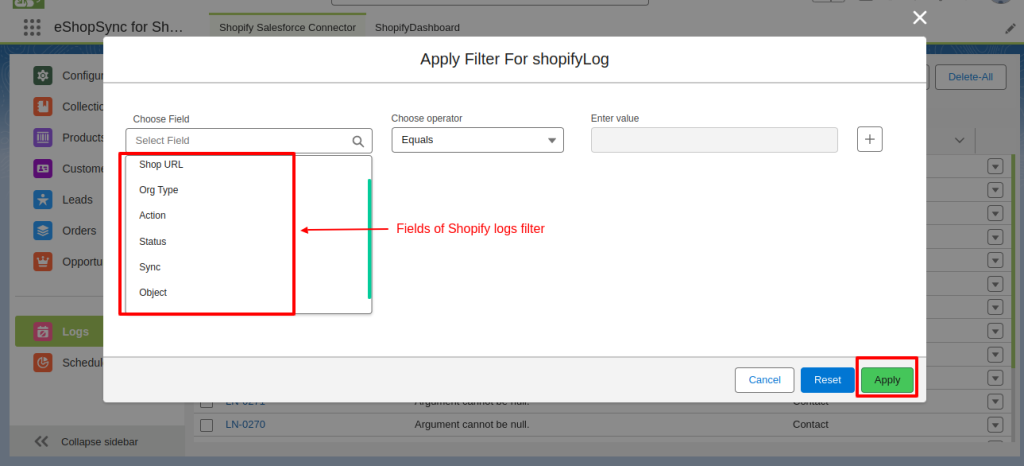
- Fields in the Shopify Logs filter are as follows:-
- Shop URL- Choose the store URL on which you are working and you want to filter its data.
- Org Type- Choose the option from which Org you want to display the data.
- Action- Select the action that is updated, created, or all to filter data accordingly.
- Sync Type- Click on the type of sync so that you can see the data on your screen
- Status- Mention the record status to filter data accordingly.
- Object- Mention an object by choosing it in the field to display that particular object-related data.
What are the different kinds of Synchronization Processes
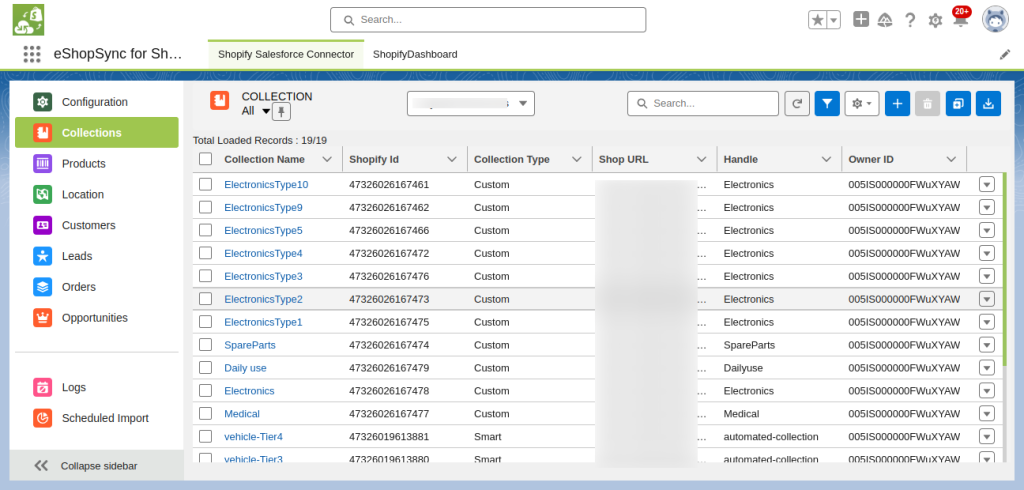
- Sync Collections: It shows you all collections of products that you have made at the Shopify end.
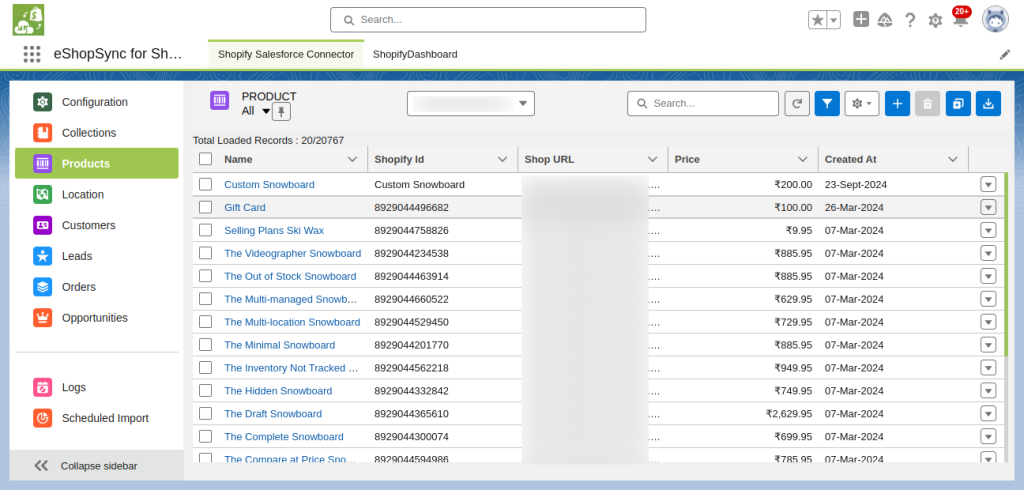
- Sync Products: This shows all the sync products that you have listed in your Shopify account with inventory levels.
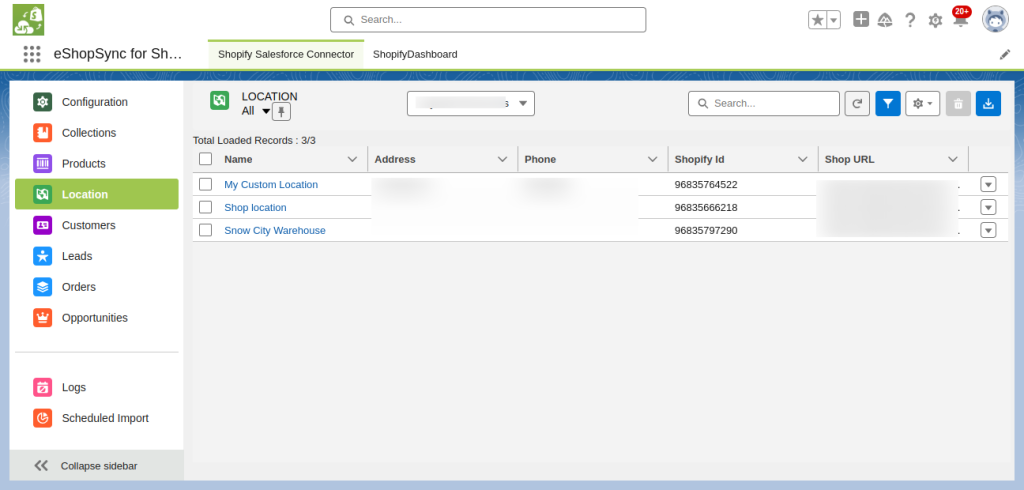
- Location: Here you can see all your synced locations of warehouses with inventory levels.
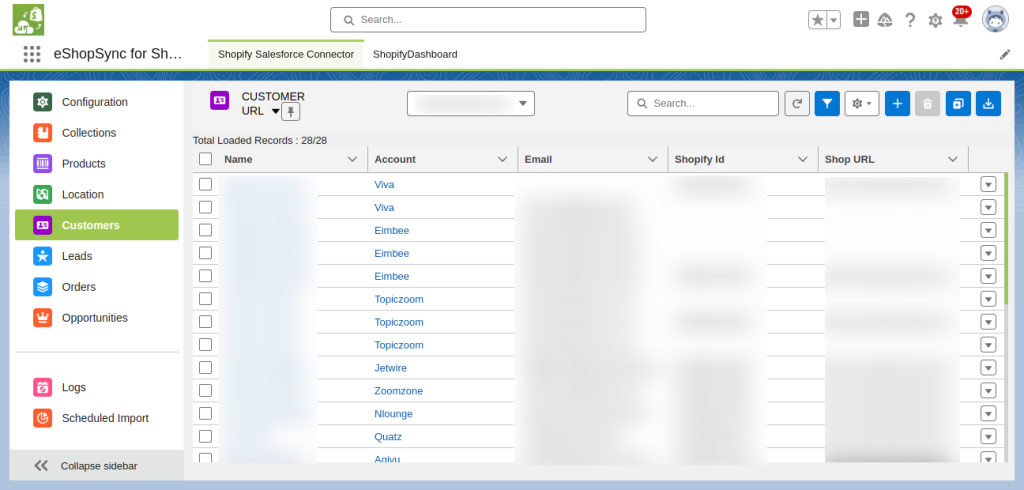
- Sync Customers: Syncs all Shopify customers as accounts and contacts into Salesforce.
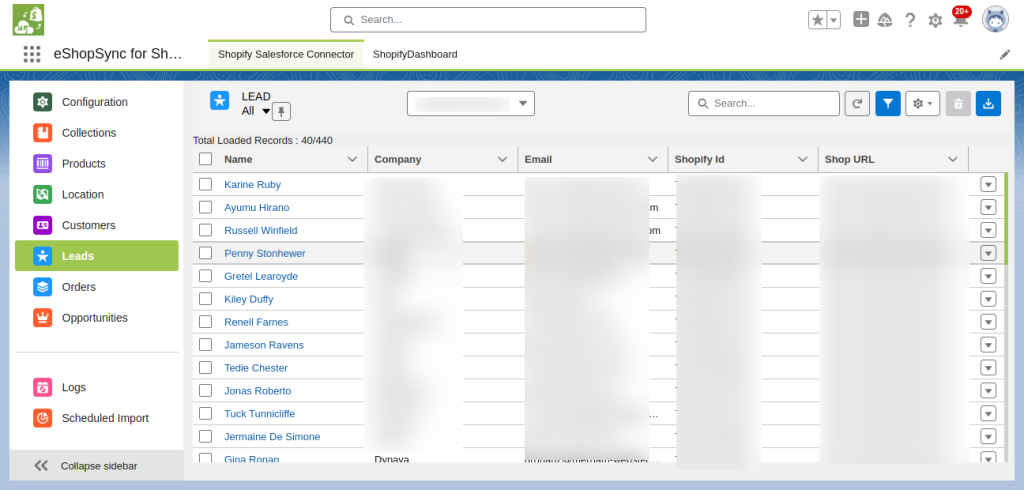
- Sync Leads: Sync all leads, including customer contact information and potential sales opportunities, from the Shopify platform to Salesforce.
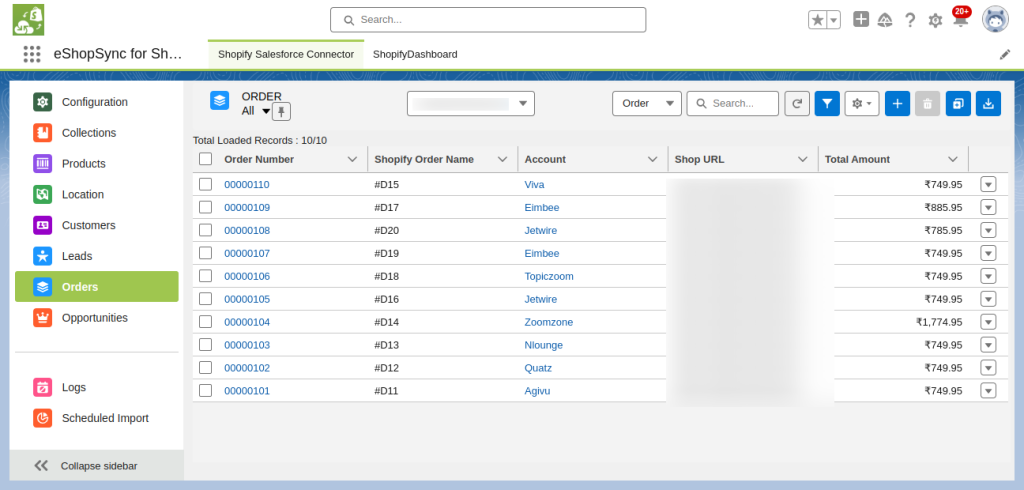
- Sync Orders: Sync all the orders from Shopify to Salesforce with their Quantity, date, and price. Now, you can handle the internal management process easier.
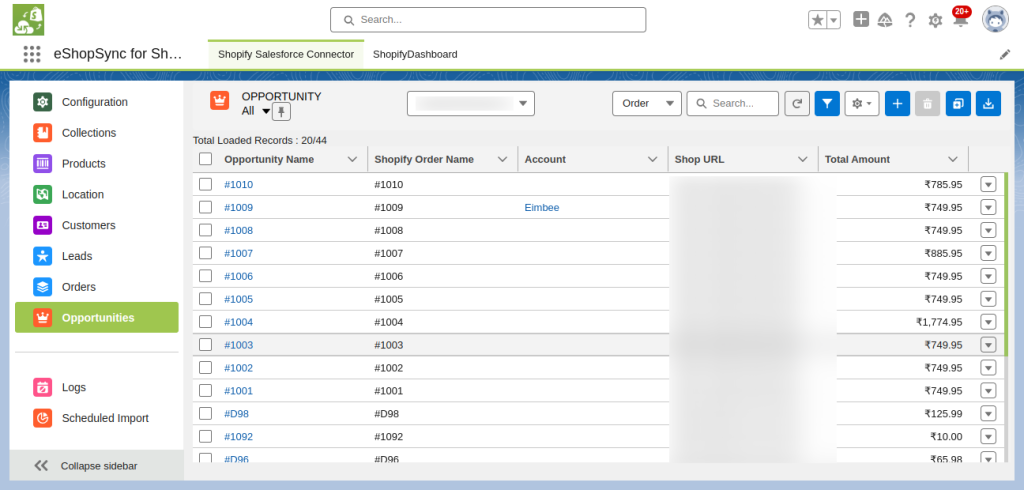
- Sync Opportunities: Sync your leads that are in progress from Shopify to Salesforce into opportunities so that you can easily track them.
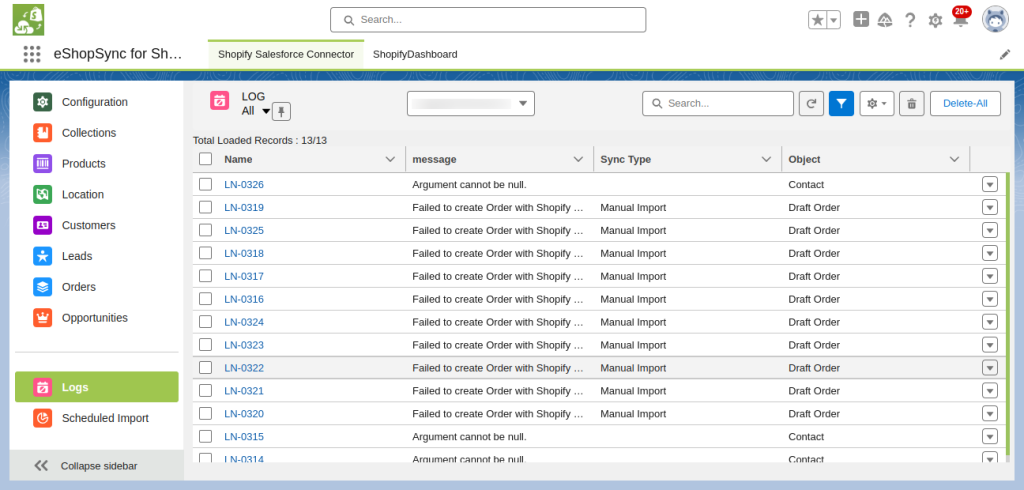
- Shopify Logs- It captures all the errors in the Shopify logs that users get while synching and also captures the received Webhook.
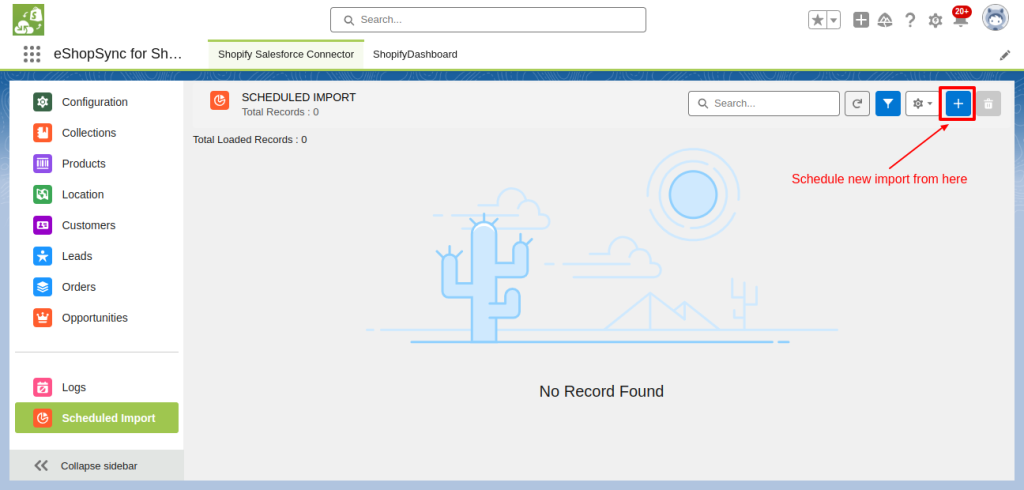
- Schedule Import- If you want to schedule your import from Shopify to Salesforce then, you can import using this feature.
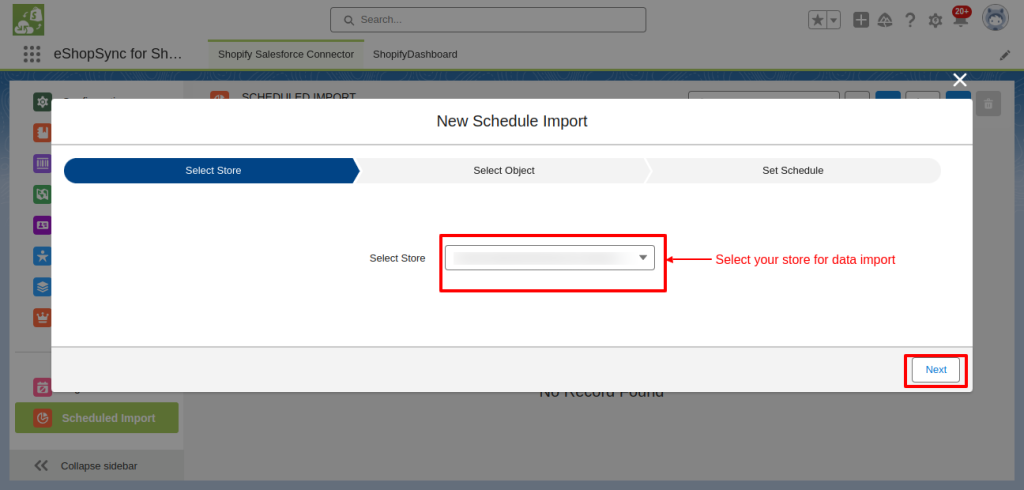
Select the store for which you want to import the data.
In this tab, choose the objects by enabling the toggle button.
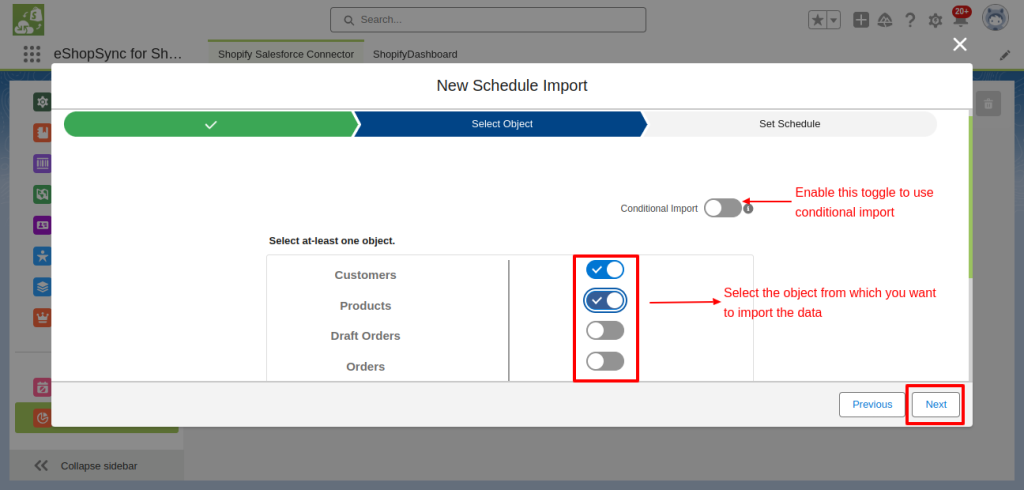
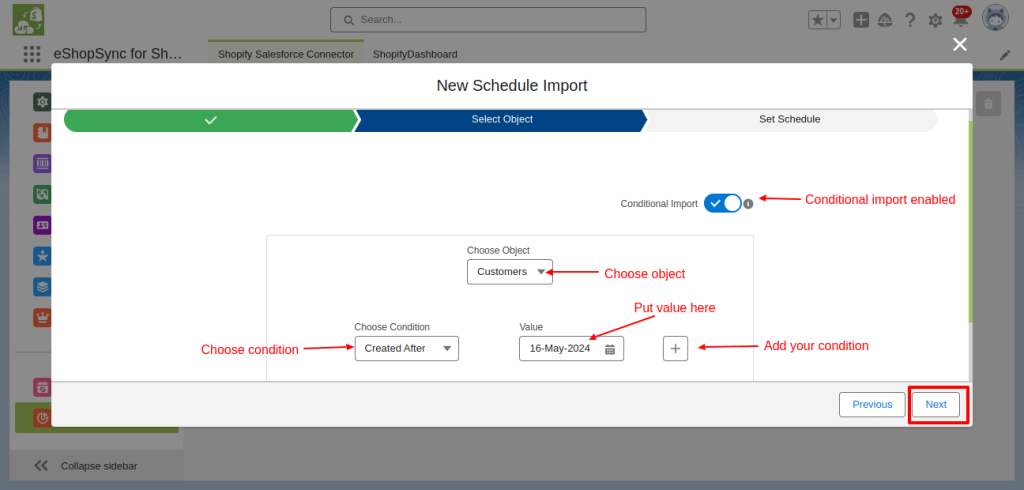
When you enable the conditional import toggle button you can add a condition to import the data.
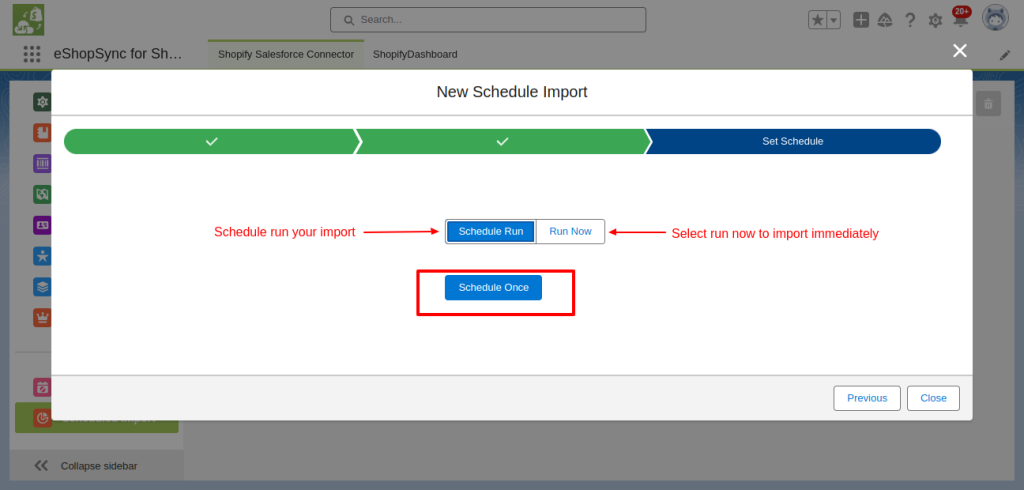
Finally, shift to a set schedule and import the data according to your preference.
Support
- To view all our applications in Appexchange, go to Webkul Appexchange Apps.
- For any further queries, Click To Create a Ticket


Leave a Comment
Comments (6)
Eric Housh
3 years ago
Hello – is inventory sync to Salesforce currently supported?
Amarpreet
1 year ago
Hello Eric Housh
Yes, it supports inventory sync from Shopify to Salesforce.
For more detail discussion please generate a ticket at [email protected]
Thank You.
Shiran
5 years ago
I have done set the setup on a test configuration for a client and it seems working fine
Further questions;
1. How can I automate/schedule the sync? There is no option for that.
2. The app doesn’t support syncing on inventory to Salesforce. Will that something planned for a future release?
Atul Singh
5 years ago
Hi Shiran,
For sync automation, we have real-time functionality already available in our application, so there is no need to do any extra work.
Regarding the inventory support, We have not planned this to implement in the near future. If you need you can request a customised version by contacting us at: [email protected]
Shashi Dhar Reddy Junna
6 years ago
Could not find client cert with dev name: ‘Shopify’:Class.wk_shopify.adminconfiguration.saveConfigData: line 386, column 1
Getting this error and cannot move forward from Config part
Vivek Gupta
6 years ago
You have not configured Self-signed Certificate. Please follow the below step & check again.
1)From Setup, enter Certificate and Key Management in the Quick Find box, then select Certificate and Key Management.
2) Select Create Self-Signed Certificate.
3) Add label & Unique name “Shopify” & Save.