
Odoo Salesforce Connector is taking the eCommerce and CRM platform to a new level. Dealing with eCommerce data is now easier than ever.
Our Odoo Salesforce integration is acting as a bridge between Odoo and Salesforce to sync data from Odoo and Salesforce.
It enhances the features of eCommerce and CRM platforms with a service-first approach.
This application allows admins to easily synchronize Customers, Categories, Orders, and Products to Salesforce CRM, which will help them track sales and growth marketing trends.
Features of Odoo Salesforce Connector
- Provides a unified Salesforce platform to manage both eCommerce and CRM data.
- Multi-store-oriented integration to enhance management of eCommerce data more efficiently.
- Effective utilization of multiple Odoo stores in a single Salesforce CRM.
- Synchronize eCommerce data at the Salesforce end to avail of CRM benefits.
- Synchronization of Collections from Odoo to Salesforce end.
- Orders and Product synchronization to manage Inventory effectively.
- Customers synchronization as Accounts and Contacts at the Salesforce end.
- Interactive design with the user interface at Salesforce end adding on effective data utilization.
Installation at Odoo End
- You must ensure that before using our Odoo Salesforce Connector, you just install our application named Odoo REST API, which will act as an intermediate between Odoo and Salesforce to sync records.
The application installation link is here: https://store.webkul.com/Odoo-REST-API.html
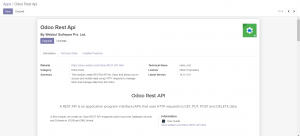
You can browse our application in your Odoo Interface when you Click on the Apps option from the sidebar menu and search for our keyword REST, our application will appear like this.
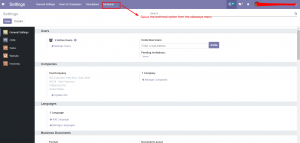
2. Now you need to configure our application at your Odoo Interface, by clicking on the setting options from the sidebar menu.

3. Meanwhile clicking on Settings, you will see a new tab opening with an option named General Settings.
You need to scroll down the general settings option till you reach the bottom bar and you see an option named Developer Tools.
Here you need to select the first option named Activate the Developer Mode ( with test Assets), this option will open a particular instance in your Odoo Interface.

4. After you click on the first option, a particular instance will open the tab and from this tab.
You need to copy the HOST URL, which we will need to install at the Salesforce end to ensure a proper intermediate connection between Odoo and Salesforce.
HOST URL which you need to copy: https://odoo-sf.webkul.com/
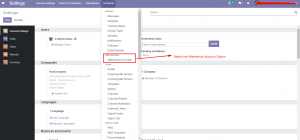
5. After performing the above step, you need to again go to the Settings Option, and select the option Technical from the sideways menu.
6. Firstly, you click on the Technical Menu, and a dropdown list will come up with options, you need to select the Webservice account option from the dropdown list.
7. After clicking on the Webservice Account Option, you will see an option to create a new Webservice Account for a particular instance. Click on the Create option as shown below.

8. Now when you click on the create option, it will prompt you to create a Name for the Key Identifier Field, and then click on the Generate API Secret Key Option accordingly.
To generate the API Secret Key, you need to copy this code as it will be used at the Salesforce end to ensure a connection between Odoo and Salesforce.

Finally, you are done with the installation at Odoo End.
Installation at Salesforce End
Configuration of Odoo Salesforce Connector
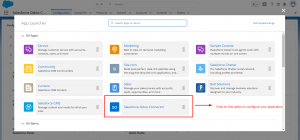
1. In the first place, logging and installing our application. You need to go to the App Launcher option to check our configuration application.
2. After clicking on the application, thereafter you will see this tab as shown below, in which you need to click on the Configuration.
Open and enter the HOST URL and API Secret Key to establish a connection between Salesforce and Odoo. You can also enter the number of days to store the log.
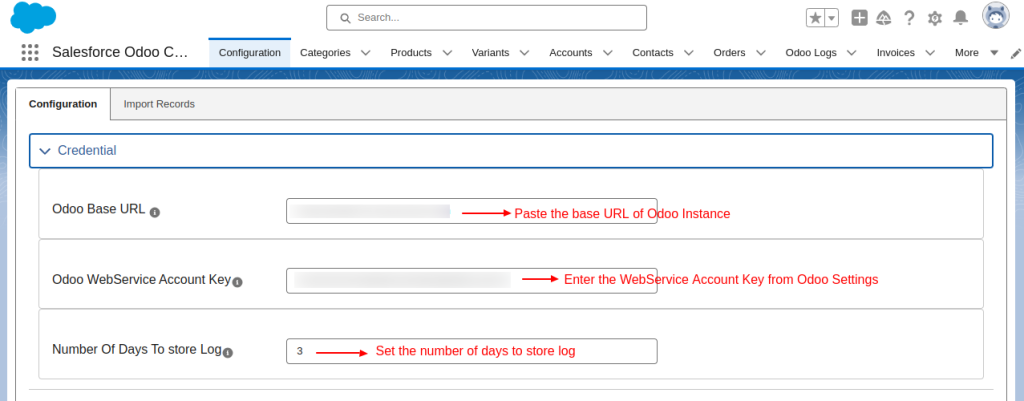
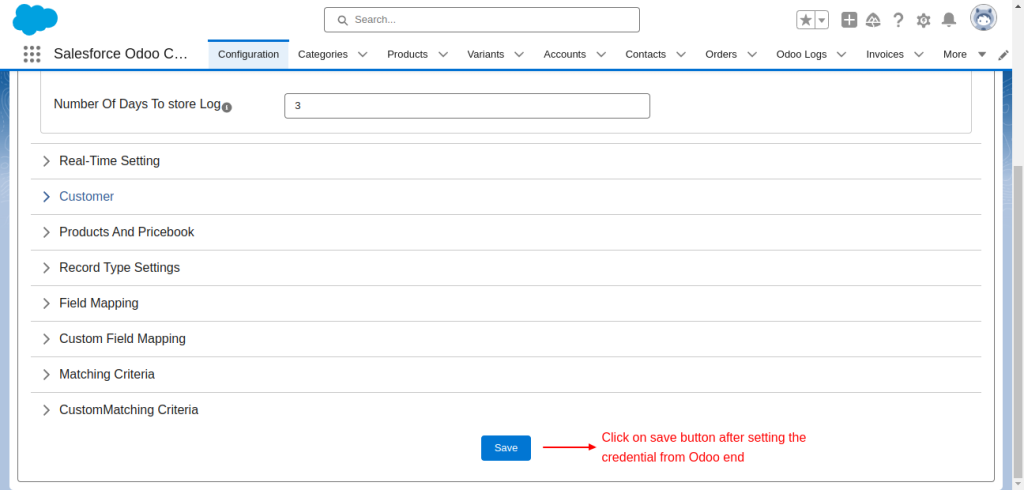
3. Click on the Save Option to save all the credential details to ensure a stable working connection between Odoo and Salesforce.
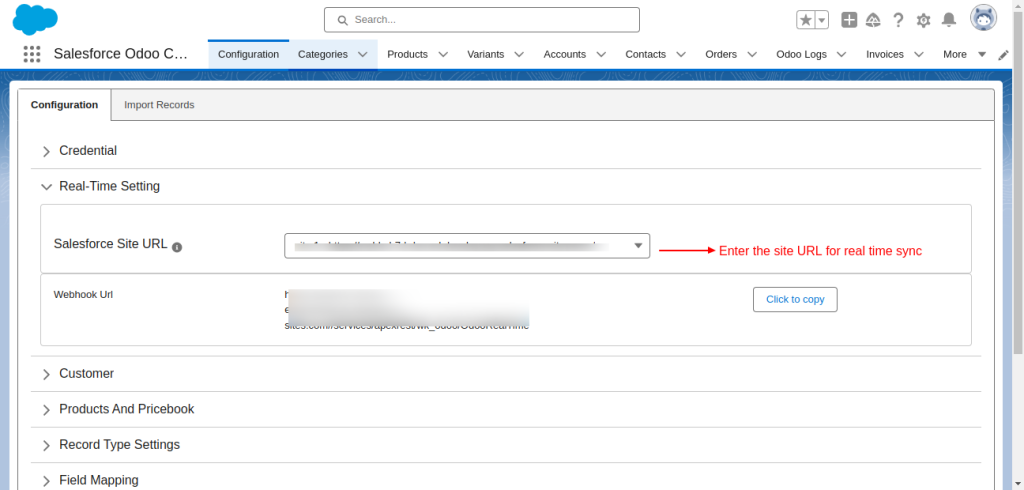
4. While configuring Real-time settings, enter the Salesforce URL that you want for real-time sync.
5. After configuring the credentials, it’s time to configure our major field which we are going to sync from Odoo to Salesforce.
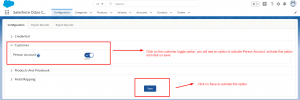
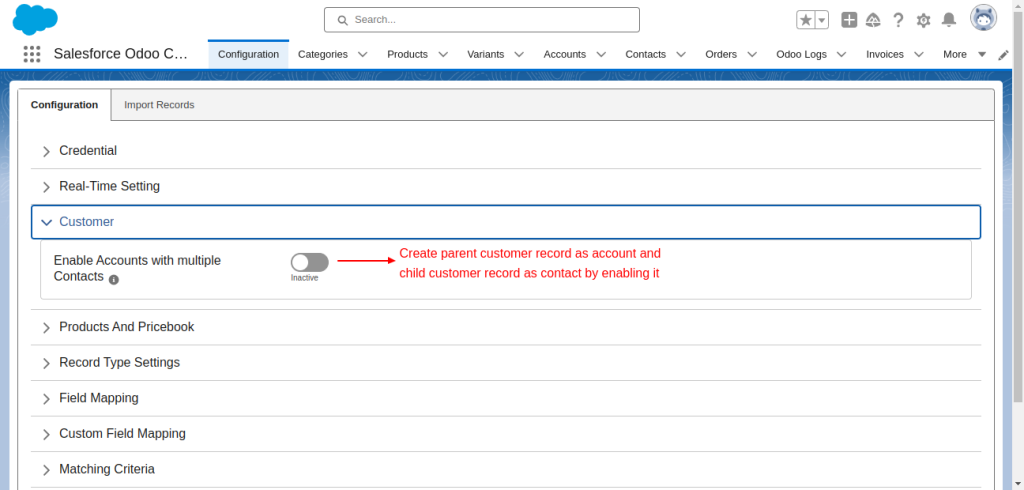
The first one is Customer, after toggling down this option, you will see an option to activate the Person Account option.
You can simply select the Active Stage and click on the option Save given below to activate this option.
*Note: This will ensure that your Odoo’s customer record will be saved as a Person Account rather than a Business Account in Salesforce.*
Enable accounts with multiple contacts to create parent customer records as accounts and child customer records as contacts.
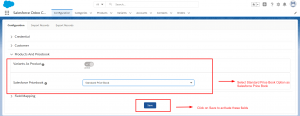
6. Move on to our next option: Product, you will see that you can select Variant as Product and select your Standard Price Book as Salesforce Price Book for your Product Listings.
In the meantime, click on Save to activate these fields as shown below.
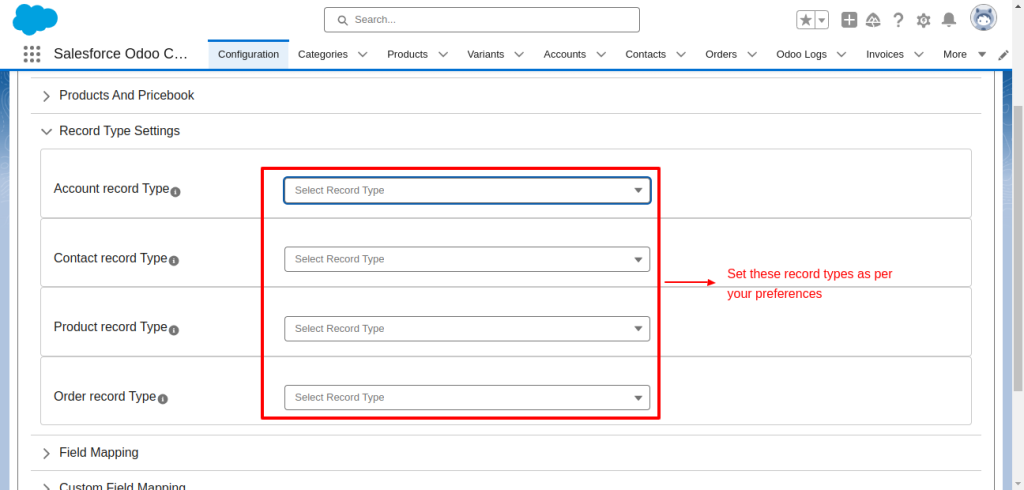
7. In the Record Type setting, select the record type for different objects of Salesforce.
8. Afterwards, let’s move on to our Field Mapping Feature, In our Field Mapping Feature, you can easily map fields from different objects and sync data correctly.
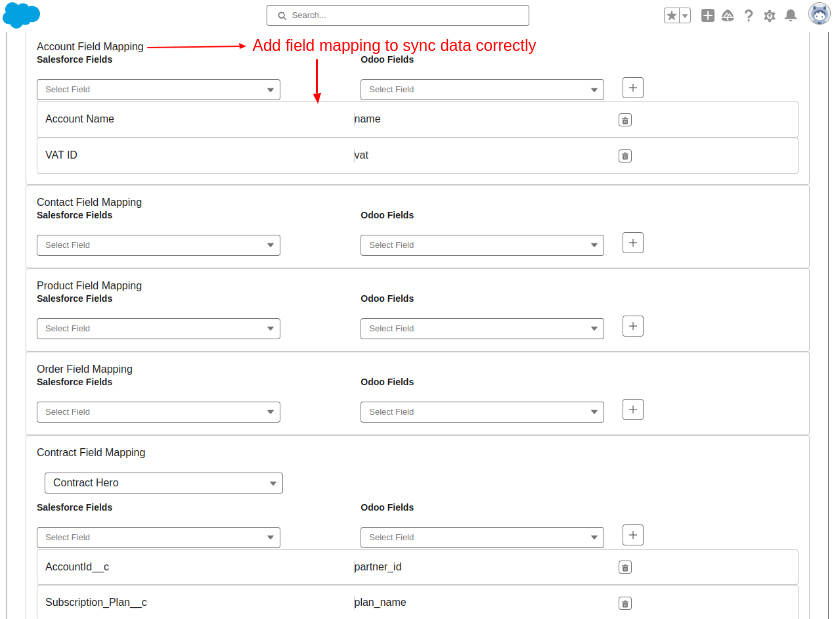
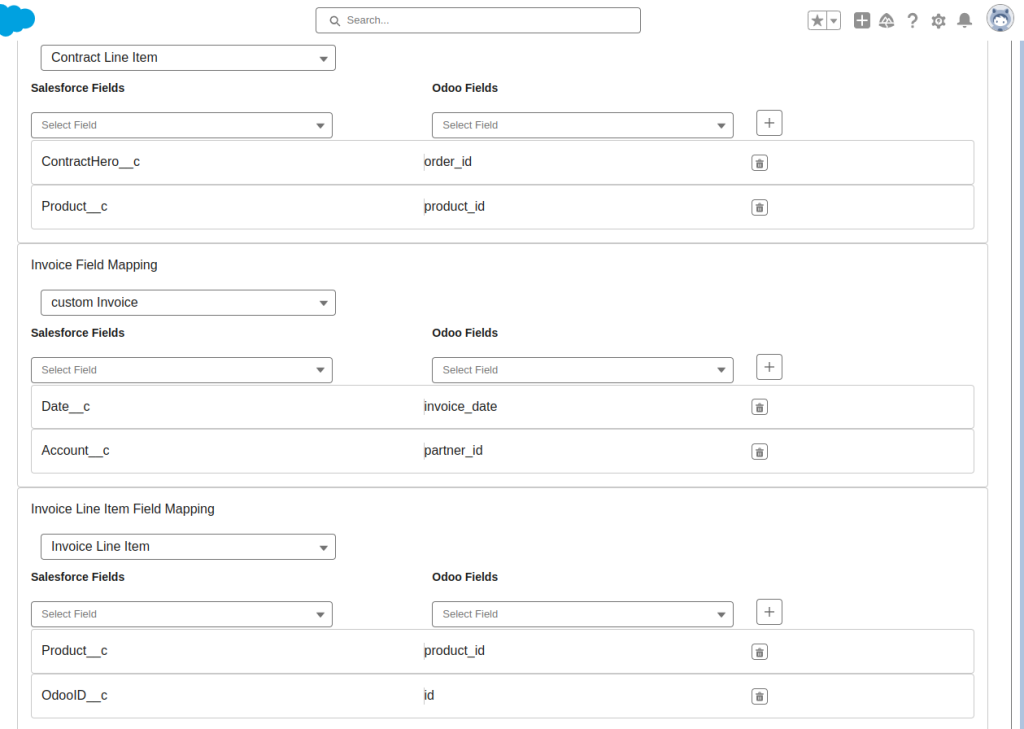
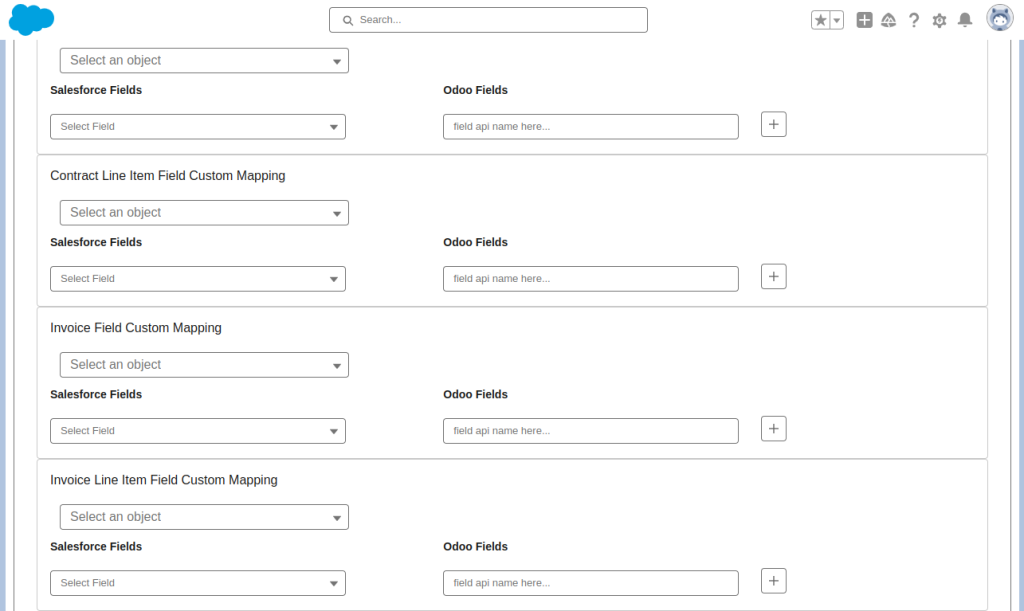
9. Add custom fields to sync data between Salesforce and Odoo.

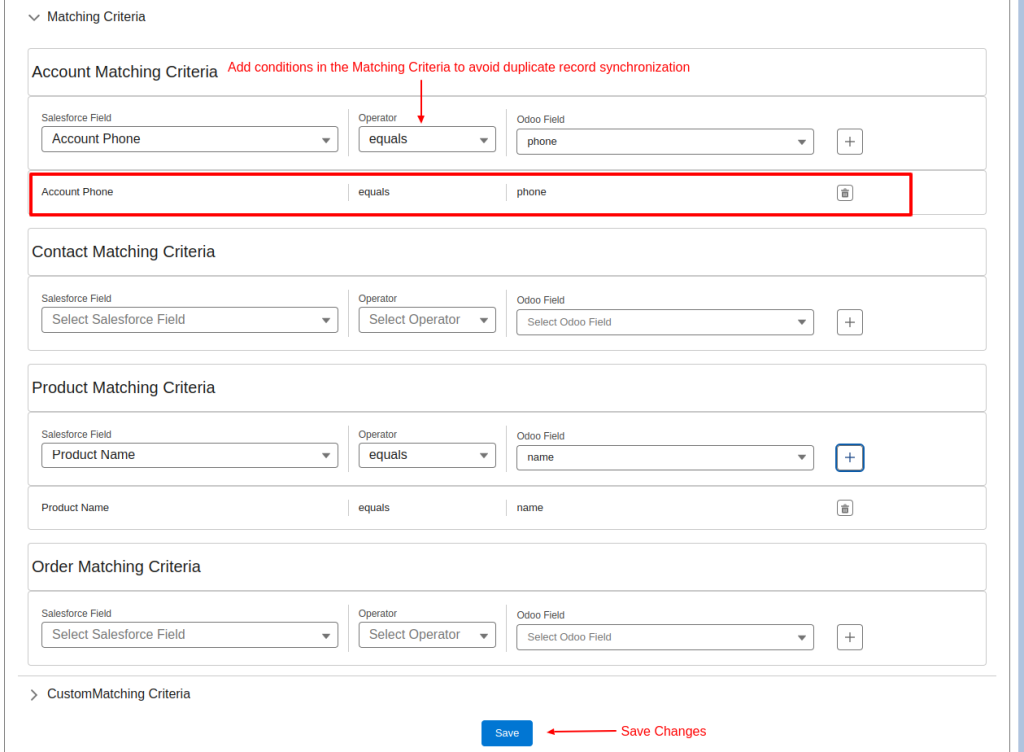
10. With the operator’s help in the Matching Criteria Section, you can add the condition to avoid duplicate record creation.
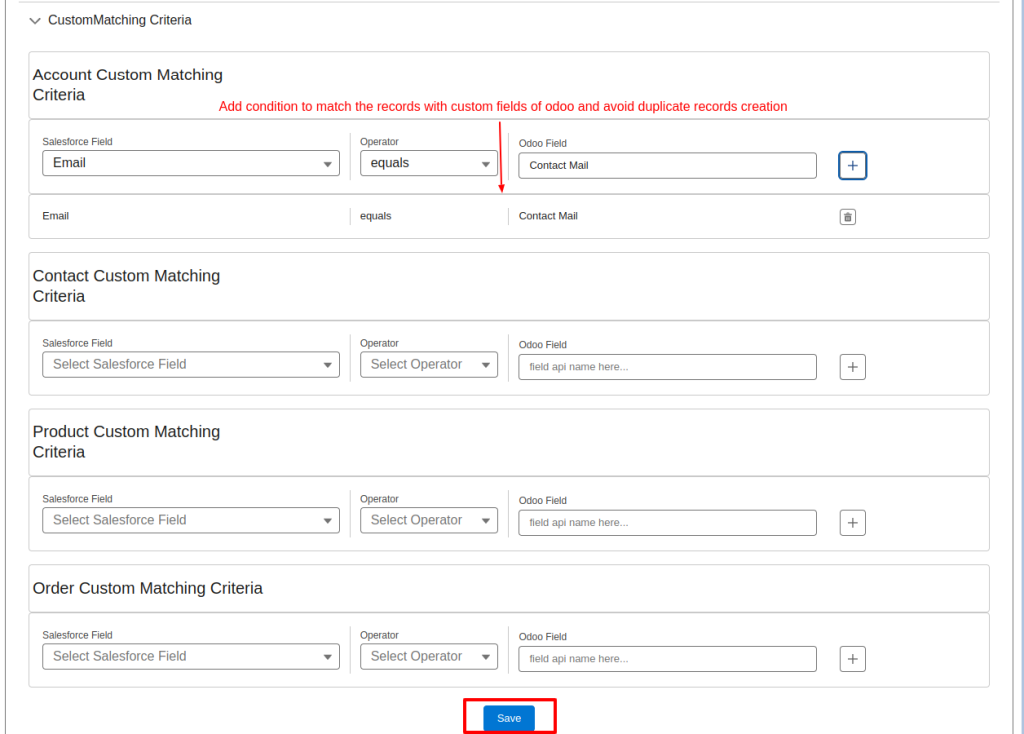
11. In the Custom Matching Criteria setting, add conditions to match the records with custom fields of Odoo and avoid duplicate record creation accordingly.
Import Records from Odoo to Salesforce
1. Afterwards, configuring the fields that need to be synced from Odoo to Salesforce, it’s time now to import records from Odoo to Salesforce.
For this, you need to select the Import Records Option to import records like Category, Orders, Products, Customers and Invoice from Odoo to Salesforce.
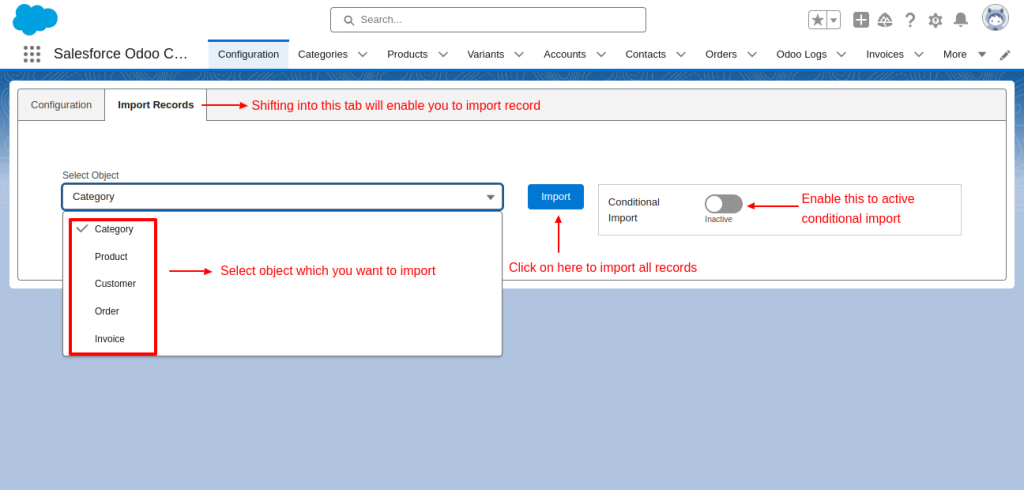
2. After you click on the Import button, all the records will be imported from Odoo to Salesforce.
For example, Orders has been imported when you select the field Order and Click on the Import button as shown below:
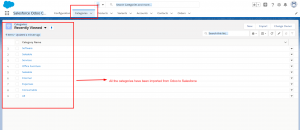
3. Your imported records will be shown below. Here’s a screenshot of the field like Orders. When you click on Orders. Afterwards, you will see all your orders listed below like a list.

Export Records from Salesforce to Odoo
Presently, we have come up with a new export feature. You can now export records from Salesforce to Odoo for bidirectional data sync.
Note: The export feature only works for the Product, Account, Contact and Subscription objects. You have to add an export button in every object before exporting the records.
For example, you want to export product data from Salesforce to Odoo. Firstly, you have to add an export button in the product section. 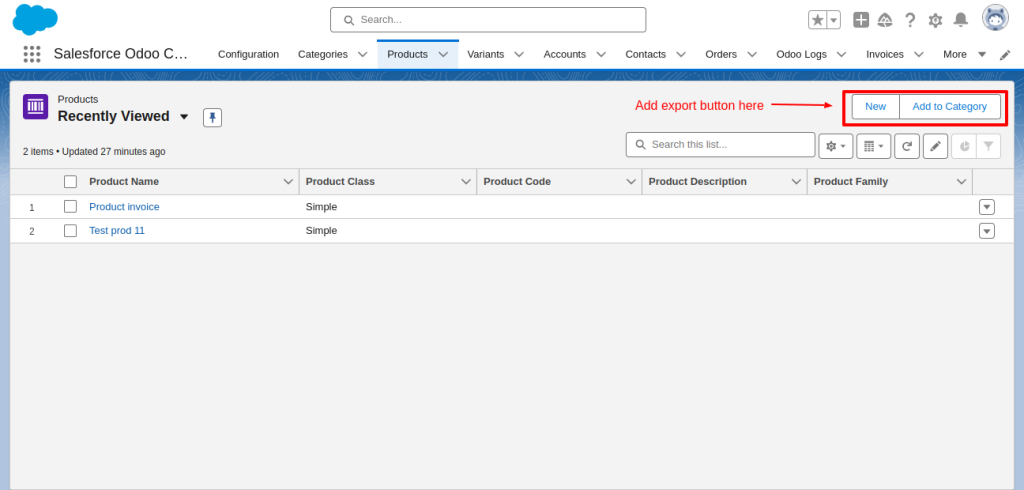
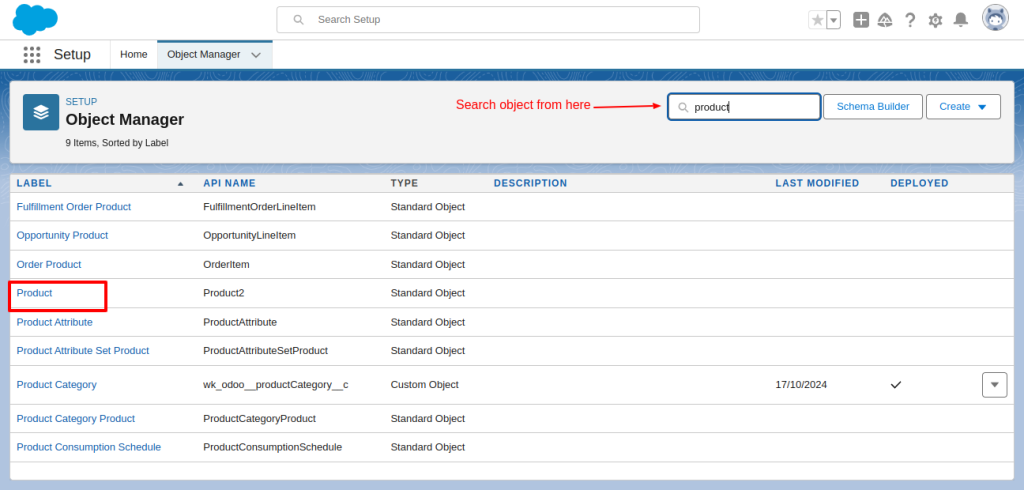
To add an export button. From the object manager. Click on the gear icon and go to setup.
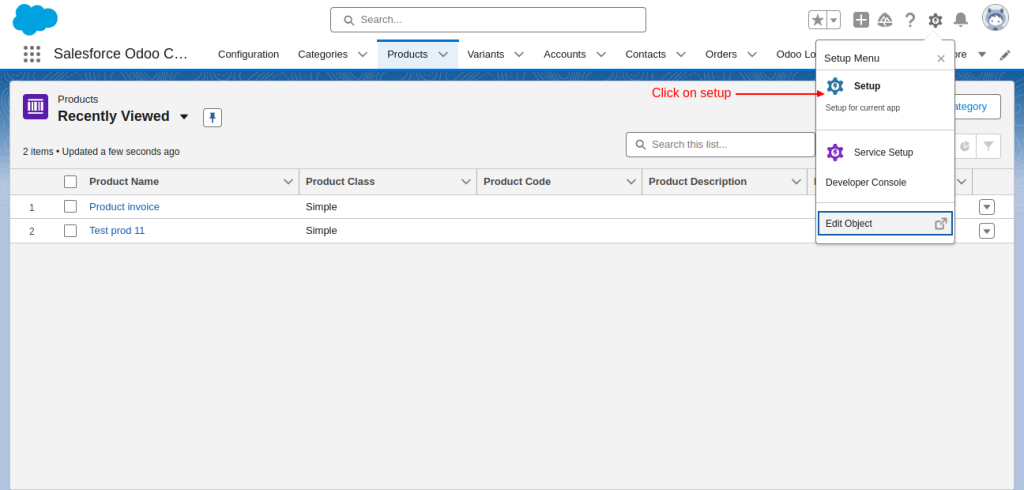
As can be seen under the object manager tab, search for products in the quick find search bar. Open product.
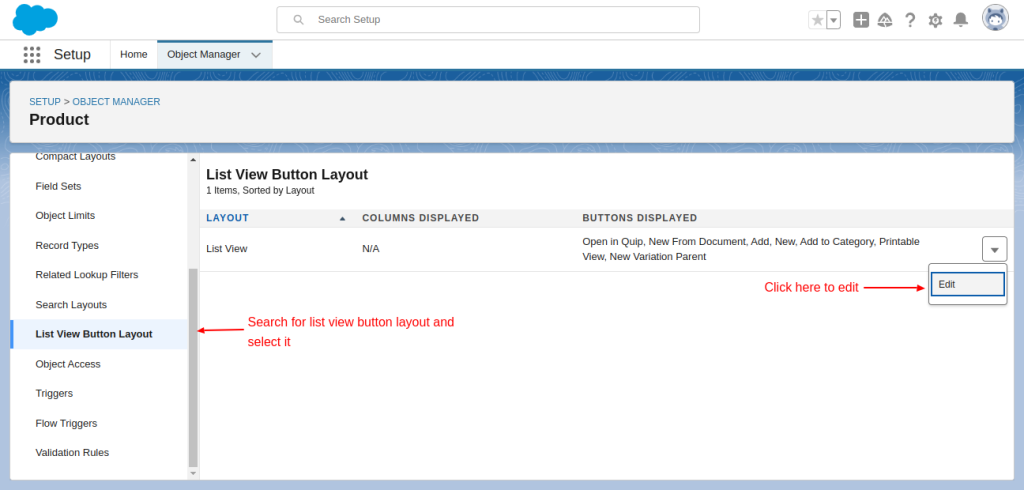
In the meantime, scroll down under the left side of the Product section select List View Button Layout and click on Edit.
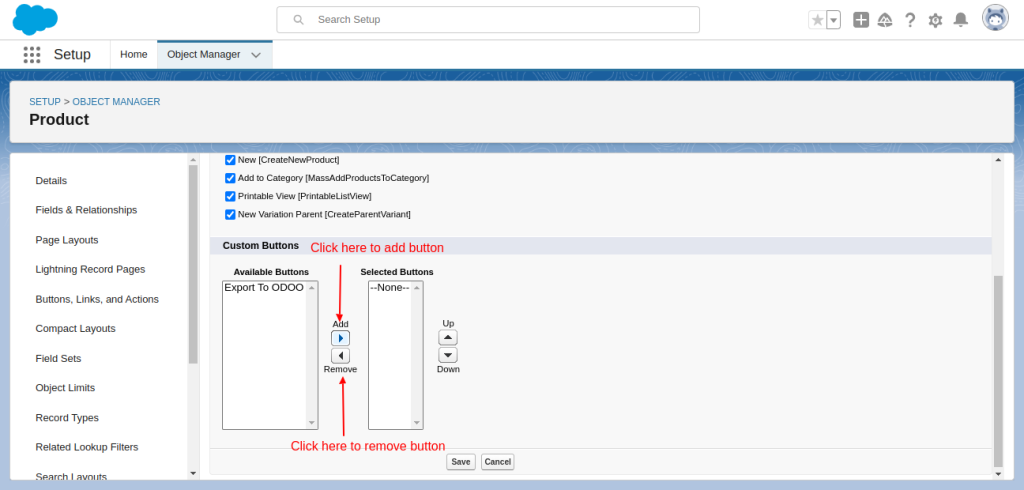
The product List view window will open. You can select the ‘Export to Odoo’ button as well as click on the Add button to transfer the button to the Selected button.
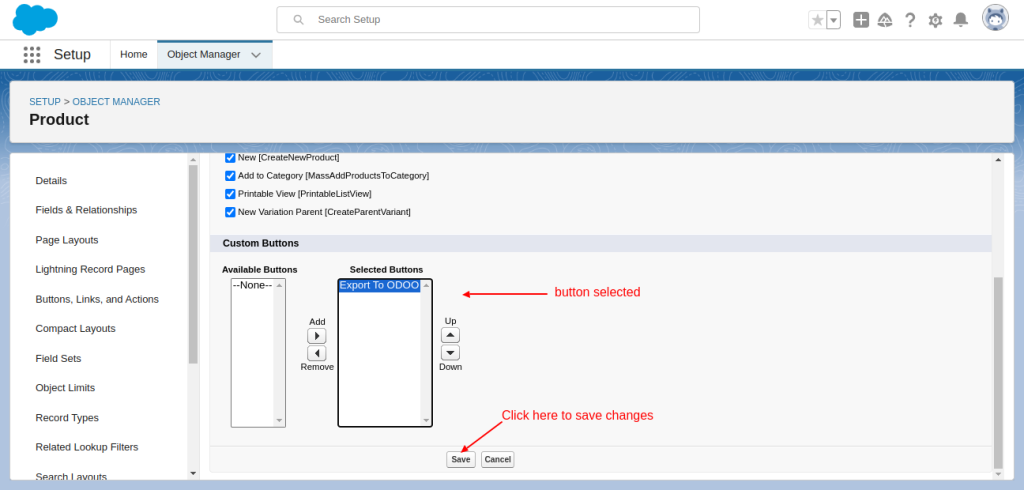
As can be seen, the Export button transferred into the selected button. Click on the save button.
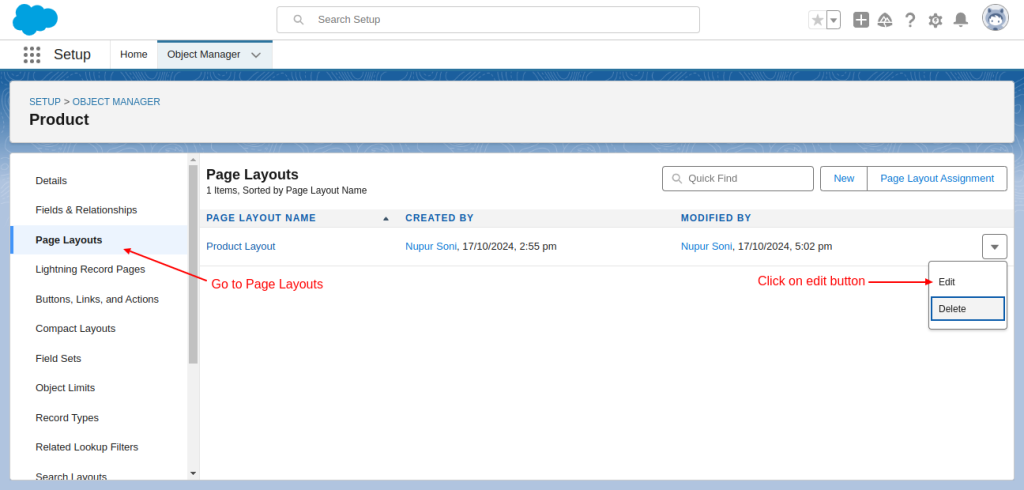
Afterwards saving changes, go to the Page layout and click on the edit button.
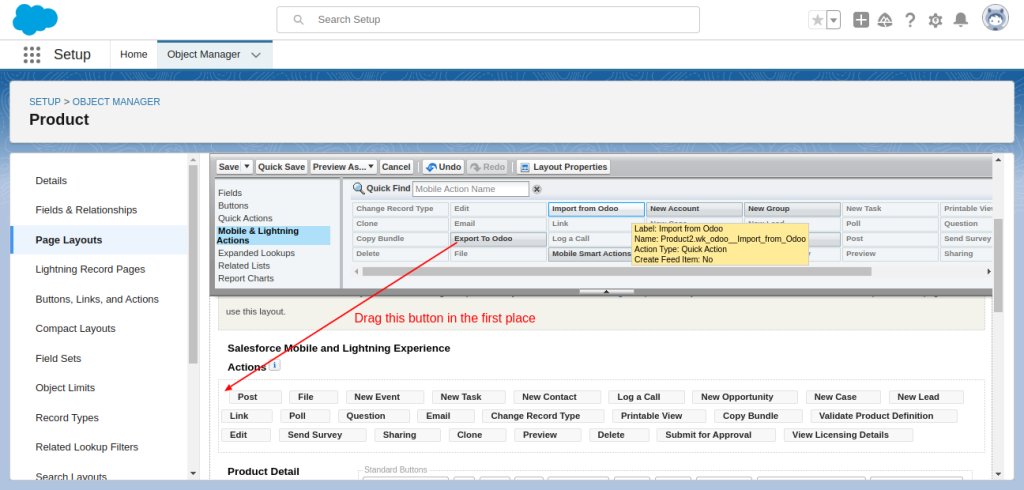
Now, drag the ‘Export to Odoo’ button in the first position under Salesforce Mobile and Lightning Experience Actions.
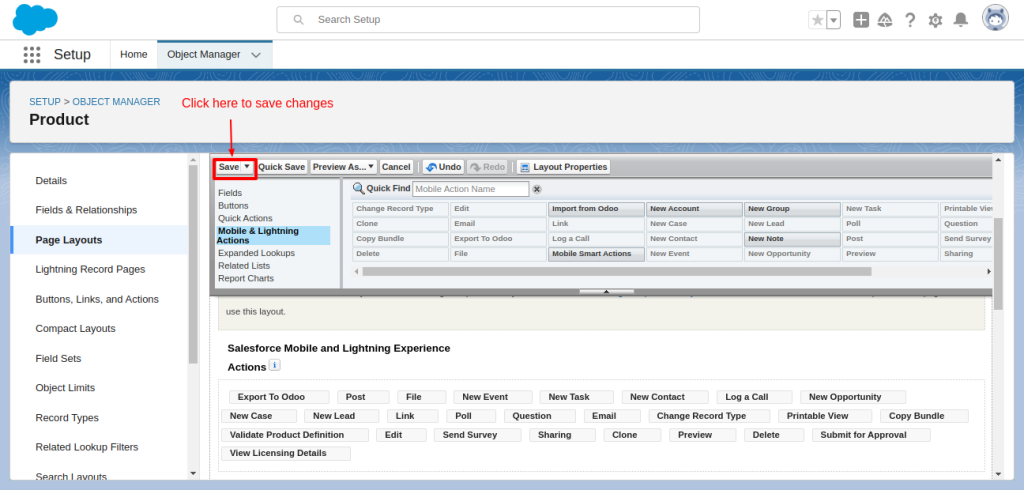
Click on the save button.
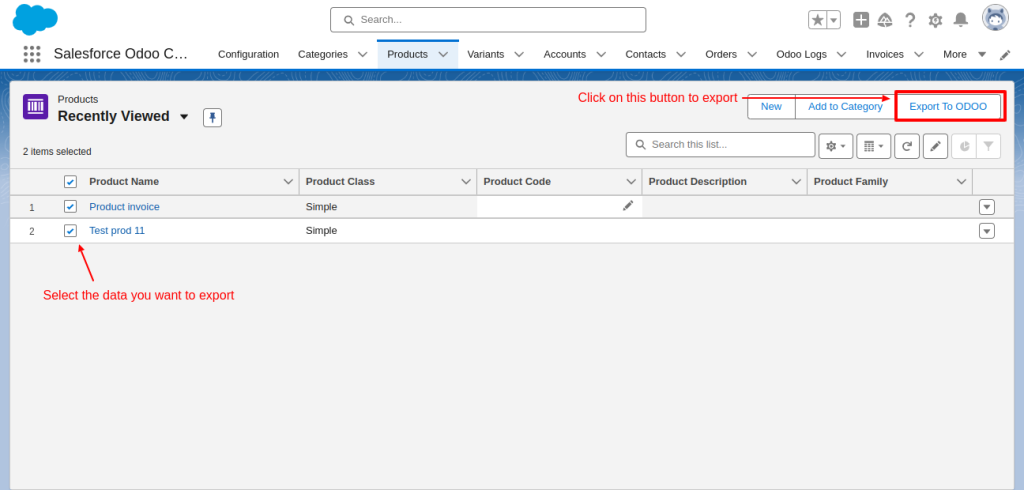
Meanwhile, refresh the Products tab. As can be seen ‘Export to Odoo’ button has been added successfully.
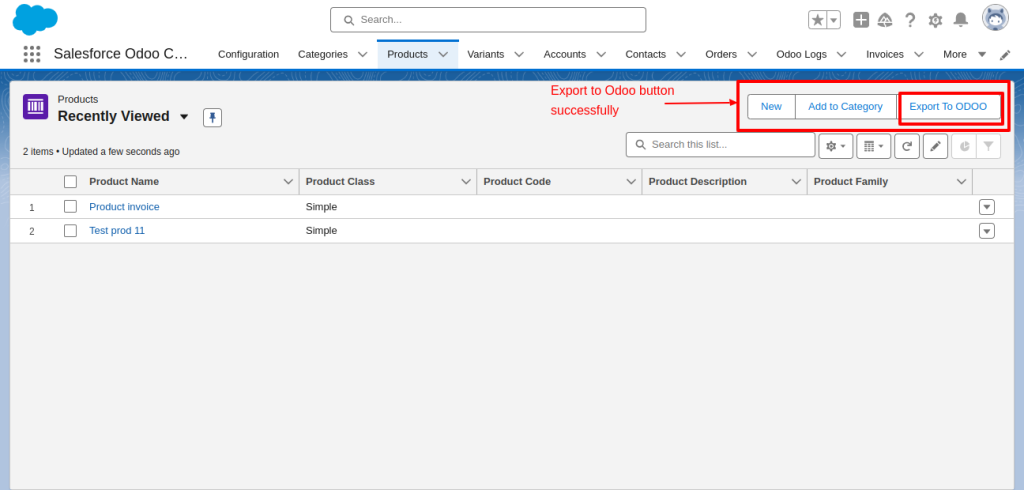
Select data from the product tab and click on the Export To Odoo button. Finally, your data will be successfully exported from Salesforce to the Odoo platform.
Support
To view all our applications in Appexchange, go to Webkul Appexchange Apps.
For any further query regarding Odoo Salesforce Connector, Click To Create a Ticket


Leave a Comment
Comments (0)