Wix Store Salesforce Integration
Updated 14 October 2025
Wix Store and Salesforce Integration are taking the e-Commerce & CRM platform to a new high. Now dealing with e-Commerce unlimited data is much easier than ever before. Our Wix Store Salesforce Connector is acting as a bridge between Wix Store and Salesforce.
It is enhancing the features of e-commerce and CRM platforms with the concept of a service-first approach. With the help of this application, admin can easily synchronize Customers, Collections, and Products to Salesforce CRM which will help them to track sales and growth marketing trends.
Features:
1. Connect multiple Wix sites.
2. Sync multiple or a single entity from each Wix site.
3. Fully customizable field mappings for each entity.
4. Import Extended fields of Wix contacts.
5. Create a related Account using the Company name of a Wix contact.
6. Choose Record Types for imported records of each entity.
7. Create, Delete, Search, Filter and Sort imported records in Salesforce.
8. Choose columns to be shown for the record list of each entity.
9. 3 ways to update synced records: single, multiple at once, or all at once.
10. Import in realtime from Wix, any new record, or any changes in an existing record.
11. Save image and video files of Wix Product and Wix Collection as Notes & Attachments in Salesforce.
NOTE:
You must use a single Wix app for connecting your Salesforce org while using our connector **eShopSync For Wix**. And you must use the same Wix app to connect all your Wix sites in Salesforce.
This has been done to remove duplicacy among the records synced. If the records have been synced and later you change to a different Wix app to re-connect your Wix site with Salesforce. Then, **it will create duplicate records in the Salesforce for that Wix site.**
For example: A Wix account have 3 sites, ‘site01’, ‘site02’ and ‘site03’. And also have 2 Wix apps, ‘App1’ and ‘App2’. In such a case, select either of two apps or create a new one. Whatever you choose will be the default app to connect your Wix sites. Otherwise, duplicate records will get created in Salesforce.
Installation at WiX Store end:
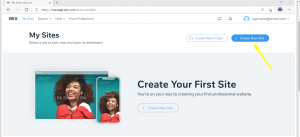
1. Go to https://wix.com and sign up for an account or login using an existing one.
2. After you have logged in, you must visit https://manage.wix.com. Any of your previously created Wix sites will be listed here.
**Note:** If you already have an existing Wix site listed here, jump to step 9.
3. Click on the ‘**Create New Site**’ button to create a new Wix site.
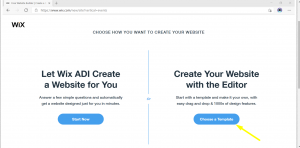
4. After Clicking, it will prompt you with ‘*What kind of website do you want to create?*’ You must select an option as per your preference.

5. Afterwards, it will ask you to, ‘*Choose how you want to create your website.*’, Click on the ‘**Choose a template**’ option.
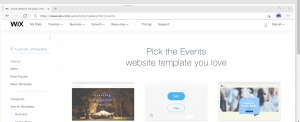
6. Select any of the shown templates and click on the ‘**Edit**’ button to launch the Wix Site Editor.
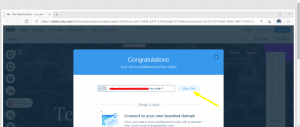
7. Click the **Publish** button to publish your Wix Site.
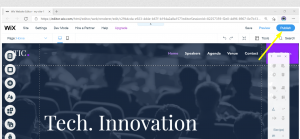
8. Click on ‘**View Site**’ to see your newly created Wix site.
9. Go to https://dev.wix.com and login with the same Wix account that was used to create the Wix site.
10. Go to the ‘**My Apps**’ section from the navigation bar.

11. Click on the ‘**Create your first app**’ link.

12. A new Wix app will instantly get created and its dashboard will be shown.
13. In the dashboard of the newly created app, go to the ‘**OAuth**’ section in the sidebar.
14. From here, copy both the keys i.e. the **App ID** and the **App Secret Key**. Both will be needed during setup on the Salesforce end.

15. Now go to the ‘**Permissions**’ section in the sidebar. And click on the**Add Permission**’ button to add a new permission.

16. Select the ‘**Permission category** as ‘**Wix CRM**’ and give all the permissions available. Then click on **Save** to save all the permissions added.

17. Next, select the ‘**Permission category** as ‘**Wix Stores**’, here also check all the permissions and click **Save**.
Your Wix app is ready, and the configuration at the Wix end is done now.
Installation at Salesforce end:
1. You need to first install our package using this package link: https://login.salesforce.com/packaging/installPackage.apexp?p0=04t2w000009J86J
2. To install this package, you must log in to your Salesforce Account
3. Once you click to install the package, you must select the **Install for All Users** option.

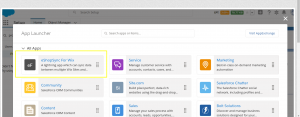
4. Open the **App Launcher** and select the **eShopSync For Wix application**
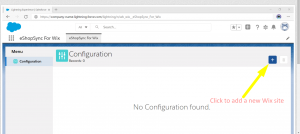
9. In the app, click the plus(+) button to add a new Wix site. ‘**Add a Wix site**’ modal will open.
10. Enter your site name, then fill both the keys from the ***Step 14*** of Wix end configuration.

11. Copy the URL at the bottom, go back to Wix and paste it as a ‘**Redirect URL**’ in the ‘**OAuth**’ section of your Wix app dashboard.
12. Click ‘**Save**’ to add the Wix site.
13. To authenticate with Wix. Click the ‘**Connect**’ button of your newly added site. You will get redirected to Wix.
14. If your Wix account has multiple sites, it will ask you to ‘**Select site**’, choose the one your want to add.
15. Now review the permissions and click the ‘**Allow and Add**’ button to proceed. You will be redirected back to Salesforce.
16. Click the gear icon next to your Wix site to open its settings.
17. Click ‘**Save & Next**’ to save changes.
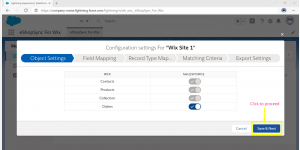
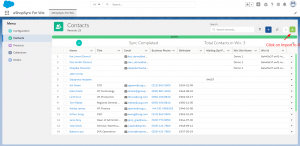
18. From the sidebar, open Contacts, Products, or Collections and click the **Import** button to import records from Wix.
Configuration for Realtime Sync:
Configuration at Salesforce end:
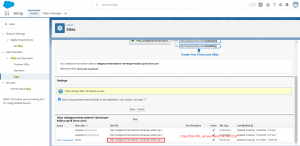
1. Go to `Setup` > `Sites`.
2. Create a new site domain by filling in the empty part of the domain. Then check if it is available, if it is, then Registers it.

3. An alert with the message ‘*Once you register, you will not be able to modify your Salesforce site domain name. Are you sure?*’ will appear. Click **Ok**.
4. Next create a new site under the domain you just registered. For that, on the same page, at the very bottom, click the ‘**New**’ button.

5. Fill **Site Label**, **Site Name**, fill **Active** checkbox. For **Active Site Home Page**, choose any of the given options.
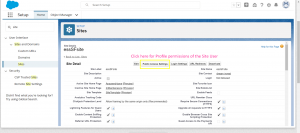
6. On the detail page of the newly created site, click the ‘**Public Access Setting**’ button. This will open the *Profile detail page* for the profile of the site user.

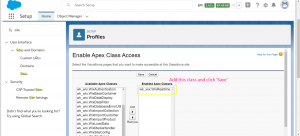
7. Hover cursor over **Enabled Apex Class Access** and click the ‘**Edit**’ button.
8. Add “`wk_wix.WixRealTime“` class to the **Enabled Apex Classes** and click **Save**.
9. On the Profile detail page of the site user, click the **Edit** button to edit the Profile.
10. In the ‘**Standard Object Permissions**’ section, give `Read` and `Edit` permission for: **Accounts**, **Contacts** and **Products**.
11. In the ‘**Custom Object Permissions**’ section, give `Read` and `Edit` permission for: **Wix Collections**, **Wix Product Collections** and **Wix Sites**. Then click on **Save**.
12. On the same profile detail page, go to the **Field-Level Security** section.
13. Edit Field-level security for each of the following objects & make sure the mentioned fields have the `Edit` access:
1. **Account**: Wix Id.
2. **Contact**: Wix Id, Wix Revision, Wix Site Name.
3. **Product**: Wix Id, Wix Site Name.
4. **Wix Site**: All fields that have an edit checkbox.
5. **Wix Collection**: All fields that have an edit checkbox.
6. **Wix Product Collection**: All fields that have an edit checkbox.
Configuration at Wix Store End:
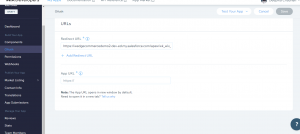
2. Go to `Setup` > `Sites` and copy the URL of the site created. This URL is needed for setup at the Wix end.
3. Log in to https://dev.wix.com. And click **My Apps** in the navigation bar.

4. Select the same app that was used earlier for connecting with Salesforce. Its dashboard page will be shown.

5. Before moving forward, first take the URL we copied from Salesforce. We need to edit it a bit. It should be looking something like this:
https://wedgecommercedemo1-developer-edition.ap16.force.com
6. Replace `HTTP at the start with `HTTPS`
7. And add `services/apexrest/wk_wix/wixRealTime` at the end of the URL
8. So the final URL should look like this:
https://wedgecommercedemo1-developer-edition.ap16.force.com/services/apexrest/wk_wix/wixRealTime
9. Copy this final URL. It is the one that will be used for adding webhooks.
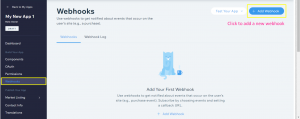
10. Now on the Wix app dashboard, go to the ‘**Webhooks**’ section in the sidebar. And click the ‘**Add Webhook**’ button to add a new webhook.
11. Select **Wix Stores** in the **API Category**.
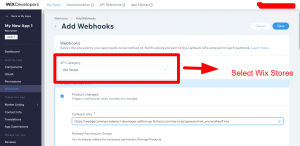
12. Select all the options that are available. And in the **Callback URL** field of each one of them, but the URL that we created earlier.
13. Click **Save** when done.
14. To configure Real-Time Sync, you need to go to https://manage.wix.com/ and login with your credentials as created earlier while creating your Wix Site.
15. Now from the left-hand side navigation bar, click on the option-> Products, now click on the New Product Option to add a new product.
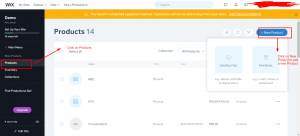
16. Now add your product info like Name, Image, Product Description, and so on to add a new product and then click on Save.

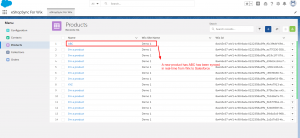
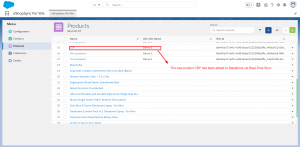
17. Now that you have added the product to Wix, the same product will be synced in real-time via Webhooks in Salesforce CRM, when you click on the Product Option to check all your available and added products.
Our real-time sync works with your Products, Collections, and Contacts in the same way as shown for the Product Category.
You just need to enter the CallBack URL and select the Wix API category and checklist all the options available to sync your data in real-time.
Support
To view all our applications in Appexchange, go to Webkul Appexchange Apps.
For any further query, Click To Create Ticket

Be the first to comment.