Amazon Payment Services Integration For Salesforce Commerce Cloud
Updated 13 October 2025
If you have a Salesforce Commerce Cloud store and want to integrate a seamless and secure payment method, then read this user guide to the end.
This user guide will help Salesforce Commerce Cloud merchants to integrate Amazon Payment Services into their online stores seamlessly.
With the help of Amazon Payment Services, you can offer your customers a secure and convenient online payment method.
You can enhance your checkout process on successful integration, improve customer satisfaction, and drive sales.
This user guide will provide step-by-step instructions for Amazon Payment Services integration for Salesforce Commerce Cloud.
What is Amazon Payment Services?
Amazon Payment Services is a payment service that allows customers to purchase on your website.
It will enable you to offer your customers a seamless and secure checkout experience, leading to increased conversions.
Integrating Amazon Payment Services for Salesforce Commerce Cloud will customize and streamline your payment flow according to your needs.
A brand name like Amazon Payment Services will help you to create trust and familiarity among your customers.
Its robust fraud protection measures can help mitigate online payment risk and give businesses and customers peace of mind.
Key Features of Our Integration
- Site-Based Currency Support: Our integration ensures that payments are processed in the base currency, providing a seamless checkout experience for your customers.
- Secure Payment Processing: We employ robust SHA/HMAC hashing algorithms to protect your customers’ sensitive payment information, ensuring a secure and compliant payment environment.
- Global Card Network Support: Our integration supports major global card networks, including American Express, Mastercard, and Visa. This gives your customers flexibility in their payment options.
- Off-Site Payment Processing: Payments are processed through Amazon’s secure payment page. It ensures that your customer’s card information is never stored on your servers, enhancing security and compliance.
- Brand Customization: You have the opportunity to customize the payment landing page to match your brand’s aesthetics. This will provide a cohesive and professional checkout experience.
Installation of Amazon Payment Services Integration for Salesforce Commerce Cloud
Installing Amazon Payment Services integration for Salesforce Commerce Cloud involves two steps:
- Deploying the Cartridge from Salesforce Commerce Cloud
- Site Import for Metadata
1. Deploying the Cartridge from Salesforce Commerce Cloud
- Go to the root directory of the project.
- Make sure that the path: base is correct in package.json, and the app_storefront_base cartridge is located at the specified path.
- Run the command “./install sh” in the terminal.
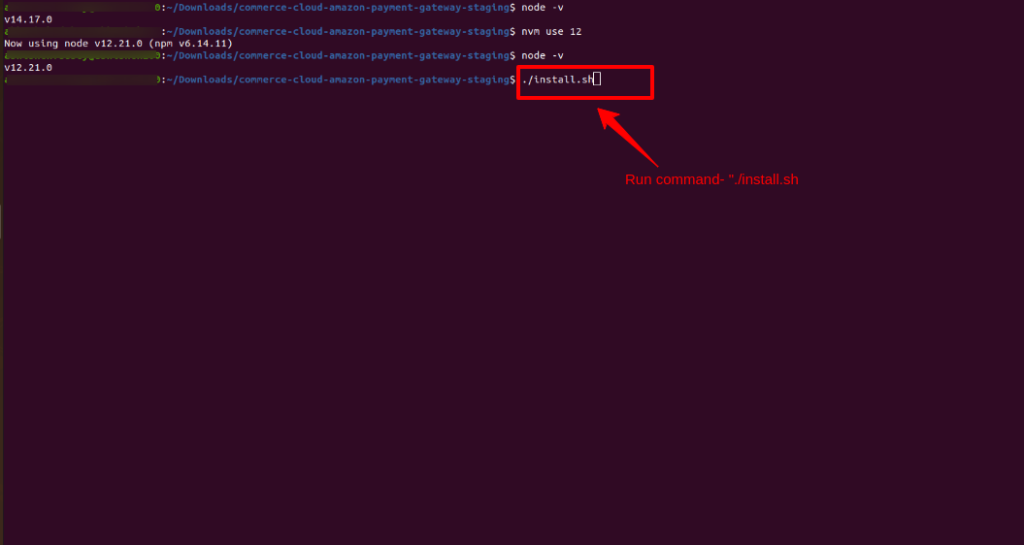
- Enter the required information correctly when prompted in the terminal.

- The cartridge will be deployed to the SFCC instance if the provided information is correct.
2. Site Import for Metadata
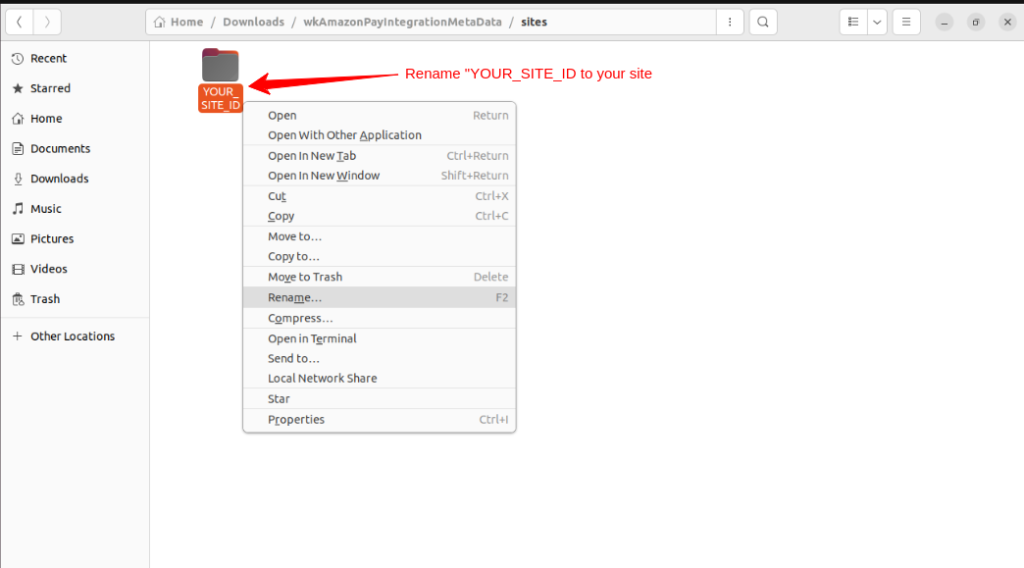
- To import the site configurations, unzip the “wkAmazonPayIntegrationMetaData.zip” and replace the YOUR_SITE_ID with the Site ID, then compress it and make a zip file again.
-
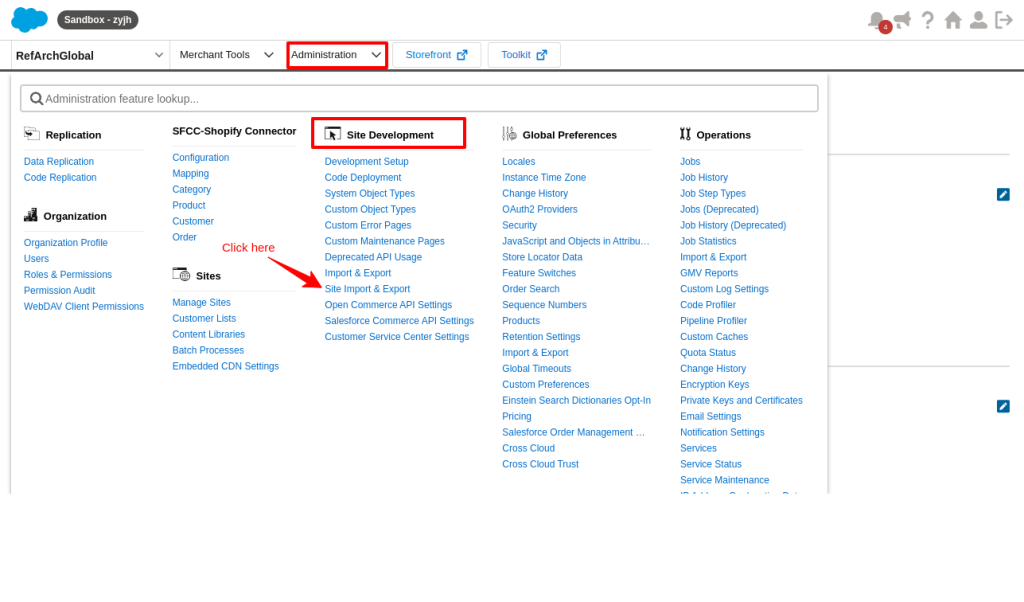
Go to Administration > Site Development > Site Import & Export
-
Select the edited zip file “wkAmazonPayIntegrationMetaData.zip” file and then upload it.
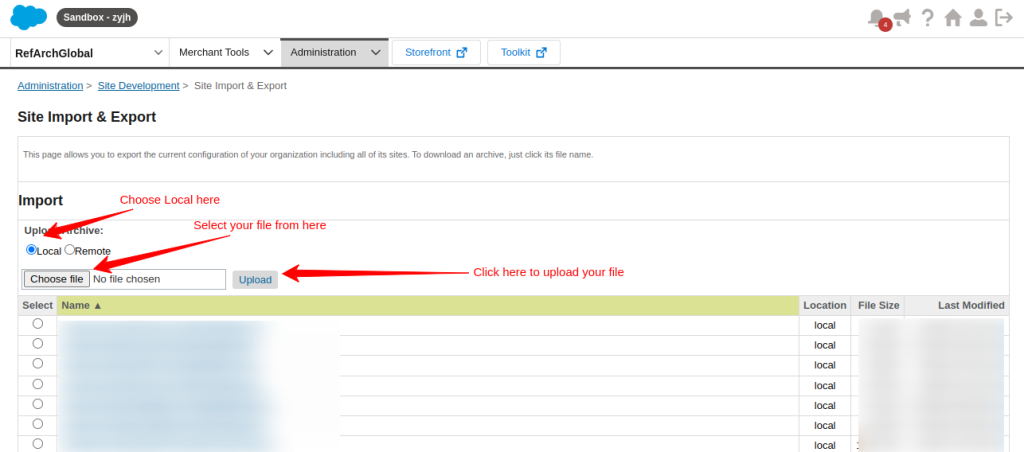
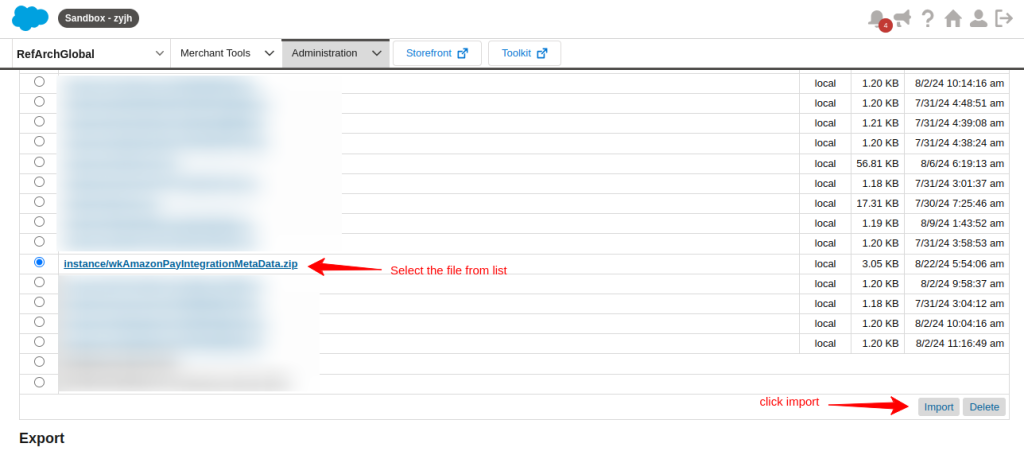
After uploading the file select the file from the options below and click on the import button. Scroll down to the bottom, a successful message will be shown after some time.
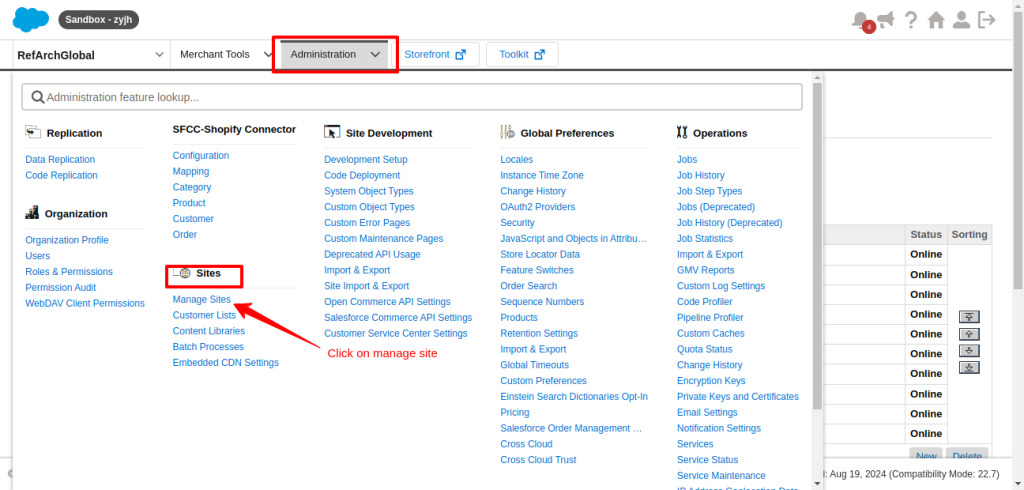
Click here to Configure Cartridge Path, or you can follow the steps below: Administration > Sites > Manage Sites > Site ID
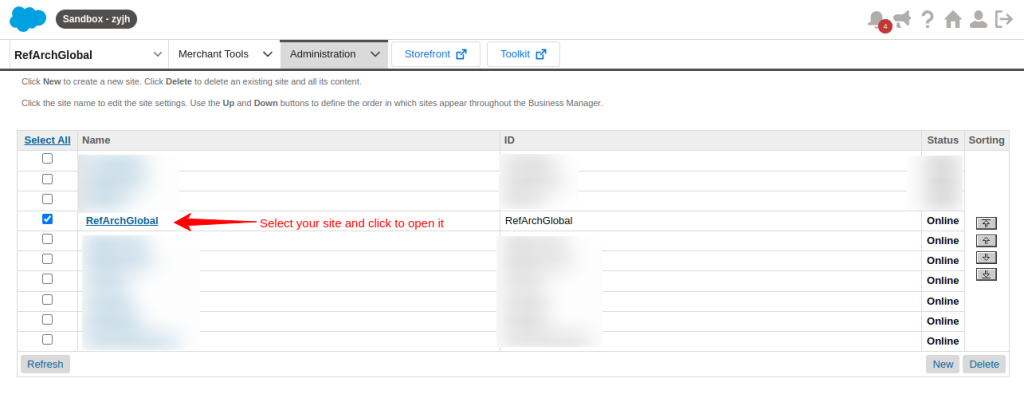
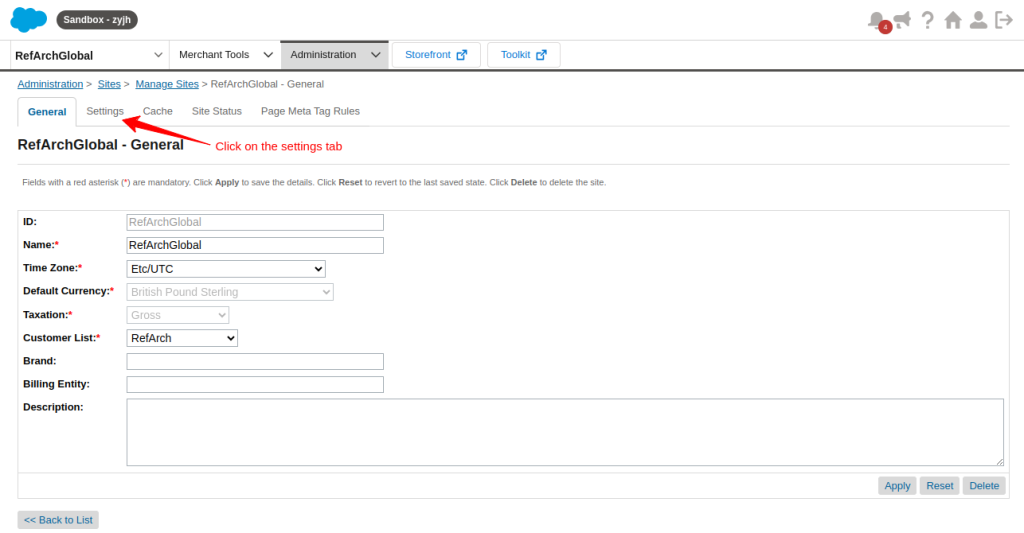
After that, select your site from the given list and open it.
Click on the settings tab to access the settings.
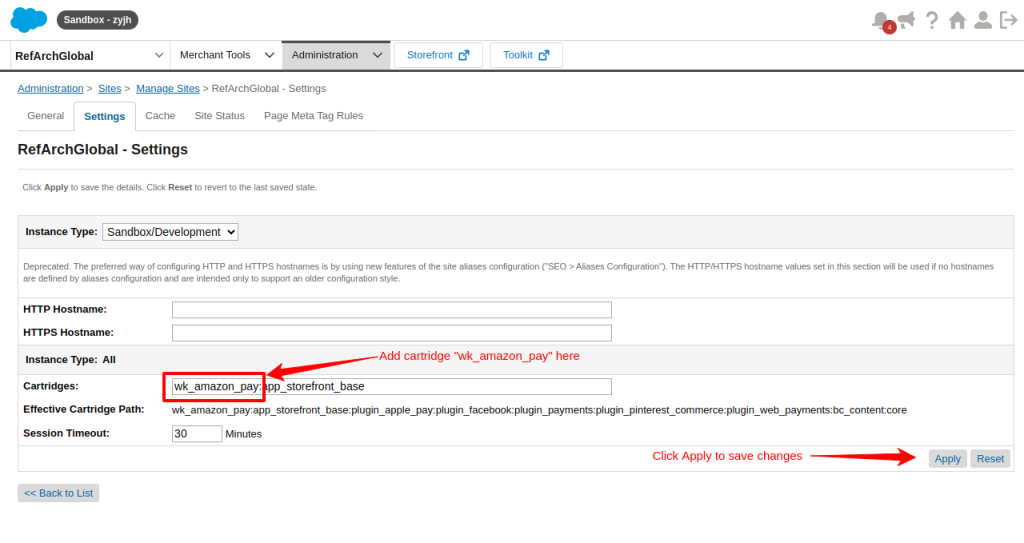
Under the settings tab add cartridge “wk_amazon_pay” and click Apply to save changes.
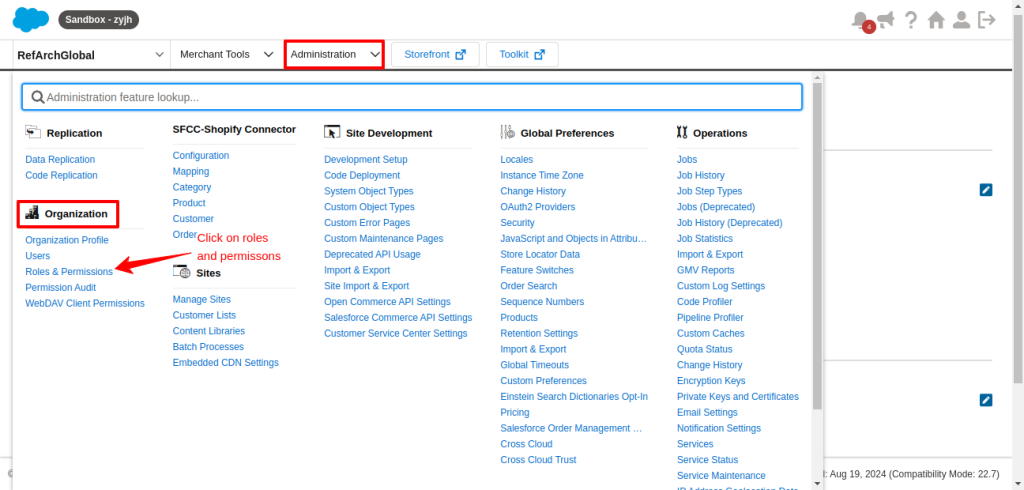
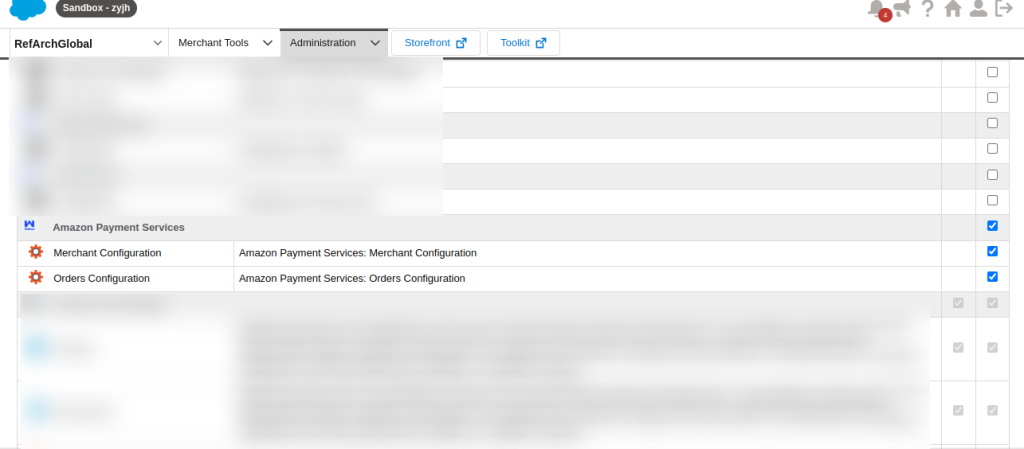
Modify the Business Manager Modules permission to make the connector visible in Business Manager.
Go to Administration > Organization > Roles & Permissions
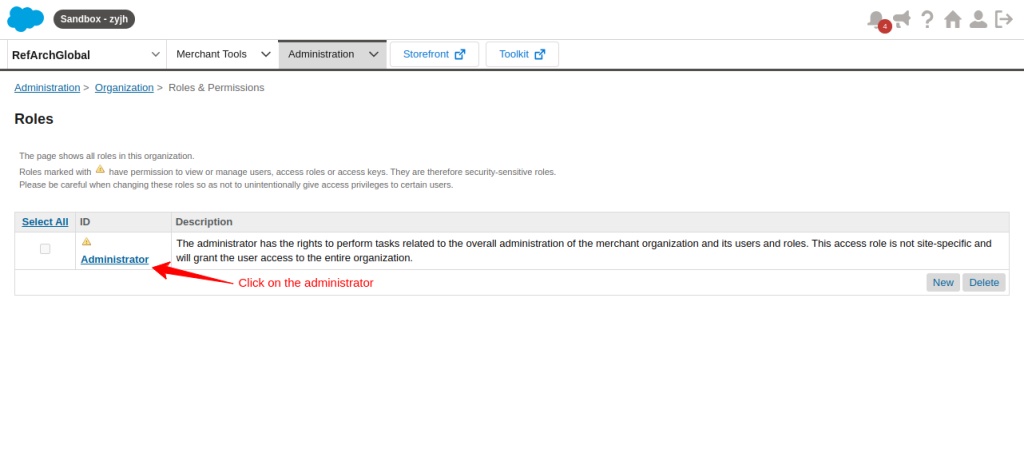
Click on Administrator to open it
Click on the Business Manager Module tab
Select your site from the list and apply.

Give Amazon Payment Services read/write permission and scroll down to update it.
Configure Amazon Payment Services integration for Salesforce Commerce Cloud
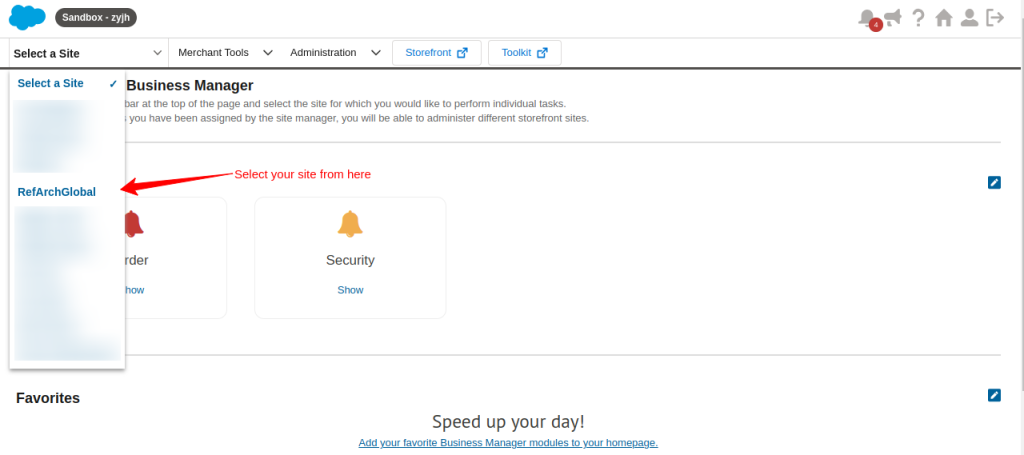
After successful installation, to configure, select your site from the left side of your dashboard.
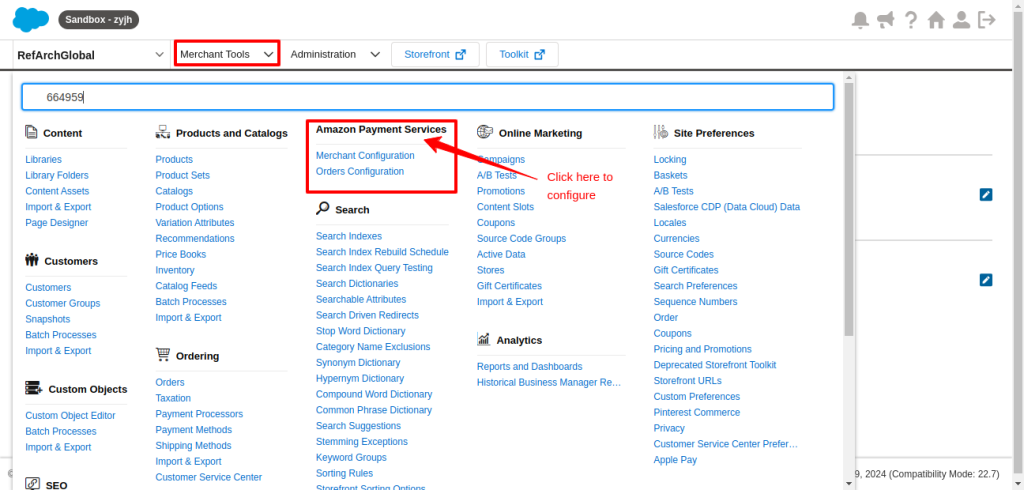
You can see that the Amazon payment service is successfully installed in the Merchant Tools dropdown section. Now click on Amazon Payment Services to configure it.
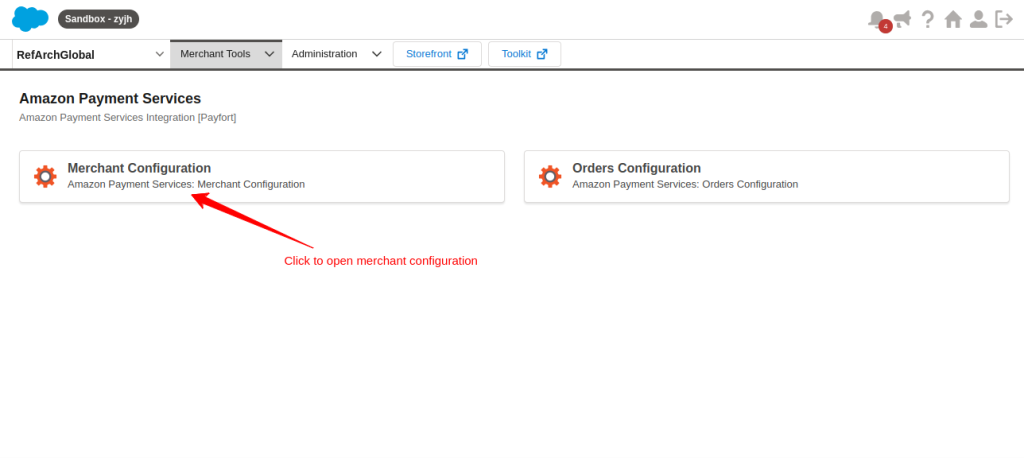
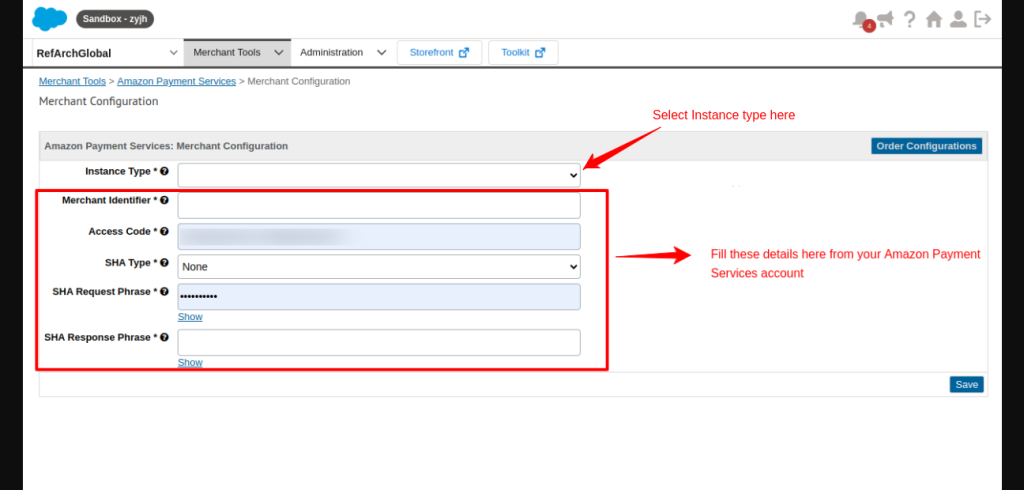
Open Merchant Configuration
Select the instance type and fill in the rest of the details from your Amazon Payment Services Account.
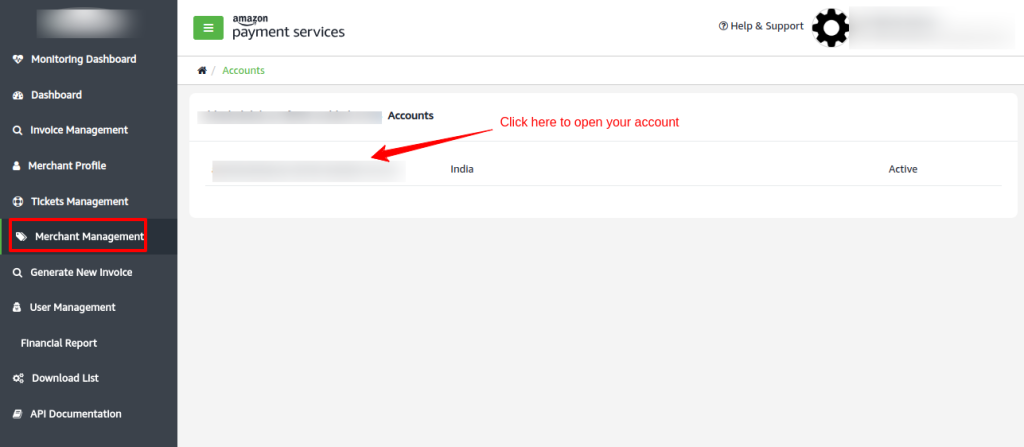
To fill in the details, open your Amazon Payment Services account and Go to the Merchant Management Section>Click on your account.
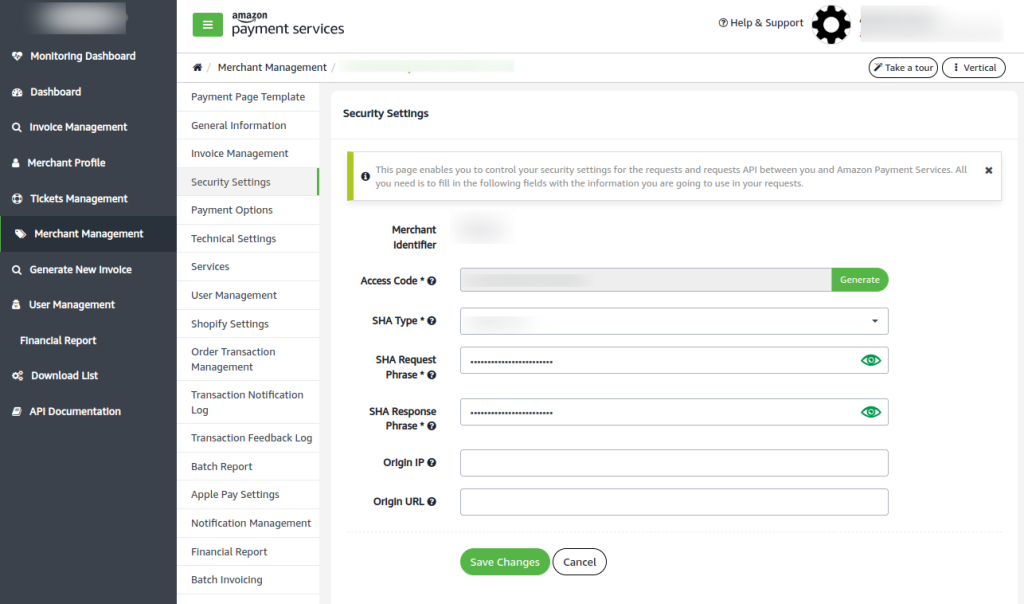
Under Security Settings, you will get the details for merchant configuration. Fill in these details to your Merchant configuration in SFCC
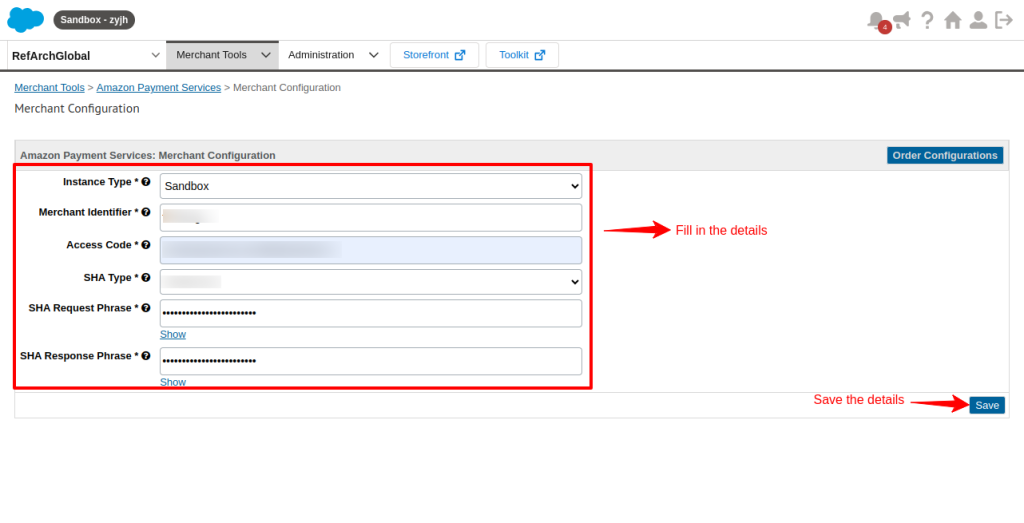
Fill in the details of your Merchant Management of Amazon Payment Services in SFCC and save the details. You will get a successful message.
After successfully saving the details, click on order configuration.
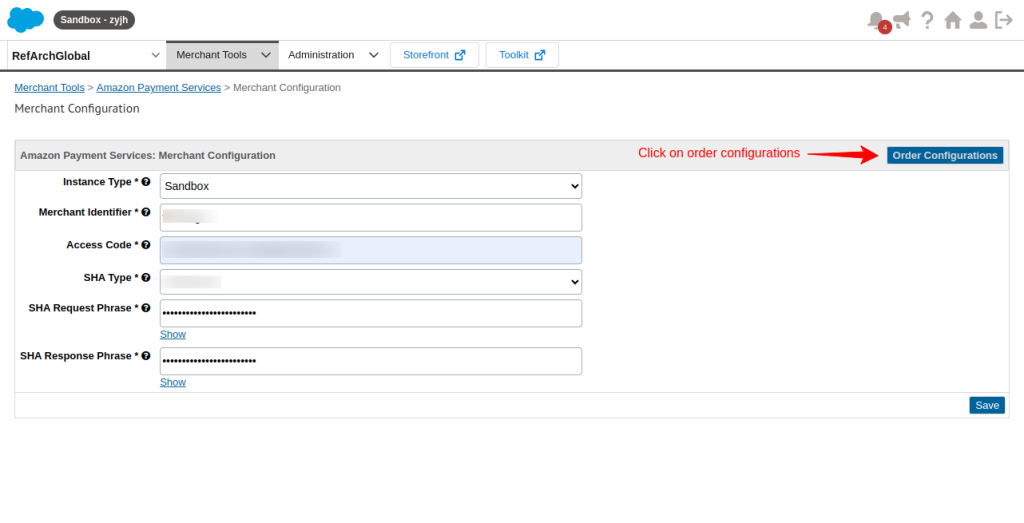
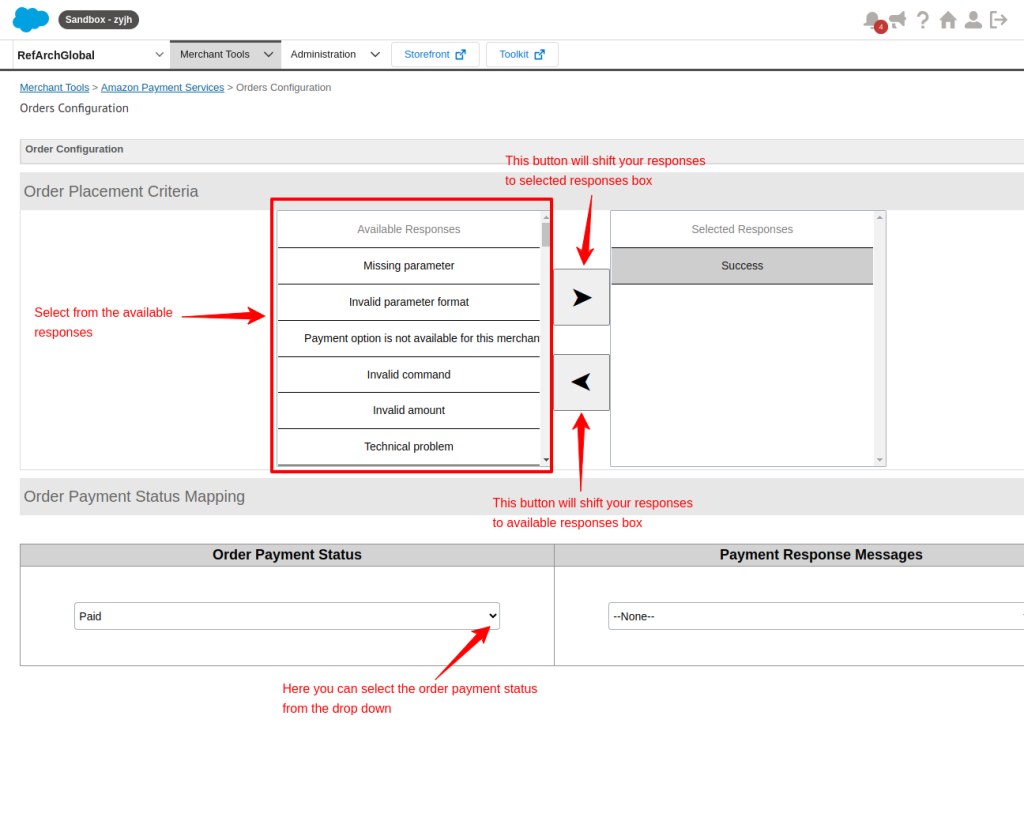
You will come to the order configuration page. On this page, you can select order placement criteria and order payment status mapping according to your requirements.
Workflow of Amazon Payment Services Integration for Salesforce Commerce Cloud
After you have successfully installed the Amazon payment services integration for Salesforce Commerce Cloud.
Go to the storefront. Whenever a user places an order and proceeds to the checkout page.
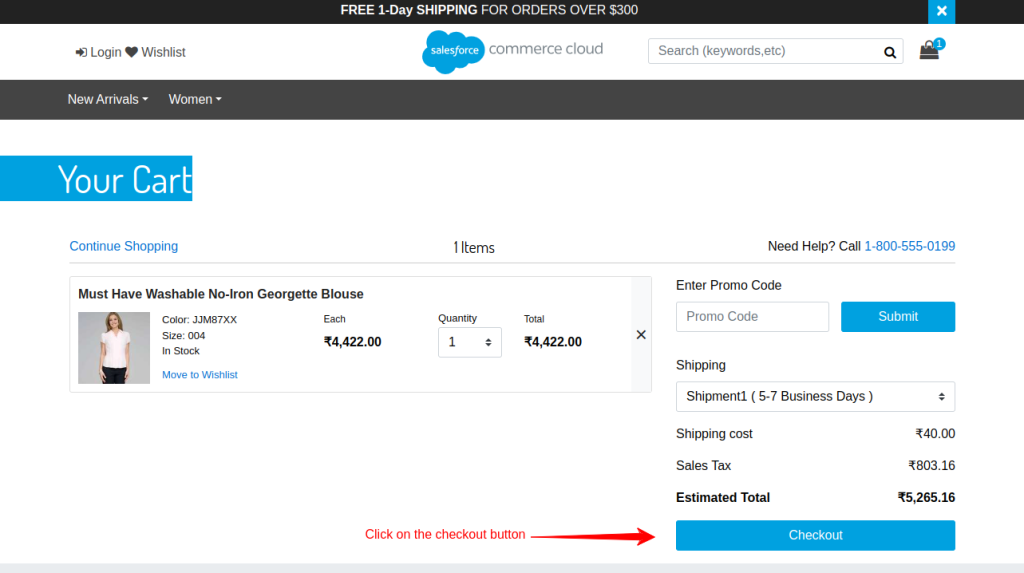
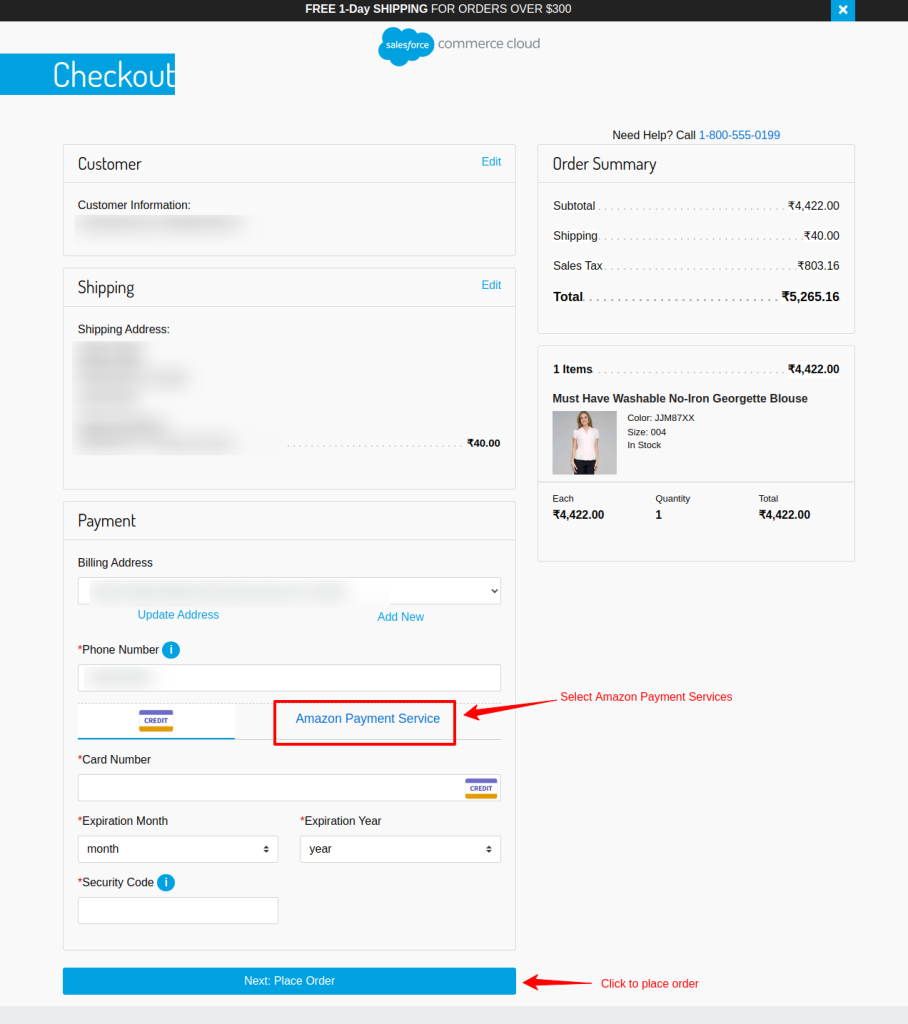
When you click on the checkout button you will come to a page where the customer will fill in his shipping details.
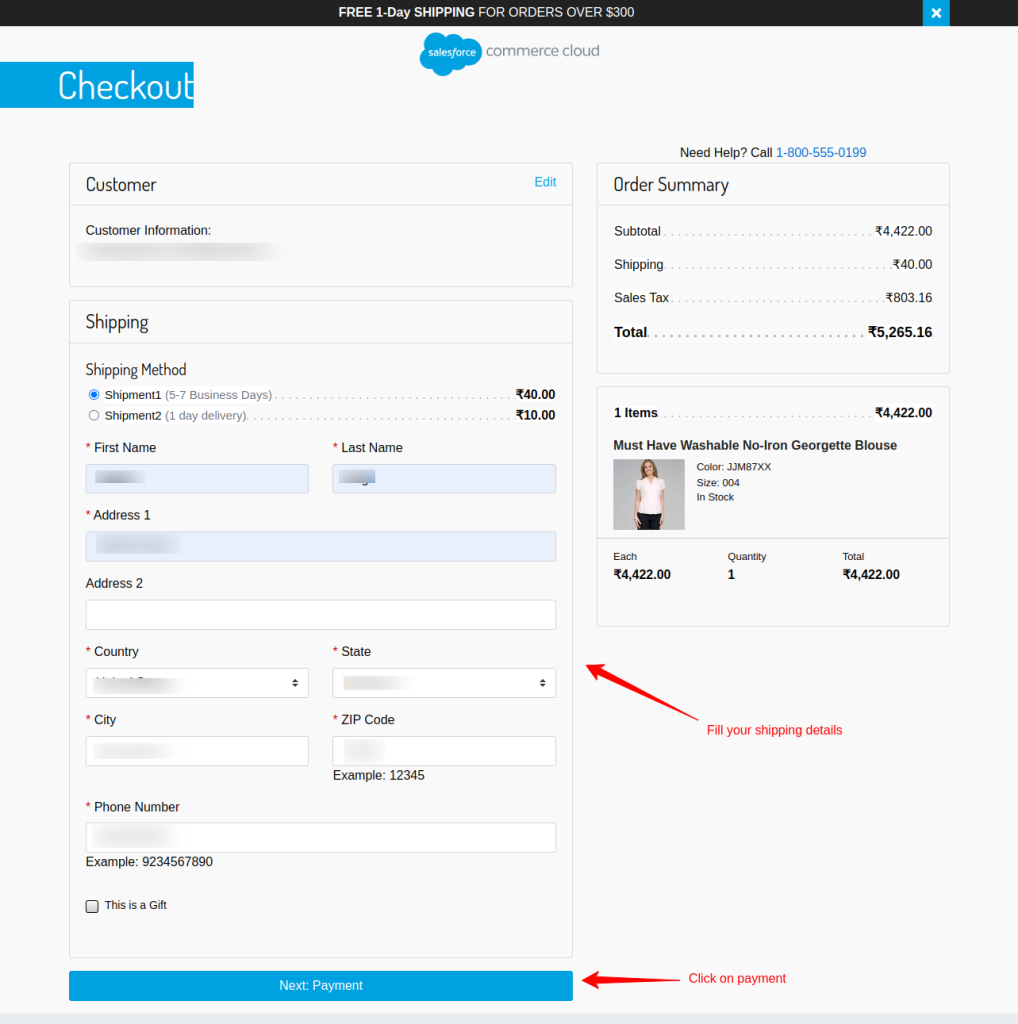
The next step is for payment. You will see a dashboard like this. Here you have to select Amazon Payment Services to make your payment. Then click on the place order button.
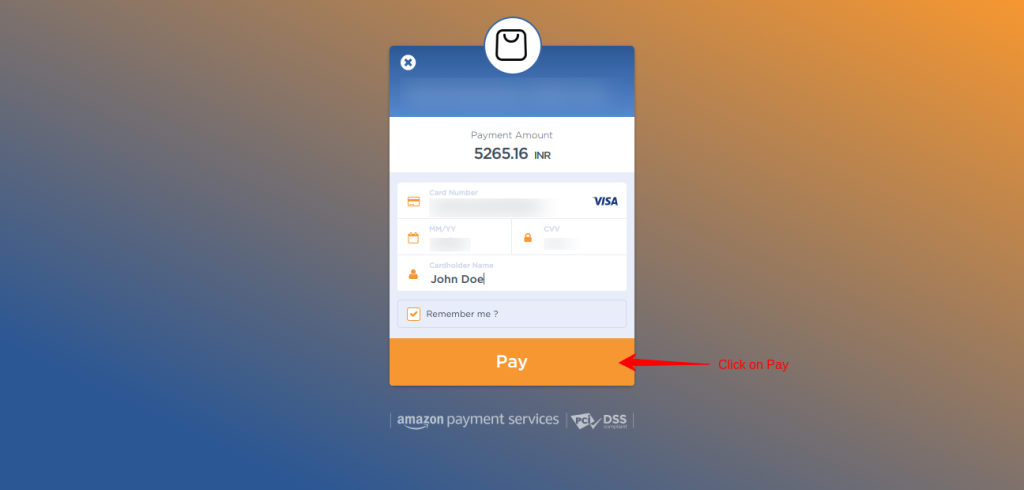
Now you will come to the Amazon Payment page. Here the customer fills in his card details and makes his payment.
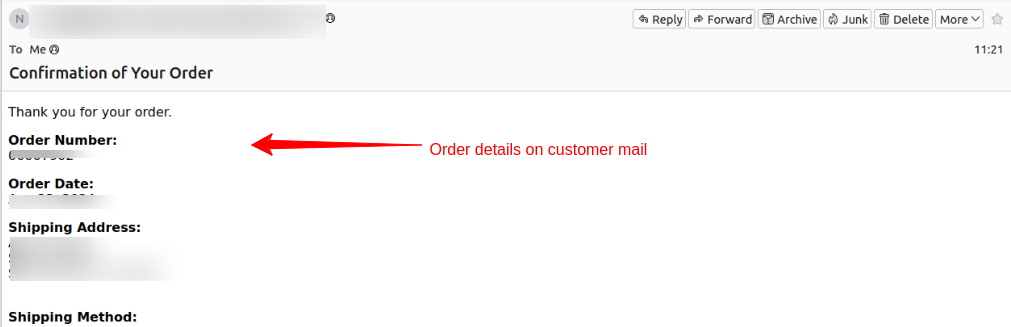
After a successful payment, the customer will automatically receive their order confirmation at their given email address.
You can also see the order details in your SFCC. Go to Merchant Tools dropdown section> Ordering> click on orders
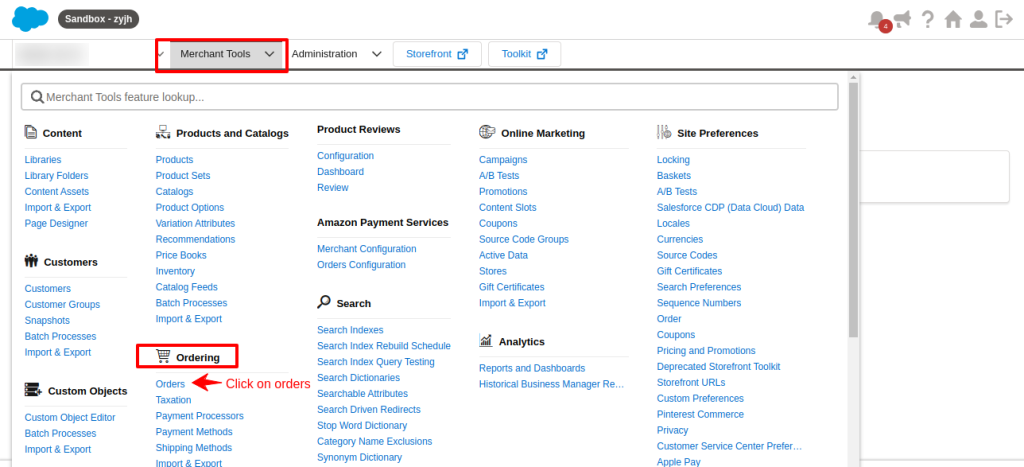
In your order section, fill in the order number and click on the Find button.
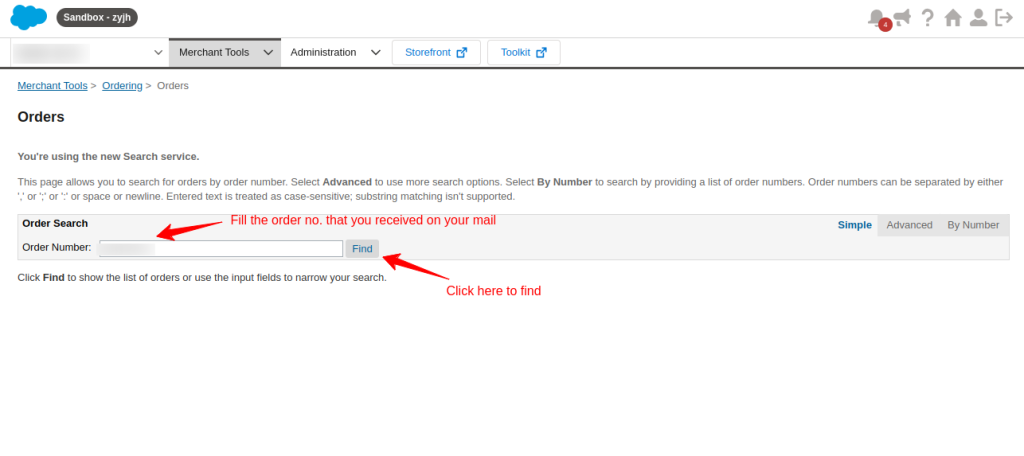
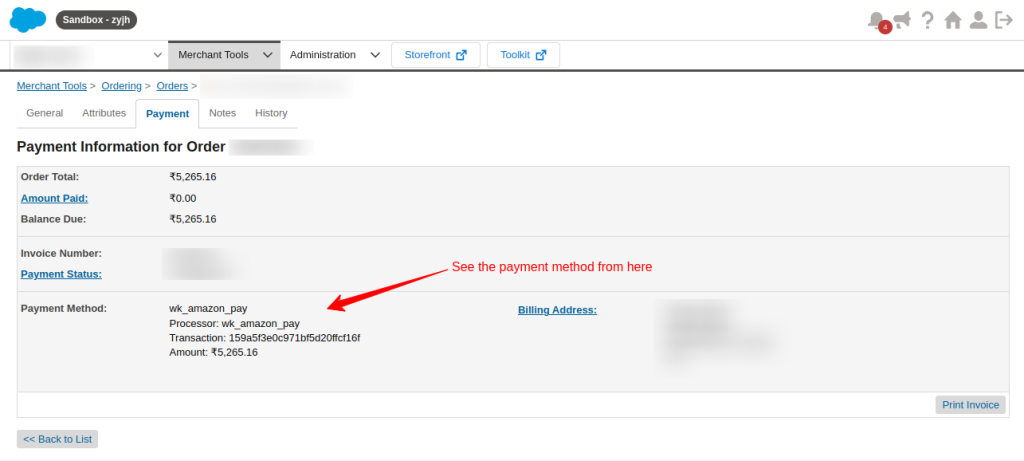
You will get all the necessary information about the order details. Click on the order no. to get more detailed information.

Shift to the Payment tab

Here you can see your payment method.
Salesforce Appexchange Consulting Profile
Ready to transform your business with the power of Salesforce?
Webkul is your trusted partner with over a decade of experience and a proven track record of delivering innovative solutions.
Explore our portfolio of 10+ AppExchange apps and discover how our certified developers and dedicated consultants can help you achieve your goals.
Visit our Webkul Consulting Profile to learn more about our Salesforce journey and partner navigator achievements. Let’s build something extraordinary together!
Support
- For customized, affordable, quick solutions, get the Salesforce PDO Services now.
- For any further queries, Click To Create a Ticket.

1 comments