Magento2 Salesforce Connector
Updated 14 October 2025
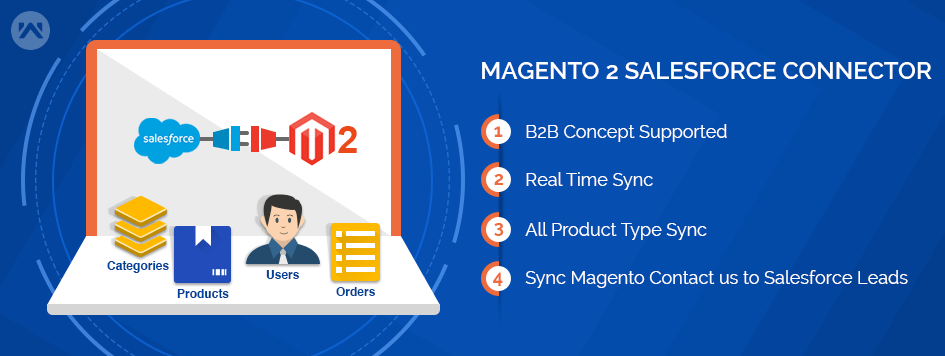
This module is best known for integrating a Magento 2 Salesforce Integration with an e-commerce platform to the Salesforce CRM platform.
Moreover, it provides real-time synchronization for the Magento store to the Salesforce end.
Furthermore, with the help of this module, admins can easily sync Categories, Products, Customers, Orders, and Contact Us (Leads) to Salesforce Org.
Consequently, this functionality will help them to track their sales and improve customer services effectively.
Note: Application (Magento 2 Salesforce Integration) required to install in Salesforce Org from AppExchnage eShopSync For Magento.
Book your Demo: eShopSync For Magento | Buy Now
Features:
- Acts as a bridge between Magento and Salesforce.
- It gives the concept of a “Service-First” approach.
- Guest User Concept to store Guest checkout details.
- Connect to the Salesforce account using REST oAuth2.
- Can process the bulk amount of data from Magento to Salesforce.
- The synchronization process will run in the background when you export the records.
- Sync all product types as Simple, Grouped, Configurable, Bundle, Virtual, and Downloadable.
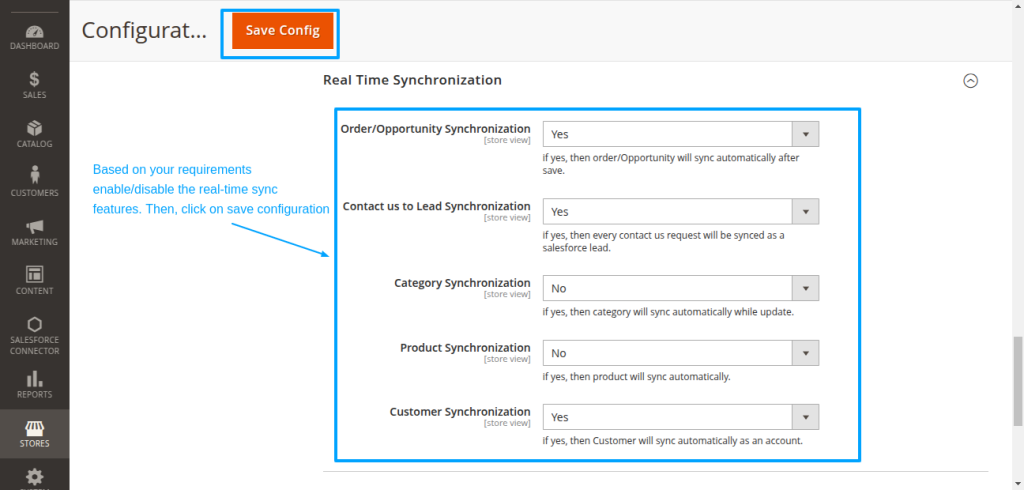
- Real-Time synchronization for Contact Us as Leads, Customers, Categories, Products, and Orders.
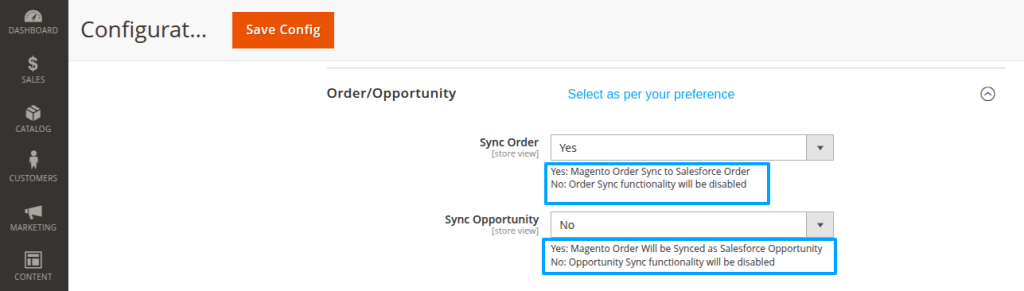
- Sync Magneto Orders to Salesforce Orders with Shipment and Tax details.
- Sync Magento Categories and Products to Salesforce as Custom Categories and Products respectively.
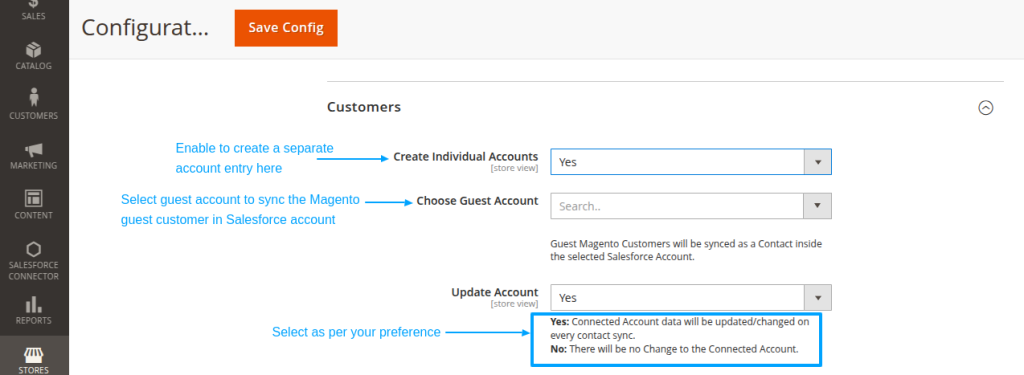
- Users can synchronize customers into an Existing Salesforce Account, or create a new corresponding account.
- Sync Magento Contact us as Leads and Customers as Accounts and Contacts to Salesforce.
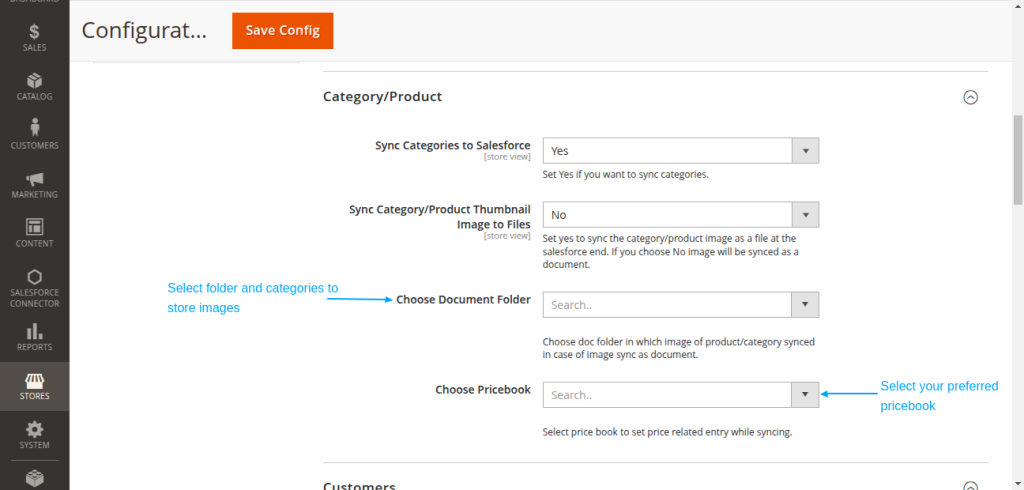
- Admin can select the default folder to store images of Categories and Products at the Salesforce end.
- Admin can select default price book for product pricing based on selected Price book.
- Dynamic Field Mapping for Product, Account, Contact, and Order.
- Matching Criteria for Product, Account, and Contact to avoid duplicate records.
- Background Jobs for Real-Time and Bulk Syncing.
- It is compatible with NPSP. An open-source, BSD-license package offering several key benefits.
Note: Real-time data synchronization can be implemented bi-directionally. This would be a paid feature. To enable the bi-directional feature, kindly connect with our Salesforce support team.
Minimum Requirements:
- Magento 2.x
- The minimum requirement for installation is PHP 7.1
How to Configure:
Pre-Configuration settings:
Update Field Accessibility: Salesforce Field Accessibility If you want to avail Salesforce Lightning experience, you need to register your domain first.
Magento 2 Salesforce Connector Installation & Setup:
- Extract the downloaded connector zip file into your system location. It will consist SRC folder & APP as Sub-folder.
- Connect Magento Back end through FTP details. Open the root folder location where the Magento setup is installed.
- Browse to the system location where you have extracted the connector folder located as shown below. Go to SRC | APP | Select App folder then Upload to Magento Root Folder as shown below.

- Open Terminal/Command Console then run the following commands on the Magento 2 root directory to reflect changes:
- To update: php bin/magento setup: upgrade

- In the same way, run the rest commands mentioned below:
- To compile: php bin/magento setup:di:compile
- To deploy: php bin/magento setup:static-content:deploy
- To clear cache: php bin/magento cache:clean
This completes the installation of the Salesforce Magento connector. Now, you need to configure the required changes at the Salesforce end and then establish a connection between these platforms.
-
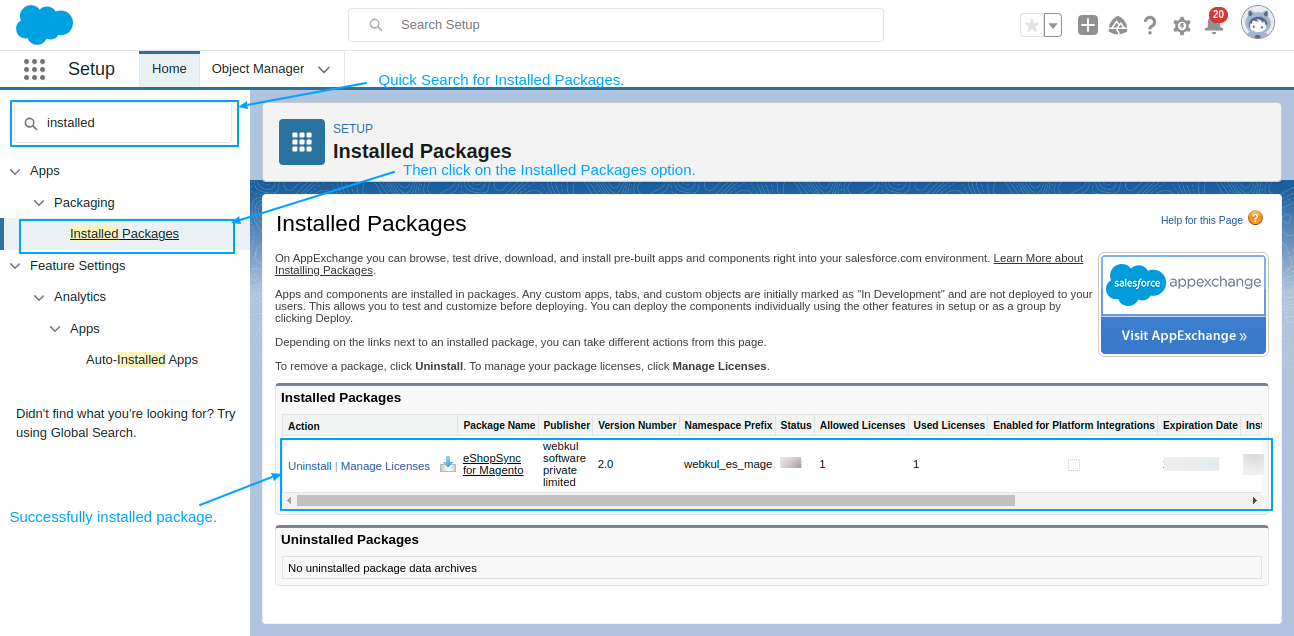
- Login to the concerned Salesforce Org to update the required changes and make sure that you have installed eShopSync For Magento.
- Go to Setup |Quick Find search for the Installed package, then Click on eShopsync for Magento (Magento 2 Salesforce Integration).
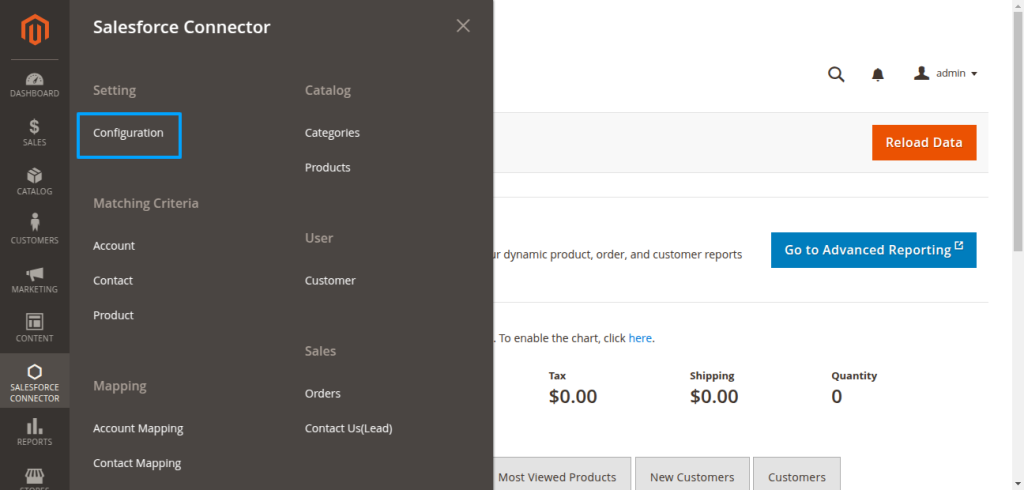
- Log in to the Magento Admin panel, then go to Stores | Configuration | Salesforce Connector to establish a connection with proper settings.
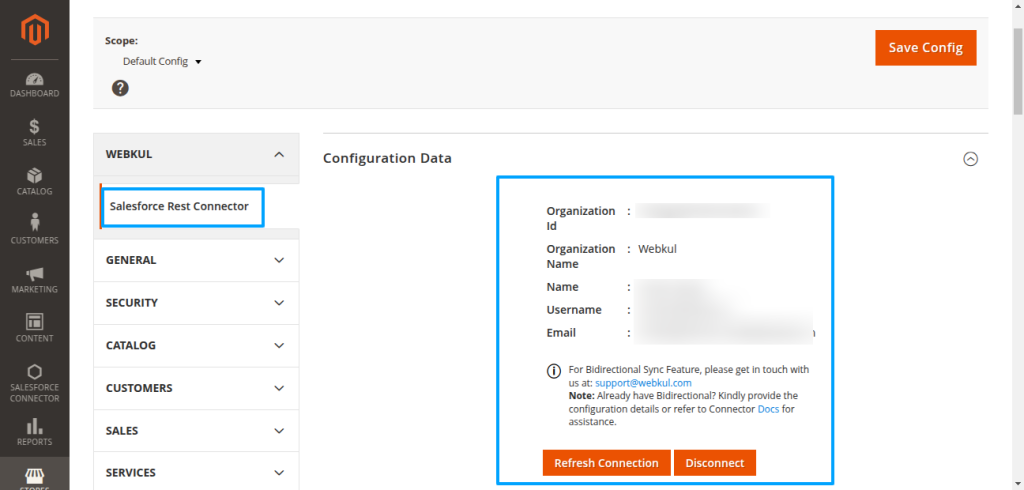
- After that, fill in all the details as described in the screenshot below:
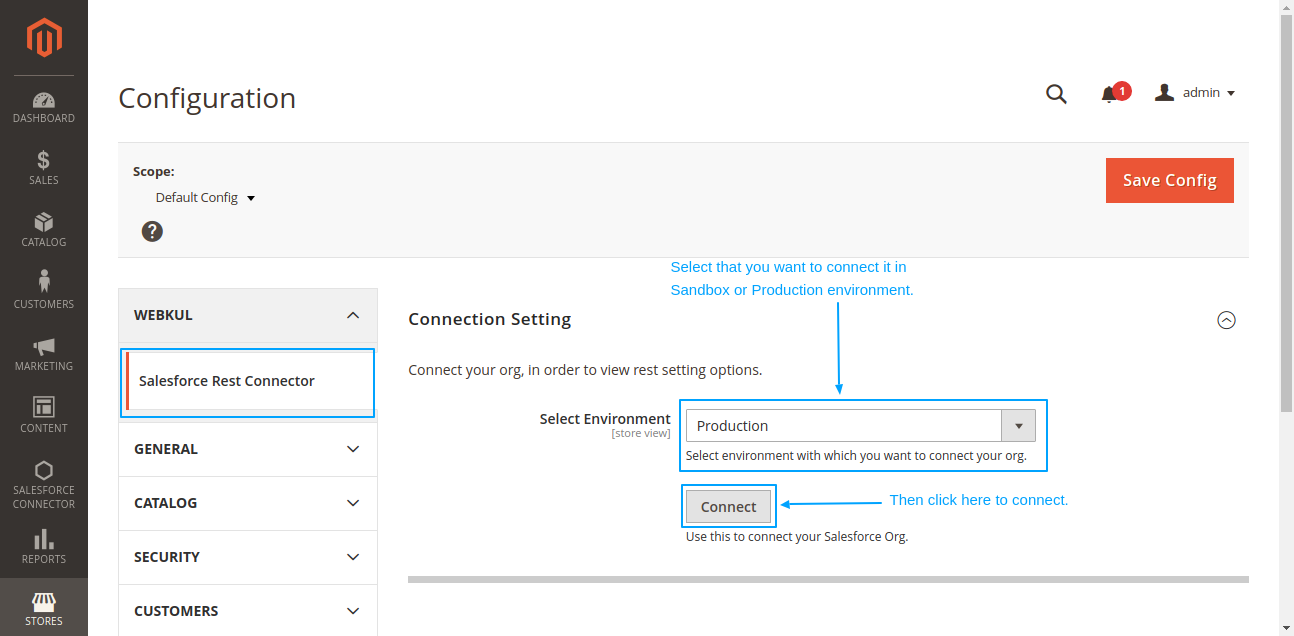
- It will ask you to log in to your Salesforce Org. Login with credentials to proceed.
- Once the connection would establish, the User would able to see the Configuration data section
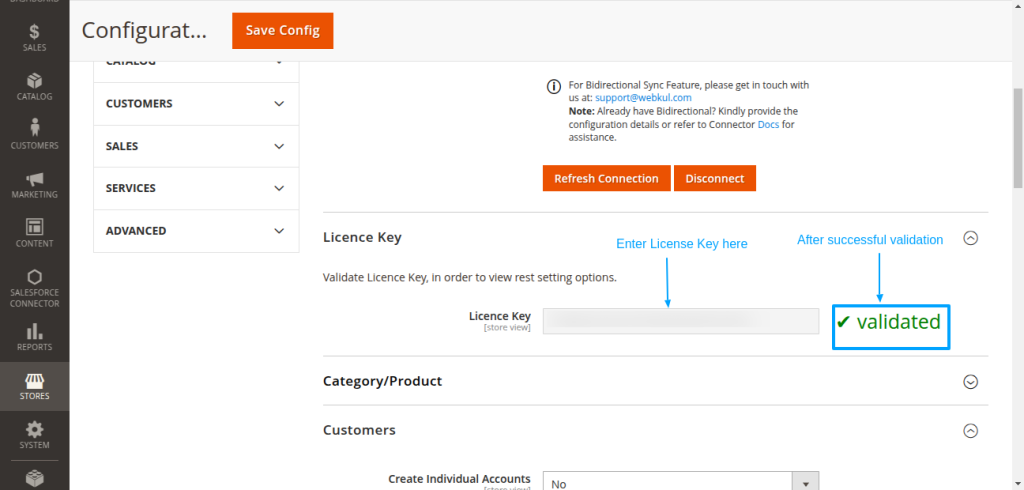
- After entering the license key you have to validate it then it shows the text that its validated as shown in the screenshot below.
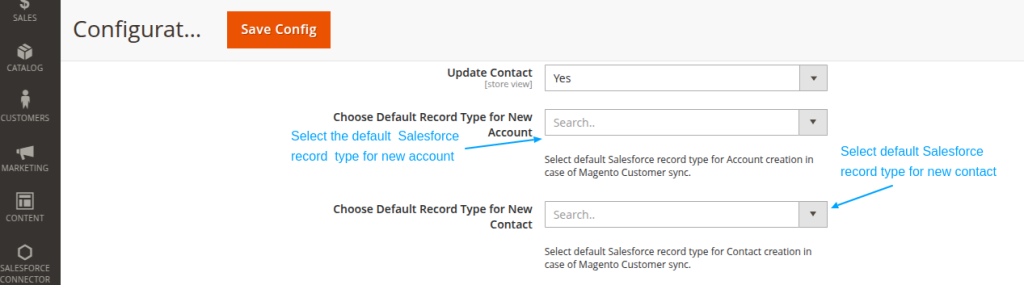
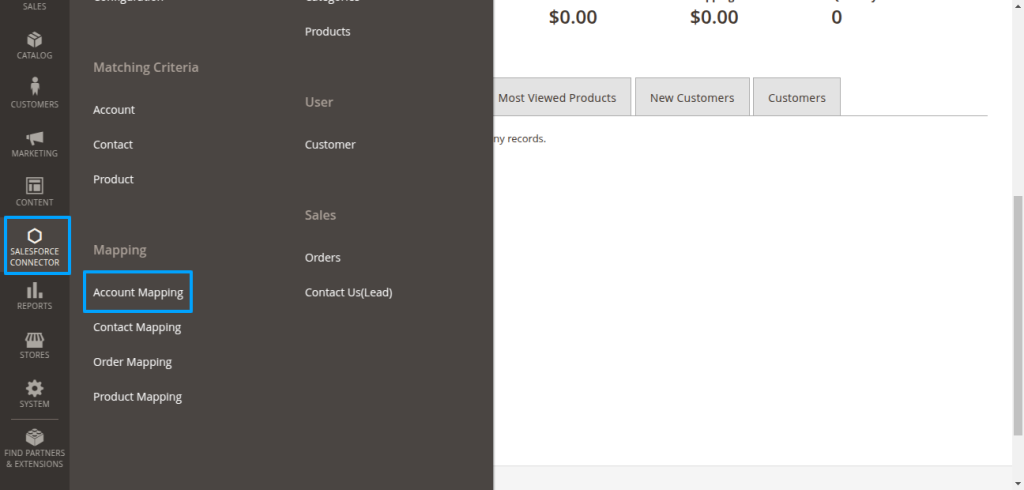
Field Mapping for Magento 2 Salesforce Integration
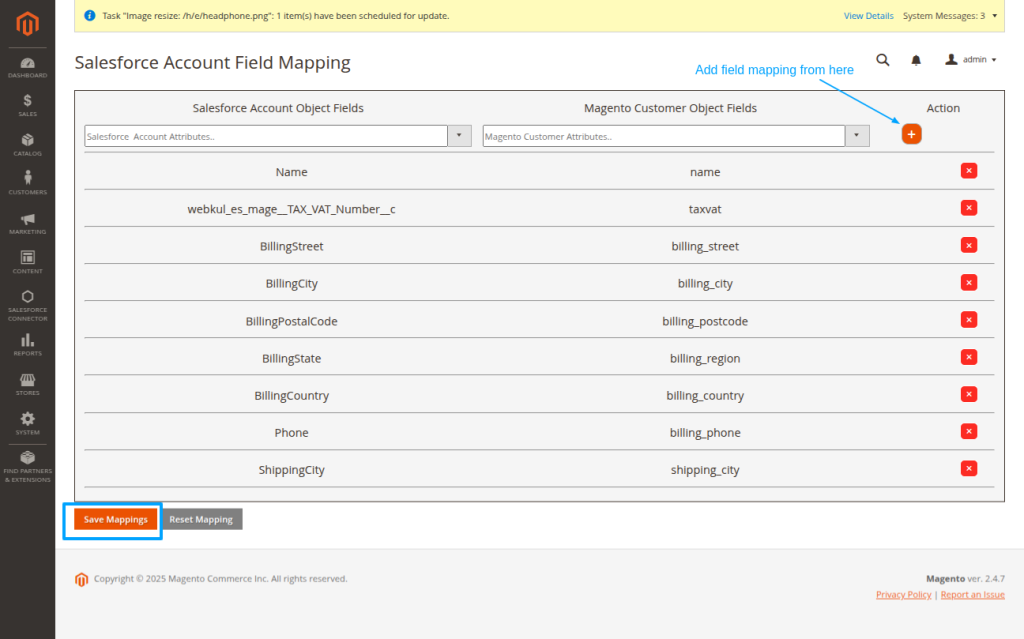
Account Field Mapping:
To begin with, to map new fields, first go to the Salesforce Connector on the left bar section. Then, under the Mapping Section, click on Account Field Mapping.
Here, you can also map new fields in different objects such as contact, order, and product.
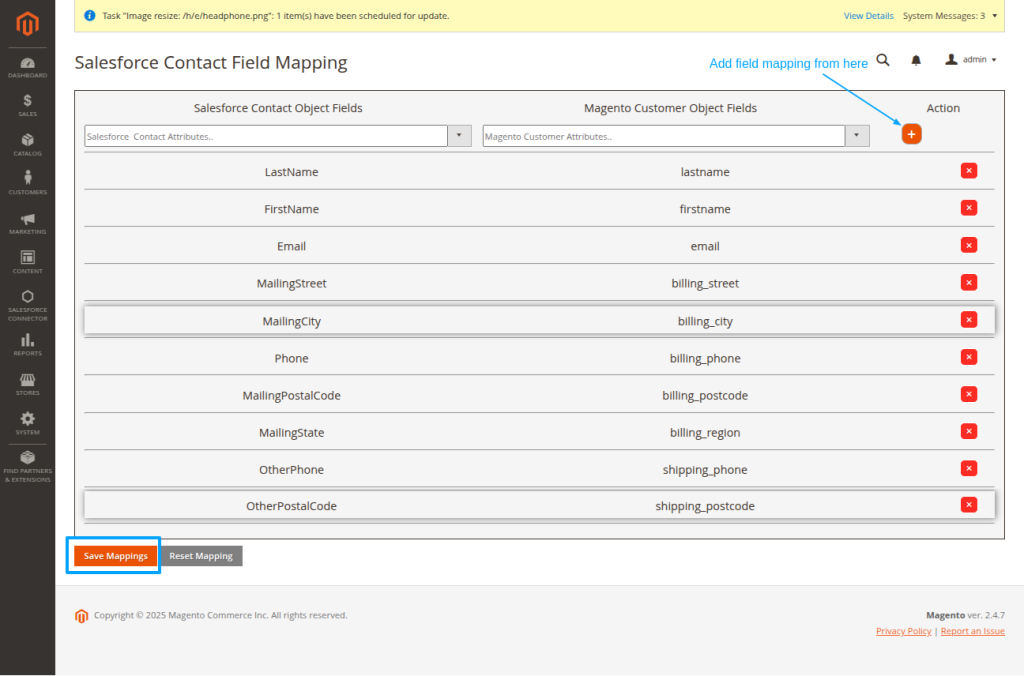
Contact Field Mapping:
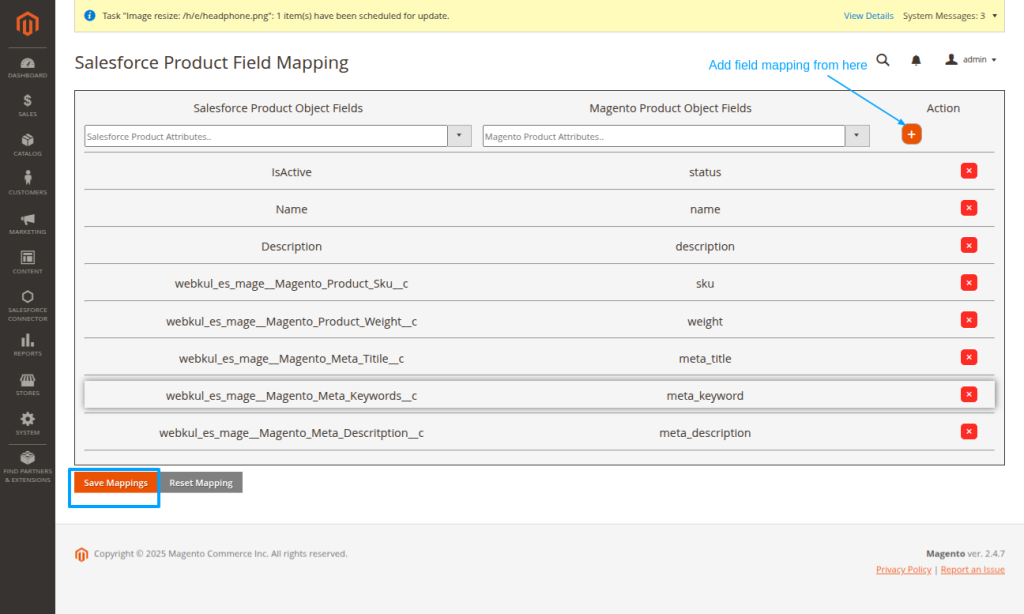
Product Field Mapping:
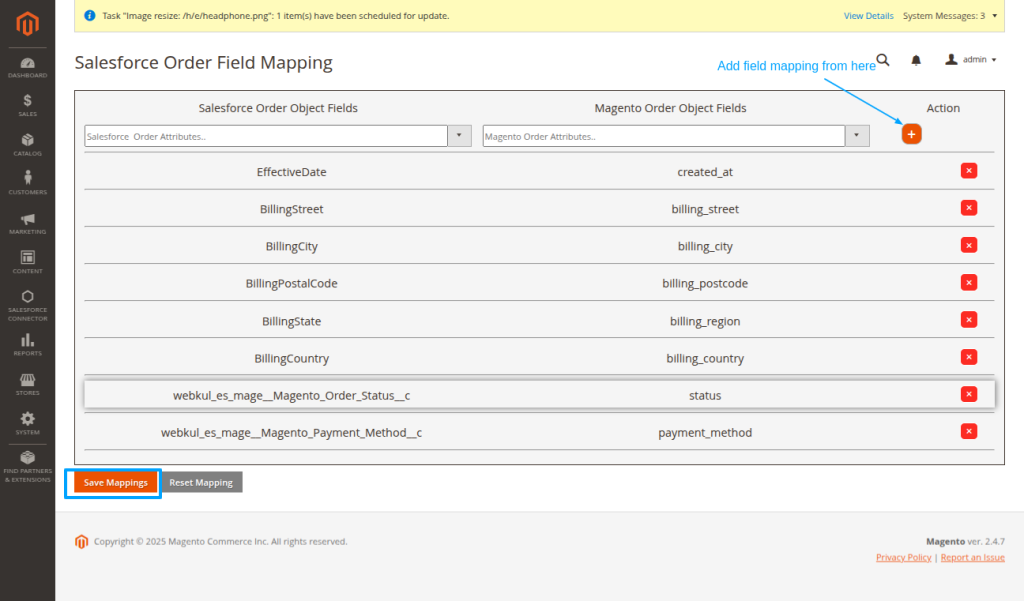
Order Field Mapping:
Finally, proceed to test the synchronization process as we are done with connector installation & configuration.
Synchronization Process
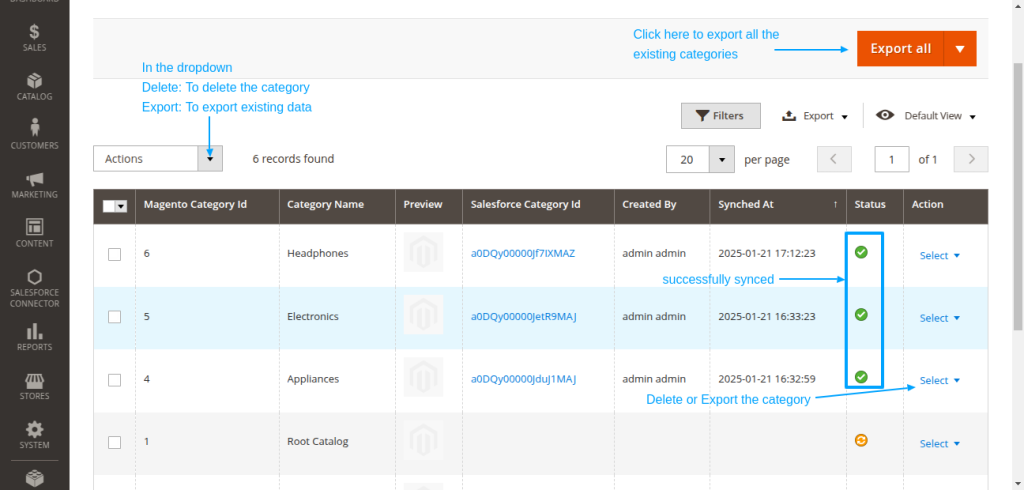
- Sync Categories: Go to Salesforce Connector | Categories
- Click on Export All Categories to export all existing categories to the Salesforce end.
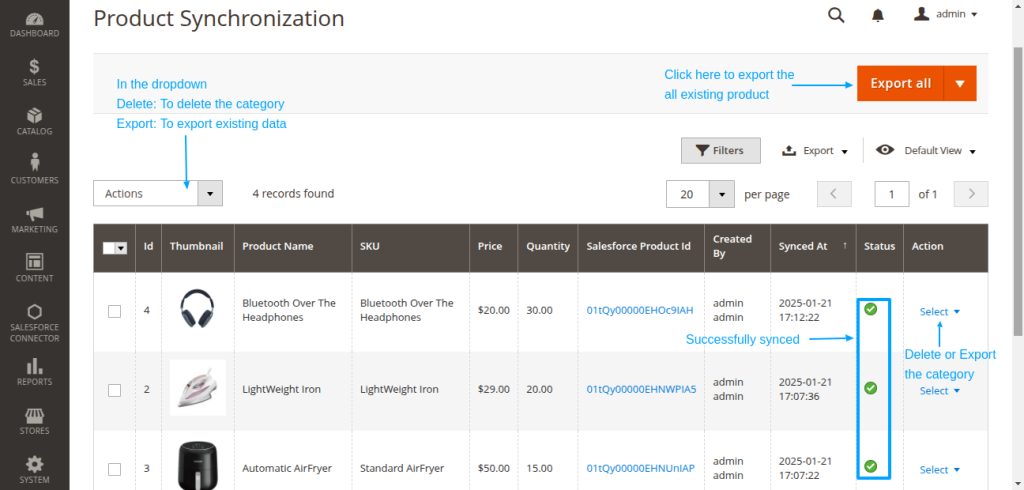
- Sync Products: Click Salesforce Connector | Products
- Click on Export All Products to export all existing Products at the Salesforce end.
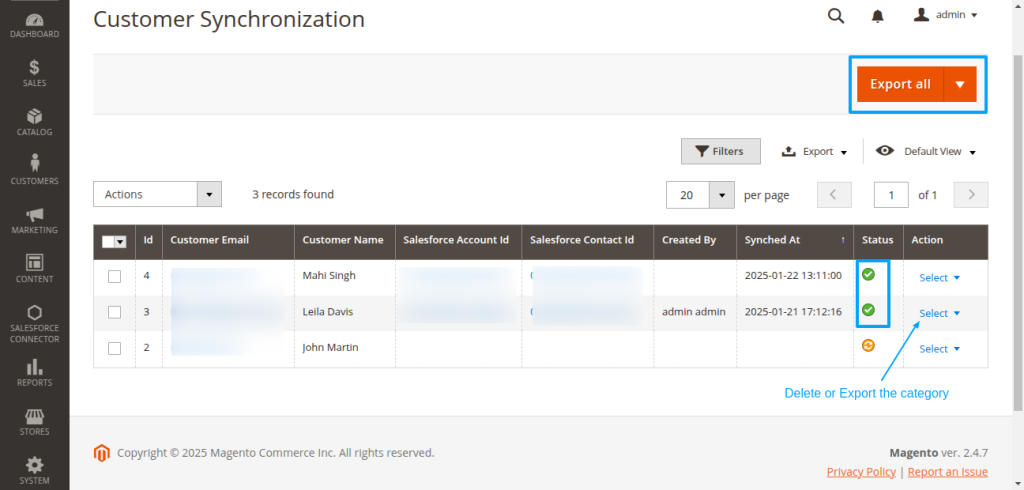
- Sync Customers: Click Salesforce Connector | Accounts
- Click on Synchronize All Customers and Address to export all existing customers at the Salesforce end.
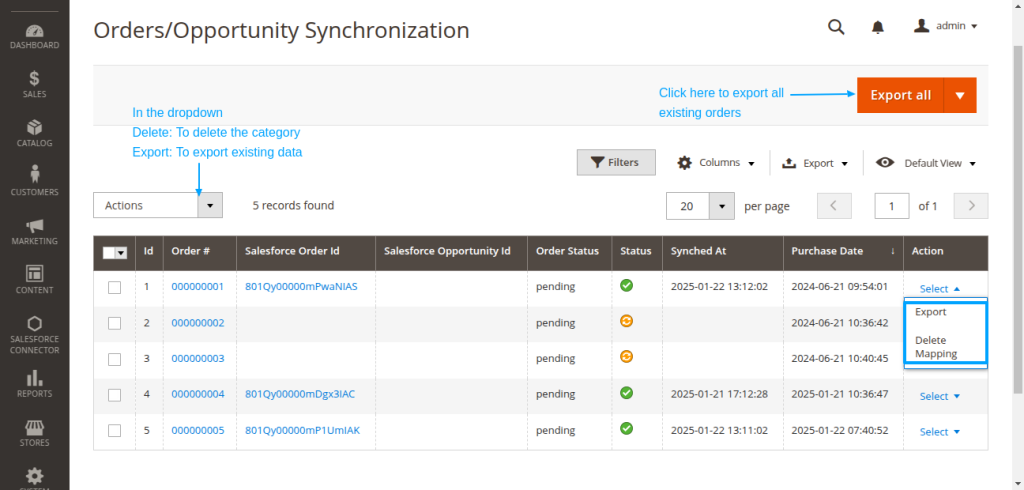
- Sync Orders: Click Salesforce Connector | OrdersClick on Synchronize Orders to export all existing Orders at the Salesforce end.
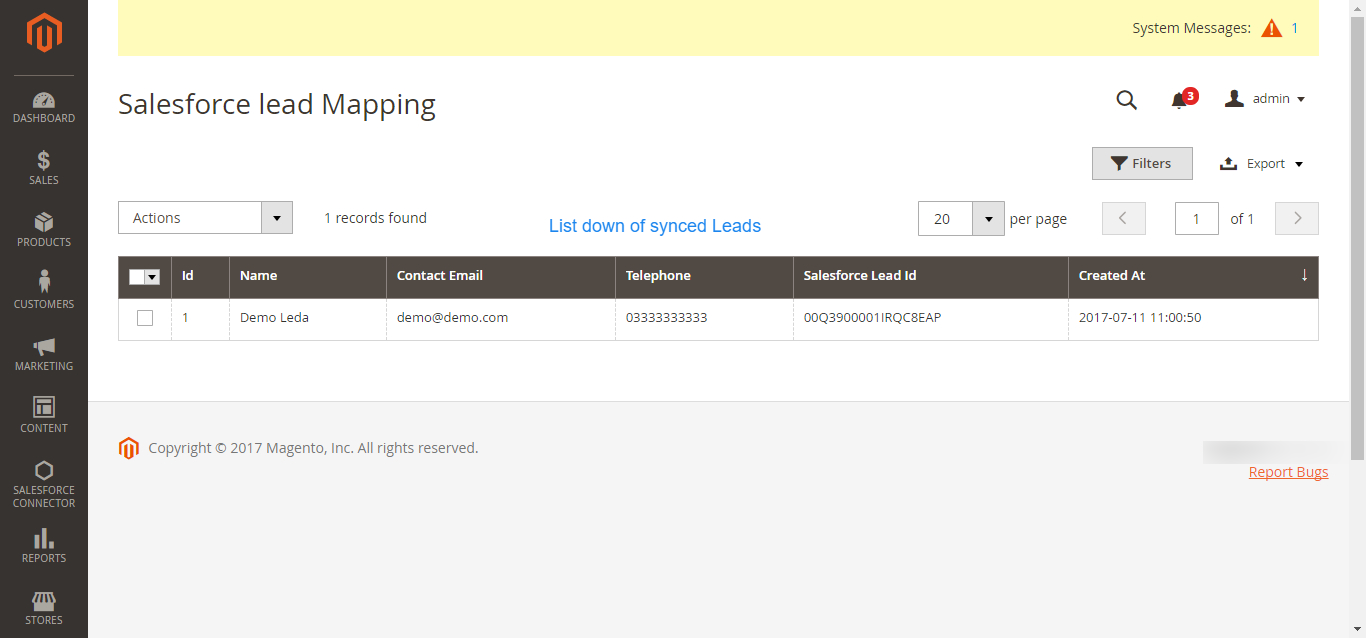
- Sync Contact Us in Magento as Leads to the Salesforce.
- All Contact Us responses will get the list down in this section if you have enabled the Real-Time Sync option.
Frequently Asked Questions:
Question: What is the best way to test the purchased connector file?
Answer: We would recommend installing and testing the connector sync features in the Development site first by establishing the connection with Salesforce Sandbox.
Upon successful testing, you may proceed to install the connector in the Live site and Salesforce Production environment.
Question: What are the benefits of purchasing the connector along with Installation fees?
Answer: Purchasing a connector along with Installation fees bring you into a comfort zone where you just need to share the required details to initiate the installation process.
Our concerned team will effectively proceed with the installation process as soon we get complete details and will get installed in 1-2 Working days.
Your trust and satisfaction are highly important to us and so your data will be completely secured.
Question: What will be covered under Installation fees?
Answer: We will install and set up Connector at the Magento end and get things ready to go situation for you.
Installation of eShopSync For Magneto as well, in case it is not installed at the Salesforce end.
We will sync a test record on each object to make sure that synchronization is working fine. Further, you may proceed with synchronization on your own.
Question: What are the required details mandatory to share for the Installation procedure?
Answer: You must need to share the following details to proceed with the installation and setup of the connector:
- Would be preferable to install it in the Development site first in connection with Salesforce Sandbox, so create a Dev site and share the details accordingly.
- Magento Admin URL of the concerned site with login credentials.
- Salesforce login credentials
- SFTP/FTP Details such as Host Name, Port, User, and Password.
NOTE: Mandatory to share SFTP/FTP details and all of the concerned sites such as Host Name, Port, User, and Password if we experience any issue while connector installation due to any plugin conflict.
Question: What are the conditions to pay Installation fees?
Answer: If you are stuck and having trouble while proceeding with configuration then you need to pay Installation fees along with the required details to install and set up the connector properly.
To pay the Installation fees: Click Here
NOTE: We have also provided helpful links and video tutorials to install and set up the connector.
Question: When you can avail benefits of free support?
Answer: Free support comes into the picture once the connector installation and configuration are done properly.
If there is any issue while connector installation then it will fall under the Installation process and resolve as per the Installation procedure.
In case, you have not paid the installation fees and want support to install and configure the connector then you need to pay the installation fees.
You must share the required details to initiate the Connector installation procedure.
Question: What will be covered under the Free 3 months of support availed with connector purchase?
Answer: Post successful connector installation and configuration, if you are experiencing any issue while data synchronization that would fall under free support.
You may find steps to resolve the issue under the Frequently Asked Questions section as per the error received.
Else, you may create a ticket on the link mentioned under the Support section with steps to reproduce and provide all required login details.
Question: What are the details mandatory to be shared to debug the issue?
Answer: You must need to share the following details to investigate the issue:
- Magento Admin URL of the concerned site with login credentials.
- SFTP/FTP Details such as Host Name, Port, Username, and Password.
- Salesforce login credentials. Or, you may grant login access for Salesforce as well: How to Grant Login Access
NOTE: Mandatory to share SFTP/FTP details and all of the concerned sites such as Host Name, Port, User, and Password if required while investigating.
Question: What if you can’t share SFTP/FTP details or Login credentials of Magento and Salesforce due to privacy/security concerns?
Answer: Your data is highly secured with us and it is mandatory to share SFTP/FTP details and login credentials of Magento and Salesforce while investigating any issue.
Without having complete details, we can’t proceed any further.
Question: Can you provide support on screen sharing sessions via any medium like Team Viewer/ GoToMeeting/ etc?
Answer: No, we don’t provide any support on any of the screen-sharing sessions like Team Viewer/GoToMeeting/etc. Hence, it is mandatory to share complete details to provide seamless support.
Question: What if you can’t share asked details on the support ticket to debug the issue and want a full refund?
Answer: In this case, the refund would be processed as per the Refund Policy: Check Refund Policy Here
Questions: What are the other options to get support if you have privacy concerns sharing Live Site details?
Answer: You need to provide a development environment (complete replica of the Live site) with the following details:
- Steps to reproduce
- Login credentials
- SFTP/FTP details such as Host Name, Port, User, and Password
We will debug the issue and provide a proper resolution on the Development site. Upon successful testing, you can also implement it on the Live site.
Support
- For any further query, Click To Create Ticket
- To know the feasibility of specific requirements: Request For Customization
- To view all our applications in Appexchange, go to Webkul Appexchange Apps
Read More: Salesforce Marketing Cloud Magento2 Connector Installation and Setup

Be the first to comment.