How to configure Live Agent for chatting with customers
Updated 14 October 2025
Live Agent lets service organizations connect with customers or website visitors in real time through a Web-based, text-only live chat. You can customize Live Agent to create a personalized chat experience for your customer service agents and the customers they serve using custom code. Lets get started about configure live agent for chatting.
Steps to be Followed to create Live Agent
Step 1: Enable Live Agent.
1) Goto Setup, enter Live Agent Settings in the Quick Find box, then select Live Agent Settings.
2) Select Enable Live Agent.
3) Click Save.
Step 2: Make yourself a live agent user
1) Enter Users in the Quick Find box, then select Users.
2) Click Edit next to your name.
3) Select Live Agent User.
4) Click Save.
Step 3: Create a Skill
1) Enter Skills in the Quick Find box, then select Skills.
2) Click New.
3) Enter the name Support.
4) In the Assign Profiles area, add System Administrator, Standard User, and Custom: Support Profile.
5) Click Save.
Step 4: Create a basic Chat configuration
1) Enter Live Agent Configurations in the Quick Find box, then select Live Agent Configurations.
2) Click New.
3) Enter the name Chat Configuration.
4) Assign the same profiles as you did for your skill (System Administrator, Standard User, and Custom: Support Profile).
5) Click Save.
Step 5: Add branding images
1) Save these chat window and button images to your desktop.


2) Enter Sites in the Quick Find box, then select Sites.
3) Create a Force.com domain if you don’t already have one.
4) Click New.
5) Enter a site name.
6) Select yourself as the Site Contact.
7) Select Active.
8) For Active Site Home Page, use the lookup to select any existing Visualforce page.
9) Click Save.
10) Go to Develop | Static Resources.
11) Click New.
12) Name the image “OnlineButton.”
13) Click Choose File and select the online button image you saved.
14) Select Public for the Cache Control.
15) Click Save.
16) Repeat steps 8–13 for the offline button and chat window images. Name the offline button image “OfflineButton” and the chat window image “ChatWindow.”
Step 6: Create a Chat button
1) Enter Chat Buttons in the Quick Find box, then select Chat Buttons & Invitations.
2) Click New.
3) Select the type Chat Button.or website visitors in real time through a Web-based, text-only live chat.
4) Name your chat button “Chat Button.”
5) Under Routing Information, add your Support skill.
6) Under Chat Button Customization, use the lookup fields to associate your site and button images to the button.
7) Click Save.
6) Copy the button code that Salesforce generates for you and paste it somewhere handy
Step 7: Make Deployment
1) Enter Deployments in the Quick Find box, then select Deployments.
2) Click New.
3) Name your deployment “Chat Deployment.”
4) Enter “Armor Decor Customer Service” for the Chat Window Title.
5) Under Chat Window Branding, use the lookup fields to associate your site and chat window image to the button.
6) Click Save.
7) Copy the deployment code that Salesforce generates for you and paste it with your chat button code snippet.
Add live agent to the console and test you chat
Add Live Agent to the Console
We will have to make a separate Service Console and enable it for Live Agent.
1) Go to Create | Apps and click New.
2) Select Console.
3) Click Next.
4) Enter “Armor Decor Console” for the App Label.
5) Click Next to skip adding a console logo.
6) Click Next.
7) Select your Navigation Tab items. We recommend Accounts, Cases, and Contacts to start.
8) Click Next.
9) Select your primary tabs and subtabs, and click Next.
10) Select Include Live Agent in this App, and click Next. We’ll talk about the additional options in the Live 11) Agent Basics module.
12) Select visibility and default settings. Make sure that the console is visible and default for you, the System Administrator.
13) Click Save.
Test the app
First, you need a Visualforce Page to act as a website. This is where you’ll place the button and deployment code snippets.
1) Go to Develop | Visualforce Pages.
2) Click New.
3) Enter the label “Start Chatting” (with the developer name Start_Chatting) and the description “Start your Live Agent chat!”
4) Add the following to your page:
<apex:page >
<!--
/**
* Webkul Software.
*
* @category Webkul
* @author Webkul
* @copyright Copyright © 2000-2016 salesforce.com, inc. All rights reserved.
*/
-->
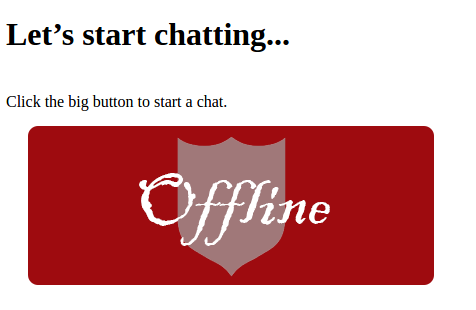
<h1>Let’s start chatting...</h1>
<br />
Click the big button to start a chat.
<br />
<!--Button Code-->
<img id="liveagent_button_online_573280000004G6W" style="display: none; border: 0px none; cursor: pointer" onclick="liveagent.startChat('573280000004G6W')" src="https://[your-site]Chatty/resource/1476691397000/OnlineButton" /><img id="liveagent_button_offline_573280000004G6W" style="display: none; border: 0px none; " src="https://[Your-Domain Name]/resource/1476691381000/OfflineButton" />
<script type="text/javascript">
if (!window._laq) { window._laq = []; }
window._laq.push(function(){liveagent.showWhenOnline('573280000004G6W', document.getElementById('liveagent_button_online_573280000004G6W'));
liveagent.showWhenOffline('573280000004G6W', document.getElementById('liveagent_button_offline_573280000004G6W'));
});</script>
<!--Deployment Code-->
<script type='text/javascript' src='https://c.la10.salesforceliveagent.com/content/g/js/38.0/deployment.js'></script>
<script type='text/javascript'>
liveagent.init('https://d.la10.salesforceliveagent.com/chat', '57228000000L2SV', '00D28000001Jm90');
</script>
</apex:page>
5) Click Save.
6) Go back to Develop | Visualforce Pages.
7) Click Launch icon next to your new Visualforce Page. We recommend keeping the page in a separate browser window, so you can easily access it while you’re in the console.
8) Your Visualforce Page should display your offline chat button. Let’s go online!
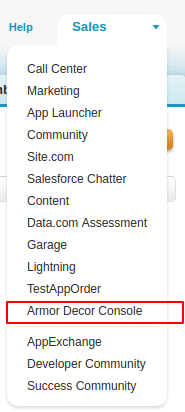
9) Go to your Setup window and use the app picker to open Armor Decor Console.
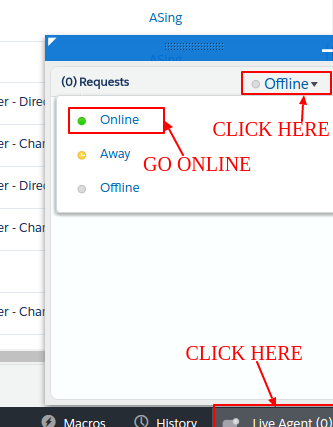
10) Open the Live Agent widget at the bottom of the page and change your status to online. Now you can receive chat requests!

11) Go back to your Visualforce Page. Refresh it. Since you’re online in the console, the button should change to an online button.

Click the chat button to request a chat.
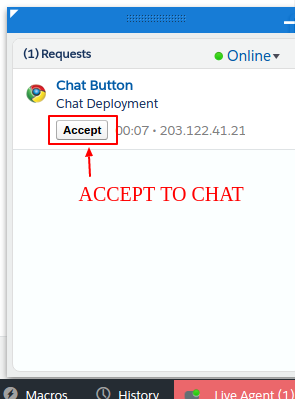
12) If a chat window appears and you get a notification in the console, everything’s working perfectly. Great job! Go ahead and accept the chat request from the console to start your chat (with yourself).
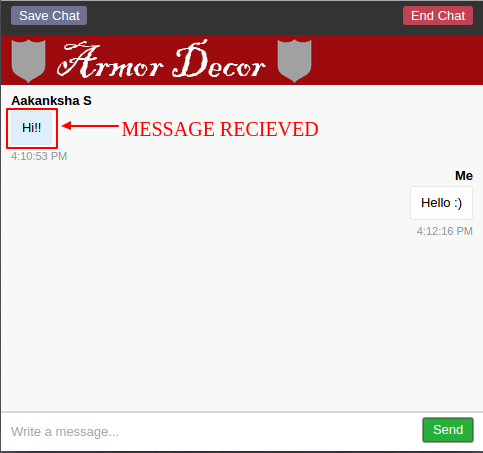
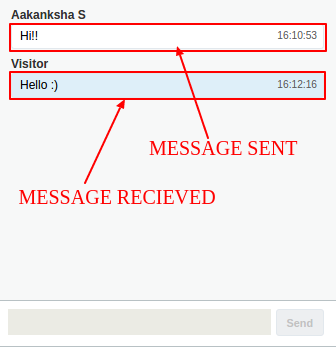
Chat as much as you’d like, then end the chat using the End Chat button on either the chat window or the console.
Read More: Exotel CTI integration with Salesforce is a virtual contact center solution

Be the first to comment.