Salesforce Exotel CTI Connector
Updated 14 October 2025

The easiest way to manage your business processes is to let your business processes ‘talk’.Using Salesforce Exotel CTI connector in Salesforce, any customer data that’s associated with an incoming phone number automatically pops up on your screen.
Whenever a customer calls, their information appears front and center for your support agents so that agents have everything they need to help the customer.No more time spent searching, scrolling, or clicking for information about a customer.
Salesforce Exotel CTI Features:
- Build complicated call flows that can combine all of your customer interaction and give you the whole picture.
- Simple Drag and Drop interface with every information available on SoftPhone. You can locate a SoftPhone in a Salesforce Console.
- Call tracking: Keeps a track of the Conversations with your customers in Activity History.
- Enabled with both Inbound and Outbound Calling.
- Missed call solution: A simple missed call to a virtual phone number provides you with an option to generate those calls as Leads.
- Go Wireless: Say no to wires and servers and highly Reliable.
- Save cost by Process Automation.
- Multiple Exophone for Outgoing & Incoming Calls: A functionality to enable different users with different exophone numbers for outgoing & incoming calls.
New Feature Functionality & Configuration for Salesforce Exotel CTI:
Multiple Exophone for Outgoing Calls & Incoming Calls:
Functionality to enable different users with different exophone numbers for outgoing & incoming calls.
Multiple Exophone for Outgoing Calls: Configuration at Salesforce End:
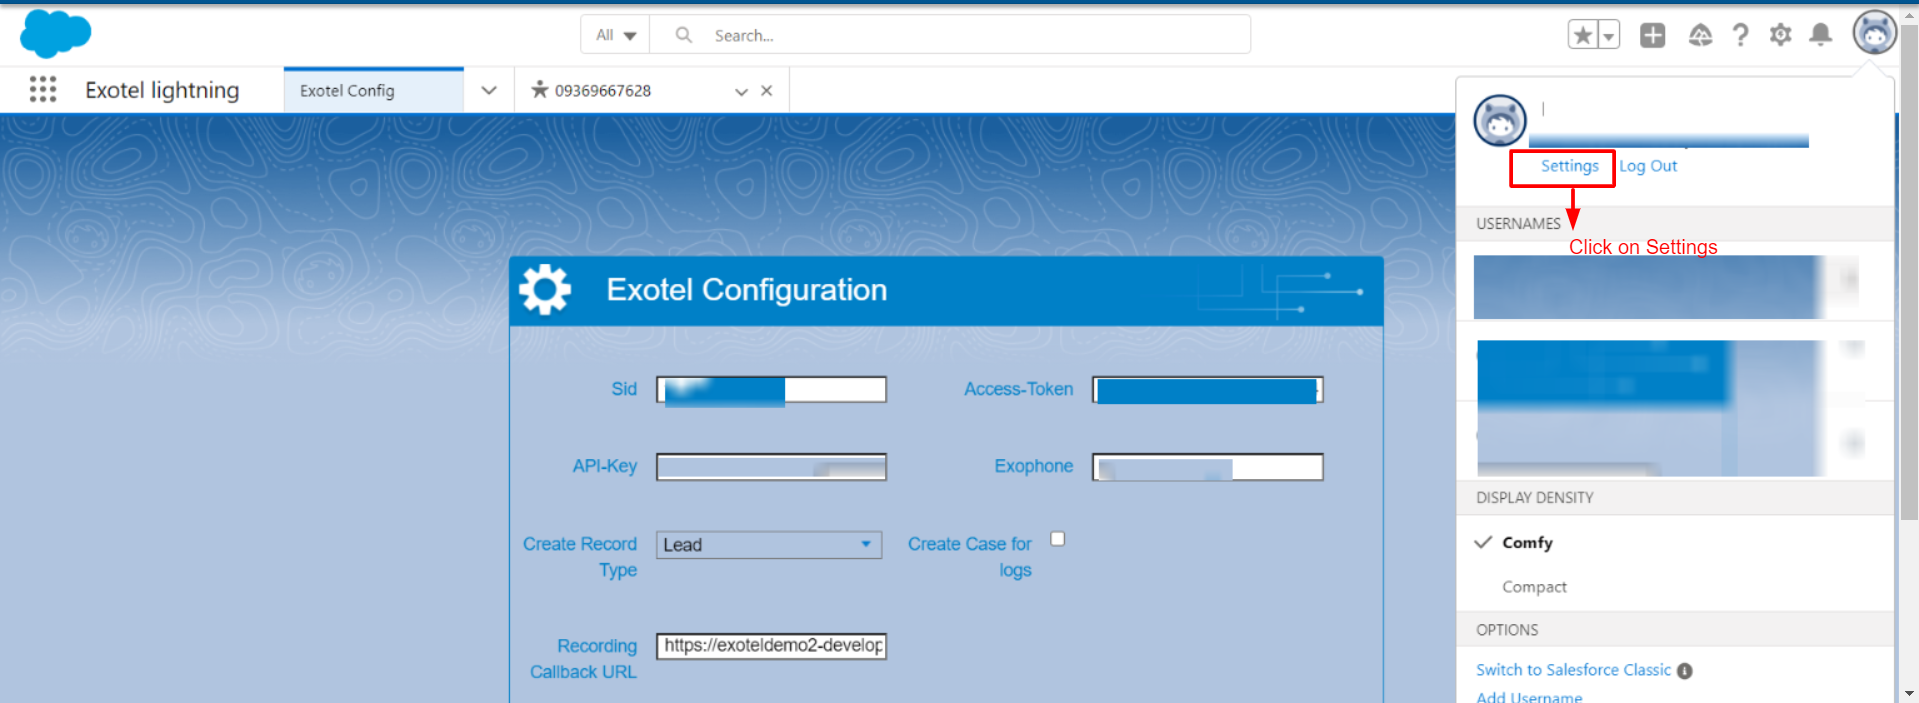
First, you need to fill in all the details for Exotel Configuration in the Exotel Configuration page as shown below:

Secondly, if you need to assign a different exophone number to your multiple agents, then you need to configure these settings at Salesforce End.
For this, first, you need to go to Object Manager and then search for User as shown below:
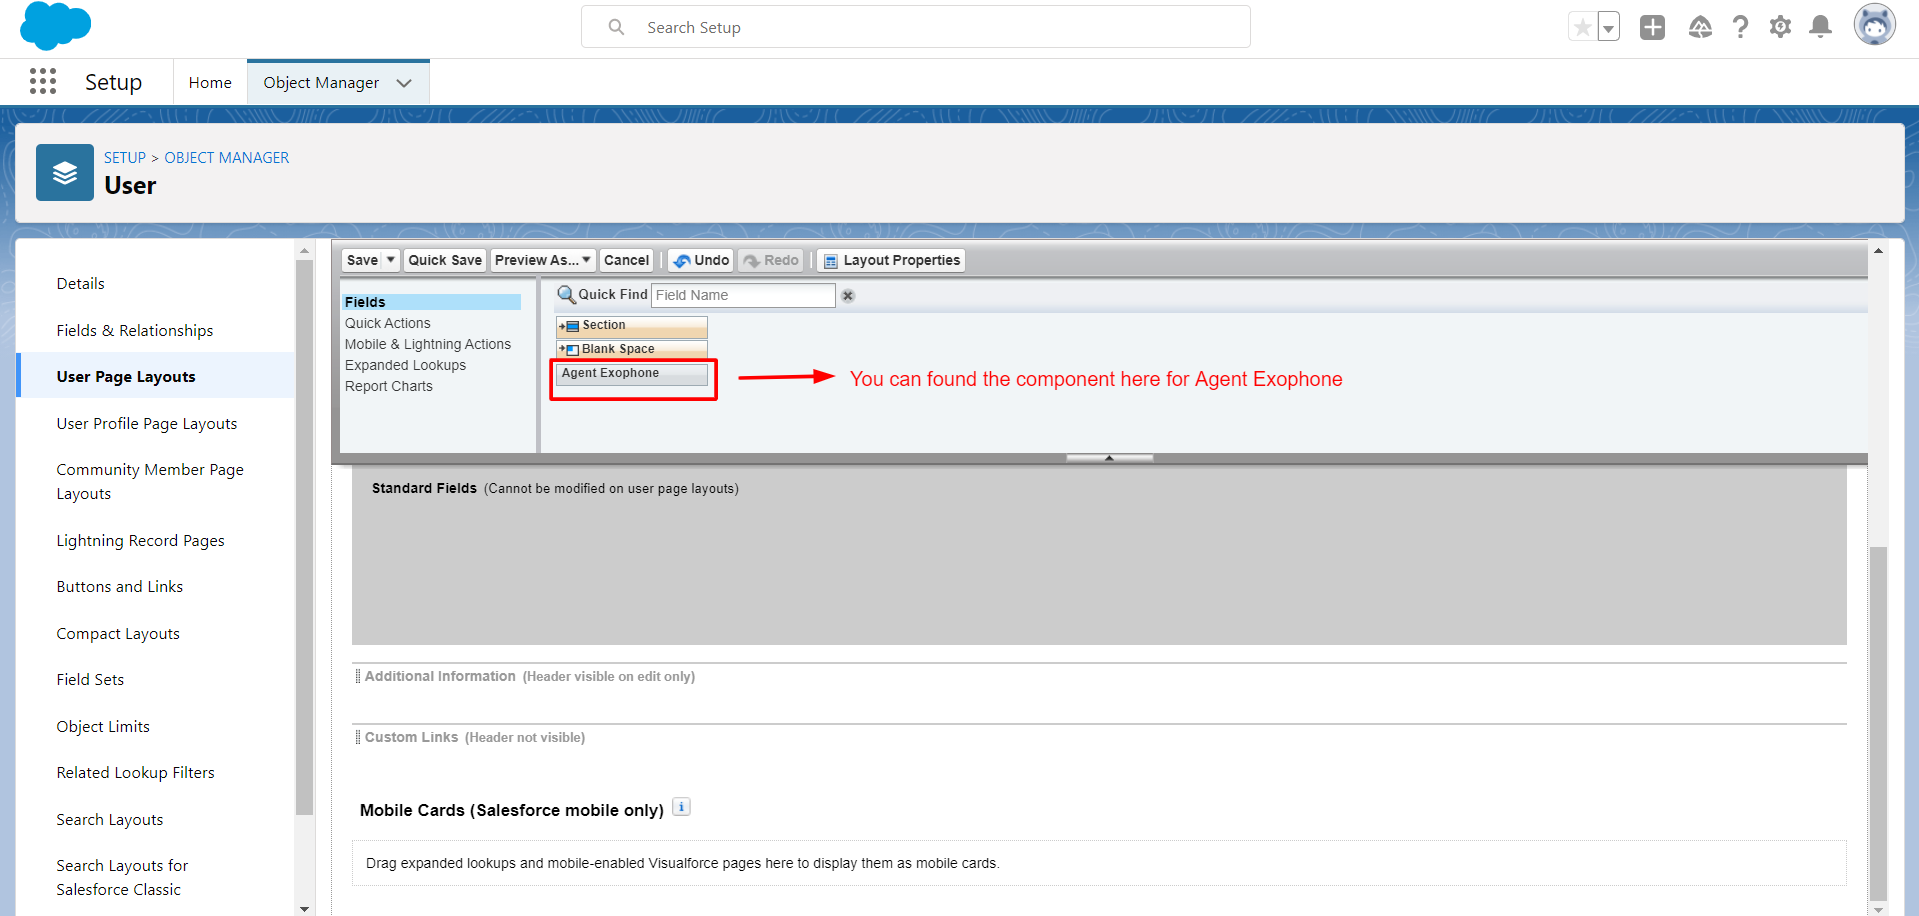
Adding Agent Exophone Component:

Now you need to click on the User Page Layouts option and Click on Edit for the user for which you would like to add a different number for Exophone.

Afterward, as shown below you can now easily select, drag, and drop the Agent Exophone component in the Additional Information Section as shown below:

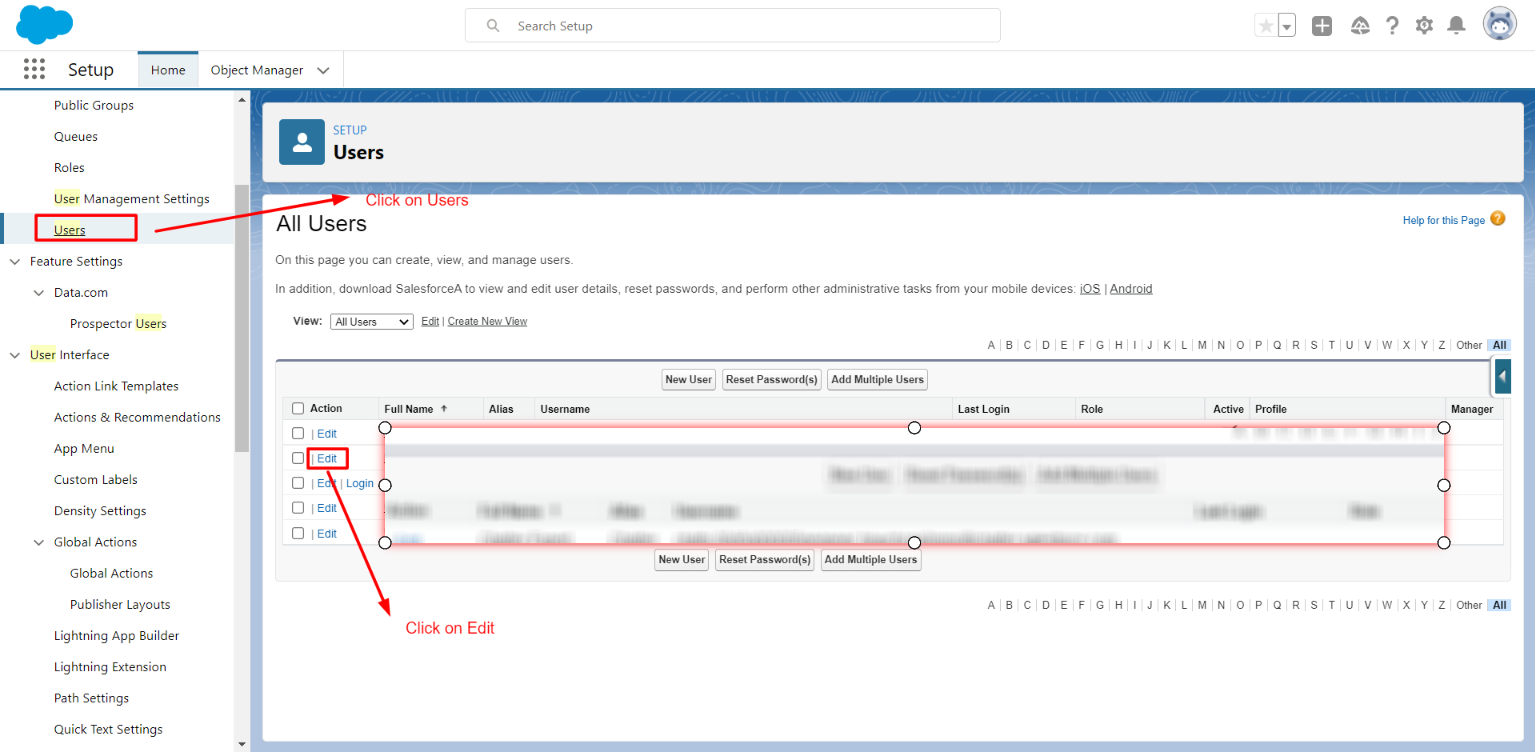
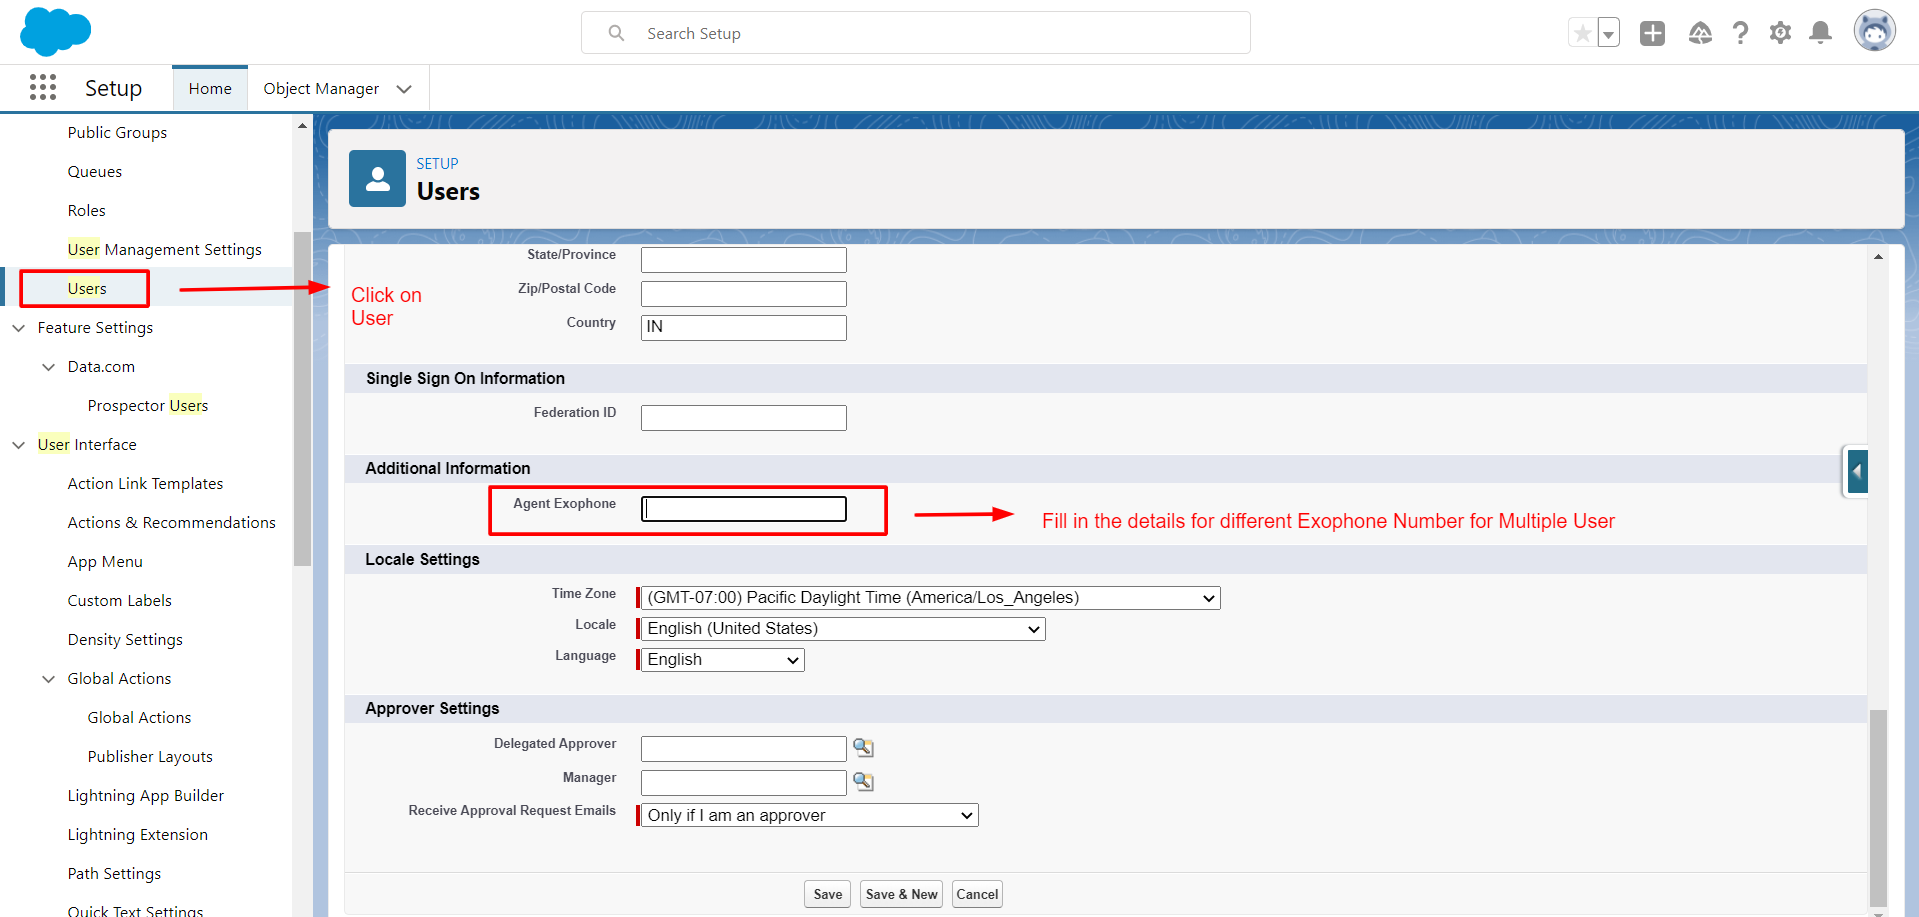
Configuring Agent Exophone Component with Different Exophone Number:
After you put in the component in the User Page, you need to go to Users, and then, click on edit, when you scroll down the page below, you will find the “Additional Information” section under that you will assign a different “Agent Exophone” number and then click on Save to save these details.
Configuration for Salesforce Exotel CTI at Exotel End::
You need to perform these steps for setting up Multiple Incoming Calls at Exotel End:
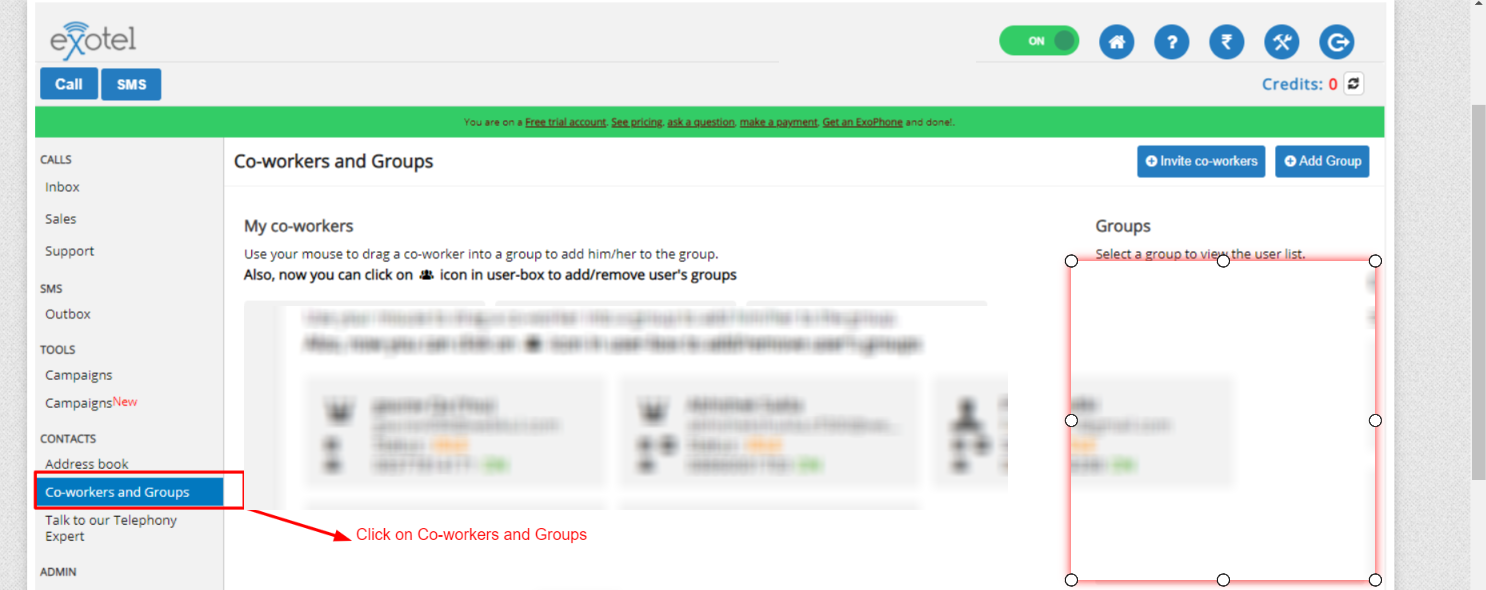
For this, first, you need to Login into your Exotel.com account, upon login, you will see this page:
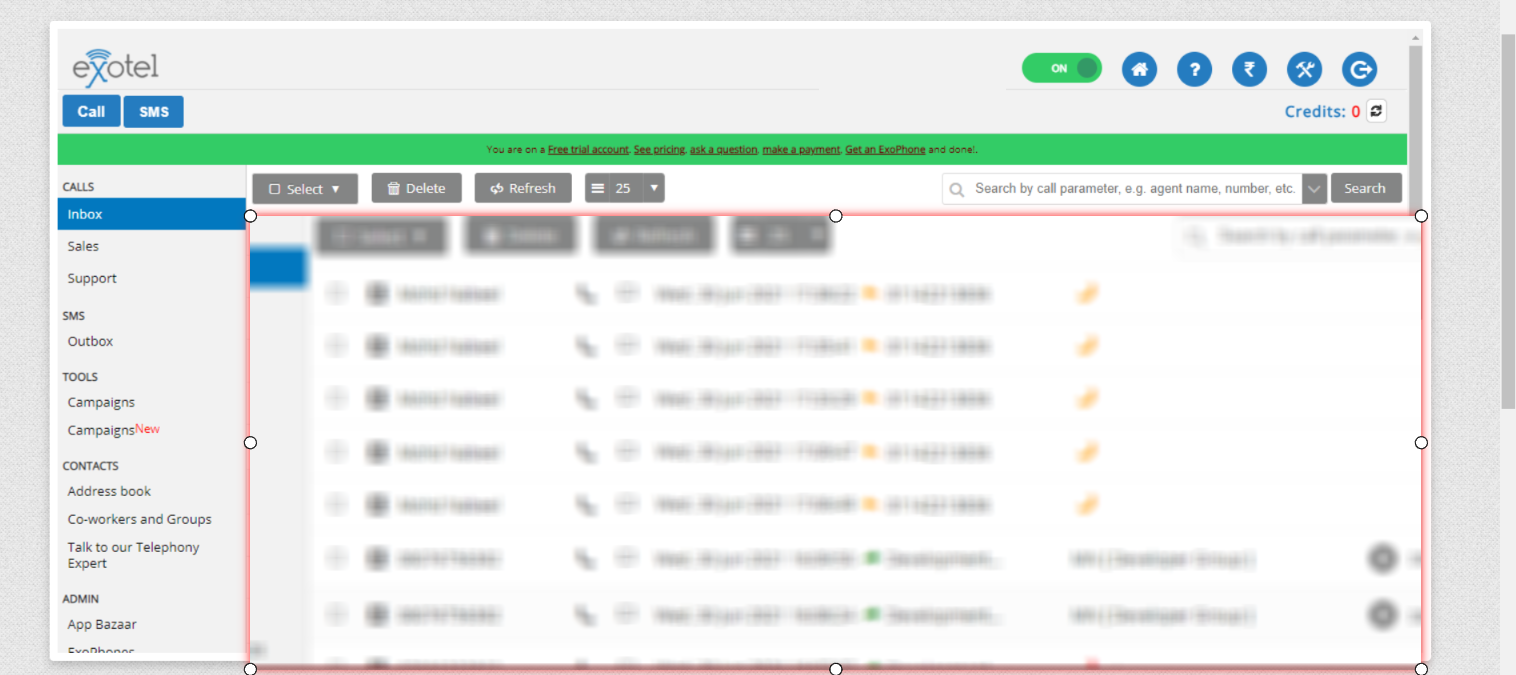
Now, you have to Click on Co-workers and Groups.
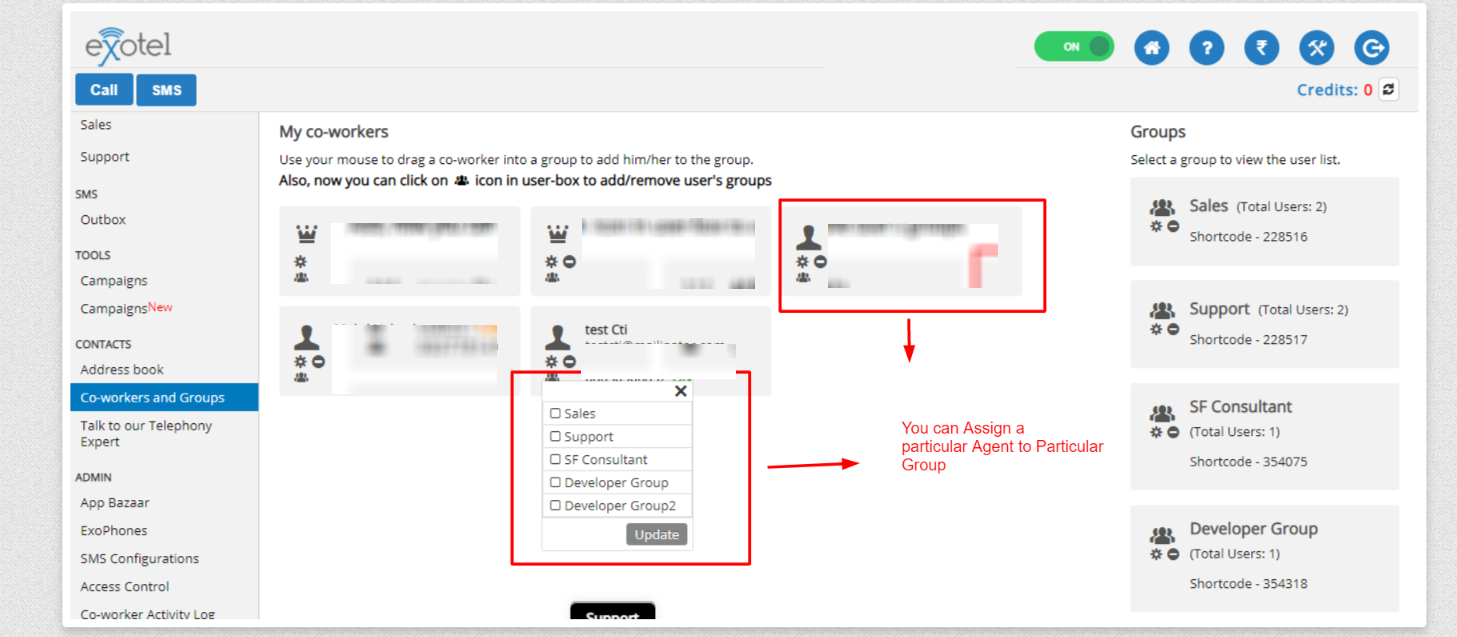
Now you need to click on Add Group to create a group and assign a group name and an email Id.

For your usability, you can create as many groups as you want.
For instance: let’s suppose you have five Agents then you can create five different groups and Invite your Co-workers to join the group
You can also add them inside the group. Also, you can Assign each agent to a specific group.
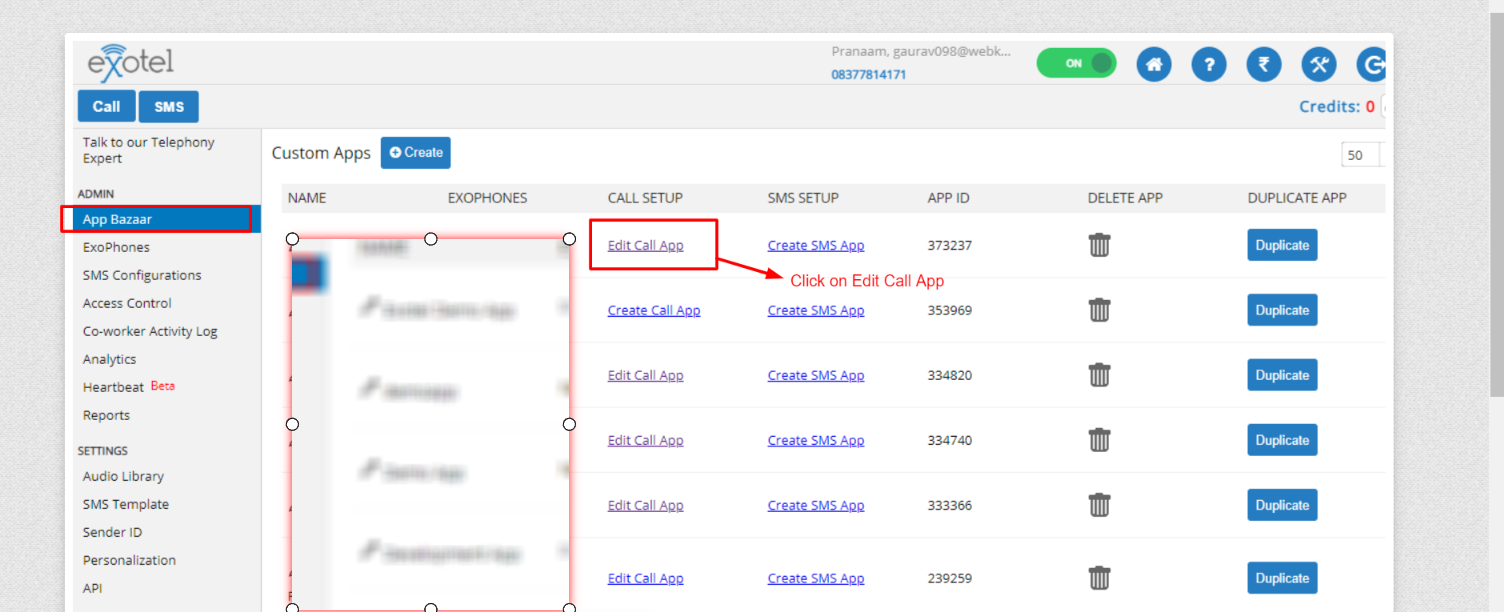
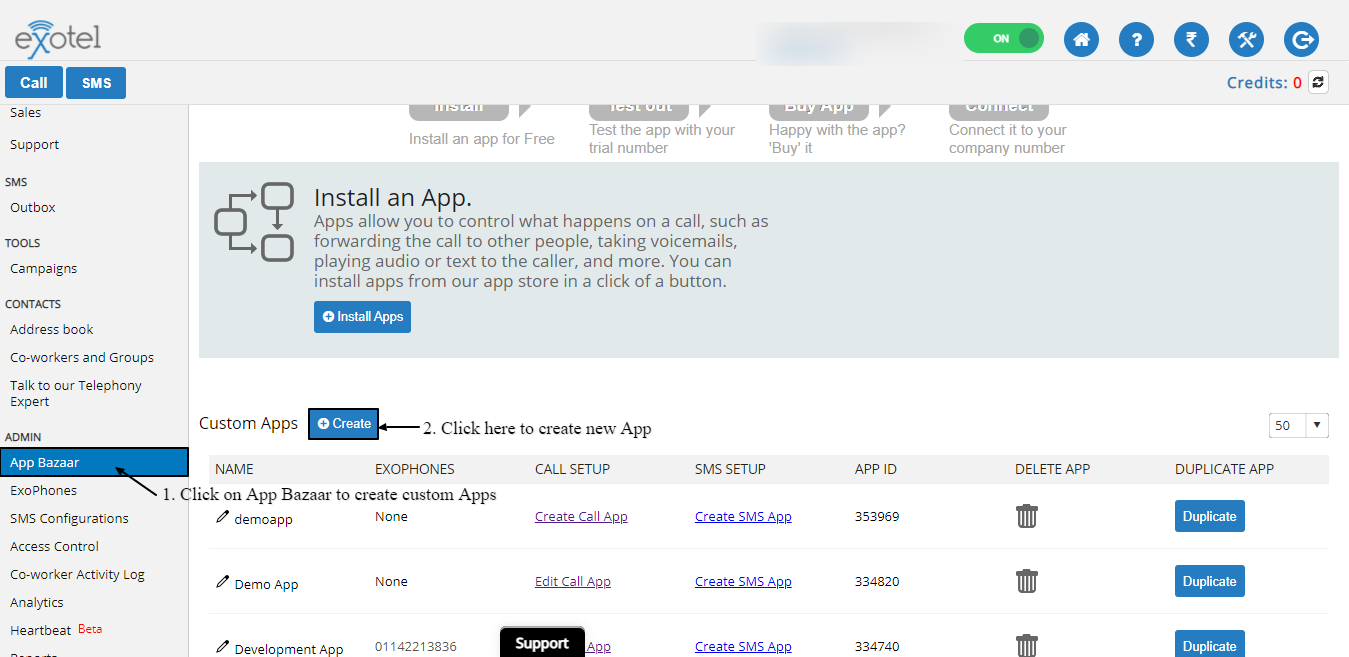
After assigning them a group, you need to go to App Bazaar, and under the admin section, you can create 5 apps for each group.
Now you need to go to Exophones under App Bazaar, from here you can assign Exophone to each flow or app.

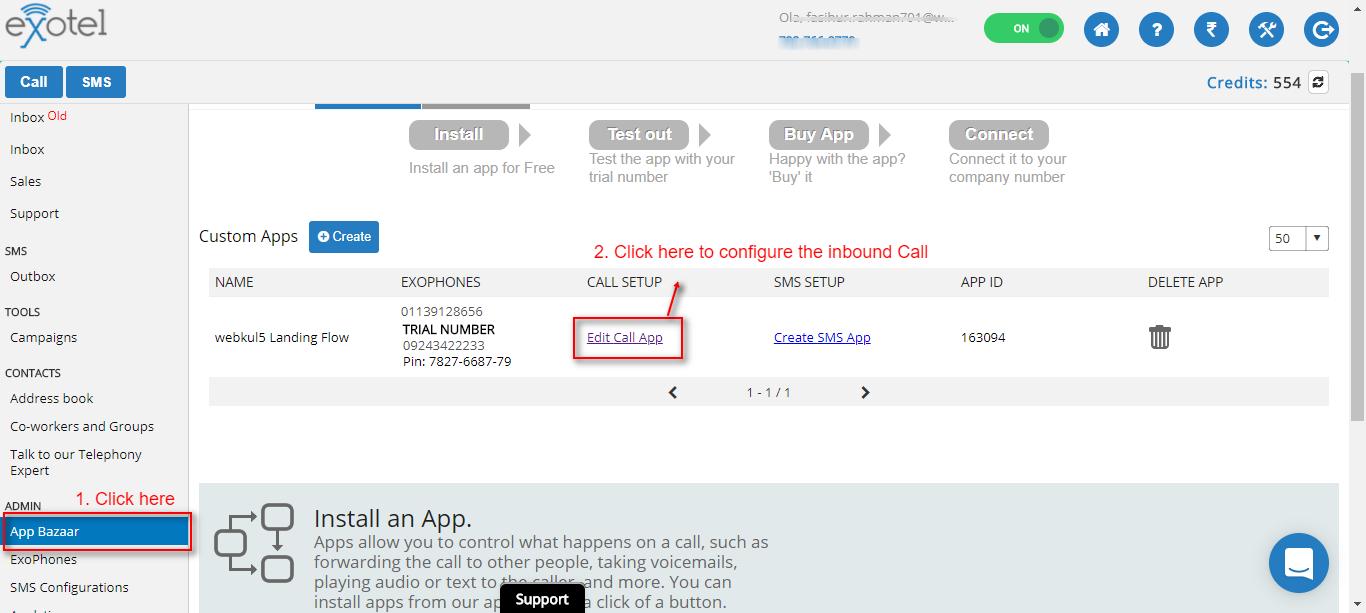
After assigning them then go back to the app bazaar and click on “Edit Call App” from any of the five apps.
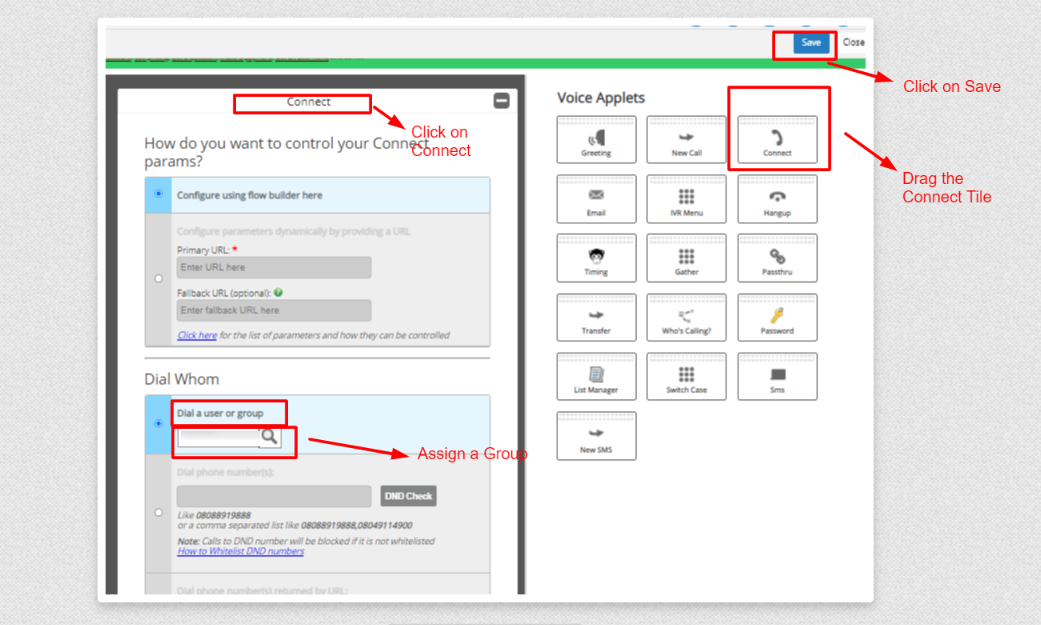
After clicking on it you will see a screen like this, from where you can drag and drop the components to the IVR menu from the Voice Applets:

Click on the IVR menu and Type in the Welcome message and Click on Save.

Now you need to drag Connect tile on the IVR Menu and click on the Connect Tile, upon clicking you need to choose a group under “Dial a User or Group”
Afterward, you need to scroll down and then copy-paste the site URL in Create Pop Up field
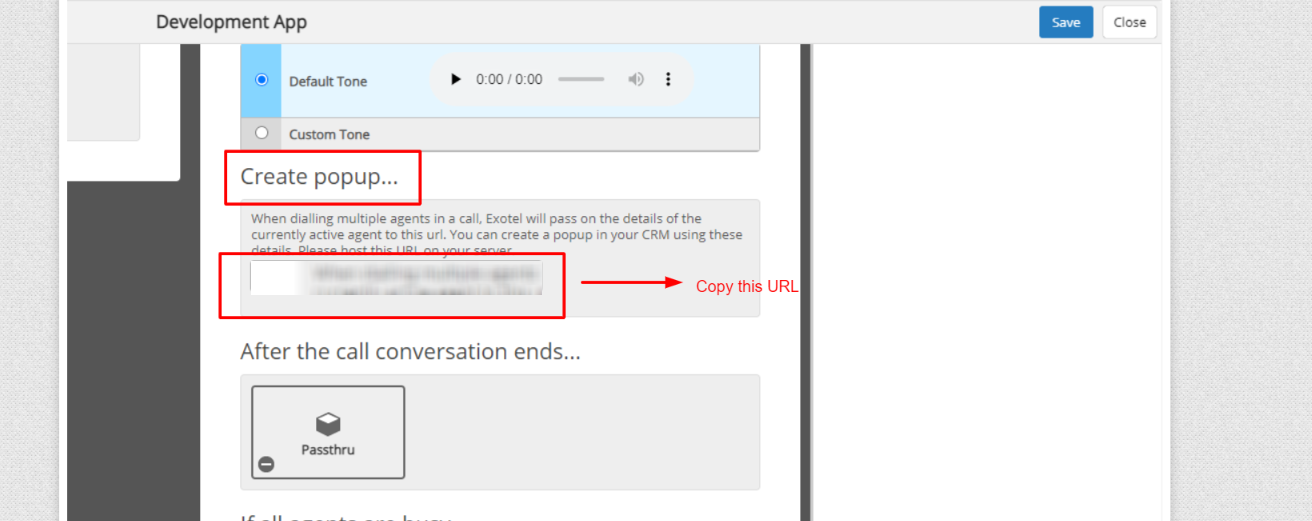
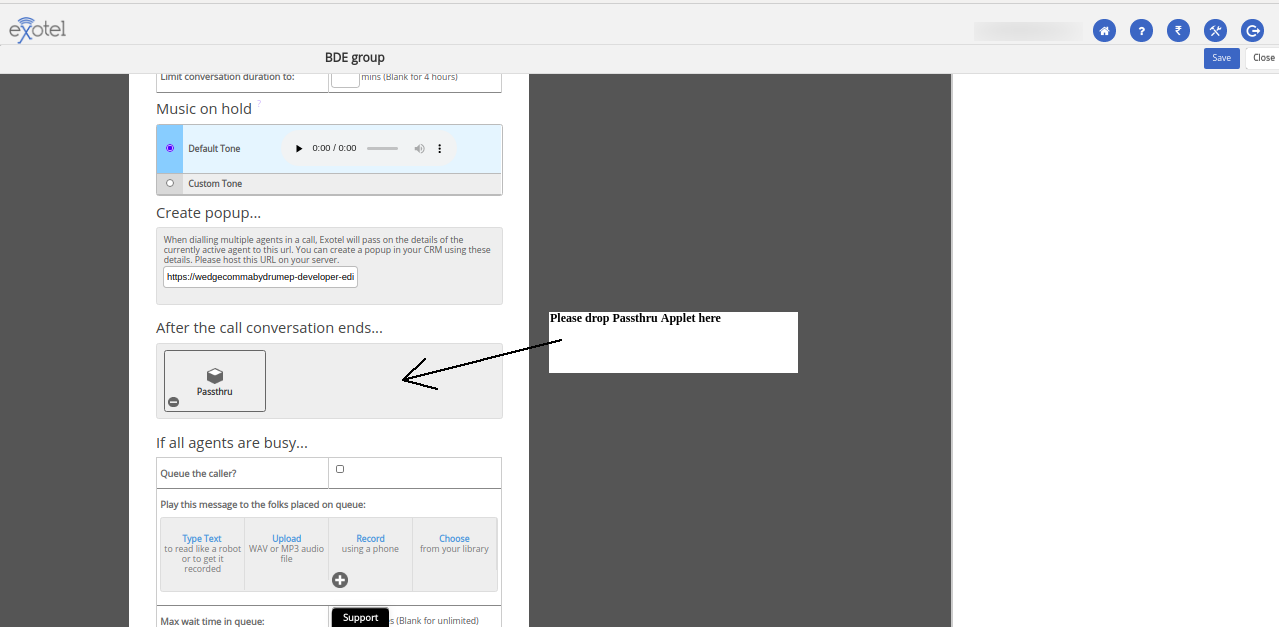
Now you need to drag the Passthru tile under “After the Call conversation ends.
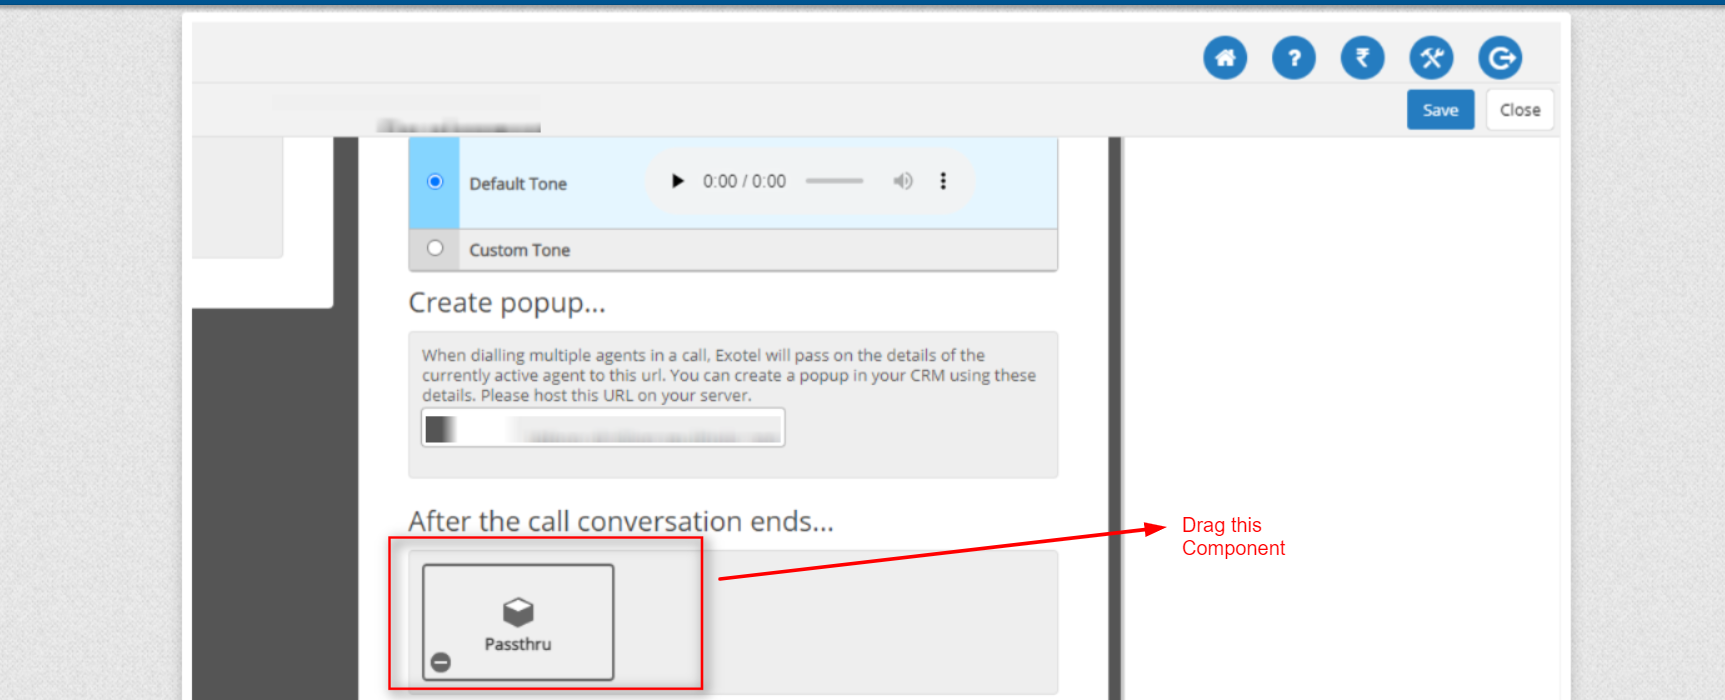
After Dragging the component, you need to paste the exact same URL that we have copied in the above steps and paste it the section as shown below:

***Note***: You can perform the same steps for all the five apps created.
Installation Link: Contact with eShopSync
Configuration at Exotel CTI Configuration
- Step 1: First, click on Home Tab and if you are already not in there and then you need to click on the API tab as shown in the screenshot below:
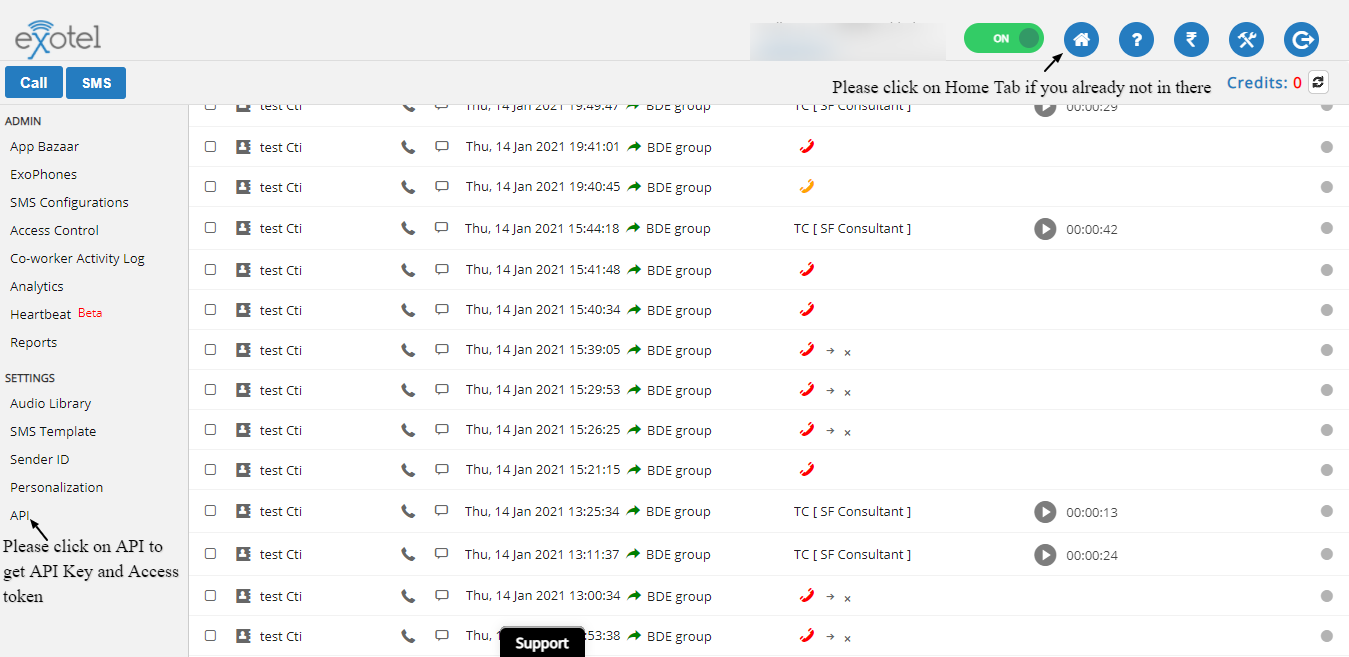
- Step 2: After that, start Clicking on API please copy the Account SID as that needs to fill in the Exotel Configuration at the Salesforce end.
If you don’t want to use default API you could create your own API credential as mentioned in
the screenshot below:
Please copy the API Key and Access Token somewhere so that you could provide these detail
when asked in Exotel Configuration in Salesforce
Step 3: Thirdly, we will create an App to manage our call flow for IVR, Greetings, and Permission to generate Pop Up and Recording URL :
For this first you need to click on Home Tab and then secondly, Click on App Bazar as mentioned in the screenshot below :
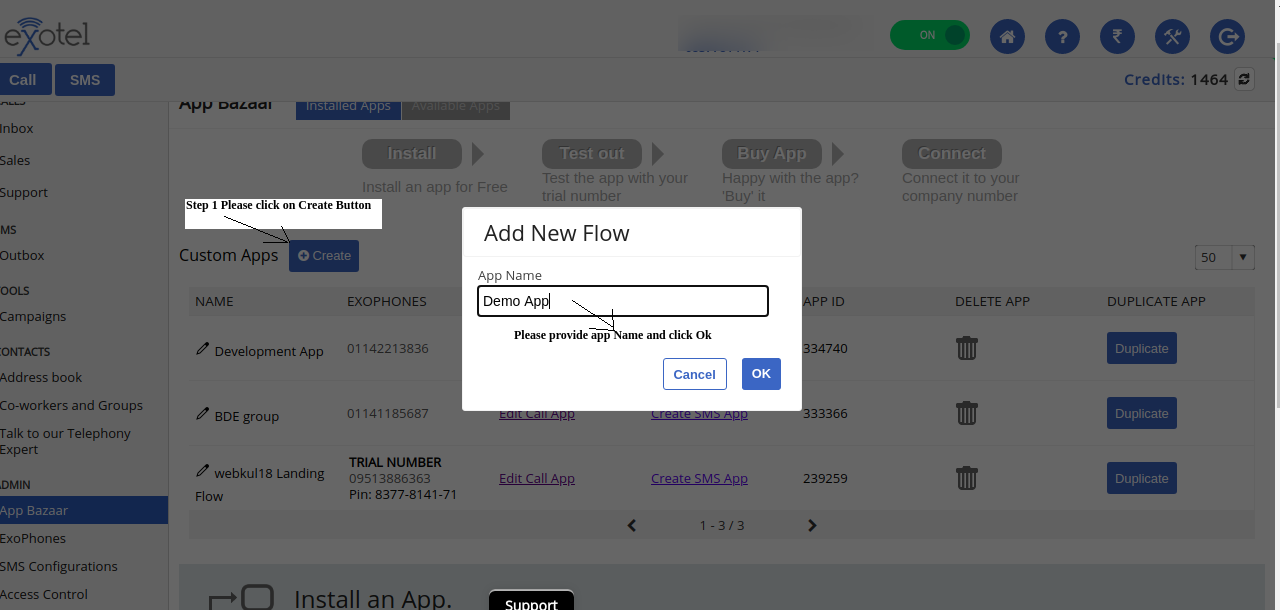
Afterwards, please follow the steps to create an App:
*****Note****: Client can still use their existing call flow but they need to make sure the Passthrough URL and Recording permissions are provided.
As soon as you click on the OK button this will open the Flow to set up further instructions to manage calls and please follow the screenshots to manage the flows: 
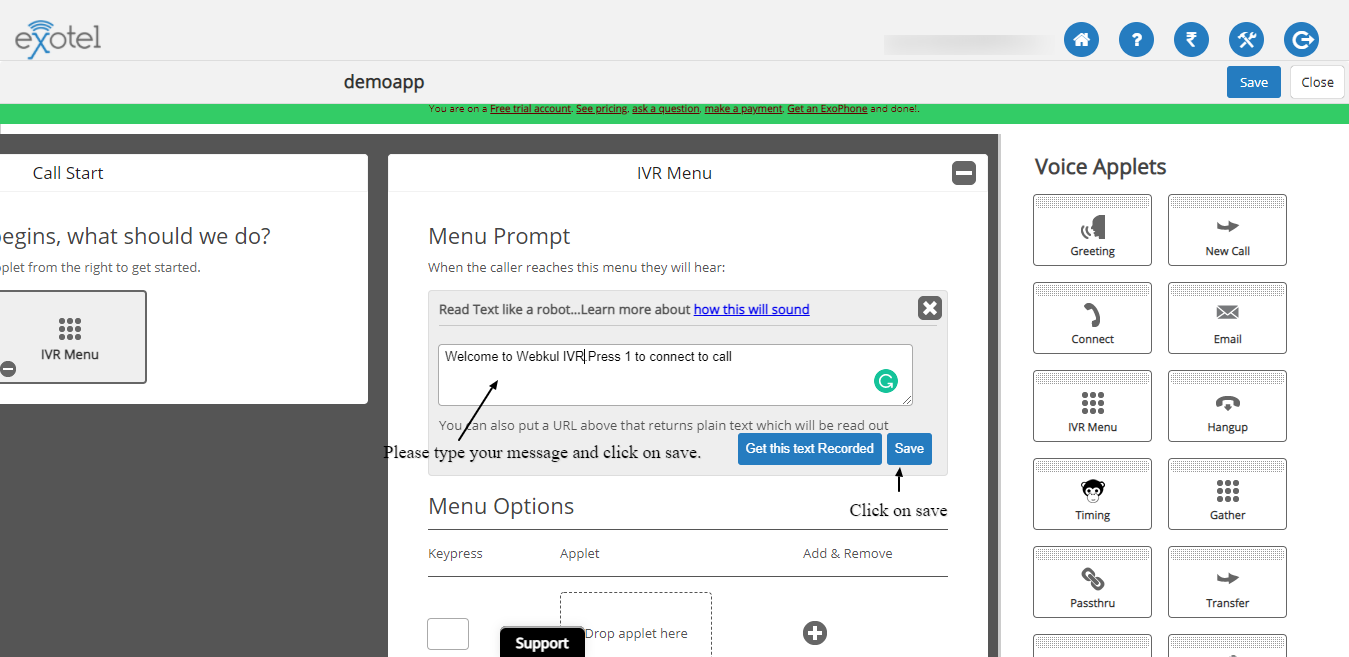
Now we will provide option to select IVR response for reference I will select Type Text :

Please type your Message and Click on Save as mentioned in Screenshot:
After this please Drag and Drop Connect Applet at Given Space as mentioned in screenshot
and same time another Screen will Open to Configure Connect Flow details:
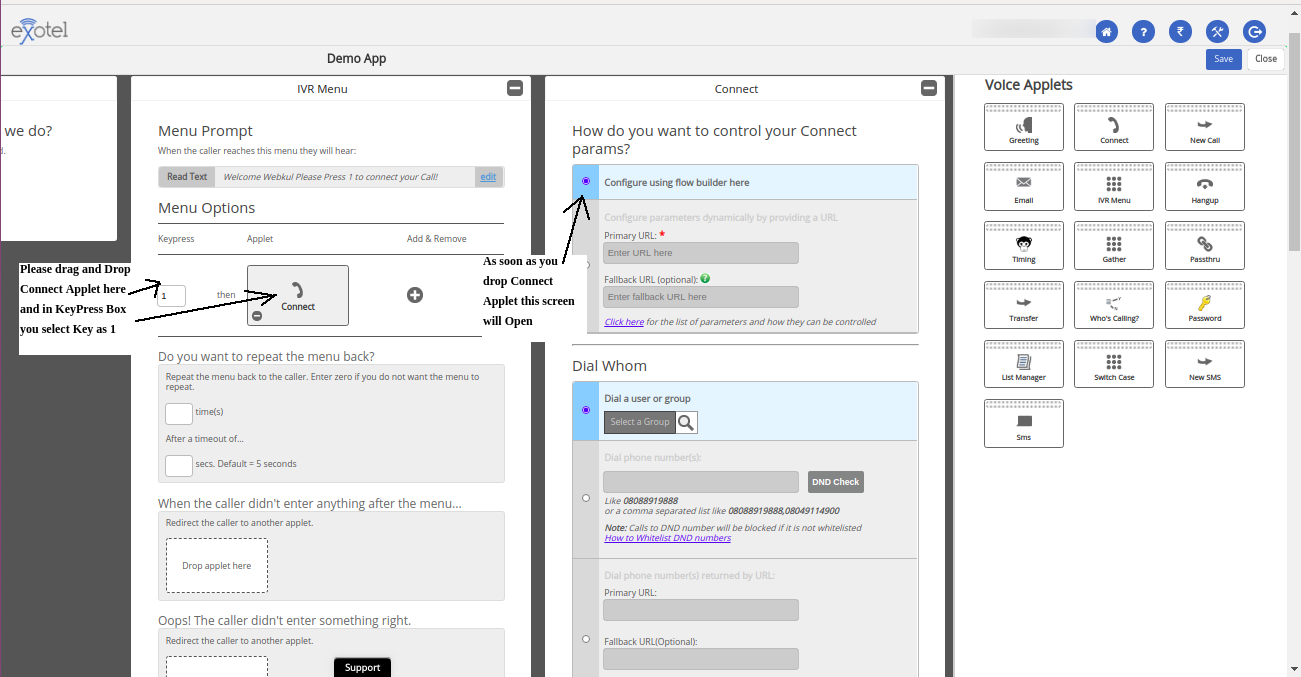
Now we will provide details in Connect Configuration :
Connect Configuration:
a:) We will provide Salesforce Site URL (How to Create Salesforce Site mentioned in this Salesforce Configuration Part )
You need to append /services/apex rest/wk_exo/receive API/ at the end of your Salesforce Site Url so that you can control the flow as well as store the call details in your Salesforce CRM or other applications
In Salesforce your site should have the URL for reference
https://wedgecommabydrumep-developer-edition.ap16.force.com/Exotel
The URL we need to provide here should look like this:
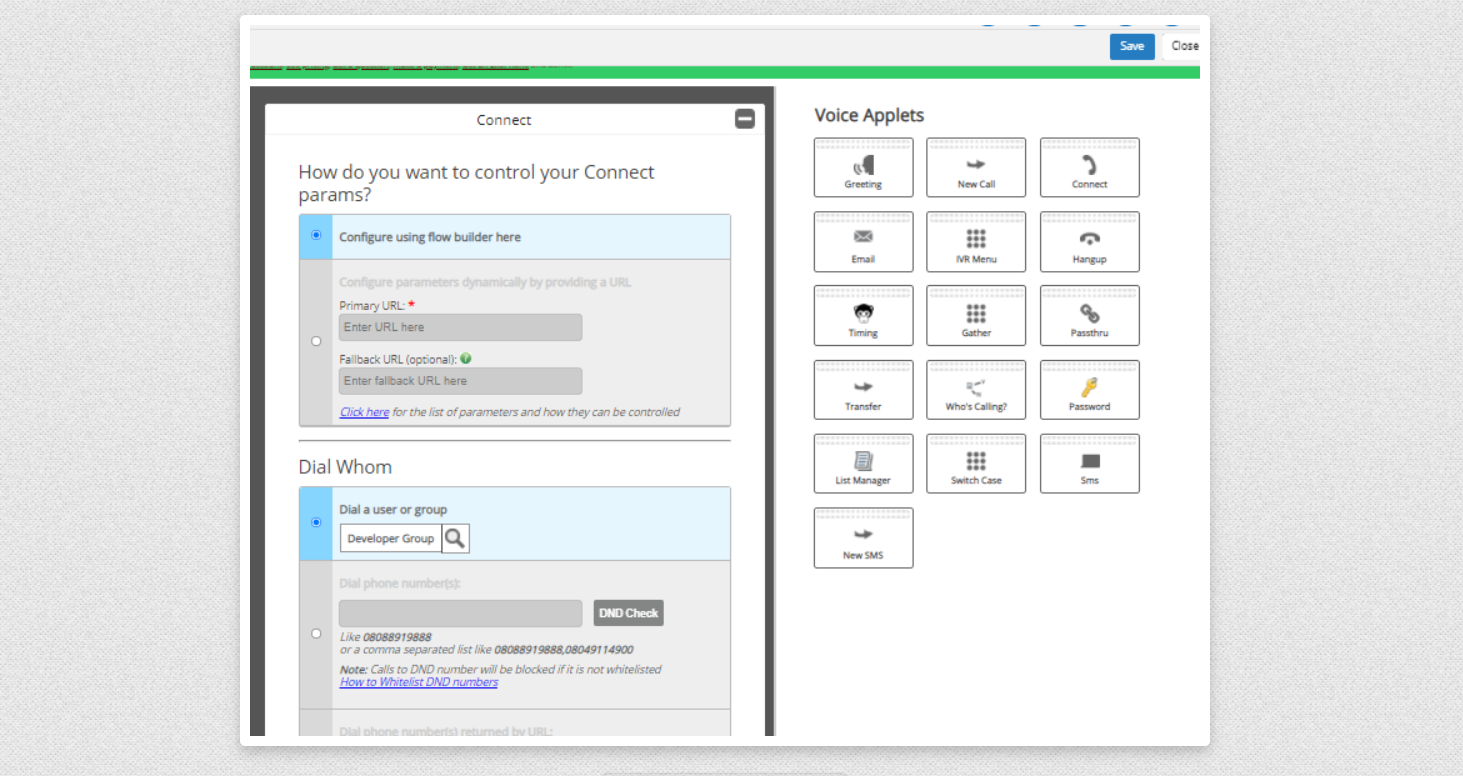
b: We need to mention where the call should route of Exotel User Grop
so please click on the search icon to find the user Group :
c: Down to the Page we will be providing Call Distribution, Recording Permission, and Create Pop up:

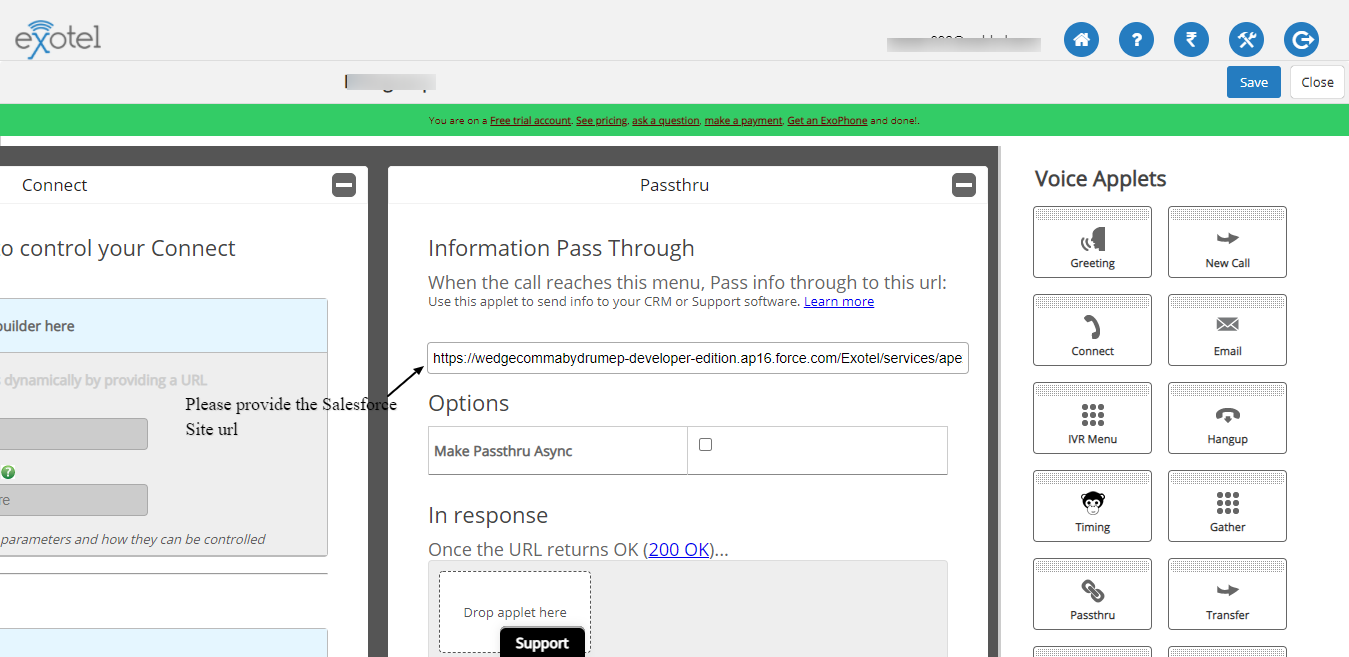
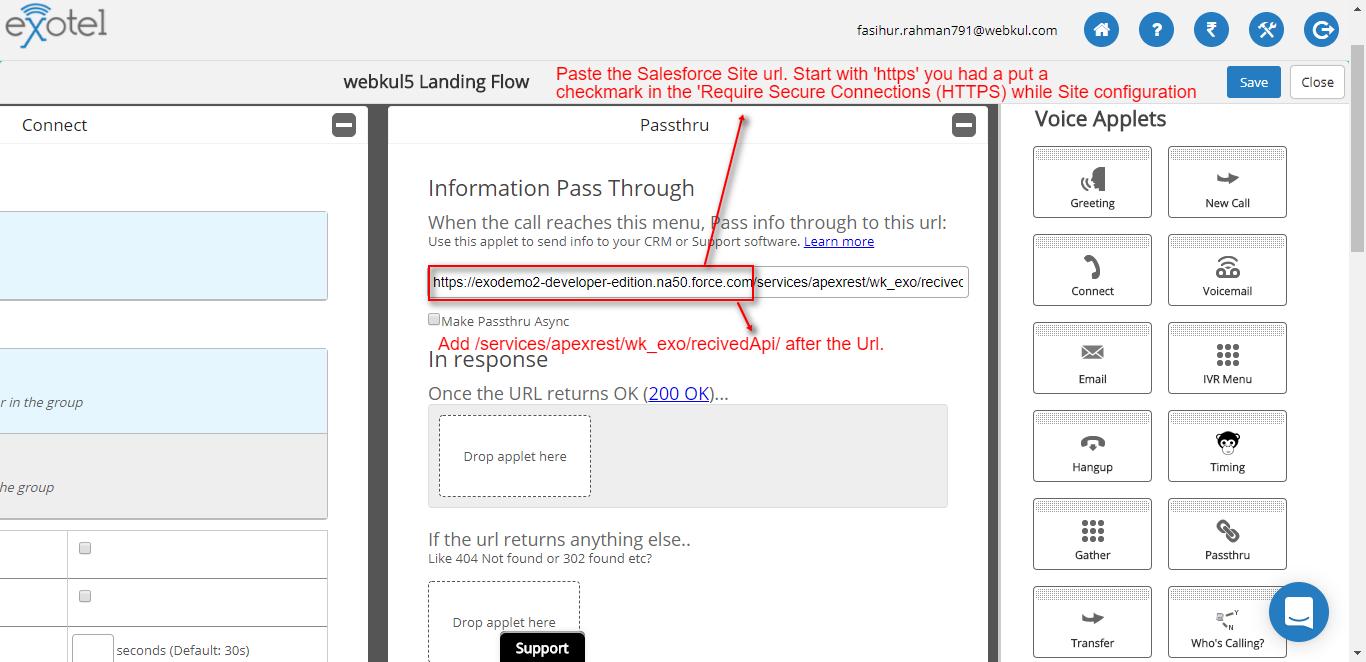
d: In the End, we will be providing the PassThru Applet so that recordings can be Saved at Salesforce End and to do so we will Drop Passthru Applet on
As soon as you drop Passthru Aplet here the next screen will open and where we need to provide
Now, we just need to configure Passthrough Applet in this section.
Note: Using the Passthru applet, you can get Exotel to talk to your Application URL and pass on details about the incoming call as and when it happens.
Your application can now process this information to decide which path (success/failure) the flow should take next. This applet helps to dynamically control the flow as well as store the call details in your Salesforce CRM or other applications.
You need to append /services/apexrest/wk_exo/recivedApi/ at the end of your Salesforce Site Url so that you can control the flow as well as store the call details in your Salesforce CRM or other applications
the same Salesforce site URL as we have provided in the steps above:

Finally please click on Save Button Save your Flow:

Configuration at Salesforce End:
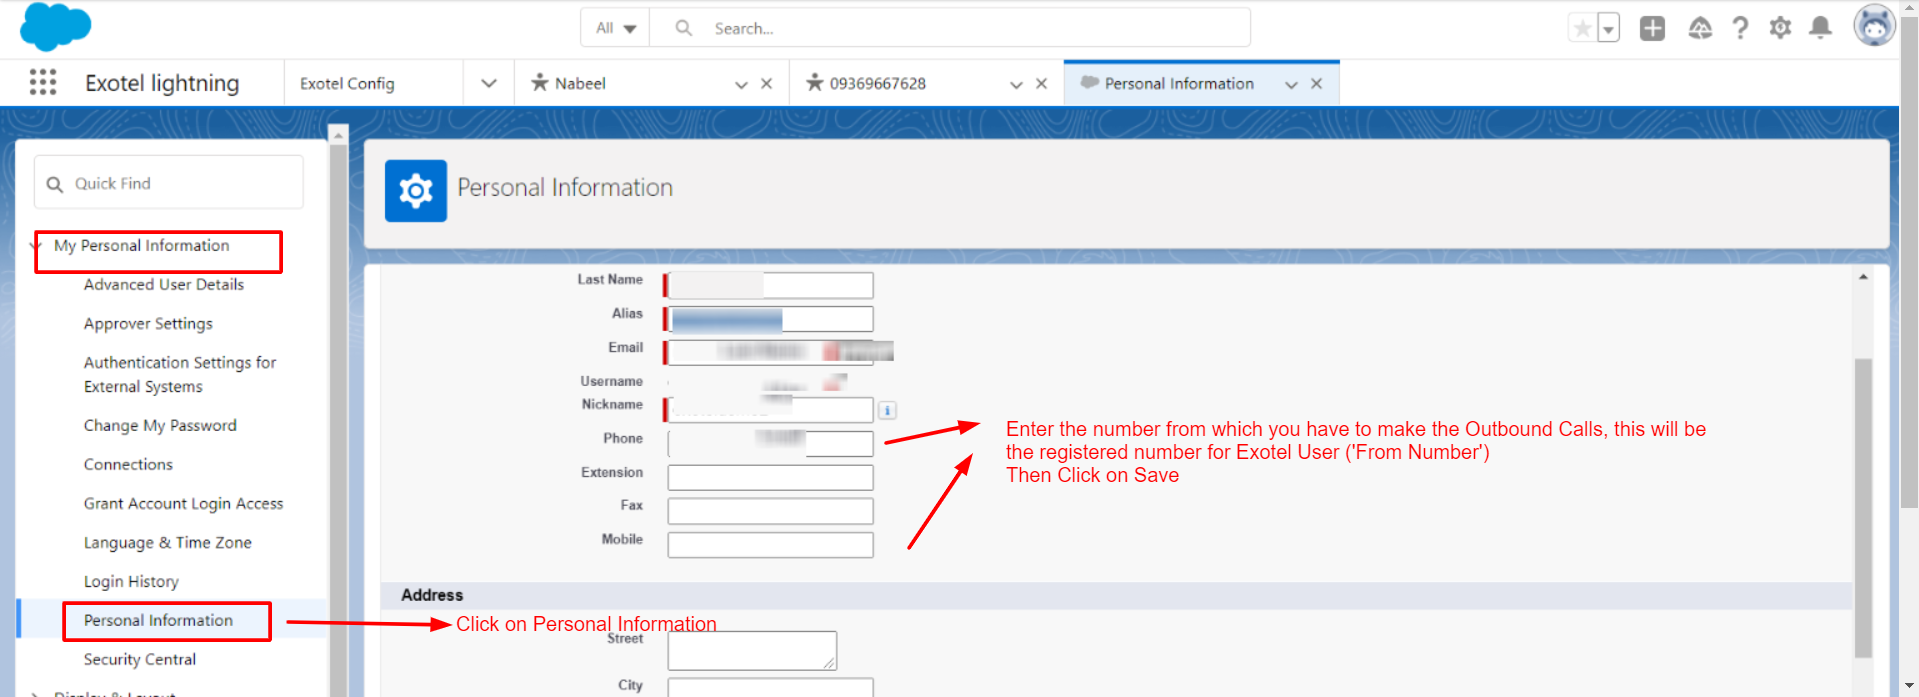
Let’s proceed with Exotel Configuration at the Salesforce end. Before you proceed with the configuration, you need to add the registered Exotel number under the My Personal Information section as shown below:
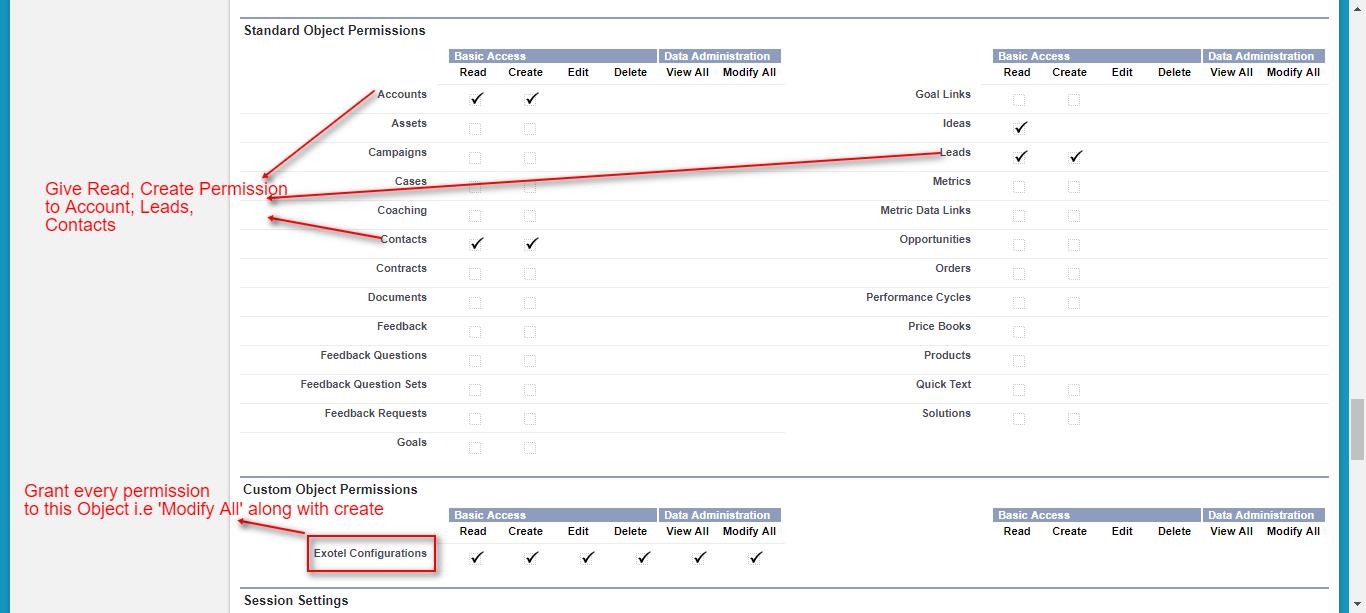
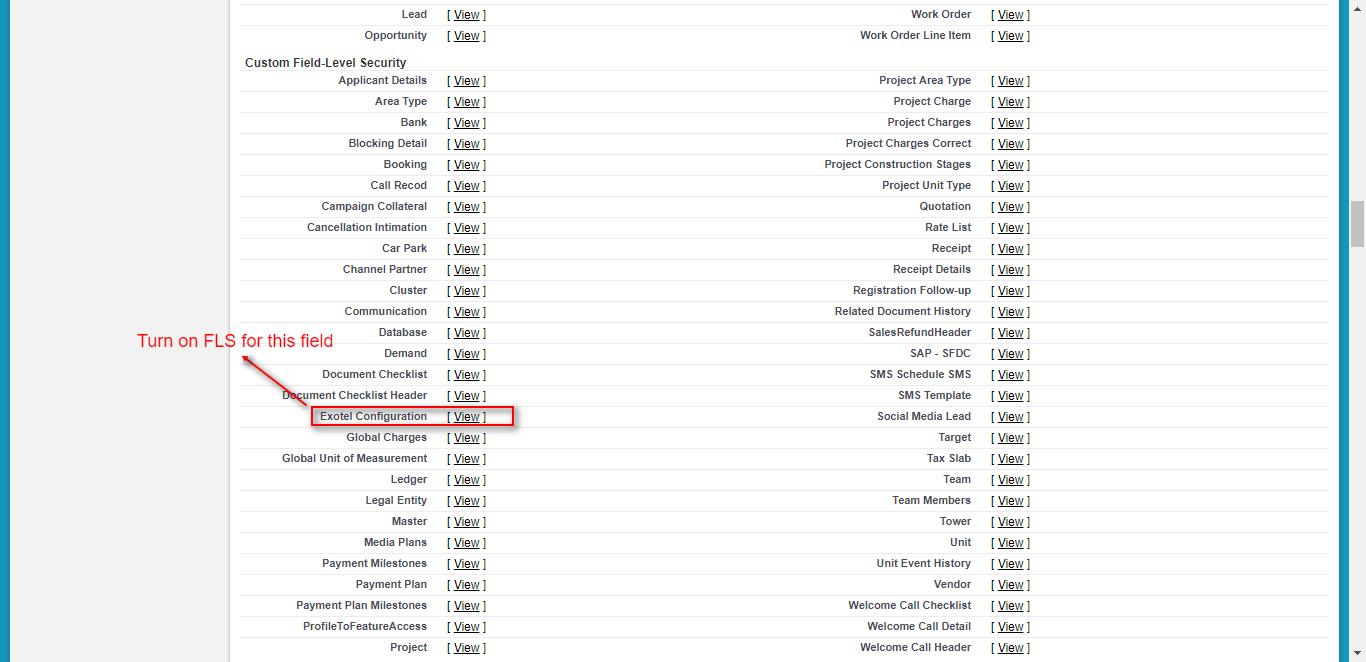
Now you need to set the Field Level Security associated with the Connector.

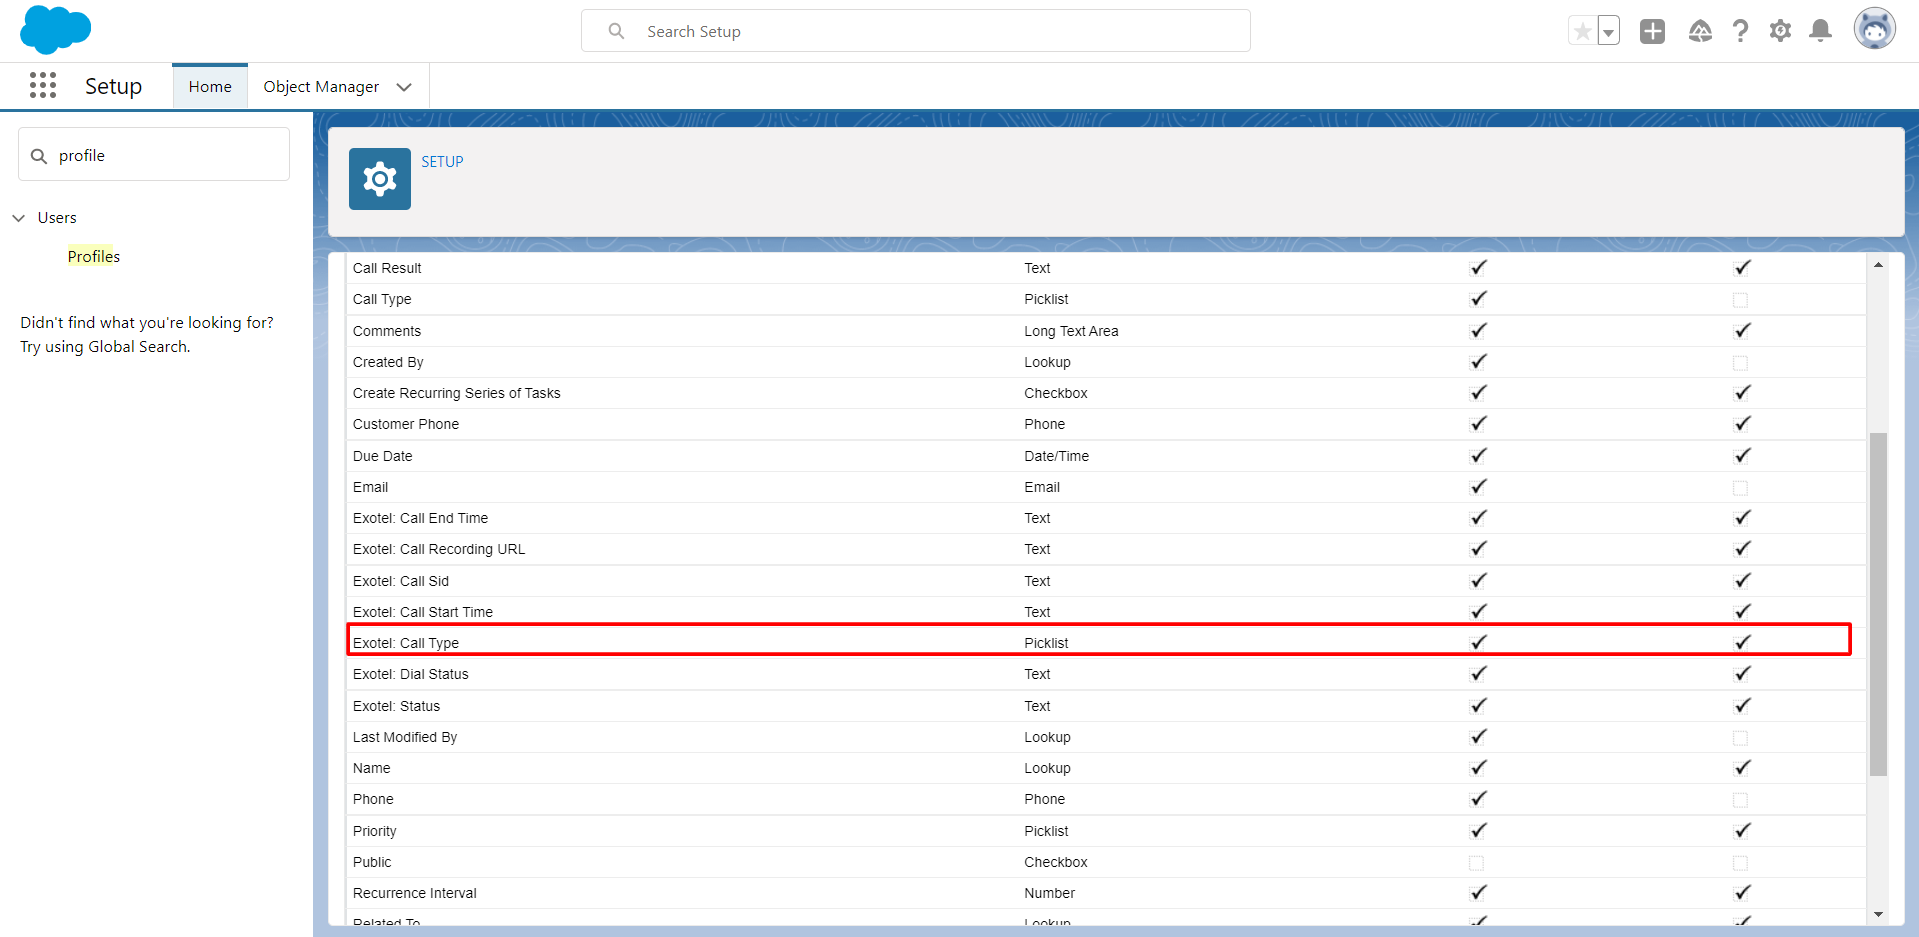
Similarly, do it for every other two fields and click on ‘Save’.
Outbound Calls:
Make an Outbound Call
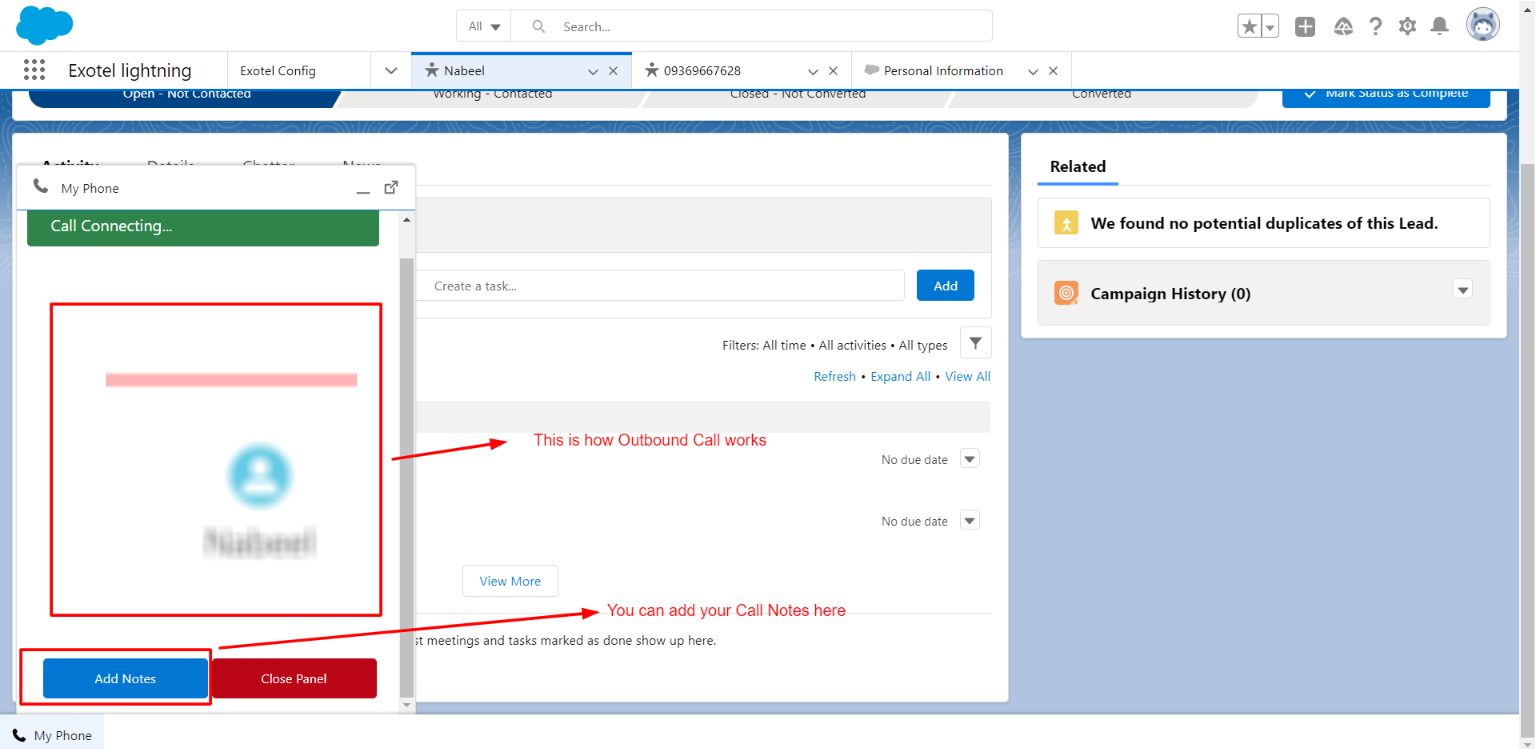
You just need to click on ‘CALL NOW’ button in the Softphone panel in order to make the Outbound Call.
This is how your OutBound Calls will appear when you make a call to any registered number on Exotel.

Inbound Calls:
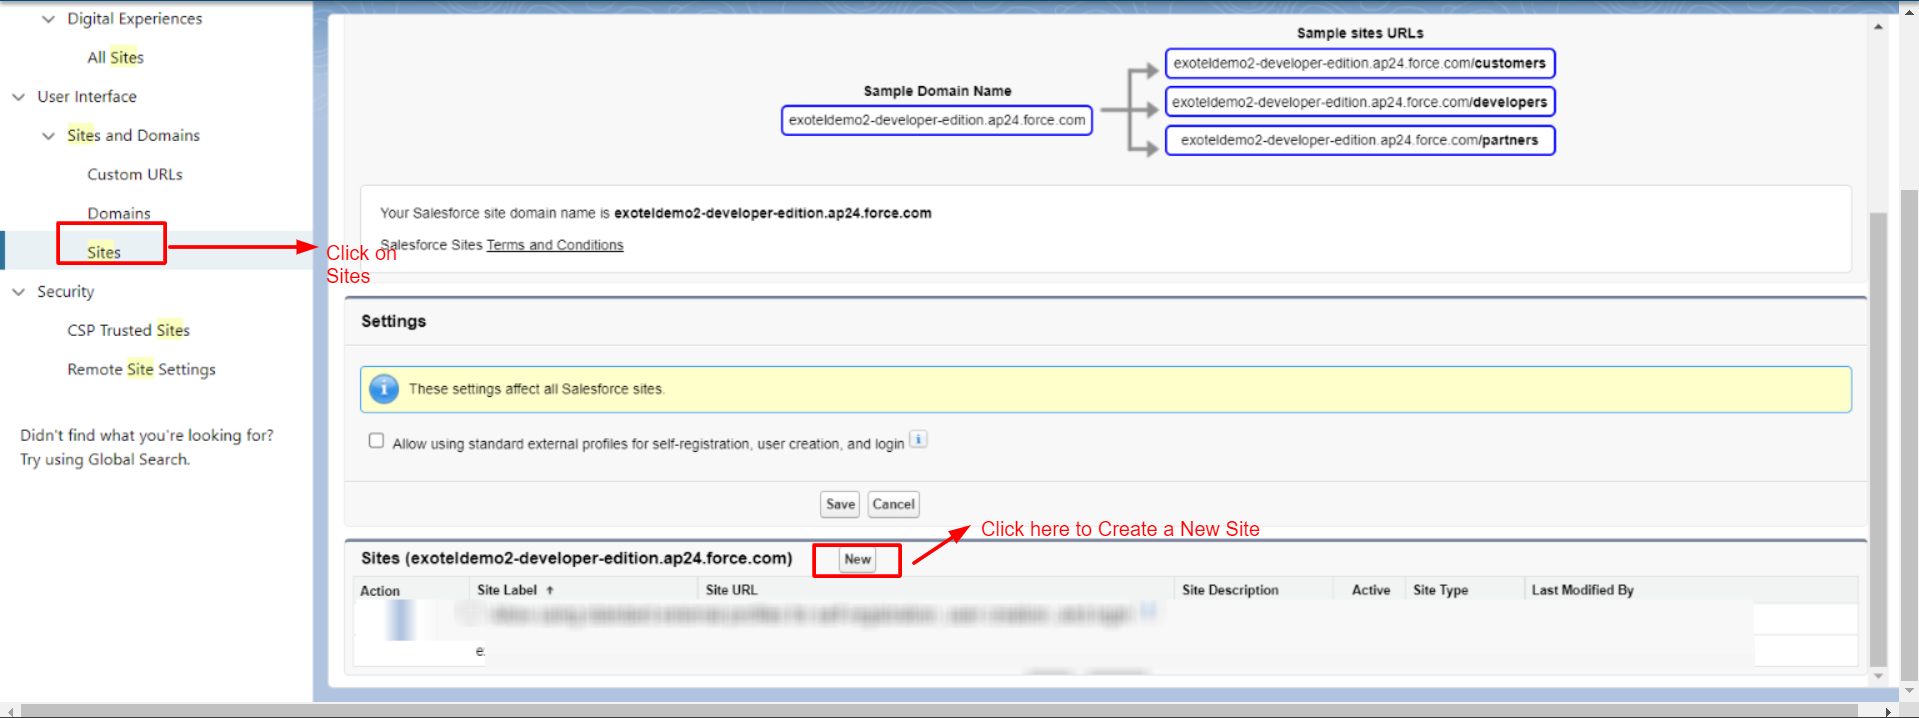
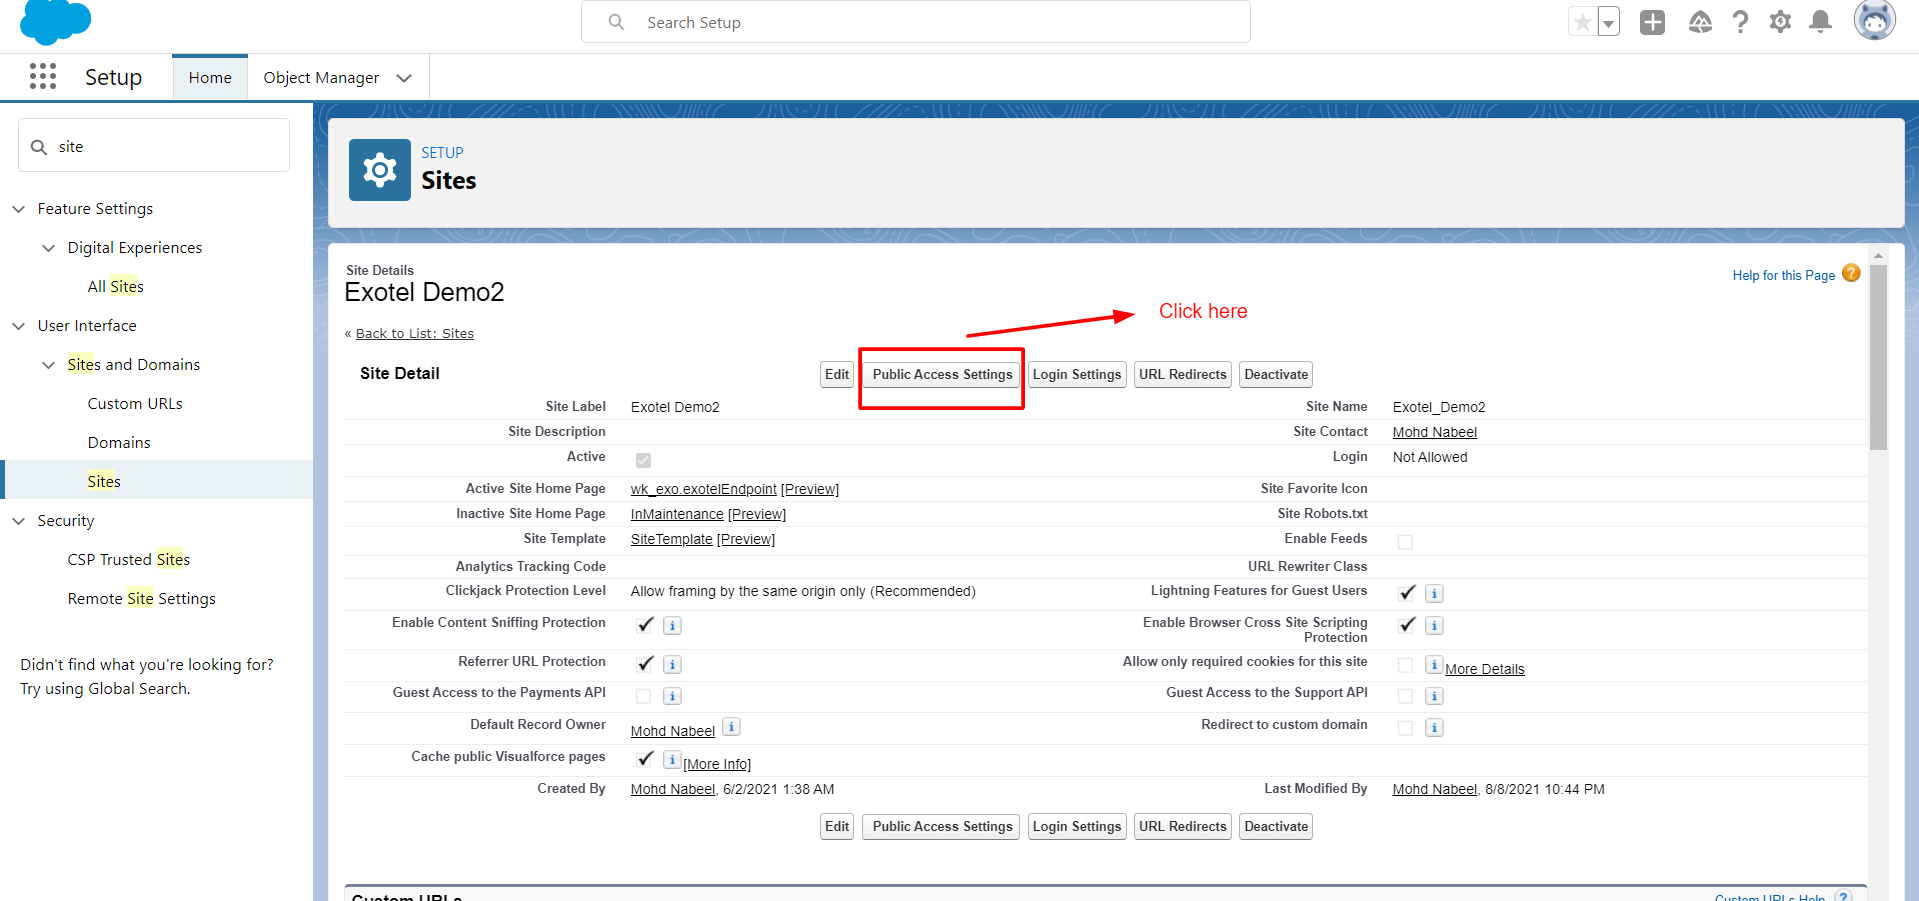
Create a Site to receive Inbound Calls: Follow the Steps below to create and Configure your Site to make it work for Exotel CTI connector.

Now, click on Save.
Field Level Security for all Accounts, Leads, Contacts and Tasks as shown below:

Enable Apex Classes:
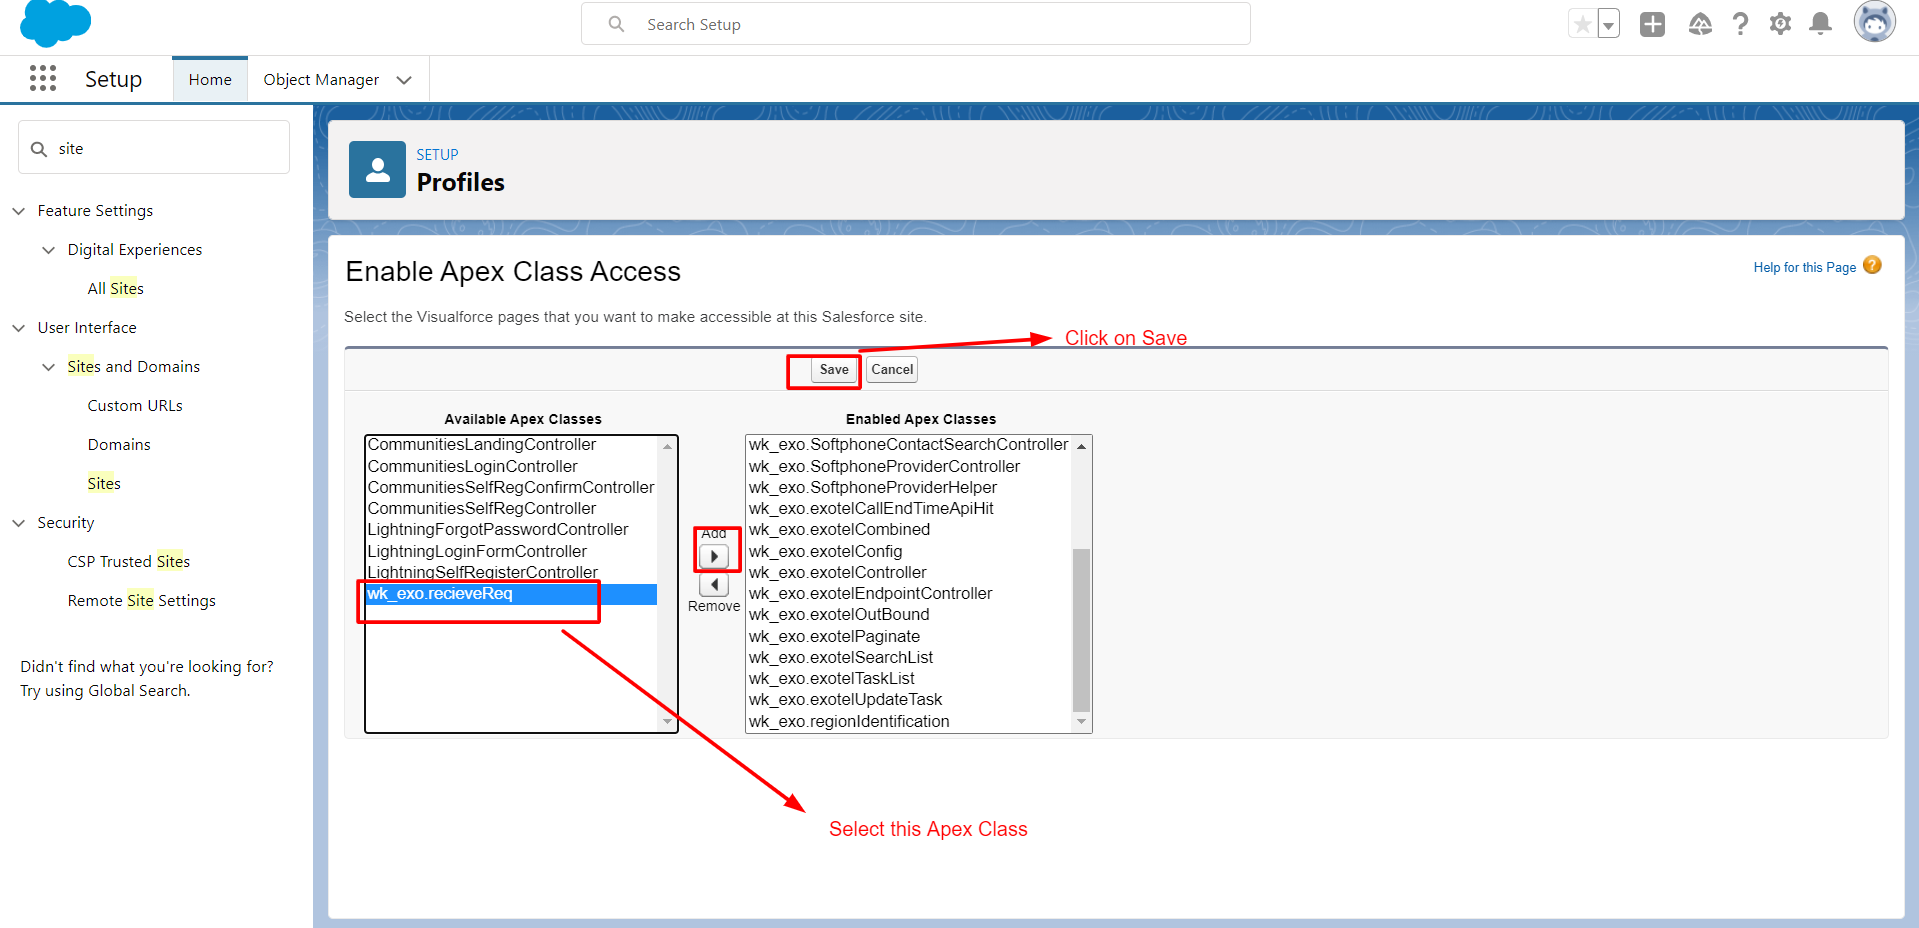
Once you are done with Site Configuration, please get back to the Exotel panel.Step 1: Click on AppBazar under the Admin Section. It will show you the list of Apps installed.
Step 3: Click on ‘Connect’.

Step 4: Now, we just need to configure Passthrough Applet in this section.
Note: Using the Passthru applet, you can get Exotel to talk to your Application URL and pass on details about the incoming call as and when it happens.
Your application can now process this information to decide which path (success/failure) the flow should take next. This applet helps to dynamically control the flow as well as store the call details in your Salesforce CRM or other applications.
You need to append /services/apexrest/wk_exo/recivedApi/ at the end of your Salesforce Site Url so that you can control the flow as well as store the call details in your Salesforce CRM or other applications. Refer to the screenshot below:
Salesforce Exotel CTI Connector Lightning Configuration:
To use the application at the Lightning end, it is required to register the domain first. Kindly go through the article: How to register your Domain in Salesforce.
Once you get registered with your Domain, please make sure that custom tabs related to Salesforce Exotel CTI should be Default On.
Go to Set Up | Call Center
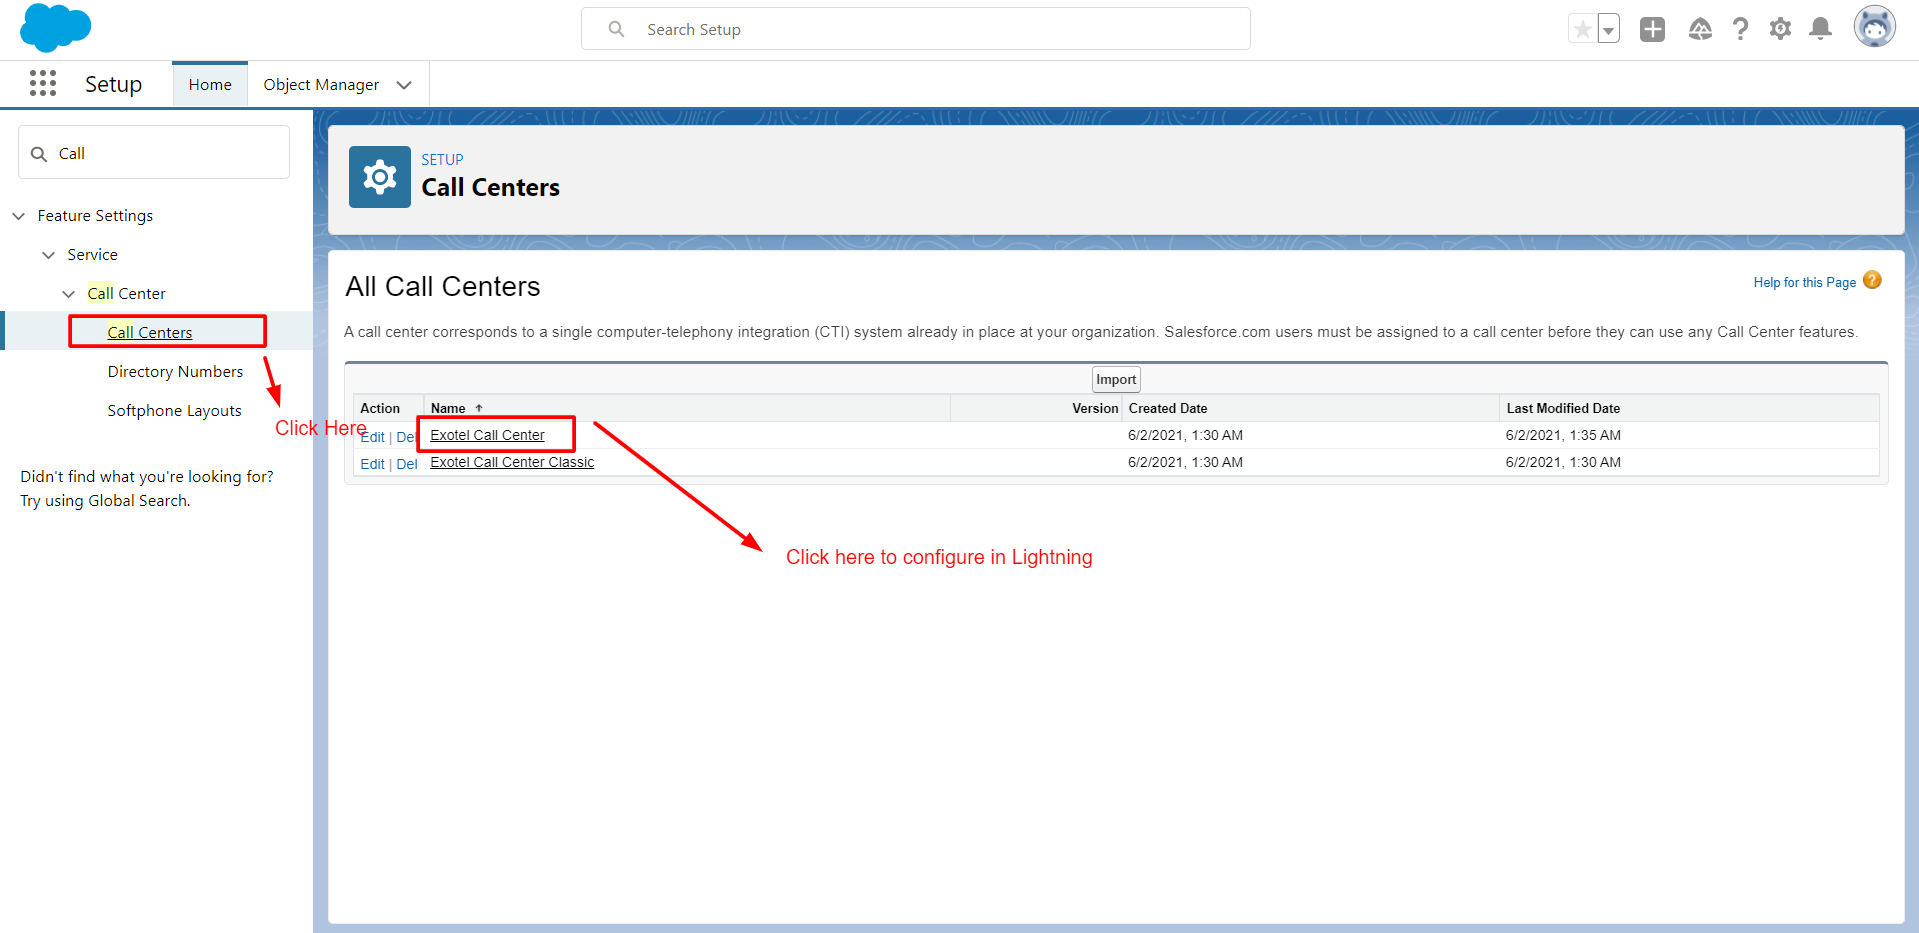
Enter the visualforce Page URL at the Exotel call center.
Click here on exotelAdapterPage.
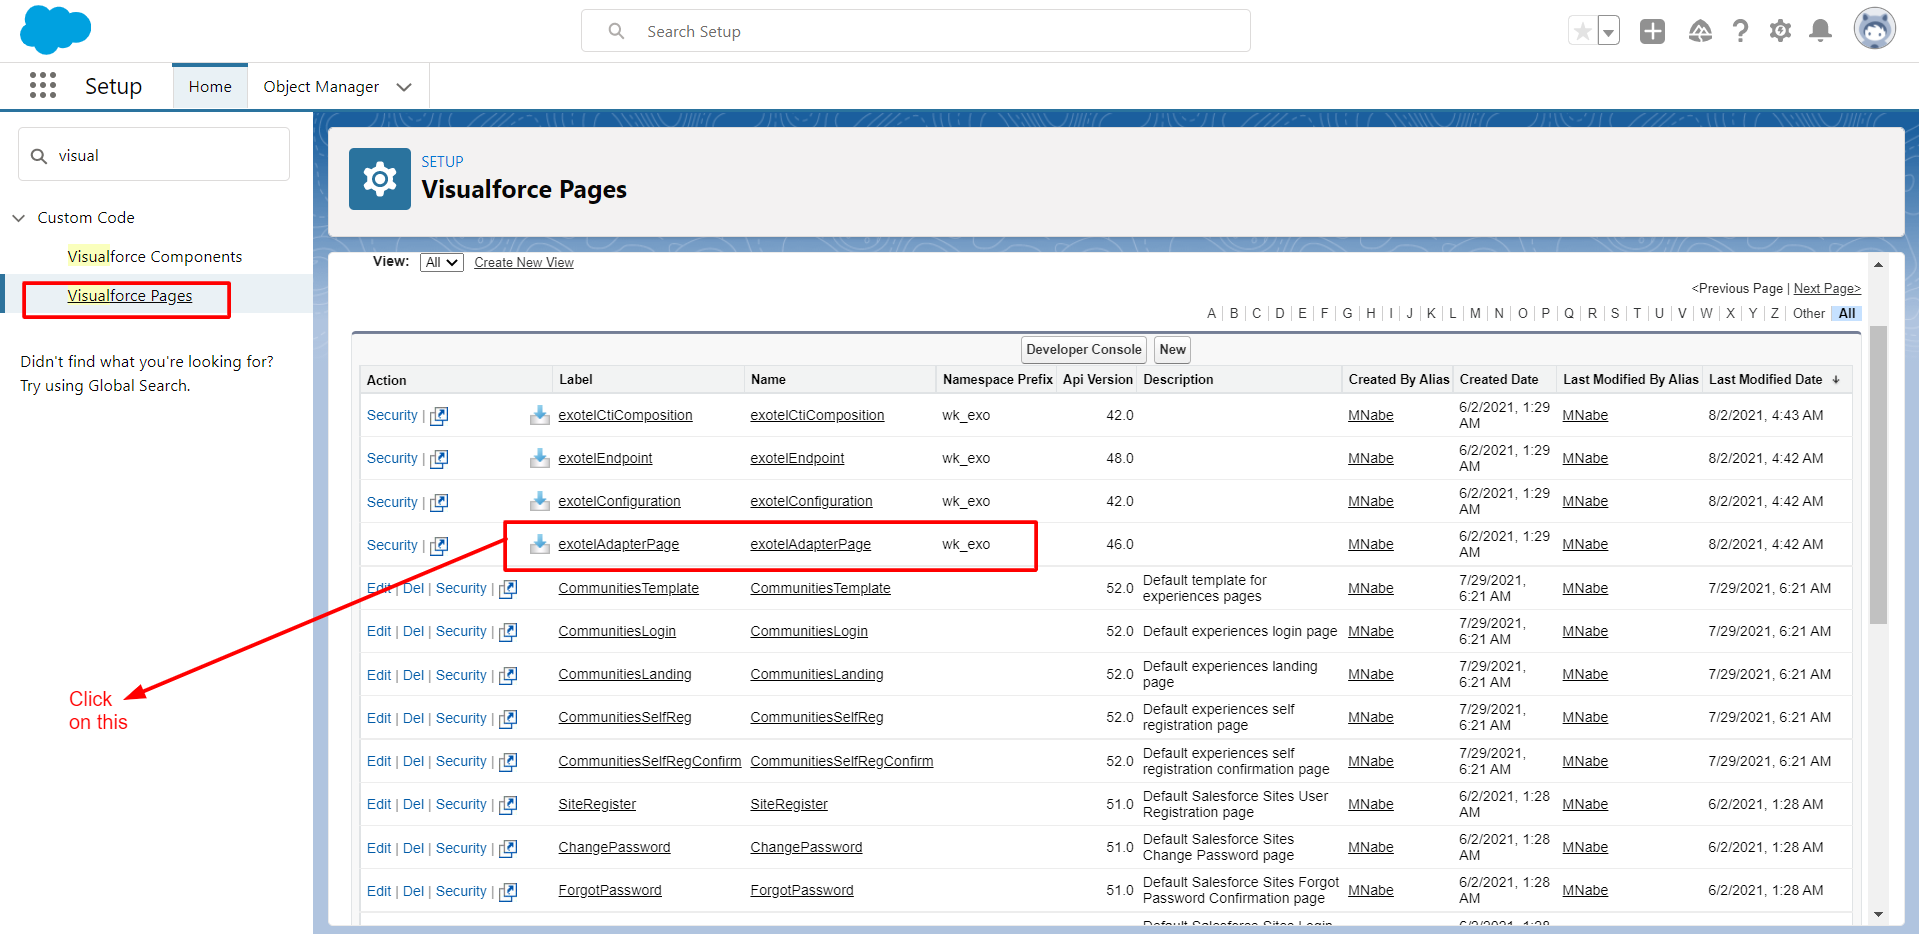

Click here to copy the page URL

Add the Exotel API Information in Exotel Settings
Go to APP Launcher | Click on Exotel Lightning.

For setting up the outbound calls, In the lightning end when the call would redirect to the Registered mobile number one Popup would generate.
You can see the past call logs in the logs tab
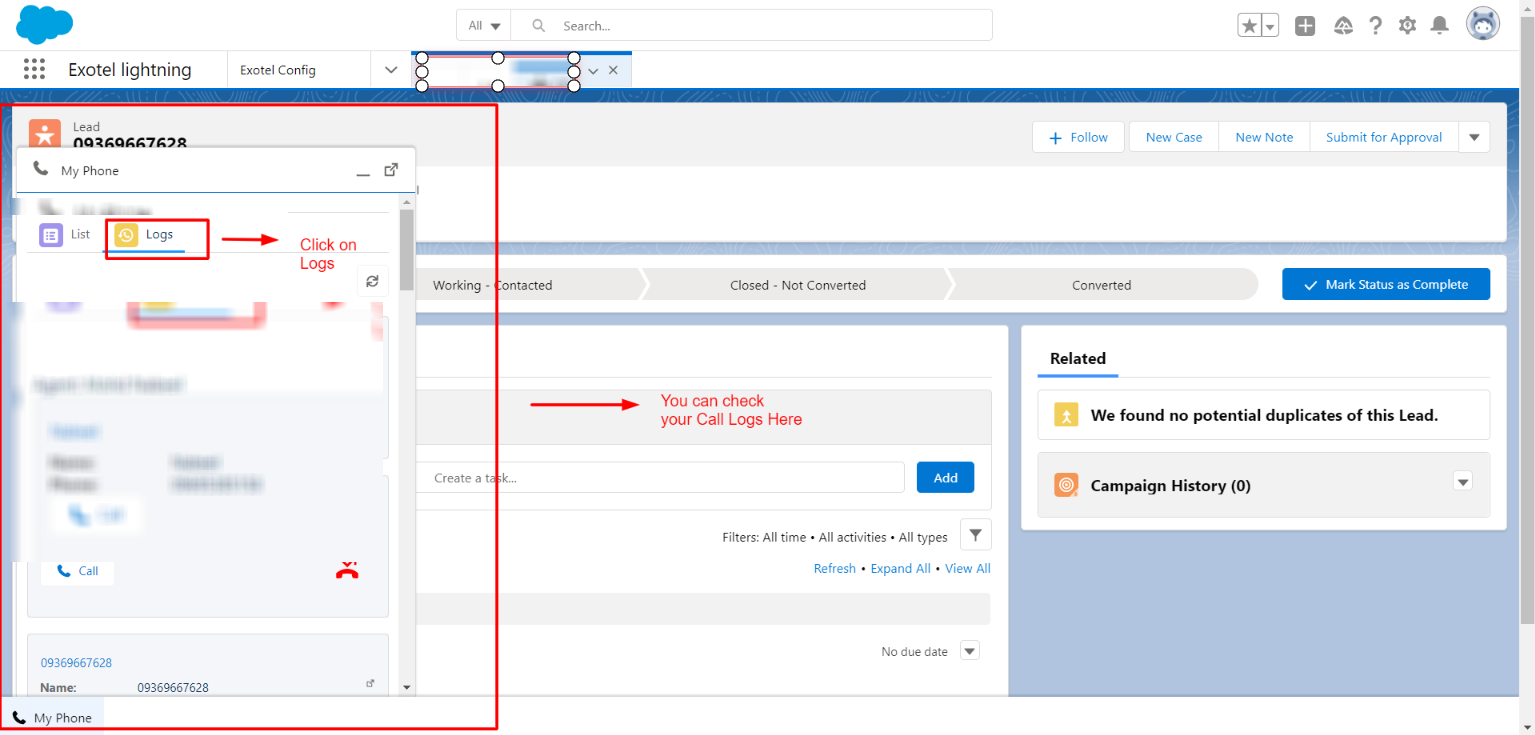
After the calling user can save the caller Information in Add Note Section. As well as users can see the Past activities related to that contact.

Support:
- For any further query, Click To Create Ticket
- To know the feasibility of specific requirements: Request For Customization
- To view all our applications in Appexchange, go to Webkul Appexchange Apps

Be the first to comment.