Mailchimp Salesforce Integration and Connector
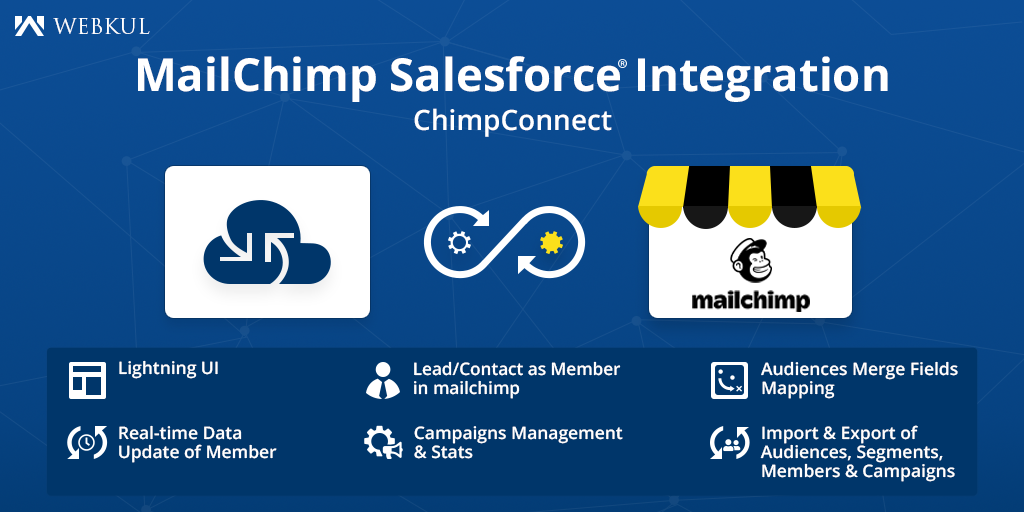
ChimpConnect deals with Mailchimp and Salesforce Integration. It is acting as a bridge between Salesforce and Mailchimp.
Another key point of the application is that users can Sync the Mailchimp Audience, Segments, Campaigns, and Members as Contacts and leads to Salesforce.
This application enhances the features of CRM and Email Marketing. We can also monitor the Campaign Report i.e. open, Clicks, Send, Count, etc.
Note: Firstly, The application required to install in Salesforce Org from AppExchange: ChimpConnect
Note: If you don’t have a Mailchimp Account, You can get it from here: Create a Mailchimp Account
Features:
- Connect multiple Mailchimp accounts to Salesforce Org.
- Easy to sync audiences from your Mailchimp account to the Salesforce Org.
- You can perform the Mailchimp actions from your Salesforce Org when needed.
- Import segments, members, and campaigns from Mailchimp to Salesforce.
- Real-time data synchronization of Subscribers and Unsubscribers.
- Sync multiple audiences conveniently.
- Add custom logic for record import/export from Mailchimp
- Easy to maintain the logs of your sync data if you get issues in the synchronization process.
- Manage Mailchimp Merge fields from Salesforce.
Paid Features:
- Multi-Account: Connect your accounts into Salesforce and sync your multi-account MailChimp data.
- Multi Audience: Add multiple audiences to manage your audiences separately.
- Schedule Export: Schedule your data sync at your preferred time without needing your presence.
- Sync conditions: This allows you to export and import data based on conditions you set. It also lets you stop the export and import of data based on conditions you set.
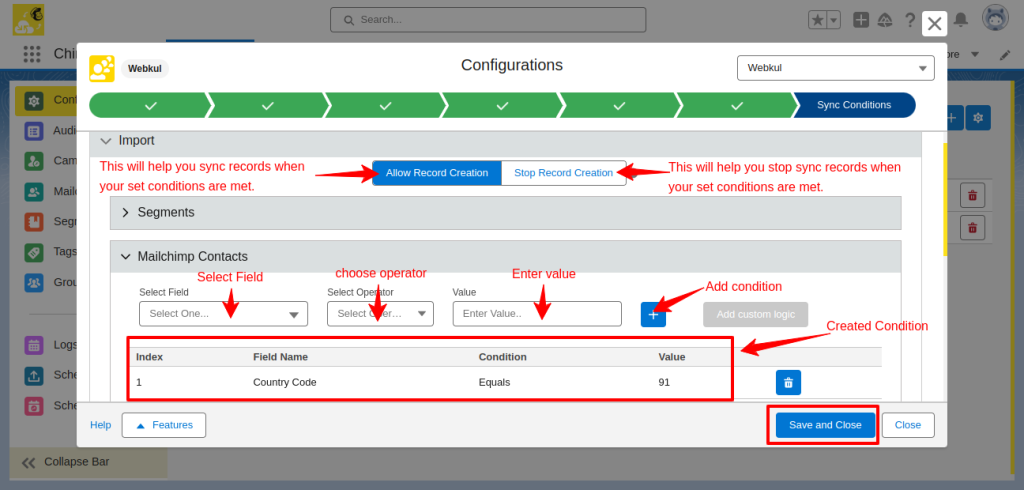
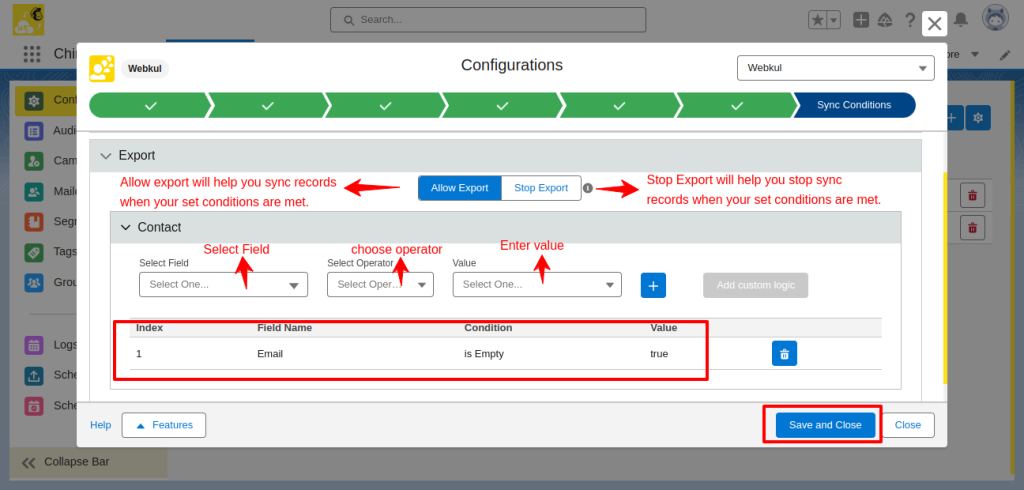
- Dynamic Mapping: Map any Salesforce objects into the Salesforce fields (both standard and custom fields).
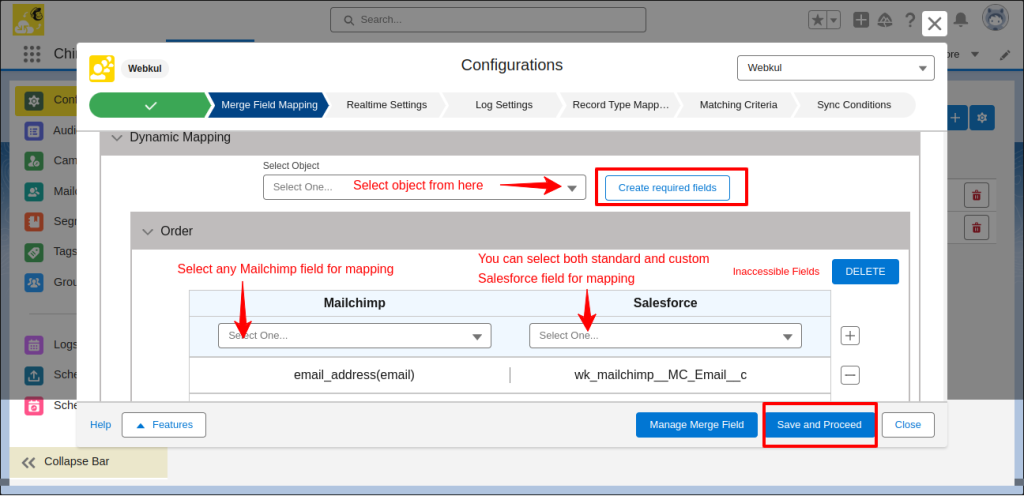
Note: These are paid features, especially for our paid customers. If you want to add these features contact us for the price.
How to Connect :
Installation of Mailchimp Salesforce Integration (ChimpConnect) At Salesforce’s End
- Once you install ChimpConnect from AppExchange.
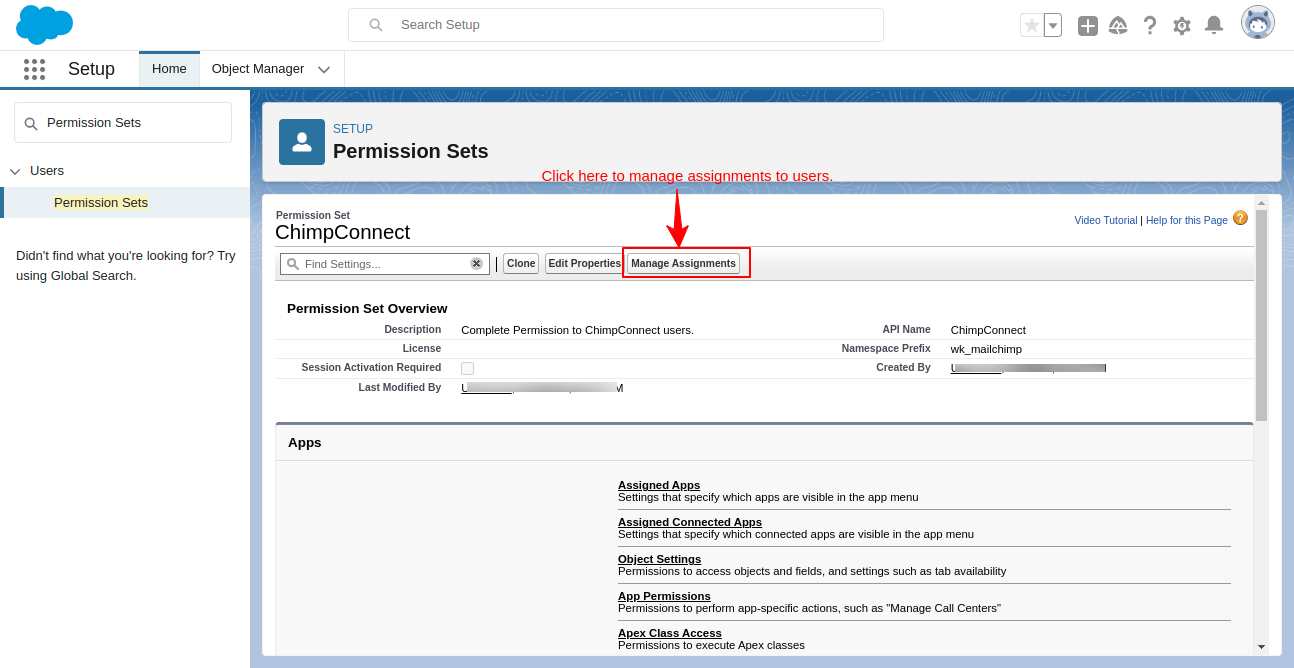
- Firstly, assign permission sets to a user for system administration.
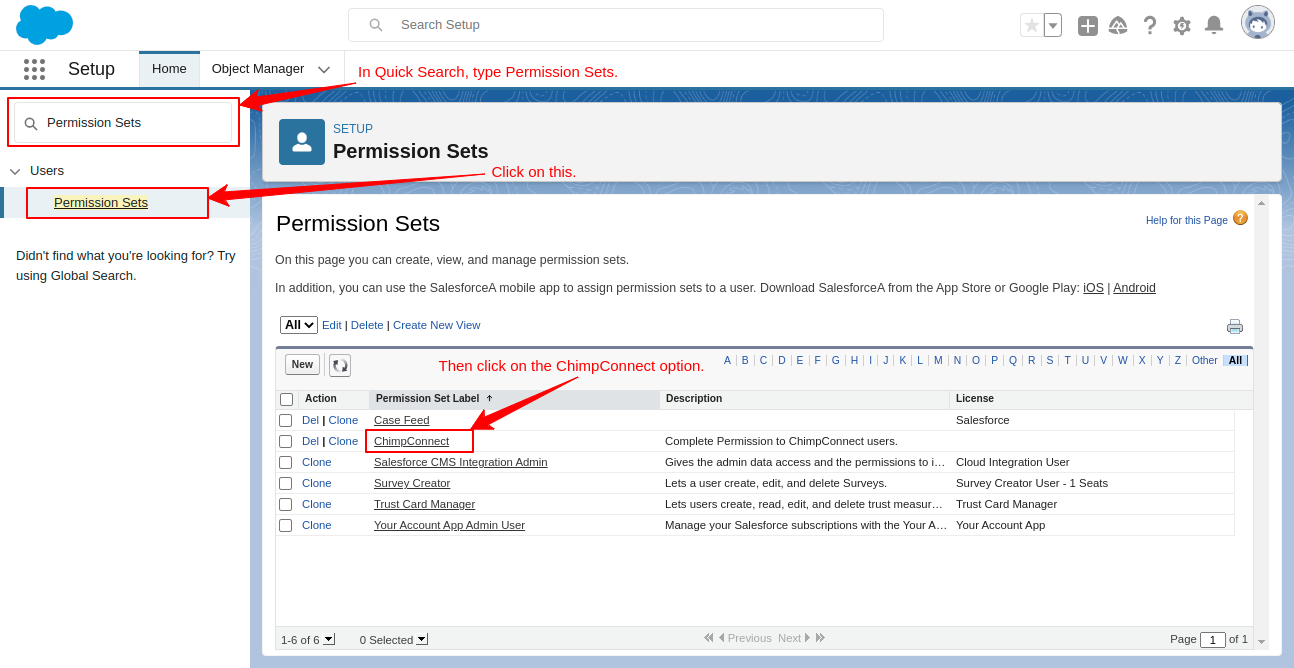
- To do this in Quick Search, type permission Sets then click on the Permission Sets option.
- In the Permission Sets window, click on the ChimpConnect option to open its permission sets.
- Then click on the Manage Assignments button.
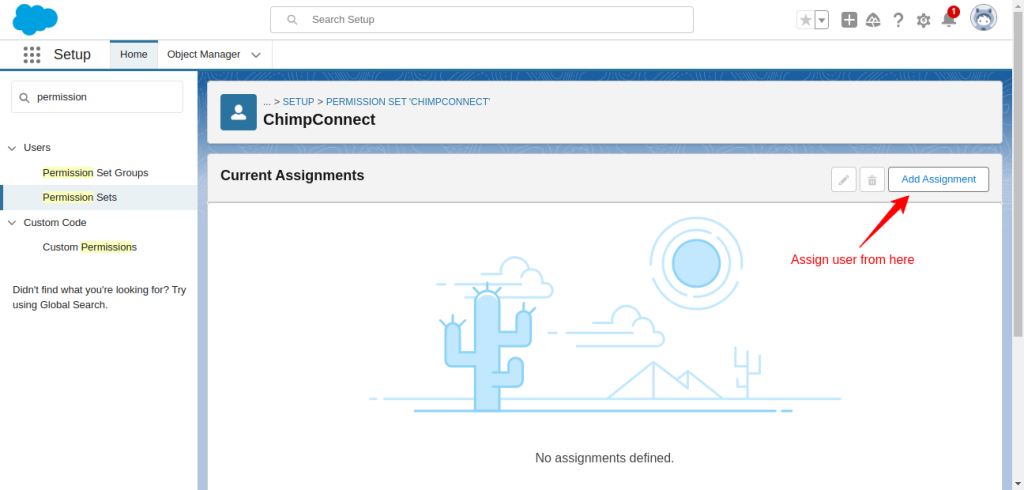
- Further, click on the Add Assignment button from the right side of the window.
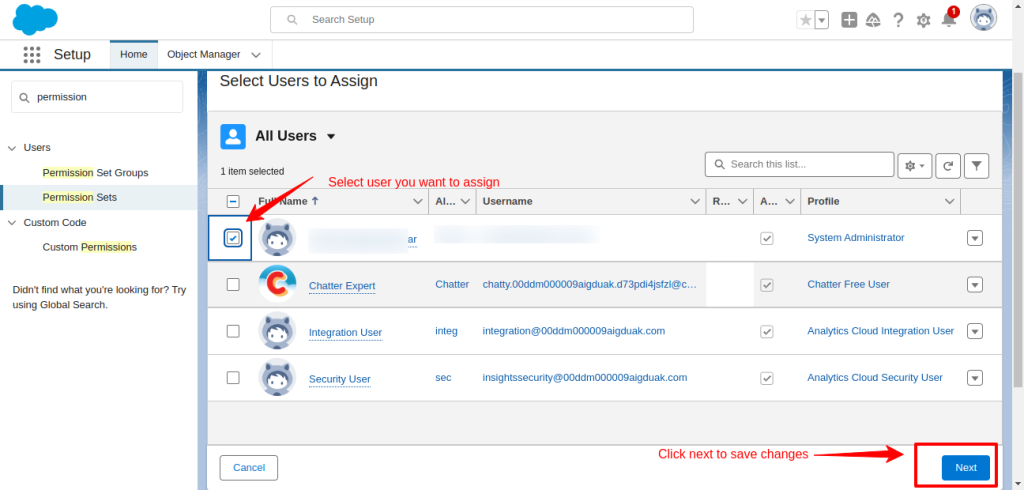
- Select the user to whom you want to assign the Permission Sets.
- Then click on the Next button.
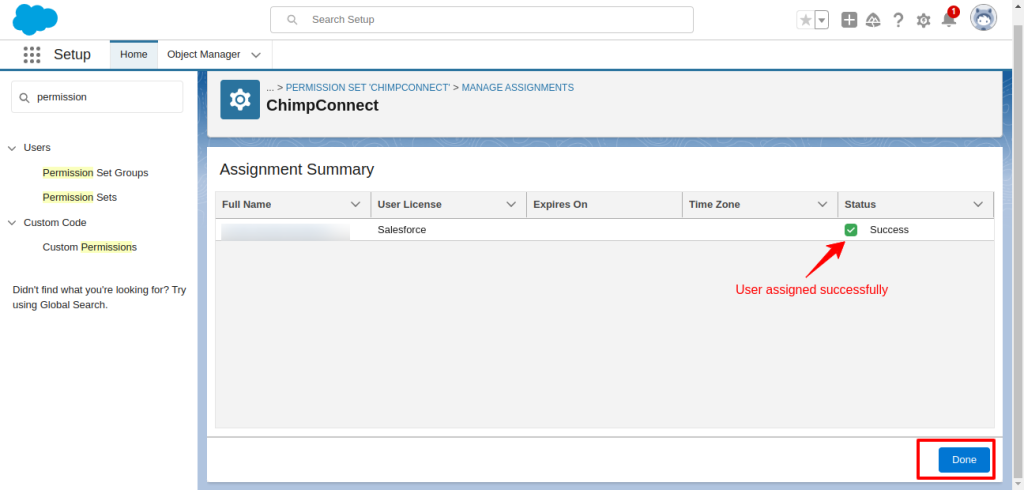
- In the bottom right side of the window click on the Assign button.
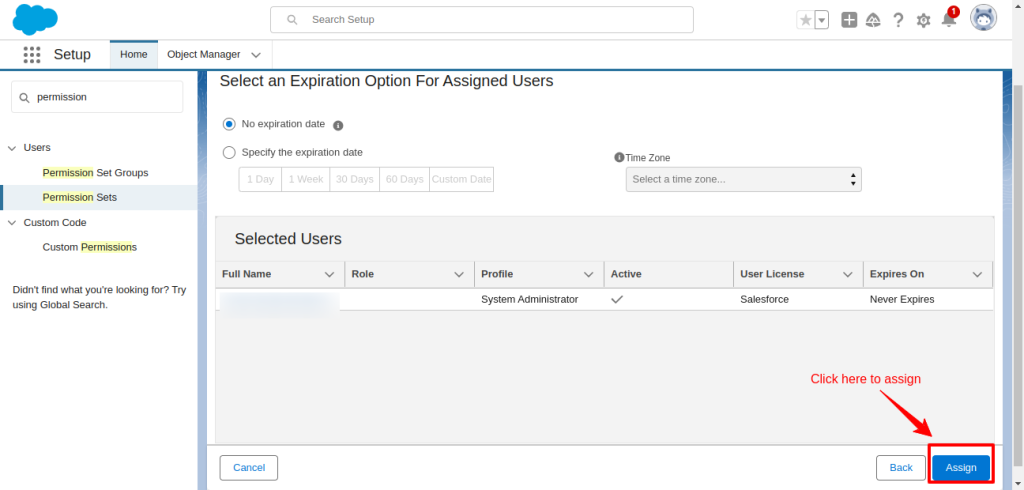
- Finally, click on the Done button and you are done.
- Now, you need to create a site in Salesforce and assign permission sets to a Guest User.
- This is an important process that enables real-time synchronization of your data. So let’s dive into the process.
- Firstly, in Quick Search, type Site and then click on Site option.
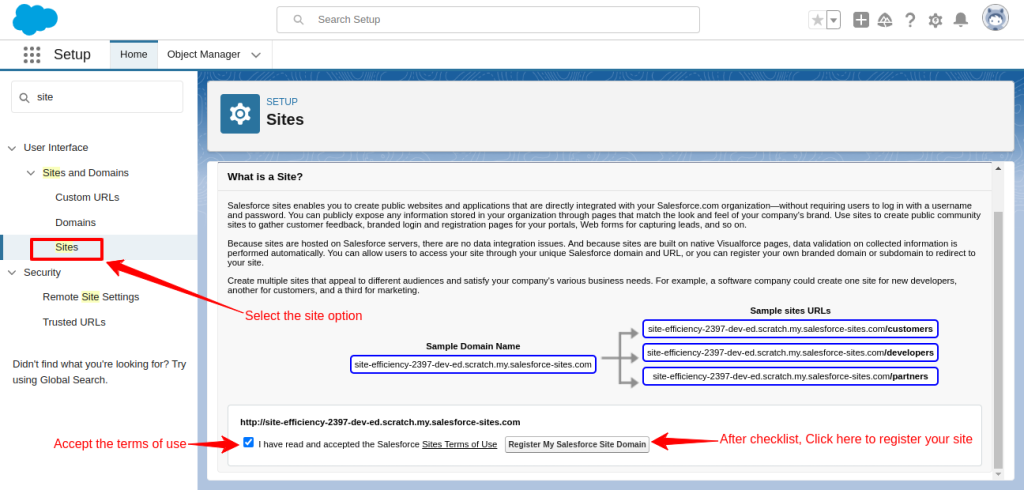
Note: The Salesforce Sites Terms of Use will only be seen for those who are registering for the first time. If you had registered your site, the above checklist wouldn’t be available in that case.
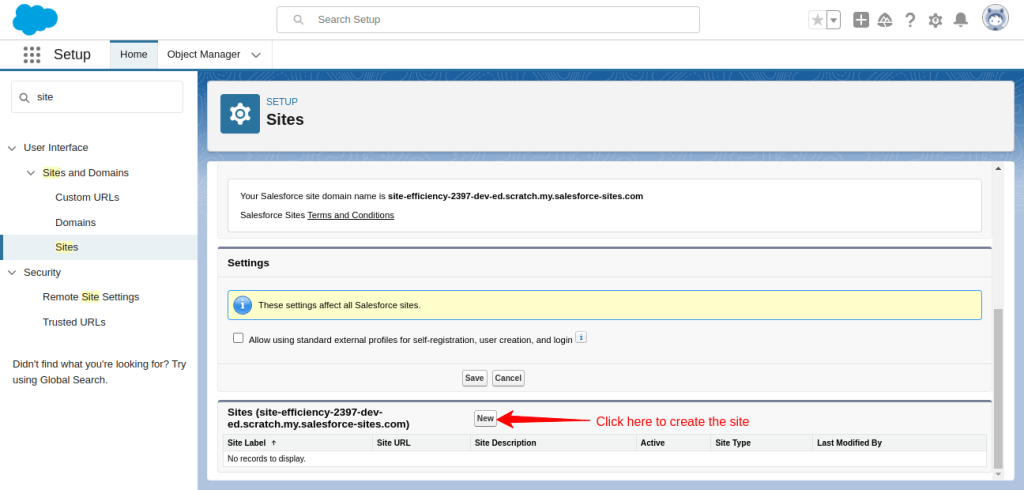
- Click on new to create the site.
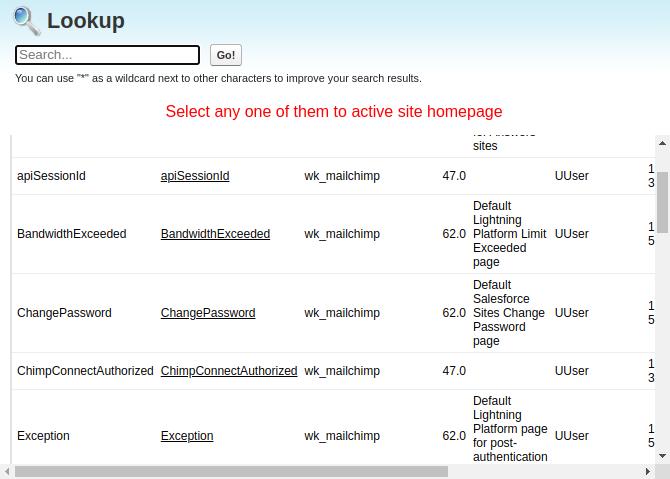
- In site edit, enter your site name and press on the search icon below to activate the site home page.
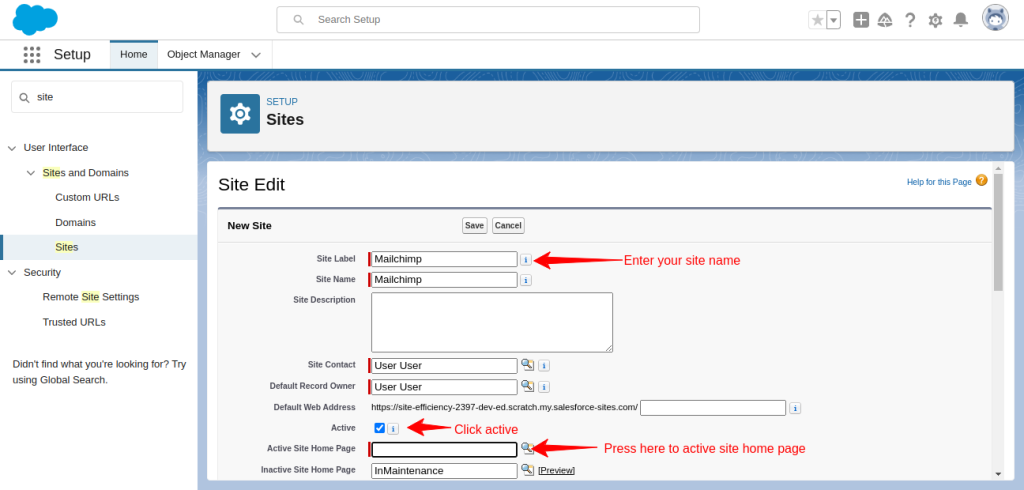
- Pick any active site homepage.
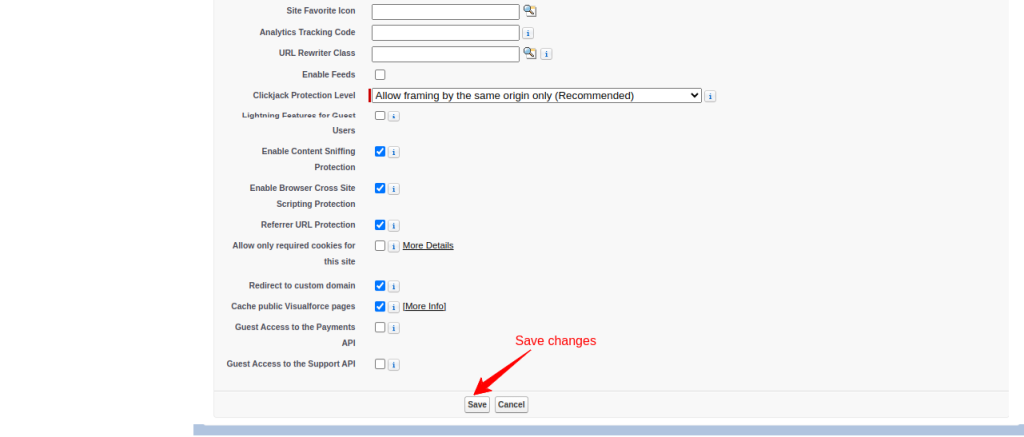
- Scroll down and save changes.
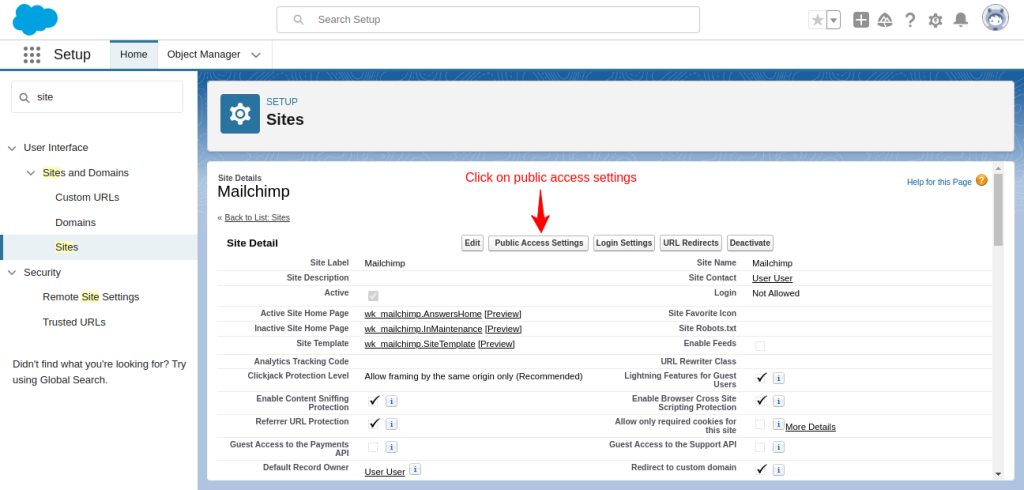
- Now, click on public access settings.
- Go to view users.
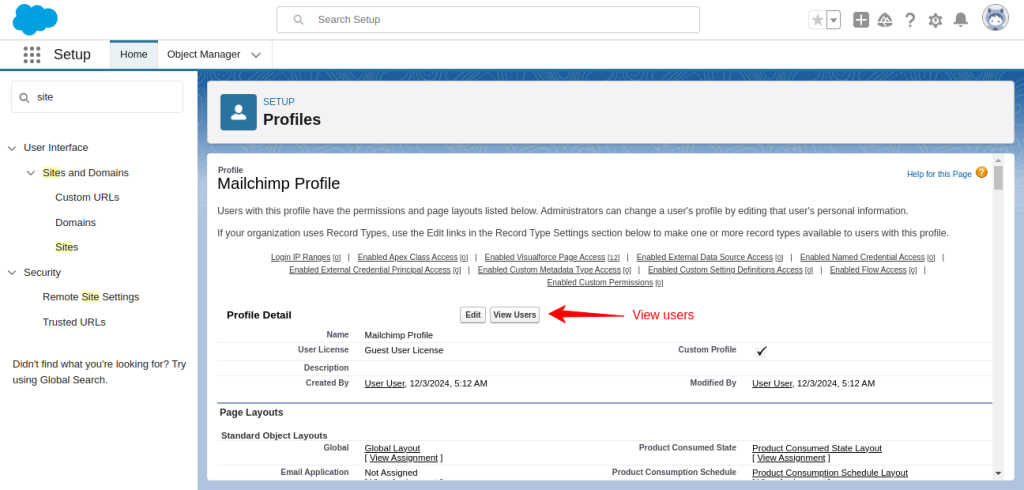
- In the Mailchimp profile section, open site guest user.
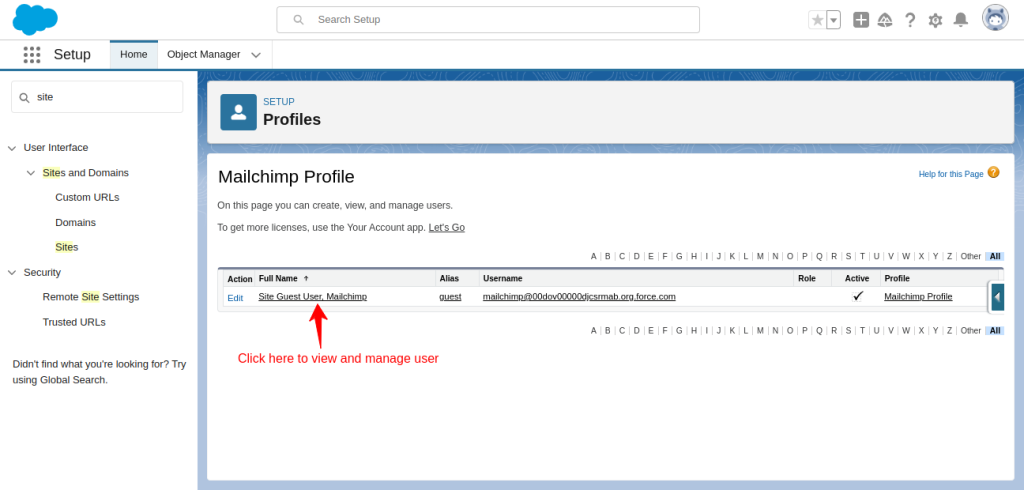
- Further, enable permission set assignment.
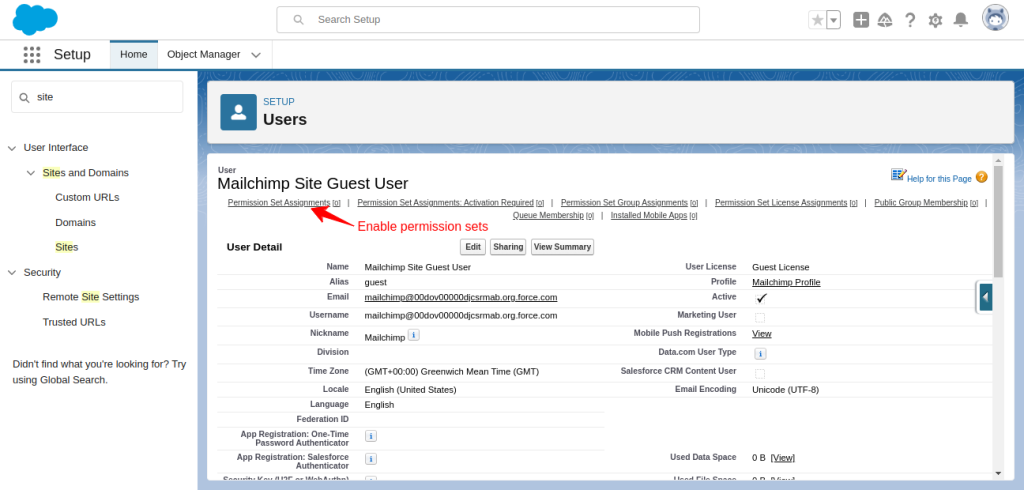
- Click on Edit Assignment
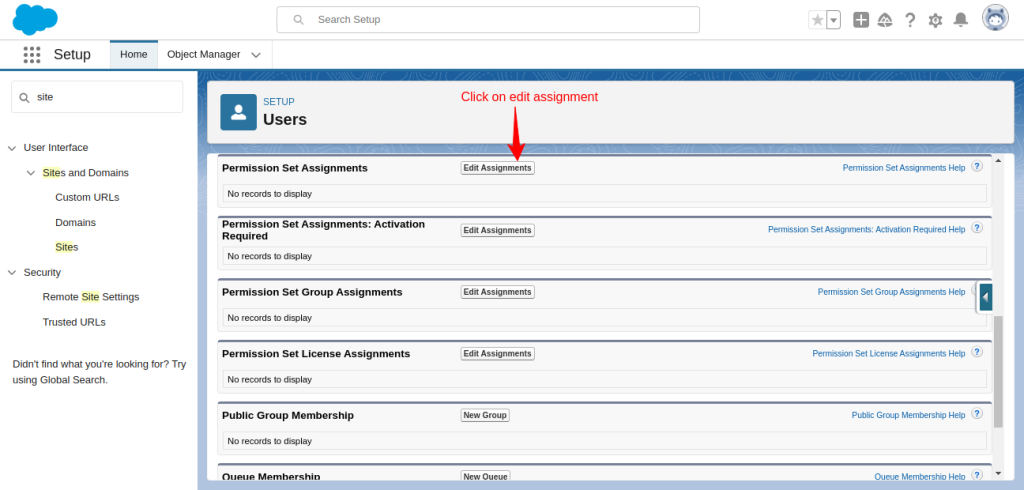
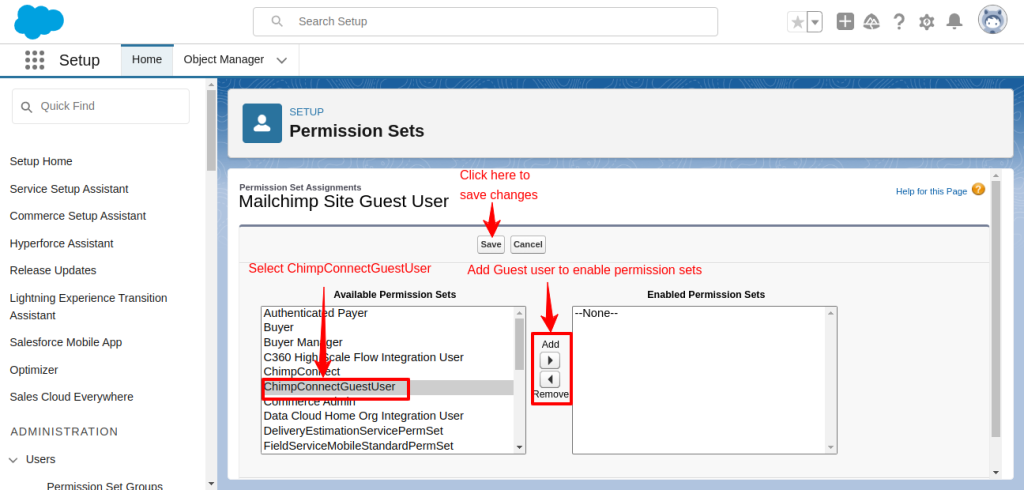
- Here you will find the available permission sets. Use the arrows to Select ChimpConnect Guest User. Finally, save changes and you have enabled permission sets.
How To Register An App In Mailchimp?
Firstly, you have to register an app by creating it in Mailchimp and then connect it with Salesforce. The detailed steps for the process are as follows:-
- Create a Mailchimp account
- Then register an application
- Open your Profile
- Then click on the Extras option
- Under that select the Registered Apps option
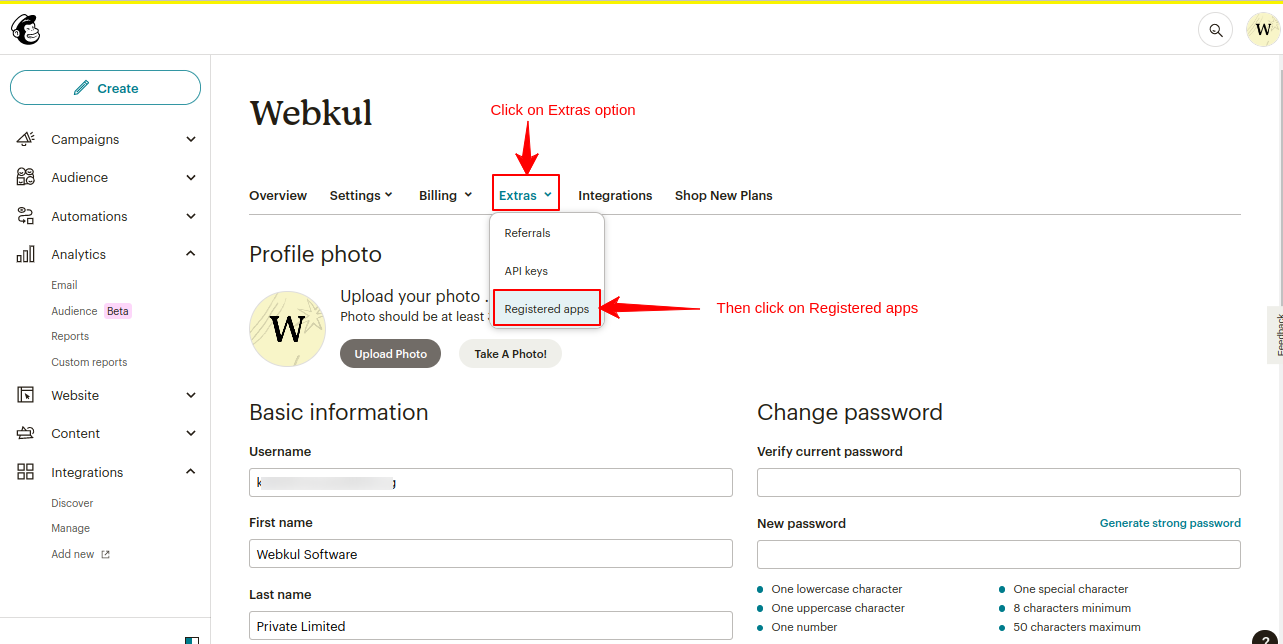
- Then click on the button Register an App
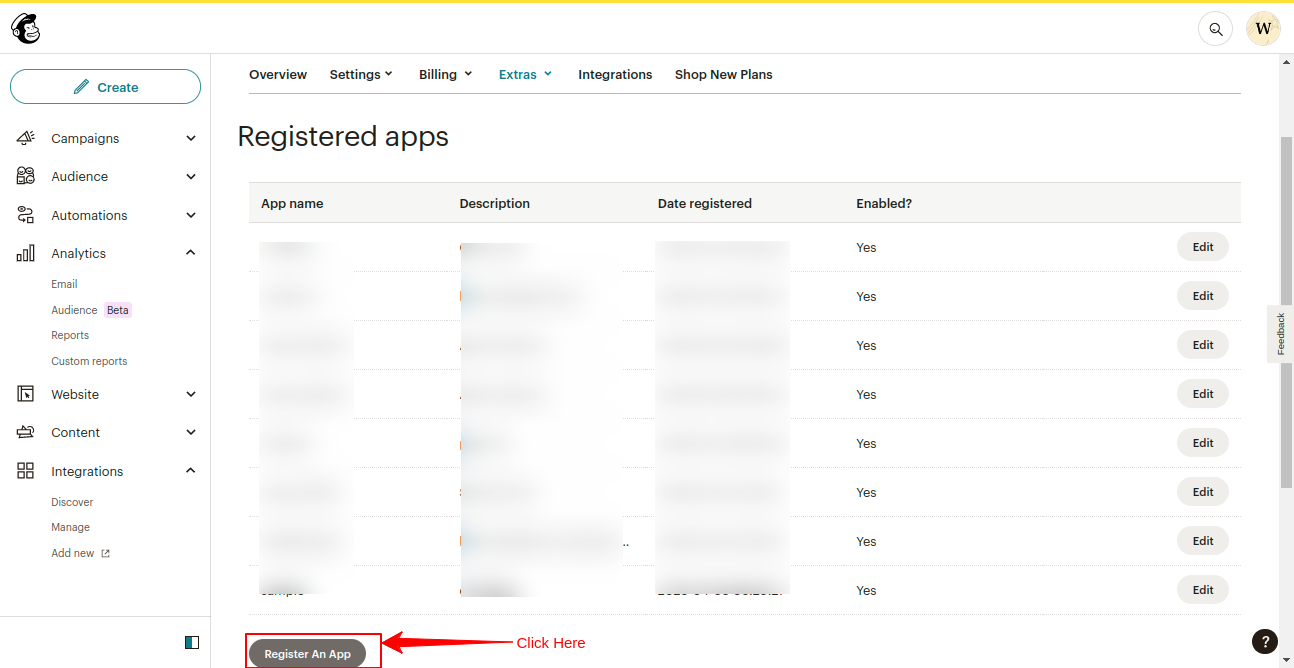
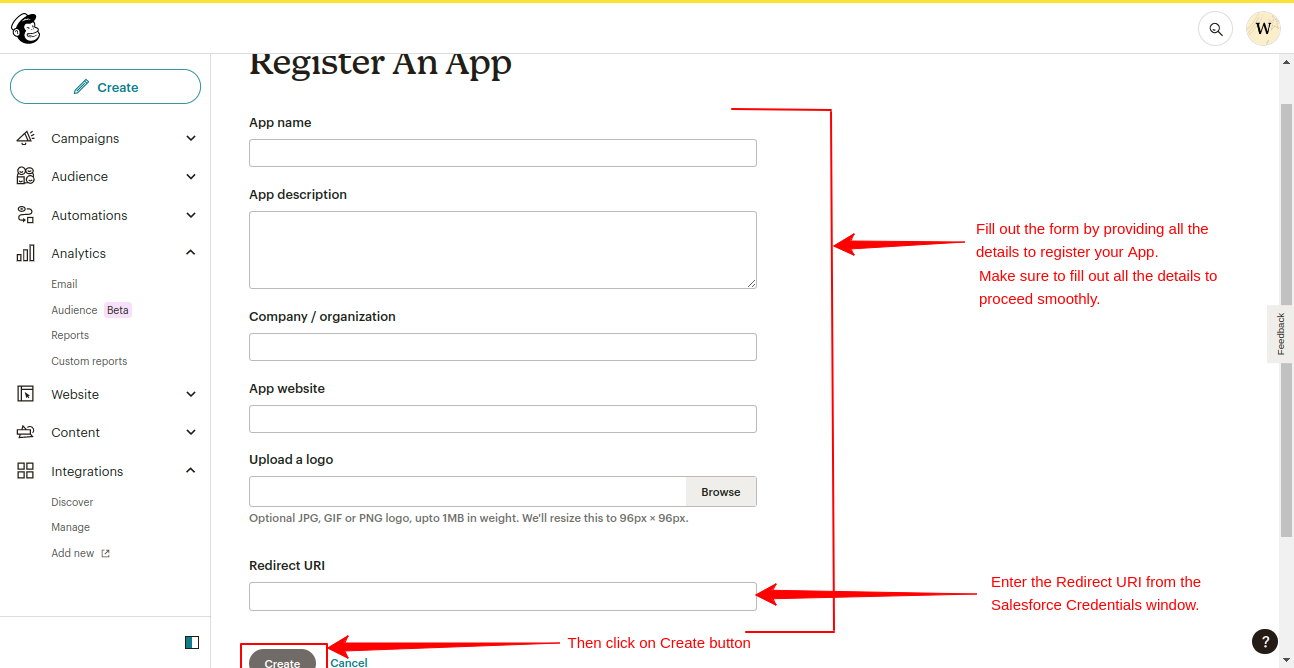
- Now, fill out the details in the form and make sure not to leave any of the fields empty.
- Copy the Redirect URI from the Salesforce Credentials window and then paste it here
- Click on the Create button.
- After that, copy the Client ID and Client Secret from Mailchimp and paste it into the Salesforce Credentials Window.
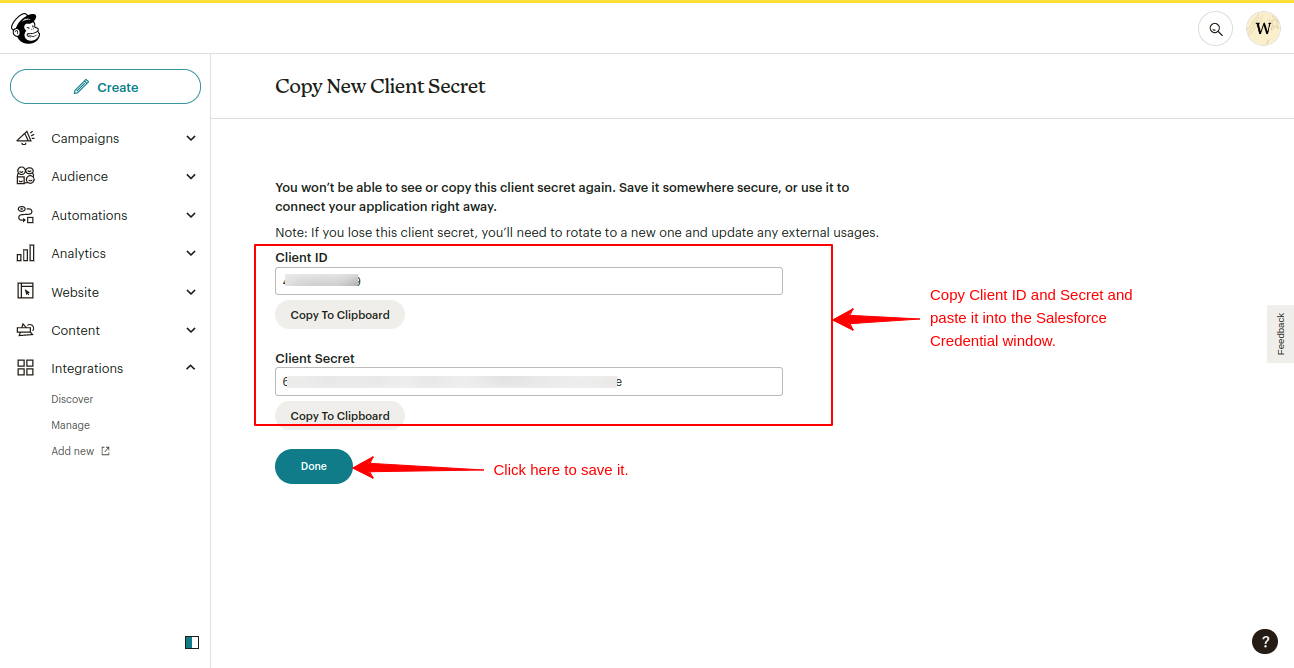
- You won’t be able to see or copy this client’s secret again. Save it somewhere secure, or use it to connect your application right away.
Note: If you lose this client secret, you’ll need to rotate to a new one and update any external usage.
How To Add A New Account Of Mailchimp Into Salesforce?
- Login to your Salesforce account
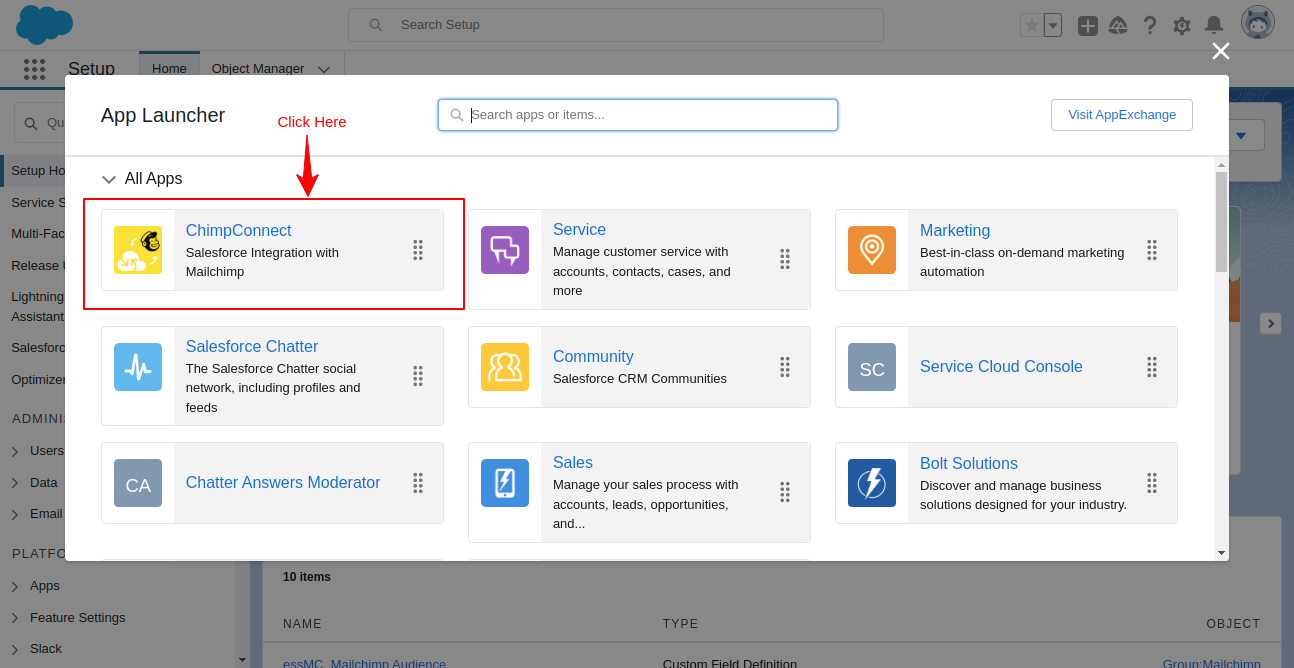
- Open App Launcher
- Click on View All then select ChimpConnect
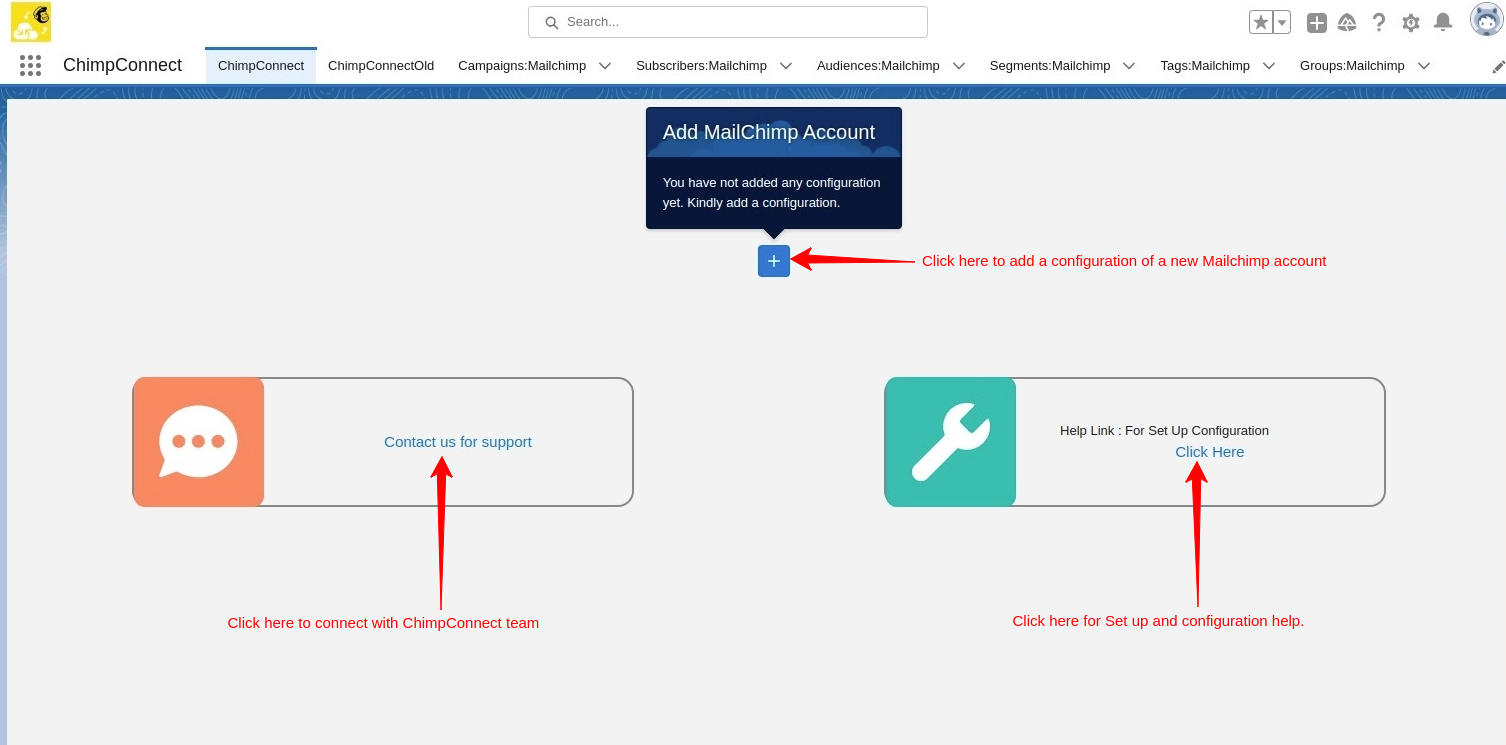
- Click on the ➕ icon to add a 🆕 credential/account of MailChimp to Salesforce.
- A credentials window opens up, from here you have to copy the Redirect URI and paste it into the Mailchimp Register an App form.
- After that, you get the Client ID and Client Secret in the Mailchimp account. Copy them from Mailchimp and paste them into this Credentials window of ChimpConnect.
- Then click on the Save button.

How To Connect App To Salesforce?
You can connect multiple accounts to your Salesforce Org and these accounts can also have multiple audiences as well.
- Click on the Connect button.
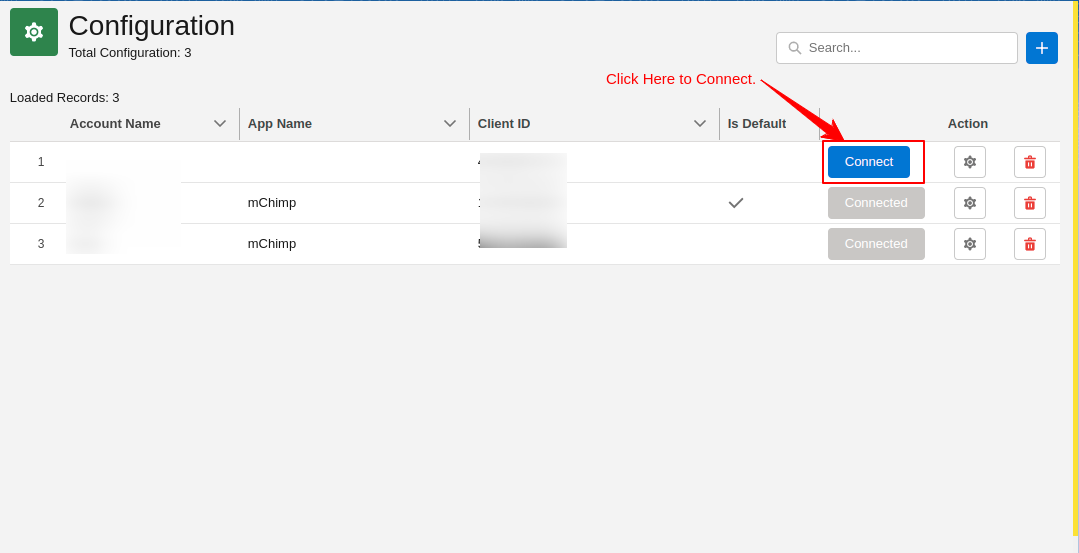
- It redirects you to the Mailchimp login page.
- Enter your credentials and allow access to your account.
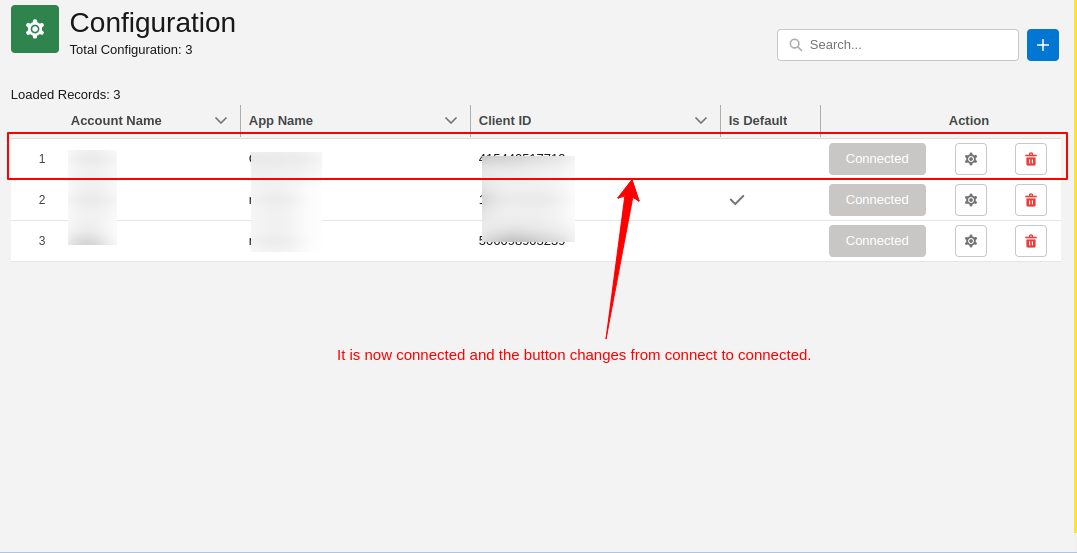
- Thereafter, you see the name of the button change from Connect to Connected.
Configuration Of ChimpConnect At The Salesforce End
As we said above, you can connect multiple Mailchimp accounts to your Salesforce Org.
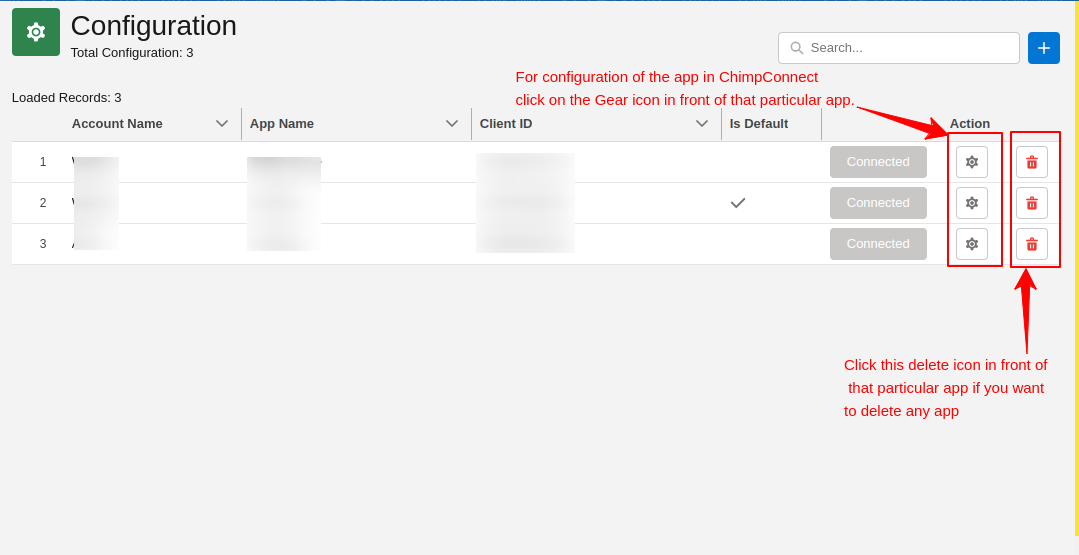
- The same goes with the delete option, you can click on the delete icon in front of the account that you want to delete.
- Click on the gear icon of the specific account or the account you have connected to recently.
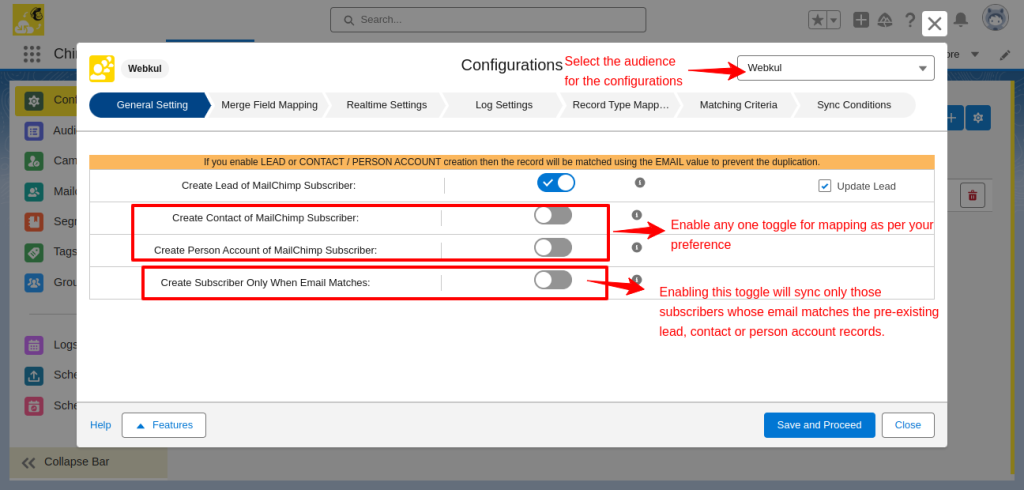
Note: If you enable Lead or Contact/Person Account creation then the record will be matched using the Email value to prevent duplication.
- In the configuration window, if you have multiple audiences then select the audience from the top right corner.
- Then in Merge Field Mapping, choose the option from contact or person accounts to enable mapping.
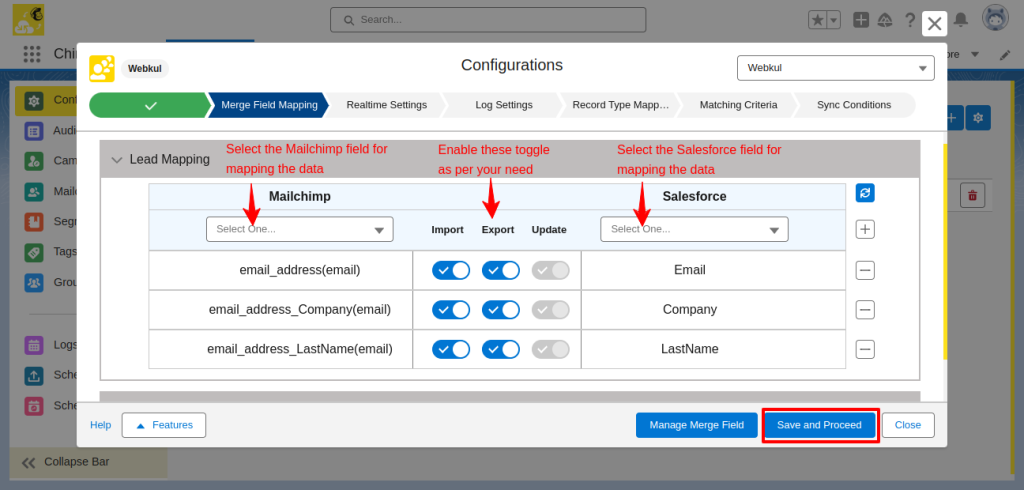
- Lead Mapping- Enable the import, export, and update toggle of the fields and also select the fields with which you want to map the data.
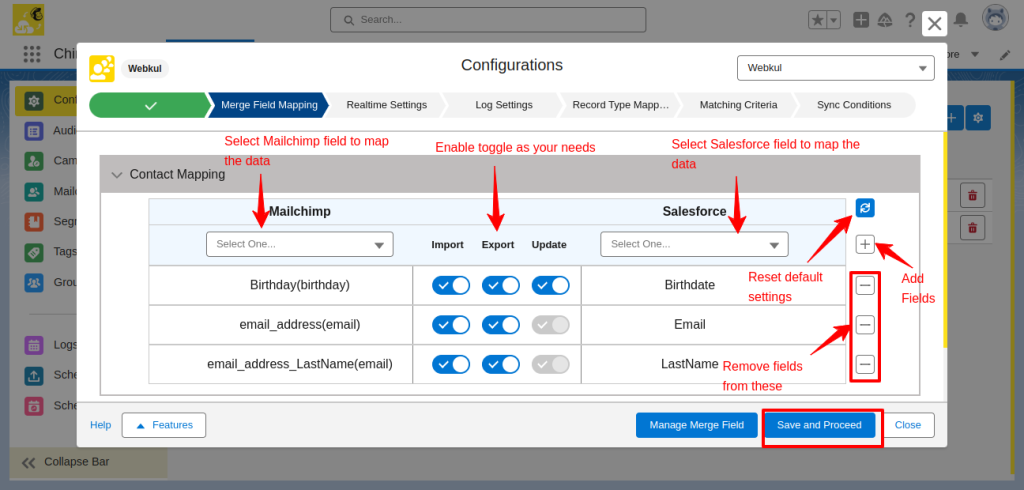
- Contact Mapping- Enable the import, export, and update toggle of the fields and also select the fields with which you want to map the data.
- After that, click on the Save and Proceed button.
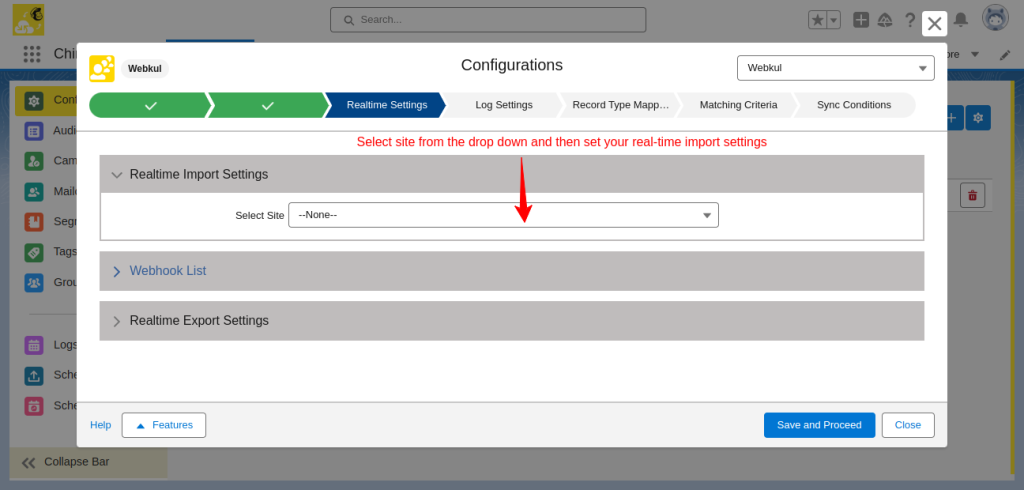
- In the Real-time Settings tab, you have to do Real-time Import settings.
- Meanwhile, select the site from the drop-down.
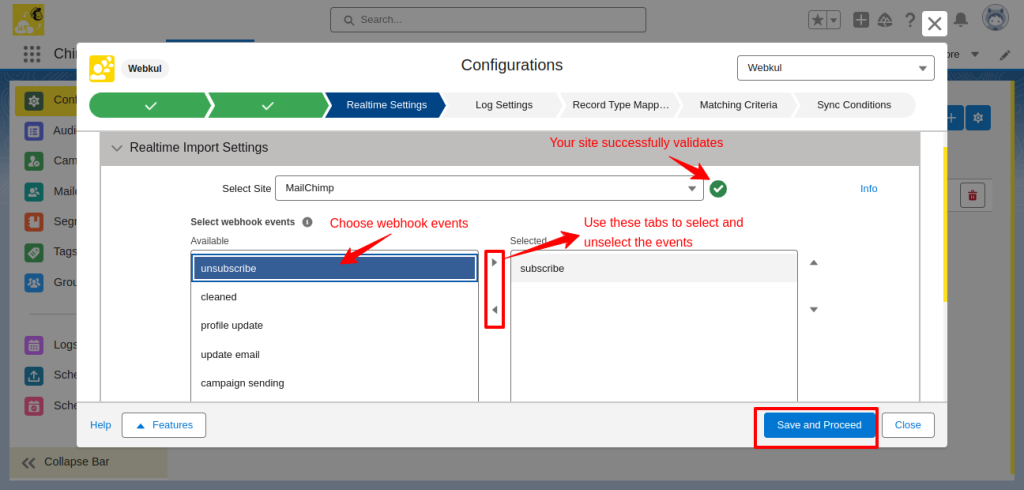
- Now it validates the site and shows a green tick mark as shown in the below image.
- Further, select the webhook events that you want in real-time sync from Mailchimp to Salesforce.
- Select them and send them in the box named Selected using the >> arrow.
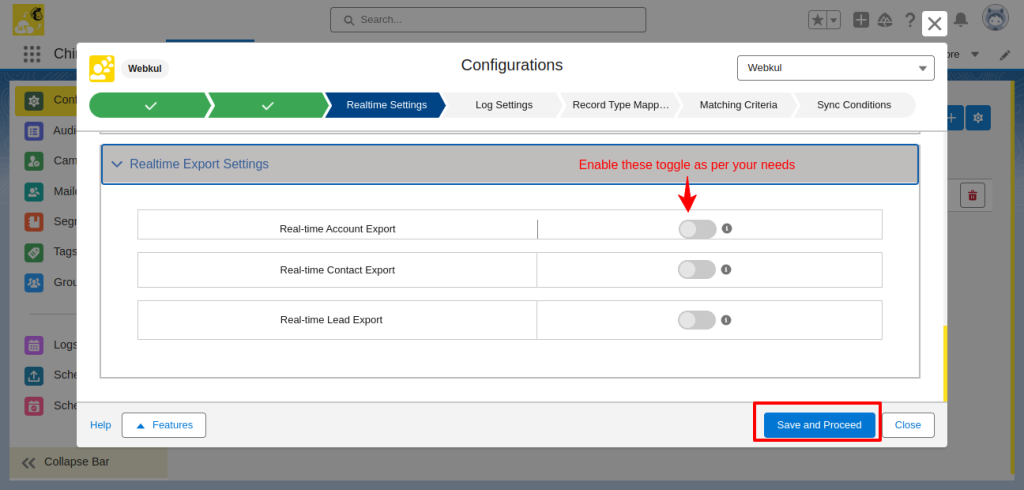
- Now, click on Real-time Export settings, and enable the toggles for which you want real-time export sync from Salesforce to Mailchimp.
- Click the Save and Proceed button.
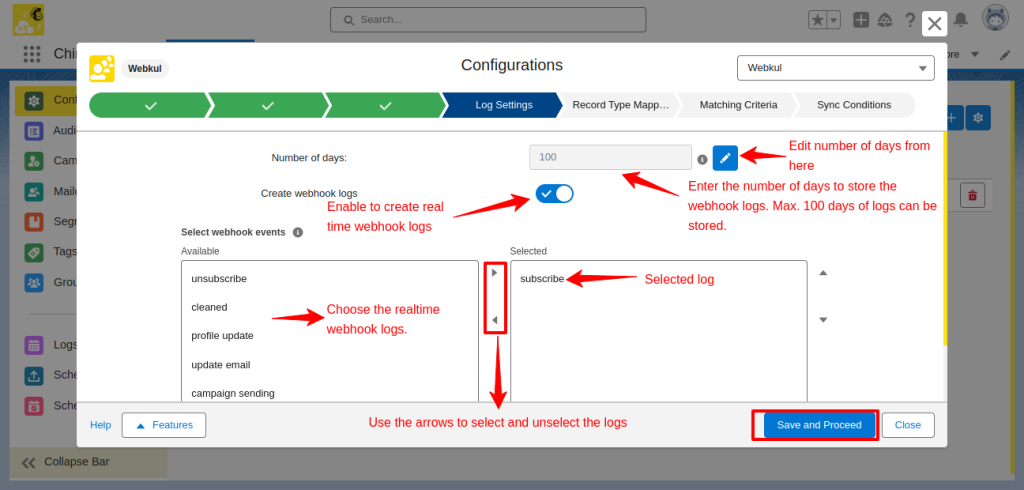
- Now in the Log Settings tab, you have to enter the number of days you want to store the logs.
- For this, click on the Edit button.
- After that, enter the no. of days.
- Then click on the Save and Proceed button.
Note: You can add a maximum of 100 days only. It records logs whether you import or export the data.
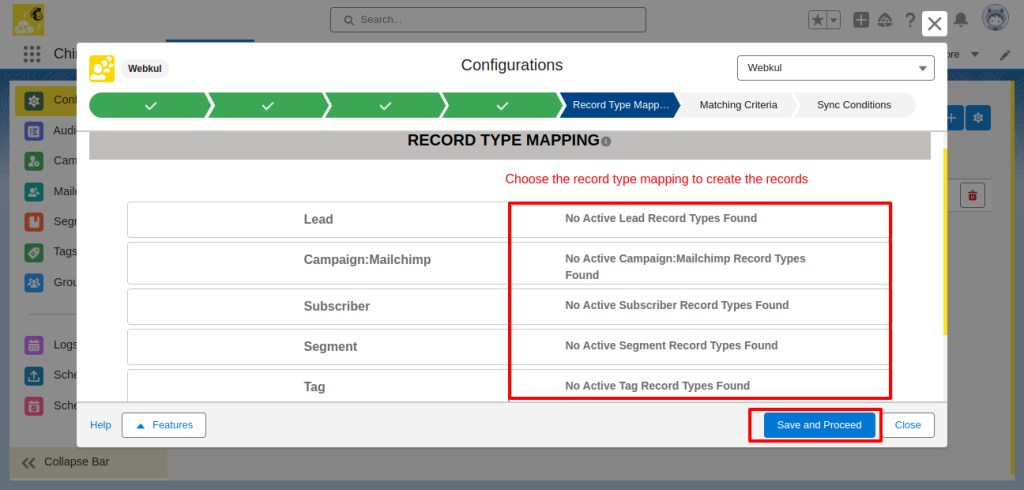
- Record Type Mapping- Choose the record type in which you want to create the records.
- There is also a contact, lead, Campaign: Mailchimp, Subscriber, Segment, Tag, and Group option so you can do record type mapping as per the availability of record types.
- Afterwards, select the record type mapping, and click on the Save and Proceed buttons to continue.
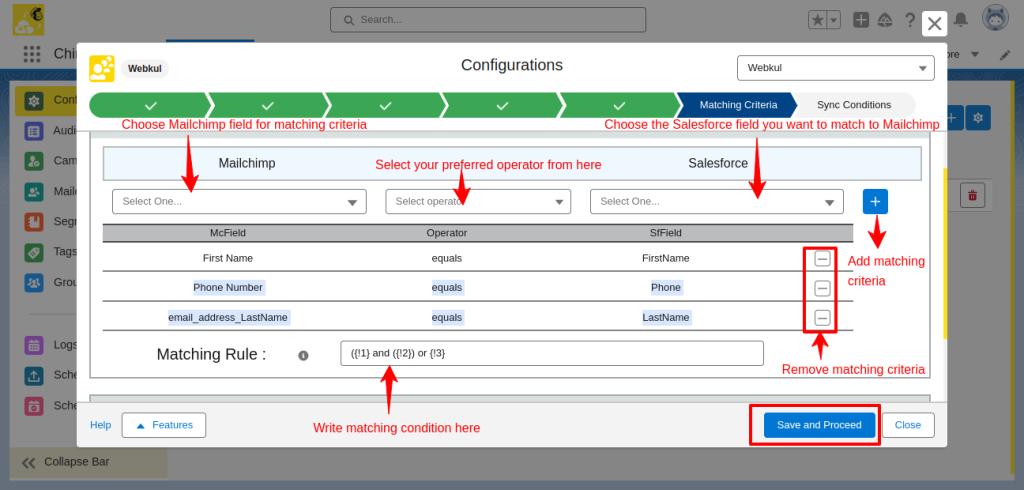
- Matching Criteria- Matching criteria are for Account, Contact, and Lead. Select fields from Mailchimp and Salesforce. Then choose conditions as per your preference.
- Click on the + add button to add the matching criteria you have set. It creates and updates existing records as per matching criteria set by you.
- If you already have many records for that criteria then it shows you a message on your screen to resolve or merge that and then go with this criteria.
Global Settings on MailChimp Salesforce Connector
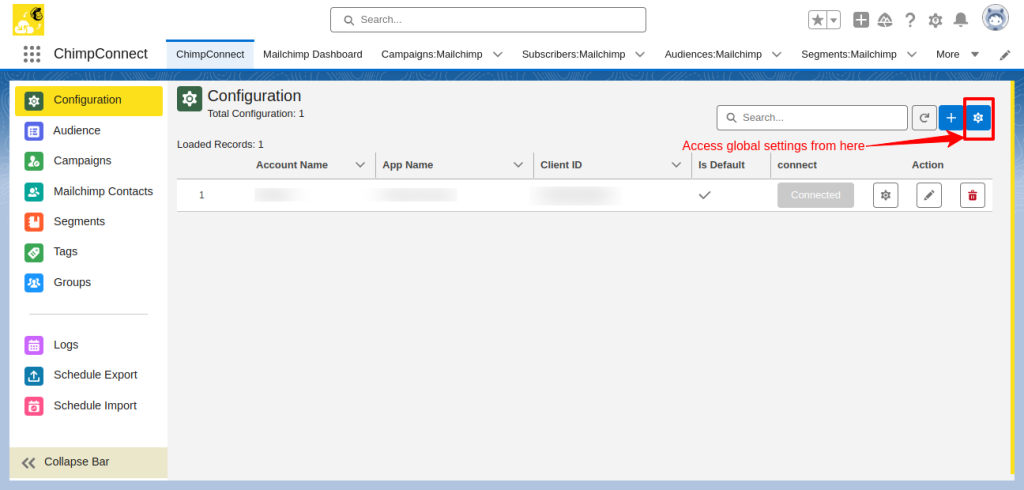
- In the configuration tab, you can find the global settings on the right side of the connector.
- Click on the setting icon to access global settings.
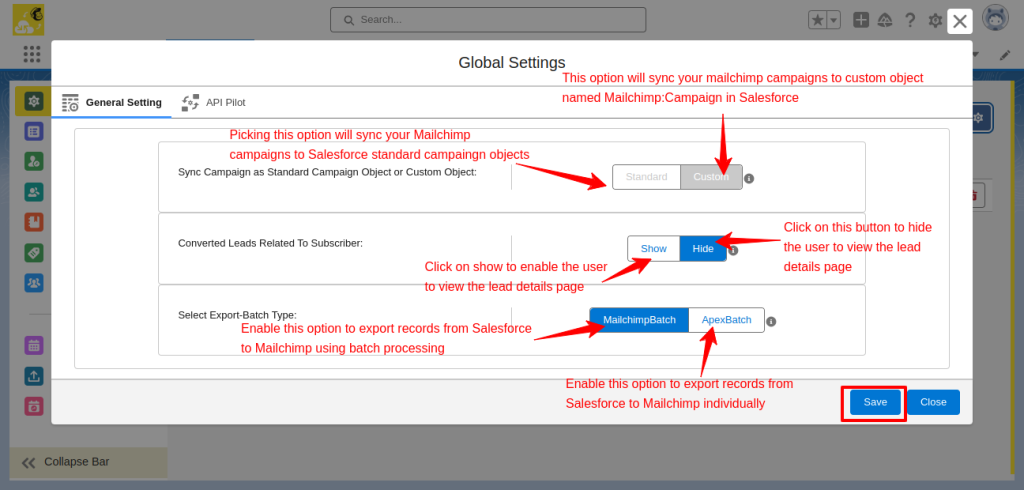
- Altogether, the general setting tab provides various functionalities like
- Sync campaign as standard and custom object.
- Give the user access to view the lead details page.
- Export your data by selecting Export Batch Type.
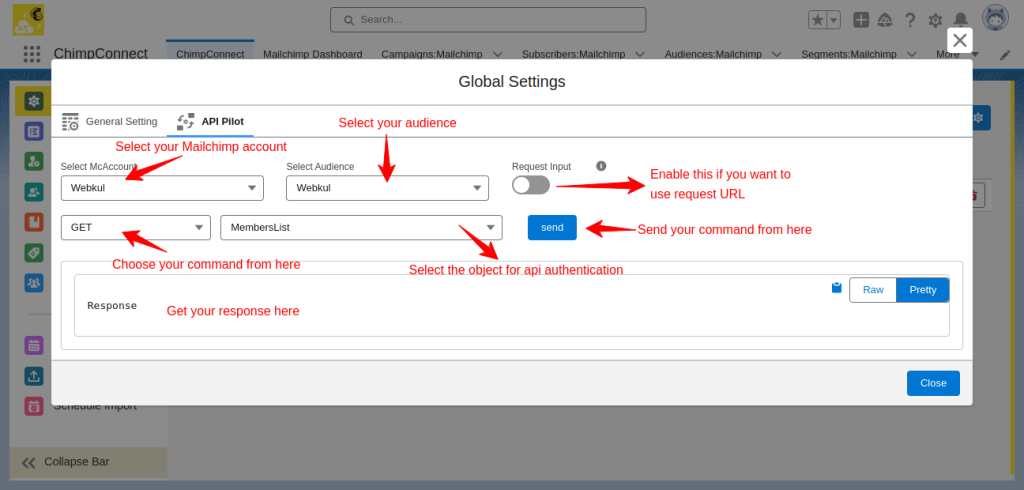
- Shift to the Api Pilot tab, It works as Postman. It enables you to get data from API to explore, debug, and test.
What Quick Actions You Can Add For Mailchimp Salesforce Integration?
You can easily create quick actions in your Salesforce to make the workflow easier. Furthermore, it helps save you time in accessing the information.
If you want to create quick actions, you can create the following actions per the object.
- Audience
- Export To Mailchimp
- Campaign
- Export To Mailchimp
- Import from Mailchimp
- Mailchimp Action
- Select Template
- Segment
- Add MC Segment Options
- Export To Mailchimp
- Import from Mailchimp
- Subscriber
- Export To Mailchimp
- Import from Mailchimp
- Account
- Export To Mailchimp
- Contact
- Sync MC Campaign Stats
- Export To Mailchimp
- Lead
- Sync MC Campaign Stats
- Export To Mailchimp
Row Actions of ChimpConnect
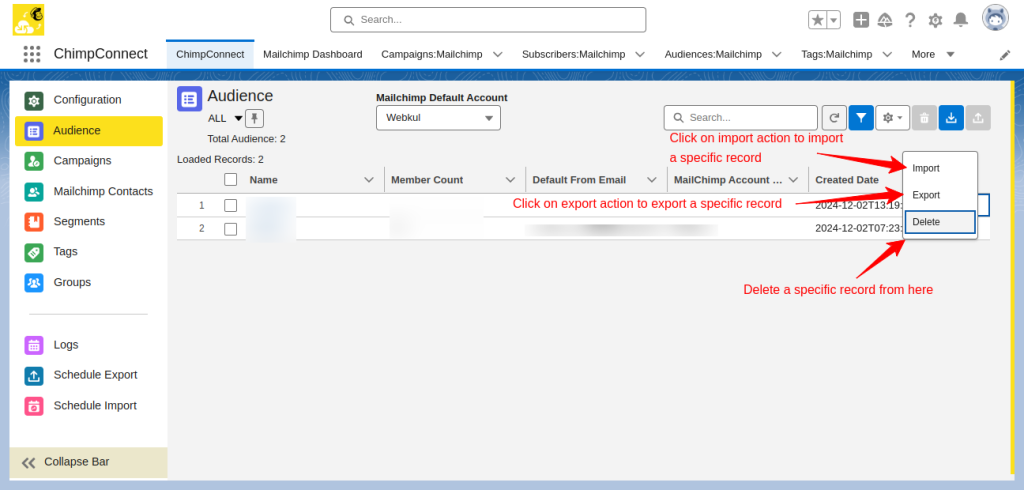
There are 3-row actions available:
- Delete: Click the Delete icon from row actions to delete the specific record.
- Import: The Delete icon from row actions is to delete the specific record.
- Export: The export icon is used to export a specific record.
Actions Available For Objects Of ChimpConnect- Mailchimp Salesforce Integration
The MailChimp Salesforce connector has various actions available for different objects. You can find most of the actions are the same for all the objects.
We will try to help you explain all the features. Features in an object that had been explained earlier for an object will not be explained again as it will do the same functionality.
So, Let’s start with the Audience.
Audience: A list view of Audiences that you have synced from your default Mailchimp account.
In the audience section, you will have many various features that can be used to enhance your workflow.
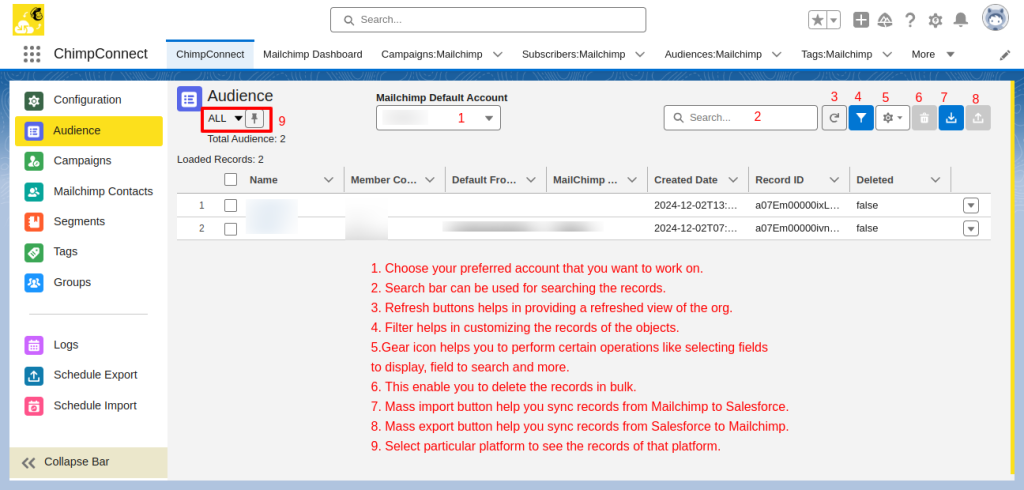
- MailChimp Default Account: Choose the preferred account that you want to work on.
- Search Bar: The search bar can be used for searching the records.
- Refresh buttons: It will help in providing a refreshed view of the org.
- Filter: Customizing the records of the objects.
- Gear icon: It helps you to perform certain operations like selecting fields to display, fields to search and more.
- Delete: This enables you to delete the records in bulk.
- Mass import button: Helps you sync records from Mailchimp to Salesforce.
- Mass export button: Sync records from Salesforce to Mailchimp.
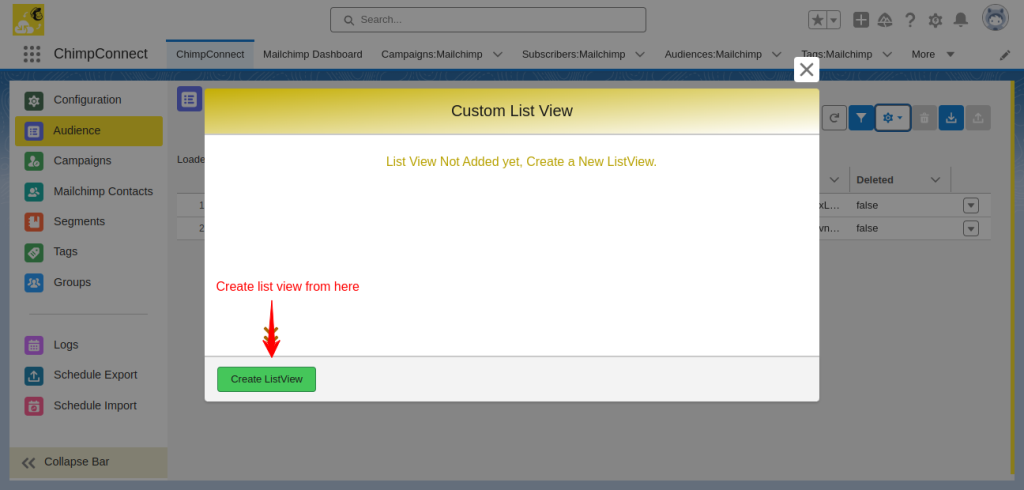
- List View: Select a particular platform to see the records of that platform.
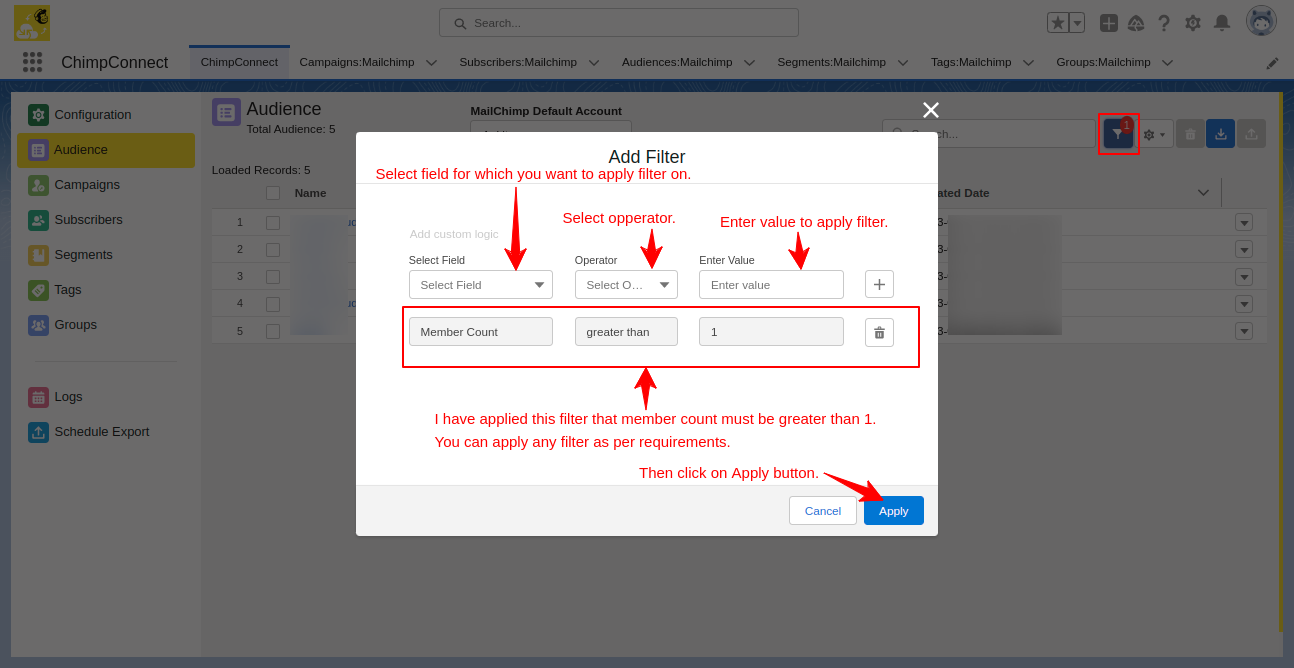
- This is how you can use the filter icon. Select the field of the object and apply operations according to your needs.
- Gear Icon: Click on the gear icon and you will find more settings inside it. We will discuss all the settings in brief.
![]()
-
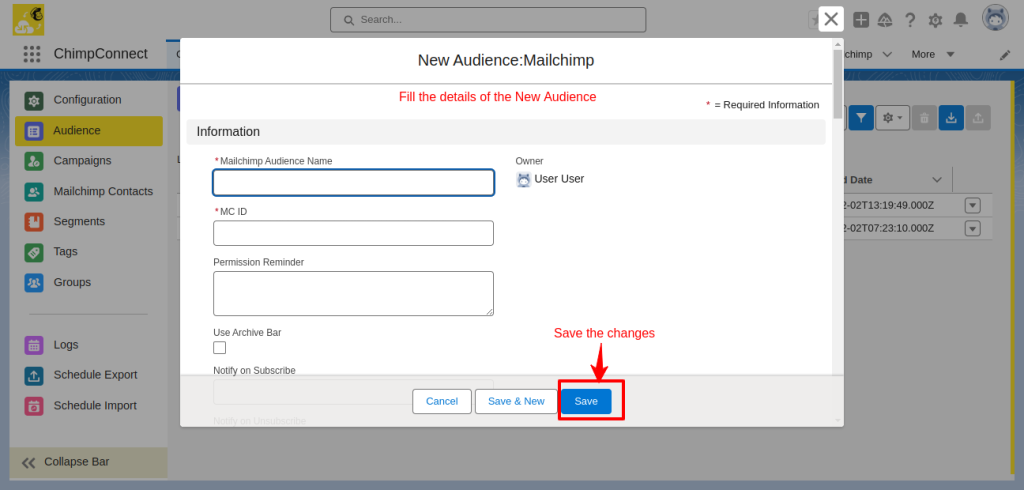
- Add Audience: If you want to add a new audience for storing your records, you can create it from here.
-
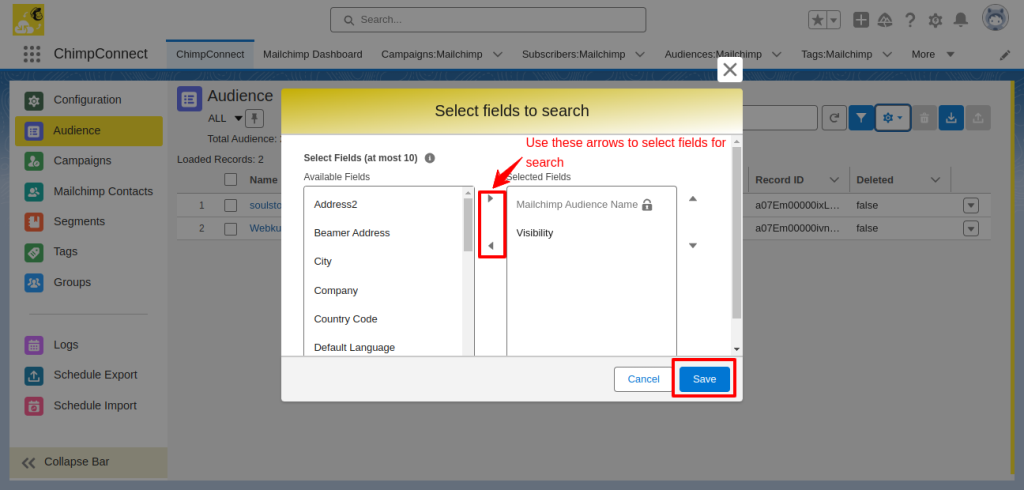
- Select fields to display: You can select the specific fields that you want to see in the List view of Objects. Further, click on the Gear icon and select “Select Fields to Display”. Now do the selection and click on the Save button.
-
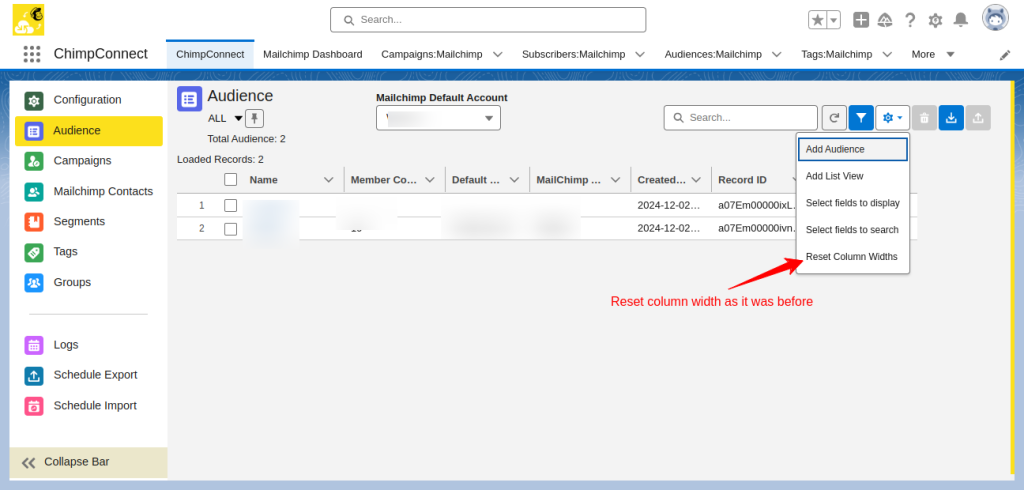
- Reset Column width: If you have changed the width of the columns to check records data and now you want to set it as they were before. Then click on this option to reset the column width.
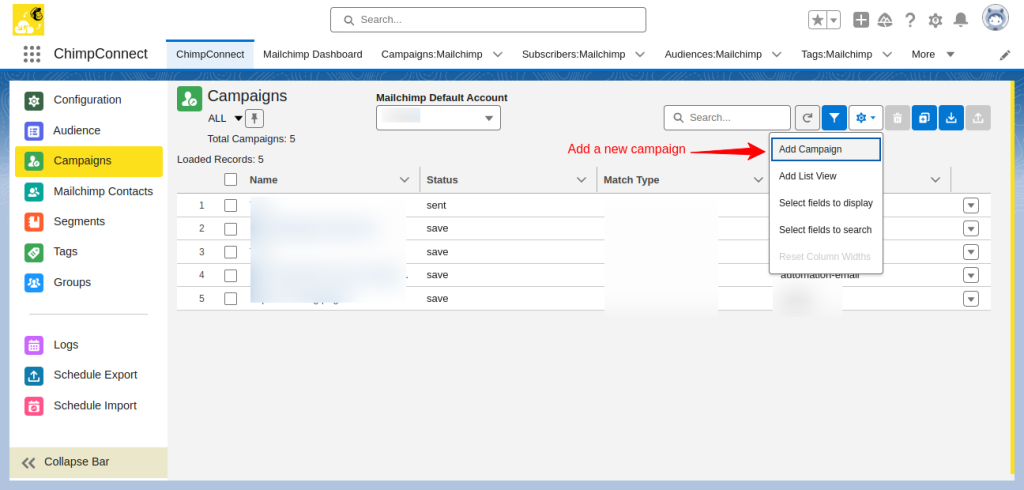
- Campaigns: Check the list view of Campaigns that you have synced from your default Mailchimp account.
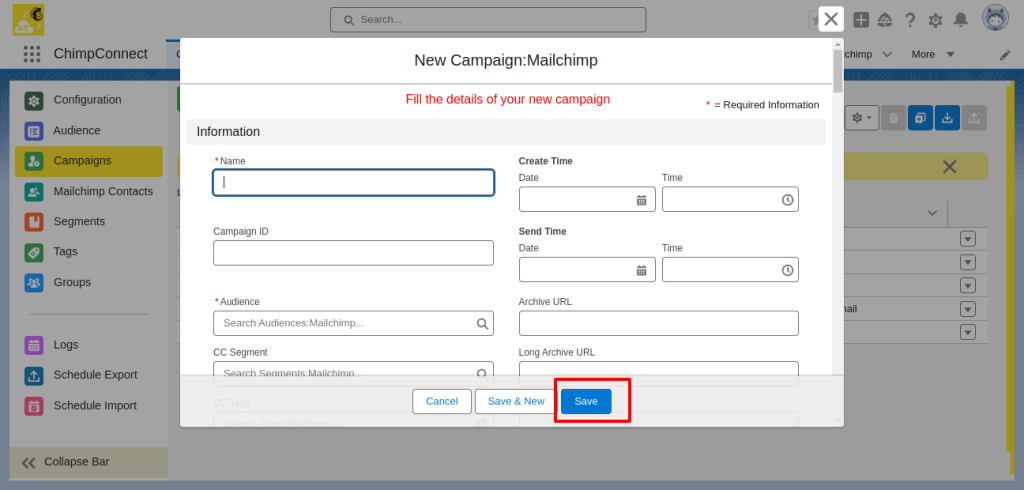
- Add Campaign: In this option, you can add a new campaign to add details to your campaign as per your needs.
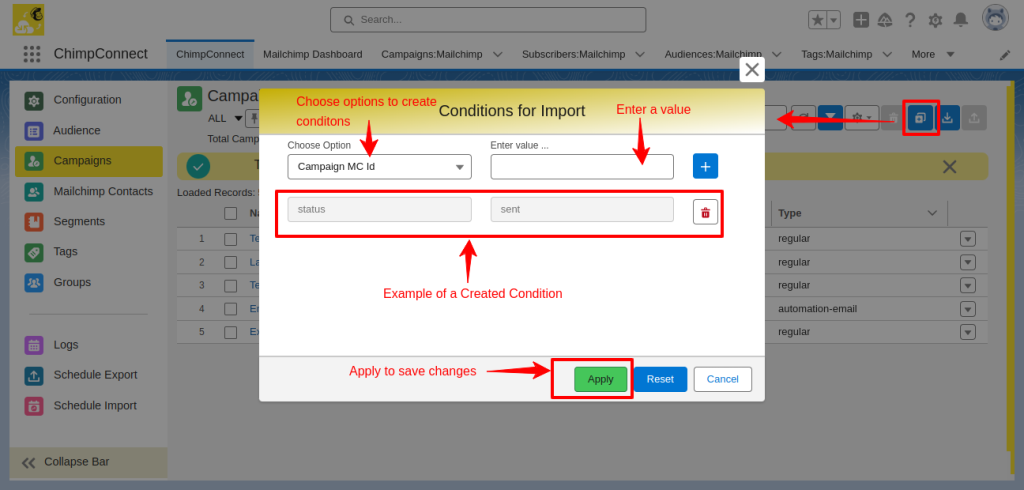
- Add Condition: You can add conditions for the import process whenever required. This option is also available in the Campaigns, Subscribers, Segments, and Tags objects.
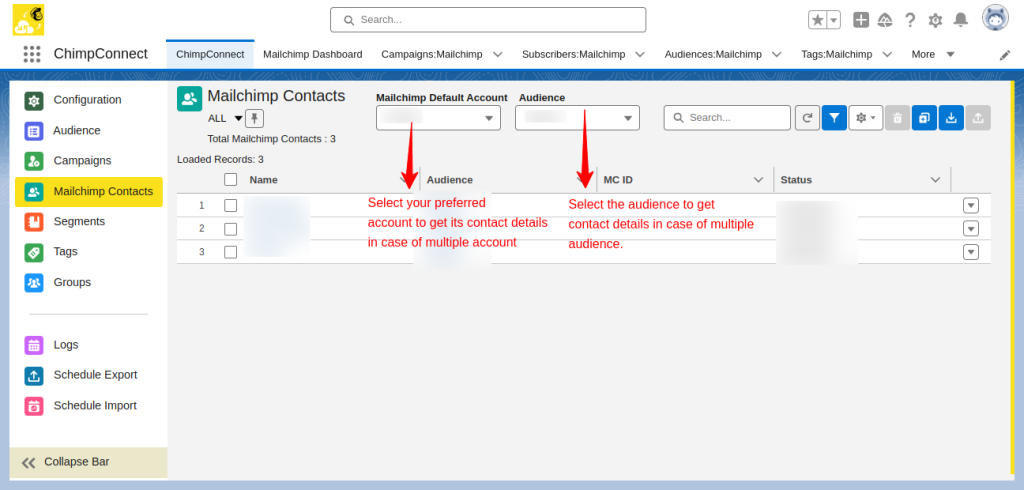
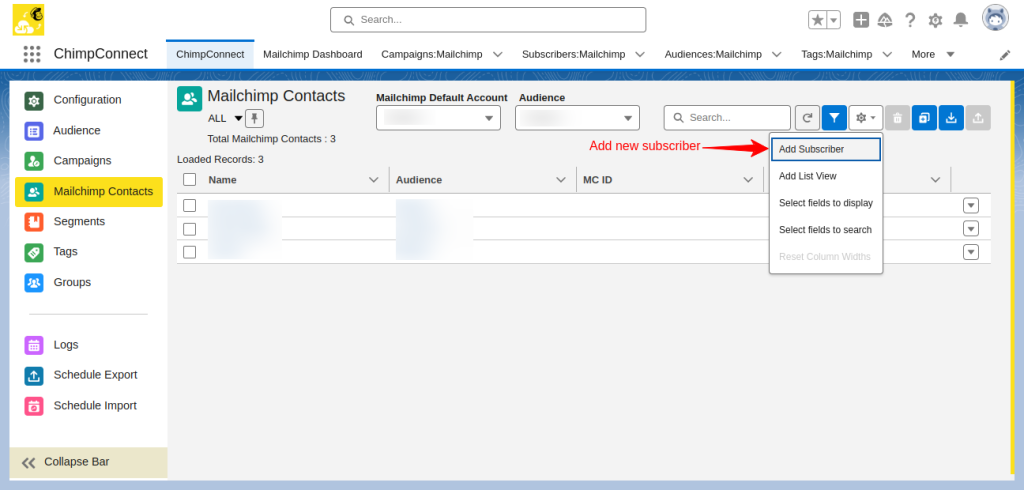
- Mailchimp Contacts: Following is the list view of Mailchimp contacts that you have synced from your default Mailchimp account for the selected audience (if multiple).
- Mailchimp Default Account: You can select the Mailchimp account in case of multiple accounts.
- Select Audience: Select the Audience in case of multiple audiences. This option is also available in Subscribers, Segments, Tags, and Groups objects.
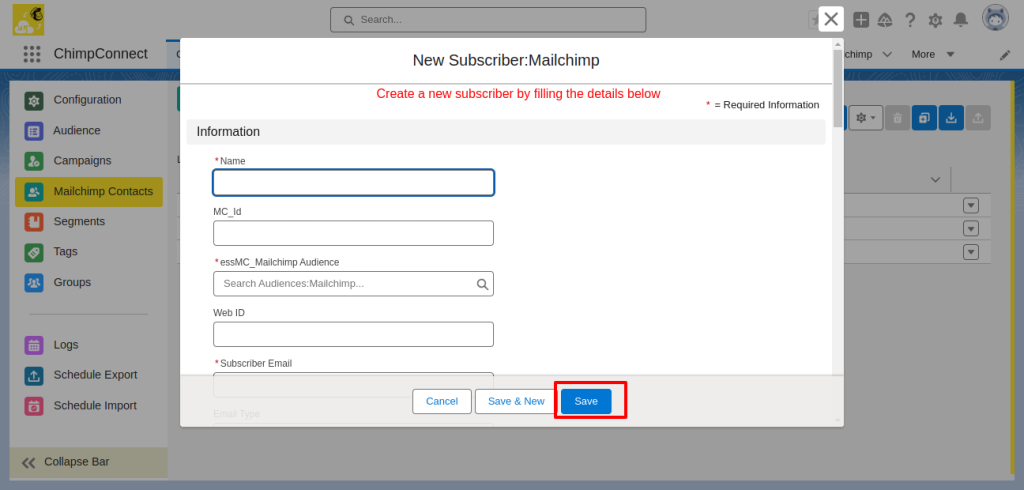
- Add Subscriber: In order to add a new subscriber to your contact, you can add through this option.
You can fill in all the necessary details about the subscriber and update your contact list with ease.
Other Objects Of ChimpConnect- Mailchimp Salesforce Integration
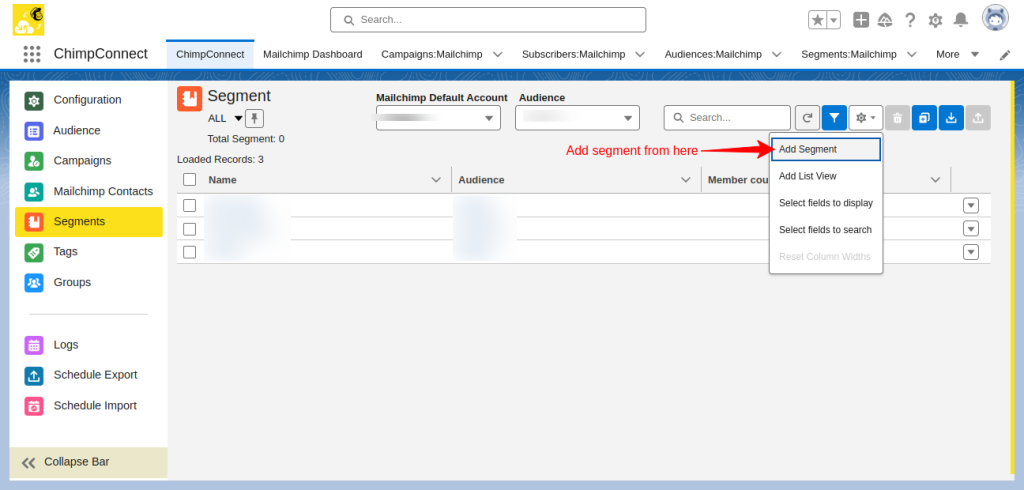
Segments: Here is the list view of Segments that you have synced from your default Mailchimp account for the selected audience (if multiple).
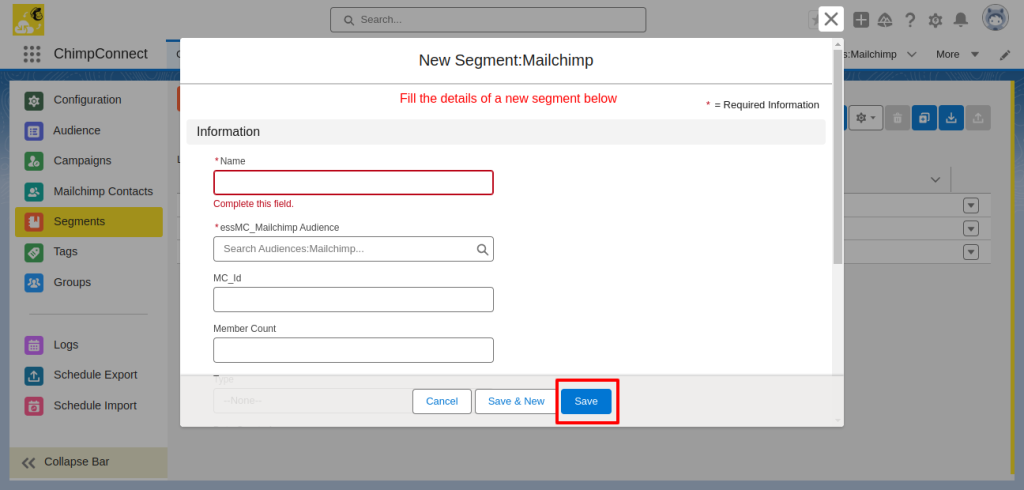
Add Segment: If you want to add a segment to your account you can add it with the help of the given option.
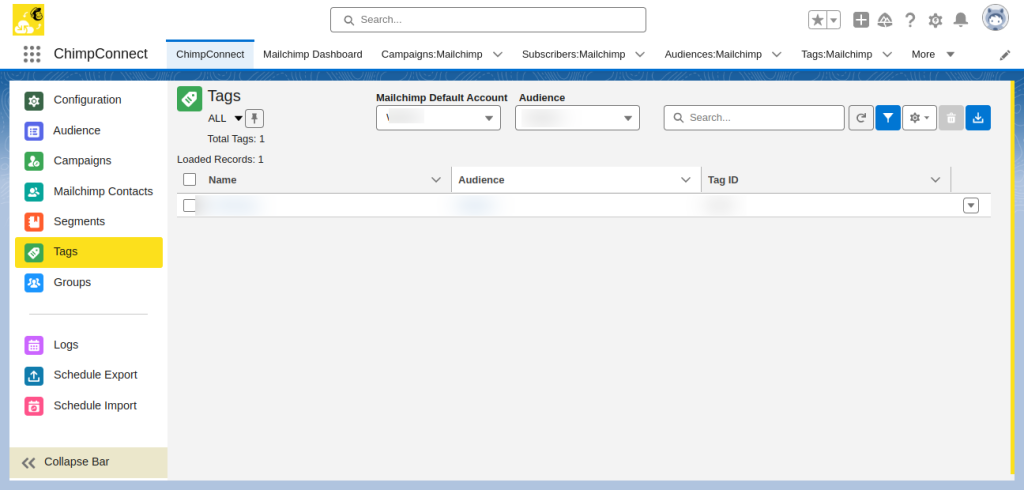
Tags: The list view of Tags that you have synced from your default Mailchimp account for the selected audience (if multiple).
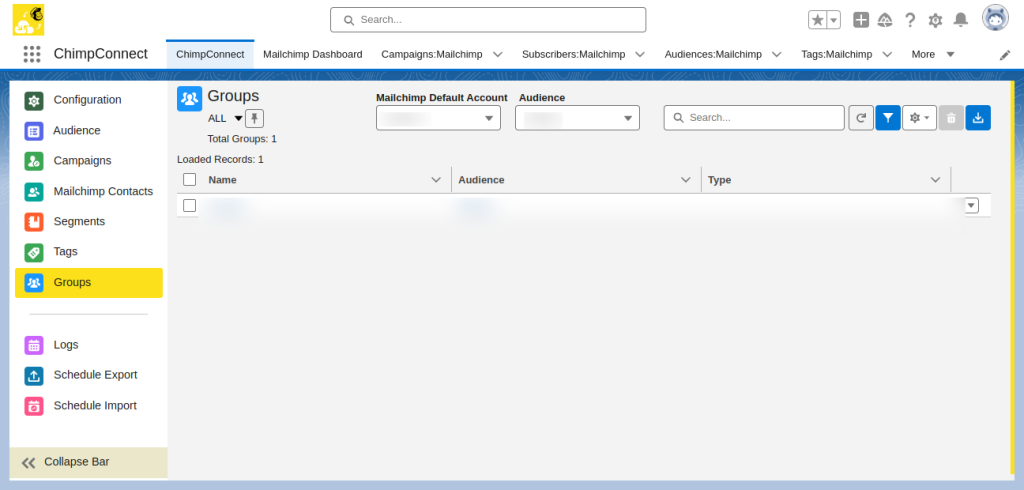
Groups: Here is the list view of Groups you synced from your default Mailchimp account for the selected audience (if multiple).
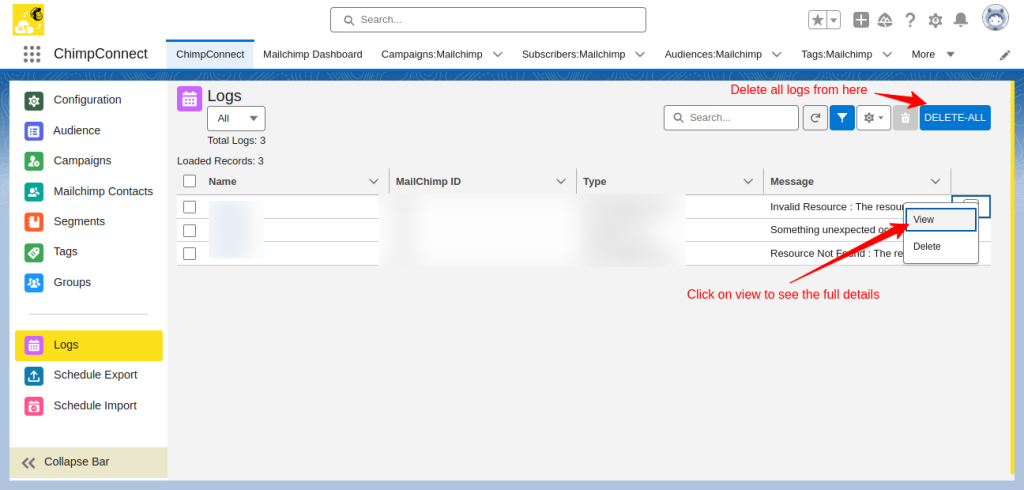
- Logs: In case of any issue while importing or exporting the records then, check them here in the Logs section.
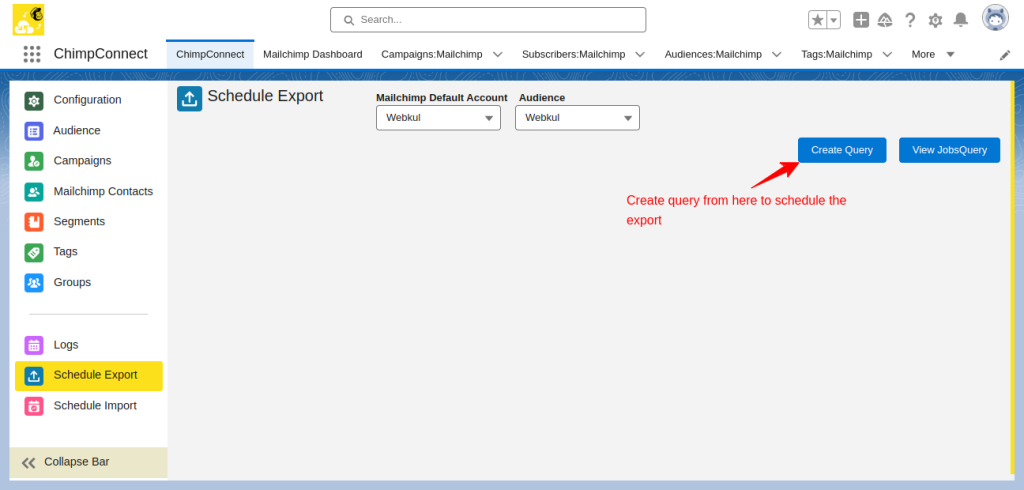
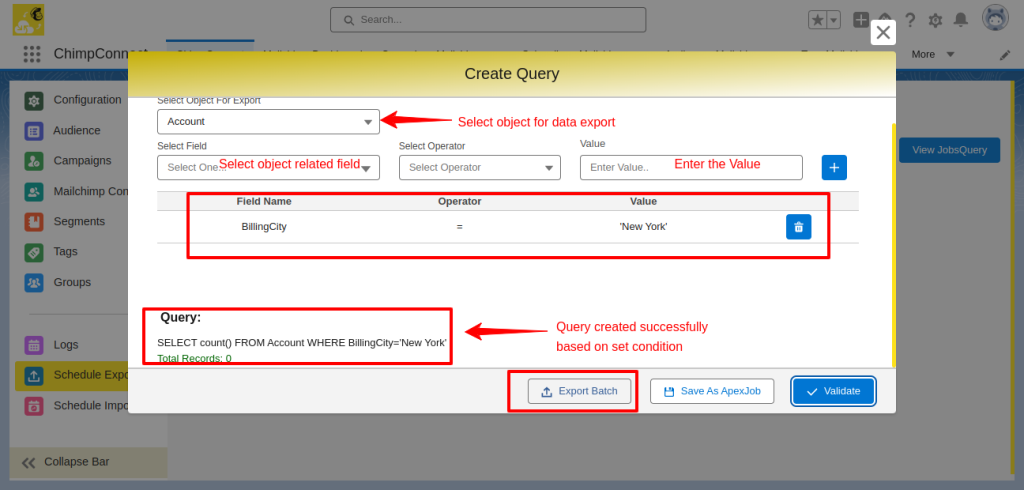
- Schedule Export: You can also schedule your export process as per your requirements in Mailchimp Salesforce integration.
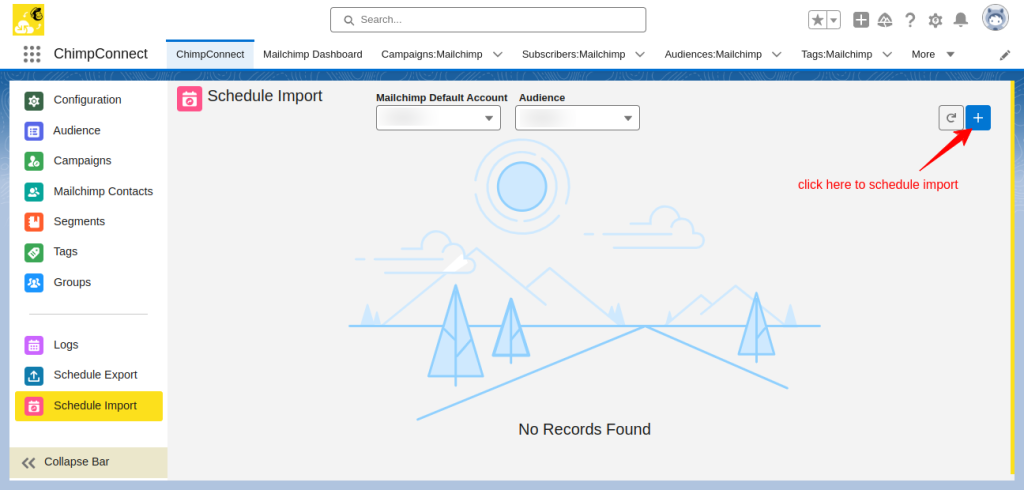
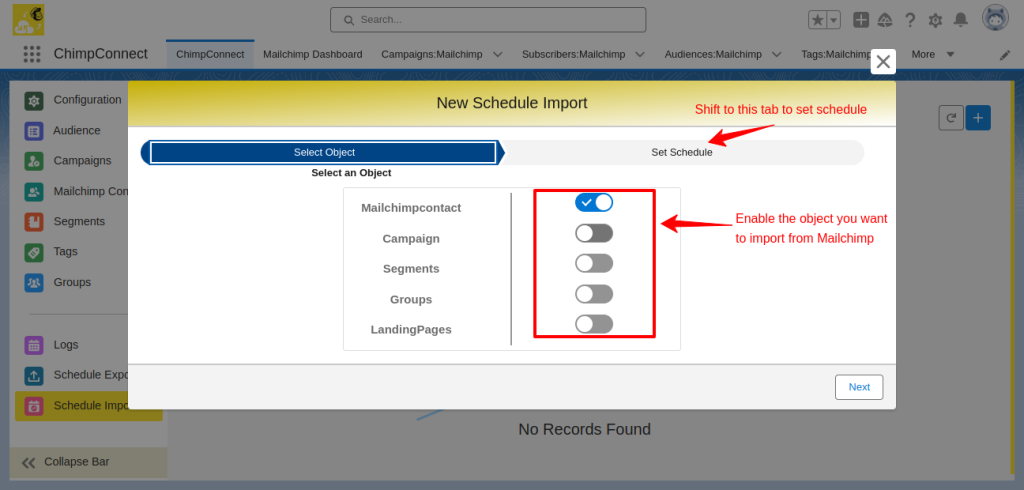
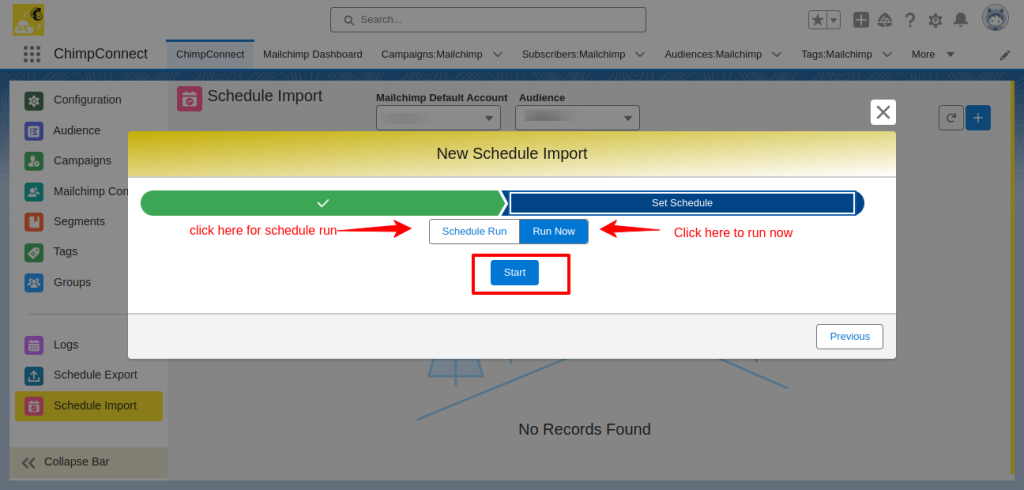
- Schedule Import: Schedule your import process from Mailchimp to Salesforce. Enable the toggle button in front of the objects and in a few clicks you can import the data.
Salesforce AppExchange Consulting Profile
We are a business software development, consulting, and PDO firm with 13+ years of experience.
We provide services for different Salesforce clouds such as Sales Cloud, Marketing Cloud, Health Cloud, Commerce Cloud, Service Cloud, and Experience Cloud.
Moreover, we have a team of certified Salesforce developers and dedicated Salesforce Consultants. There are more than 10 applications that we have published on the Salesforce AppExchange.
Please visit the Webkul Consulting Profile to check our expertise and partner navigator achievements
Support
- To view all our applications in Appexchange, go to Webkul Appexchange Apps.
- For any further query, Click To Create Ticket


Leave a Comment
Comments (0)