BigCommerce Salesforce Connector
Updated 14 October 2025
BigCommerce Salesforce Connector: BigCommerce and Salesforce Integration are elevating e-commerce and CRM platforms. As a result, managing unlimited e-commerce data is easier than ever.
It acts as a bridge between BigCommerce and Salesforce, enhancing both platforms through a service-first approach.
Furthermore, this application allows admins to easily synchronize Customers, Categories, Products, and Orders with Salesforce CRM, which helps track sales and growth trends.
Note:
- Firstly, the application required to install in Salesforce Org from AppExchange: eShopSync For BigCommerce
- If you don’t have a store yet or want to create a new store: Create a BigCommerce Store
Connector Features
- Provides a unified Salesforce platform to manage both e-commerce and CRM data.
- Synchronize e-commerce data at the Salesforce end to avail of CRM benefits.
- The Salesforce Centric configuration concept is to make it a hassle-free environment.
- Synchronization of Categories from BigCommerce to Salesforce end.
- Product and Order synchronization is needed to manage inventory effectively.
- Customers synchronization as Accounts and Contacts at the Salesforce end.
- Guest Checkout synchronization with complete Users & Order details.
- Interactive design with the user interface at the Salesforce end adding on effective data utilization
- Real-time synchronization of Customers, Products, Categories, and Orders.
- You can apply the custom conditions to import or export the records from the BigCommerce account to the Salesforce Org.
- The logs are maintained so that you can fix the issues of record synchronization and again sync them from the Log section itself.
How to Connect :
Paid Features
- Conditional Import: You can import the records conditionally by adding specific conditions in the connector
- Multistore: To sync your data, you can add multiple stores to eShopSync for BigCommerce.
- Sync Condition: This feature tab is available in the configuration window when you add the Sync Condition. In the connector, you can add conditions for objects and then choose whether to allow or stop this sync on the applied condition(s). The sync conditions can be customized in the import and export process.
- Bi-Directional- The data can be imported and exported from BigCommerce to Salesforce or Salesforce to BigCommerce.
- Batch Import- Schedule your data sync at your preferred time without needing your presence.
- Metafield Import- Metafields are user-defined key-value pairs that can be attached to BigCommerce data objects to add custom information. They can be used to store data about products, categories, variants, brands, and orders.

Installation & Setup At Salesforce’s End
- Install the “eShopSync for BigCommerce connector’ from Appexchange.
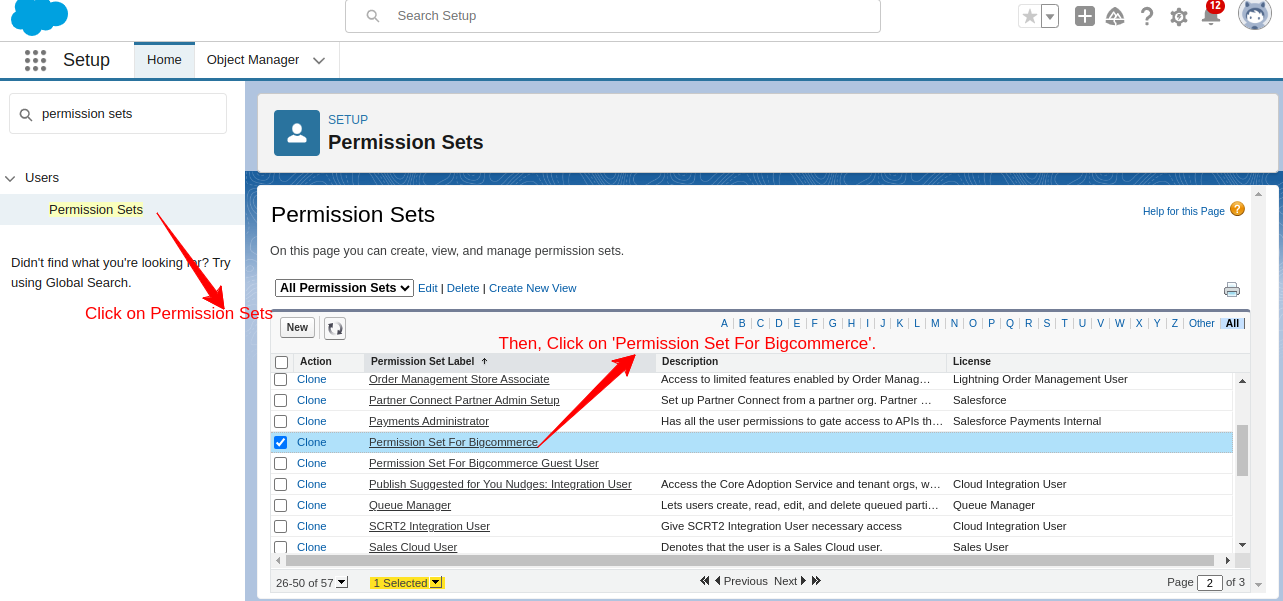
- After installation, you have to assign the permission sets to the user. In Quick Search, type Permission sets and click on it to open it.
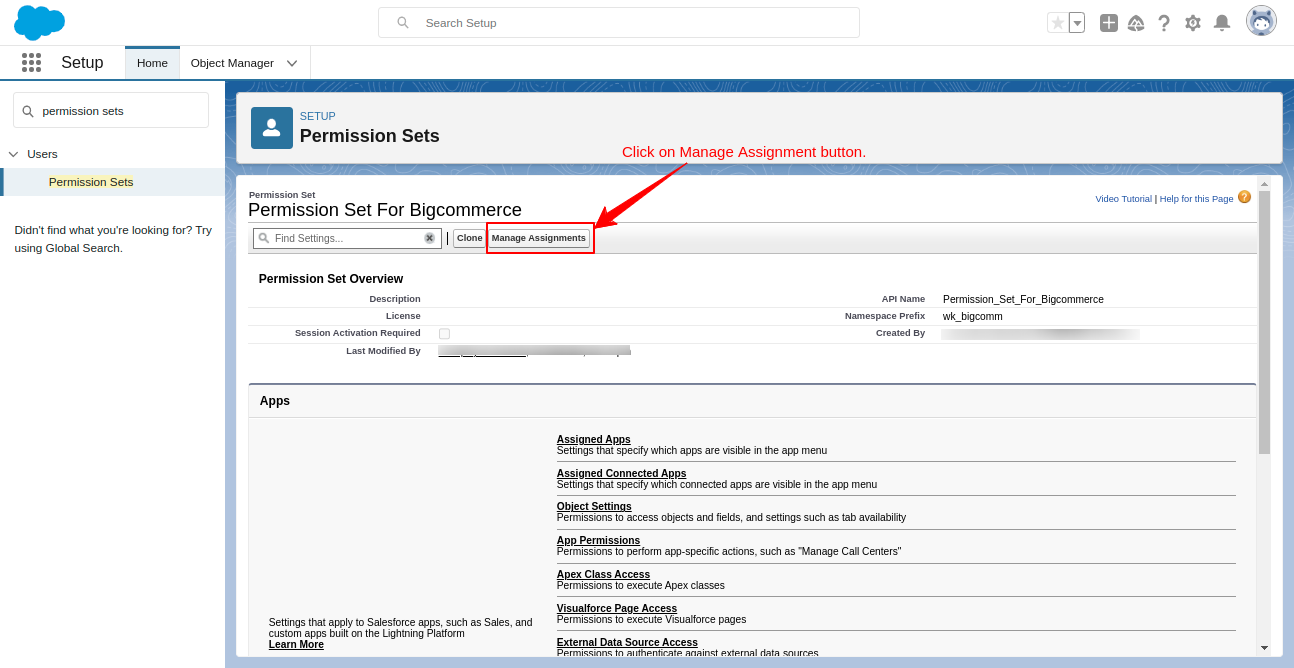
- Then click on the Manage Assignment button
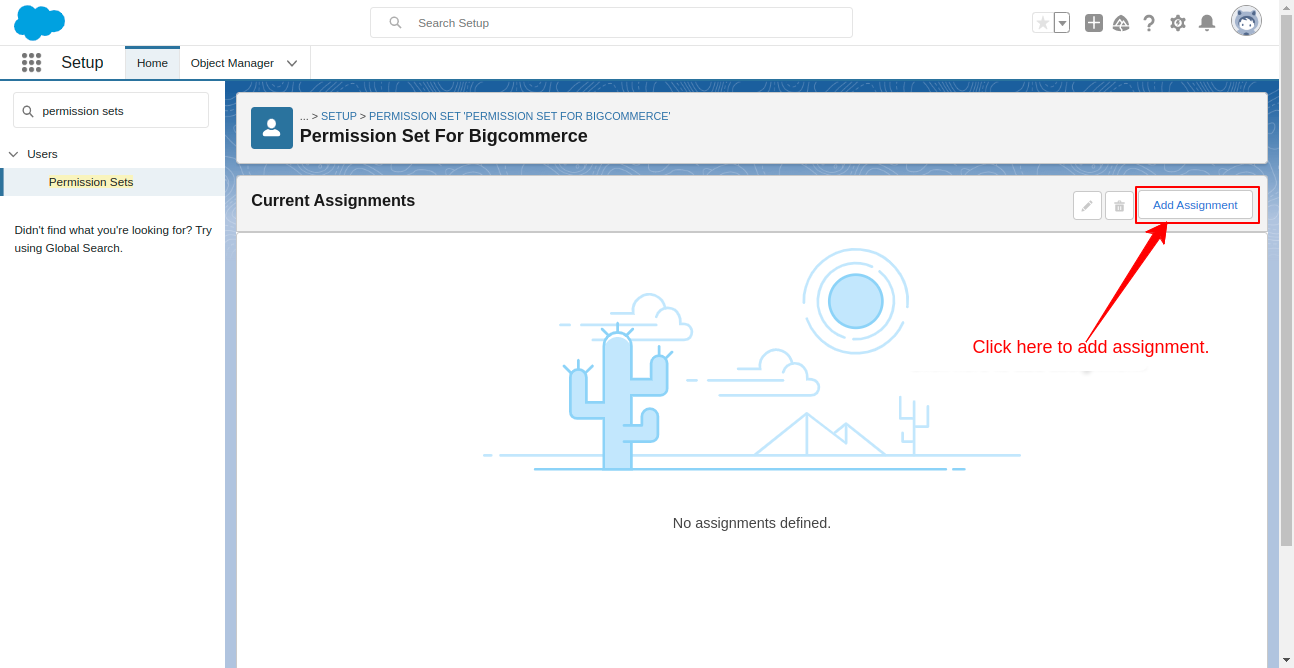
- Hit the Add Assignment button
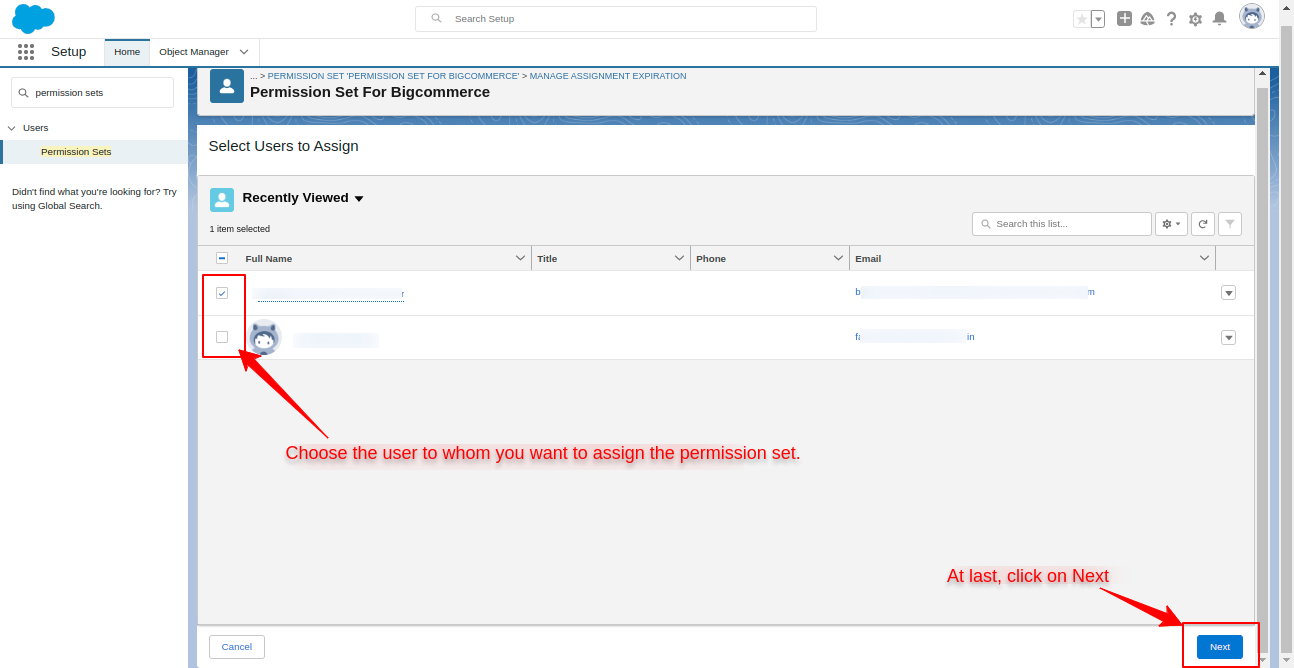
- Select the user to whom you want to assign permission sets and click on the Next button
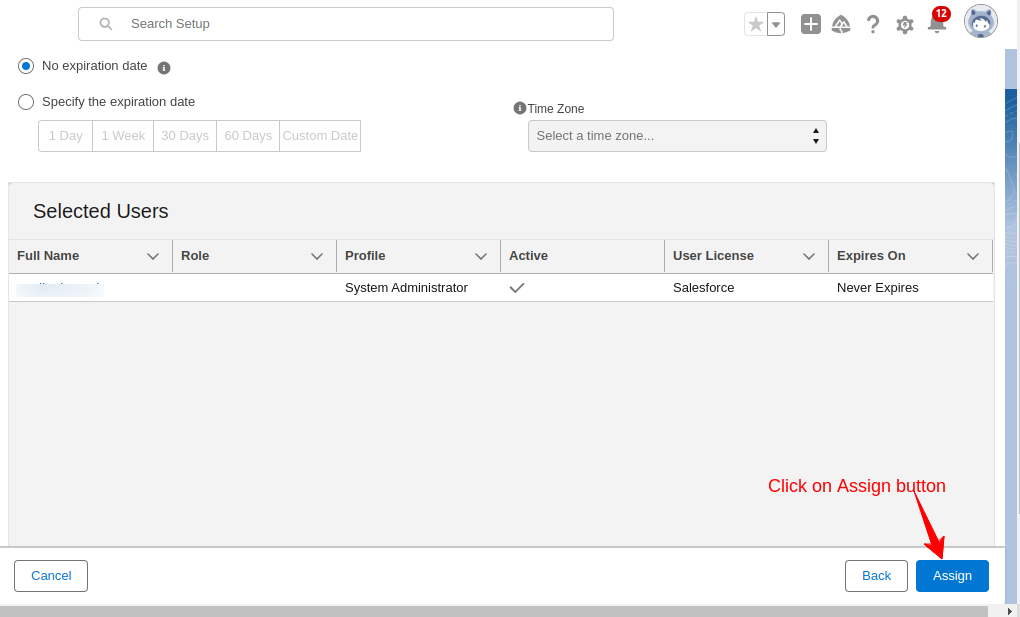
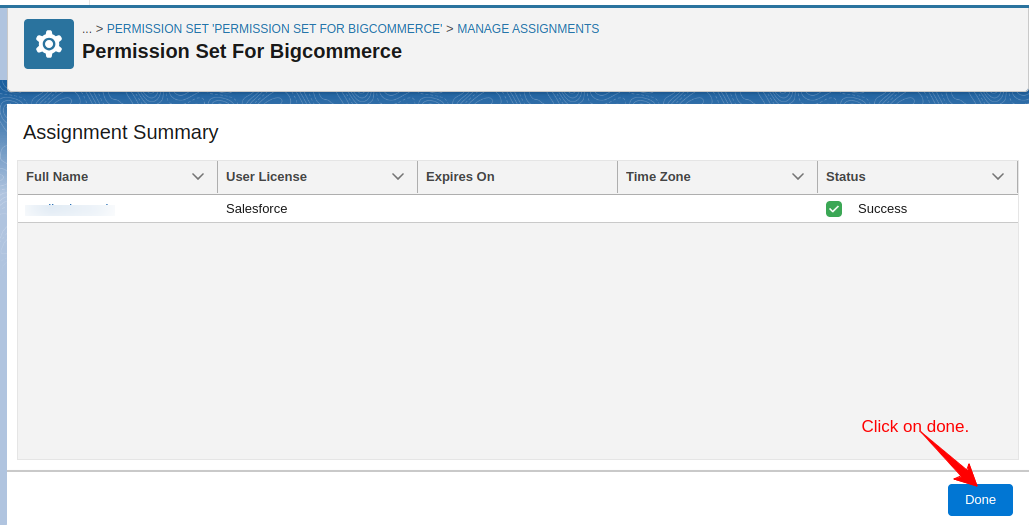
- Click the Assign button in the next window Click on the Done button.
For Real-Time Settings
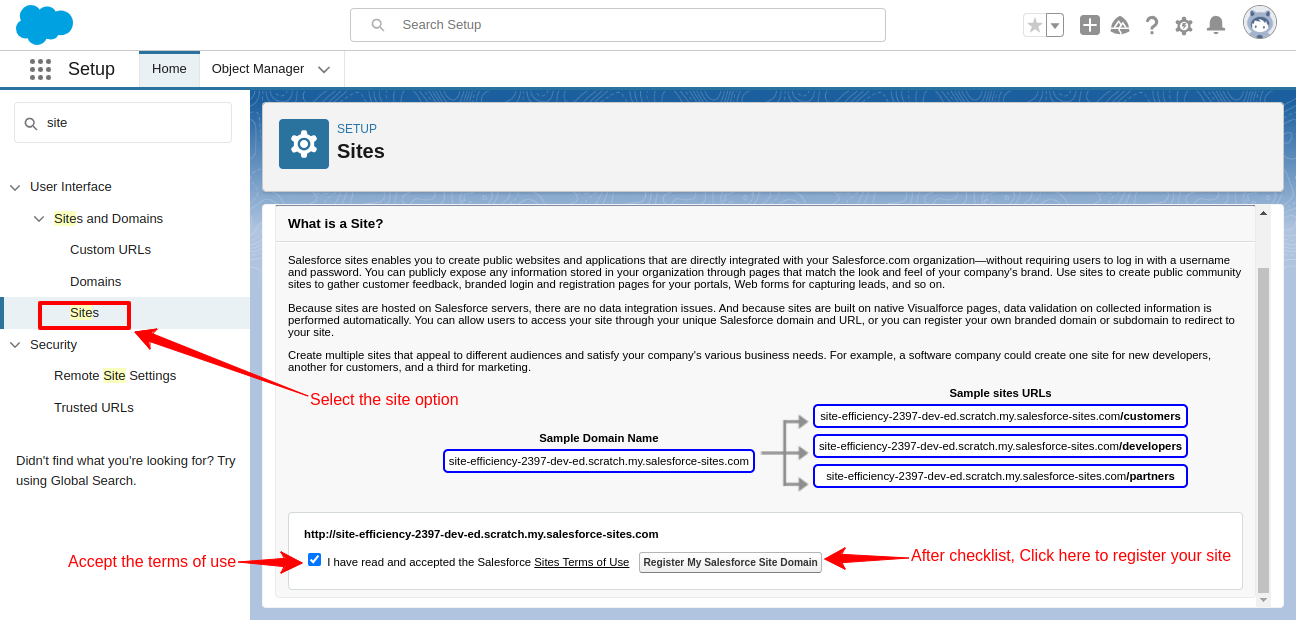
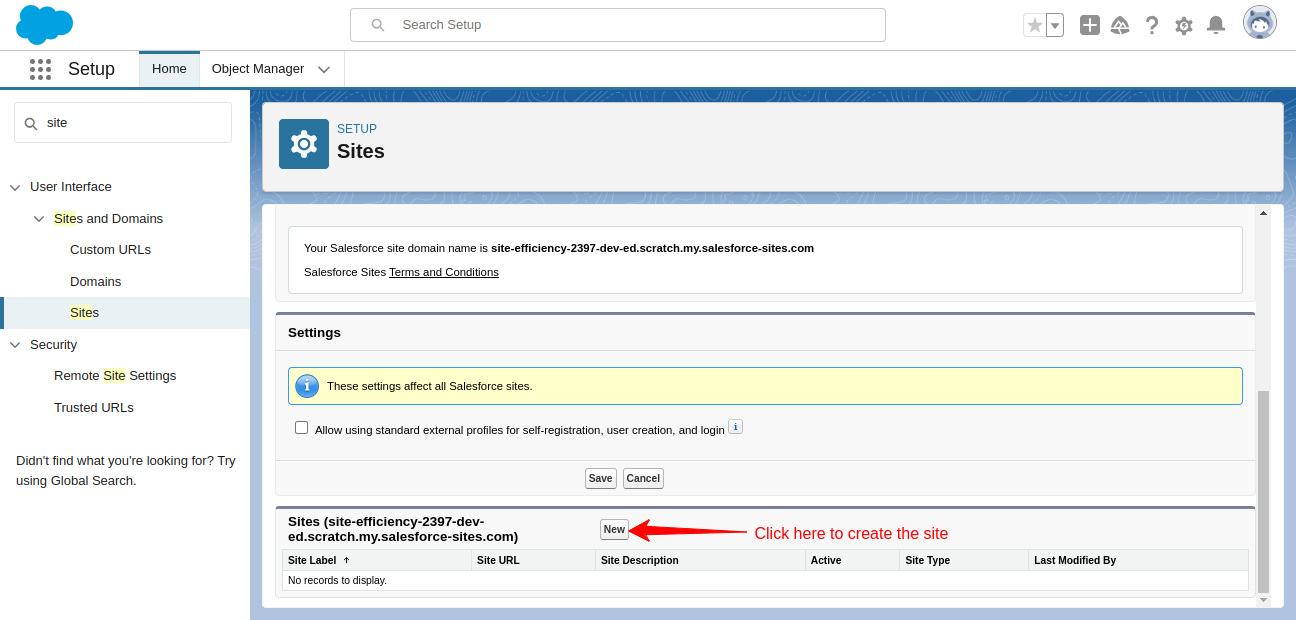
- In Quick Search, type “Sites” and click on it to open. If you’re doing this for the first time, you need to accept the Salesforce Terms & Services when the Sites page opens.
- In this tab, you have to first click on New to create a new site
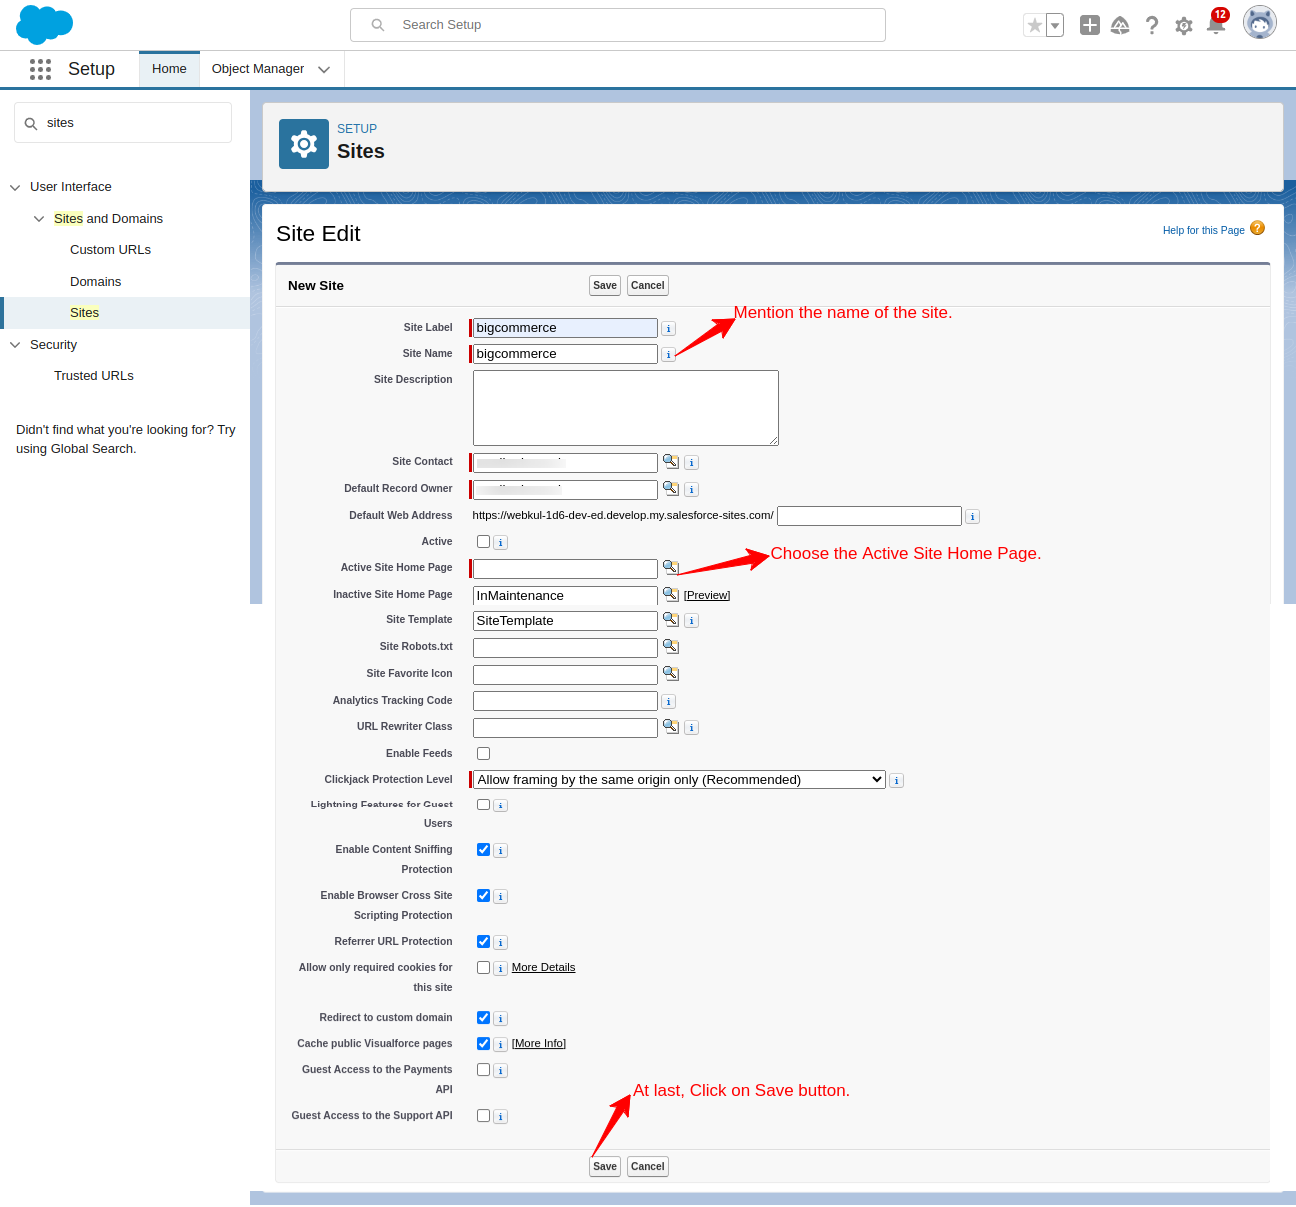
- In this tab, you have to create the name of a site in the Site label box and that same name comes in the site name box automatically. After that, Click on the Active box, and then you have to select the Active Site Home Page and choose any option that you want to proceed with. Then, Click on the Save button.
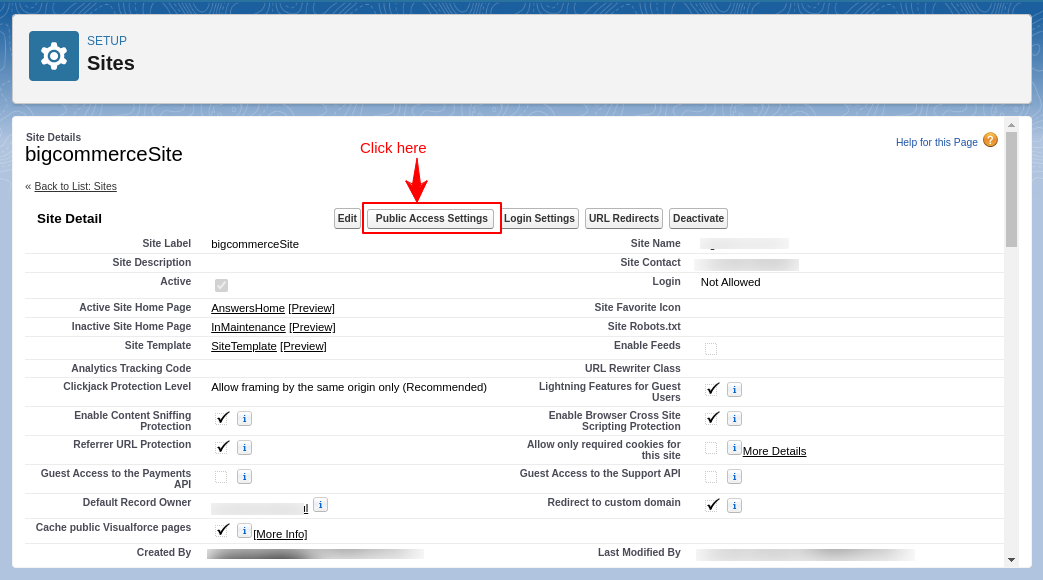
- After completing the previous steps, you have to click on ‘Public access Settings’.
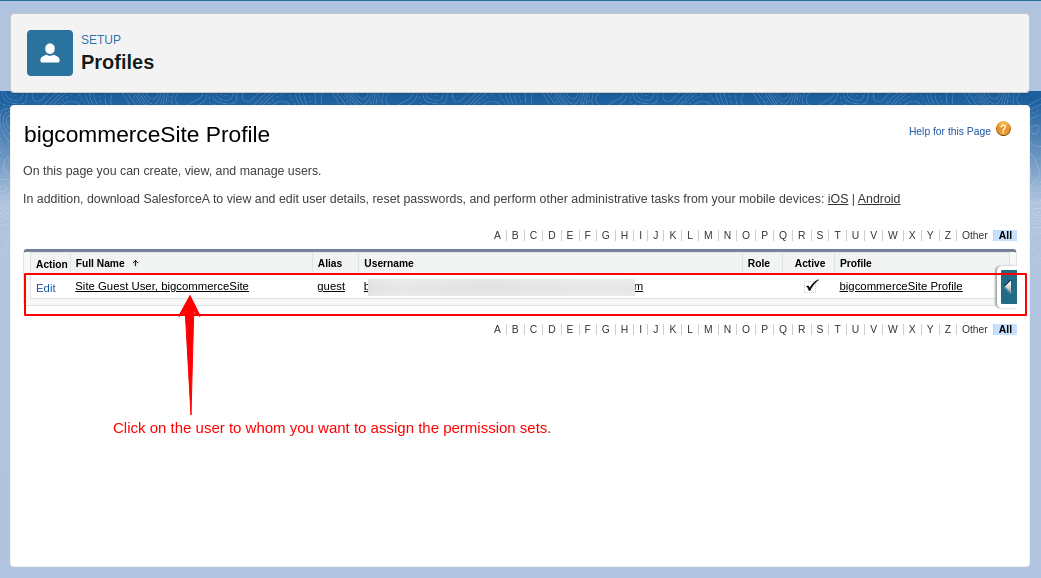
- Click View Users and then click on the user.

Then click on this tab, to assign the Permission Sets.
- In the user, scroll down, and under the heading Permission Set Assignments, hit the button.
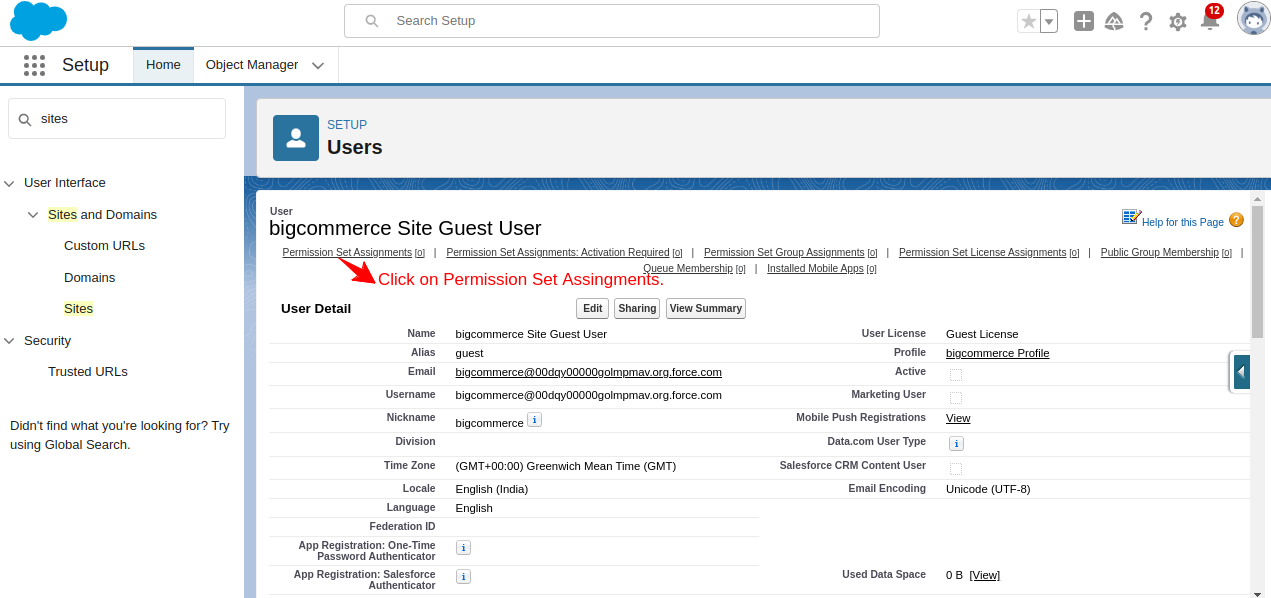
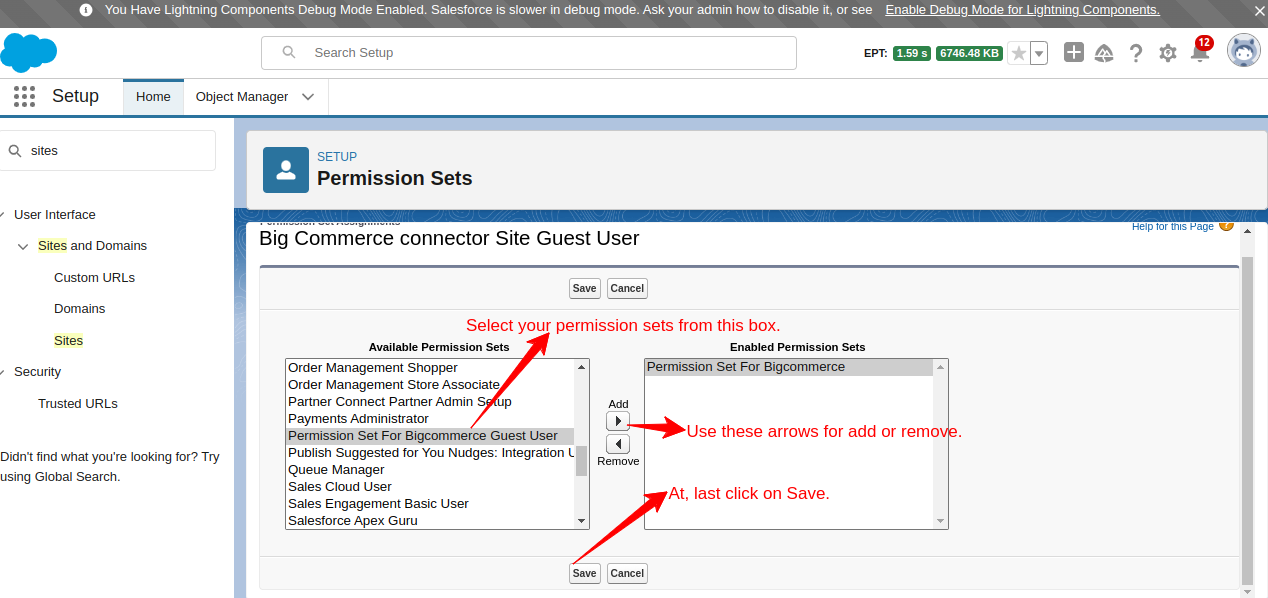
Here click on Edit Assignments.

- Enable “Permission Set For BigCommerce Guest User” and click on the Save button.
Configuration At BigCommerce End
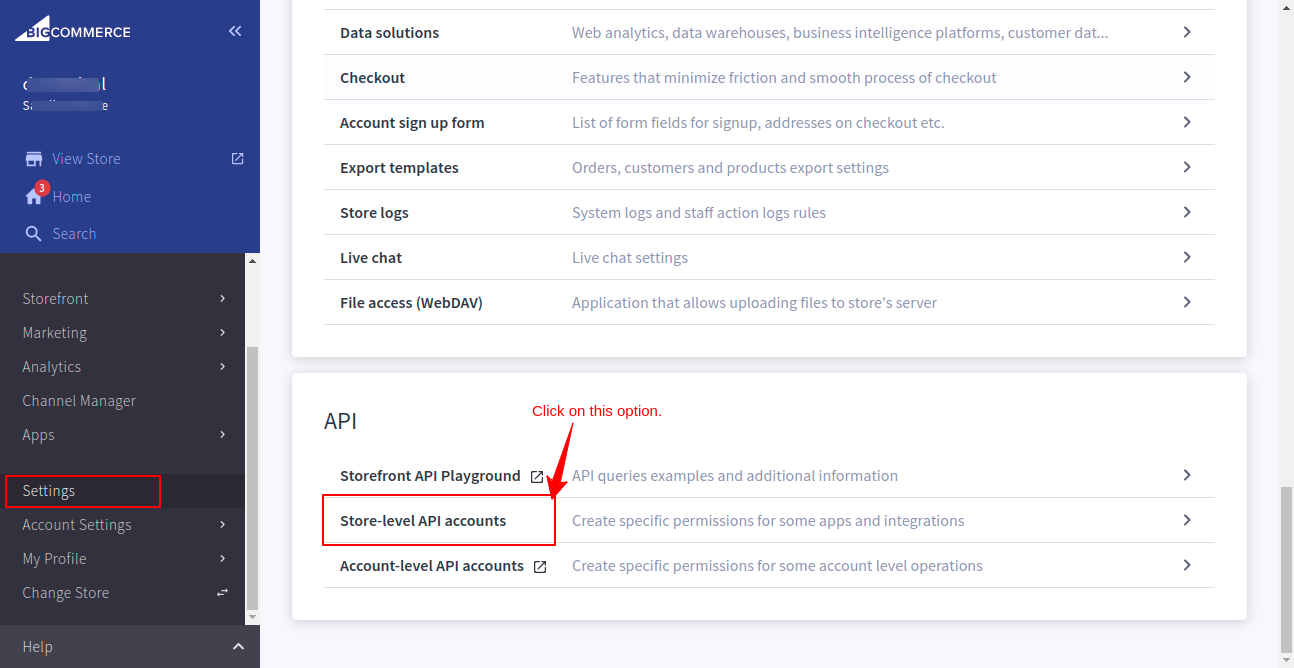
- Login to BigCommerce Store >> Go to Settings from the left navigation panel
- Scroll down to the API heading and click on the Store-level API accounts option
- Then click on the Create API account button
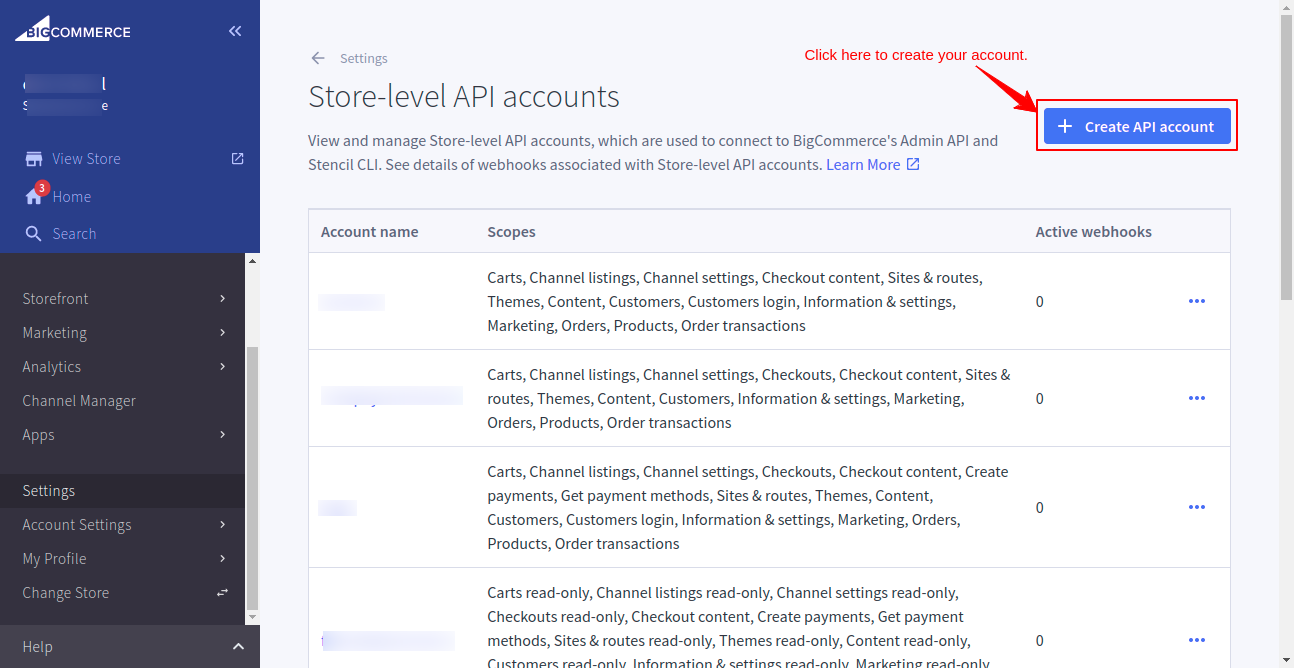
- Fill out the form and then click on the Save button.

- After filling in the sections and clicking on the Save button, you get the Client ID, Client Secret, and Access token that you have to copy and paste into the BigCommerce Salesforce Connector Credentials general settings.
- When done with credentials, click the Done button.
Note : An API credentials file with the details that you have to enter in Salesforce to connect to the BigCommerce store is also automatically downloaded into your system.

Add Bigcommerce Account To Salesforce
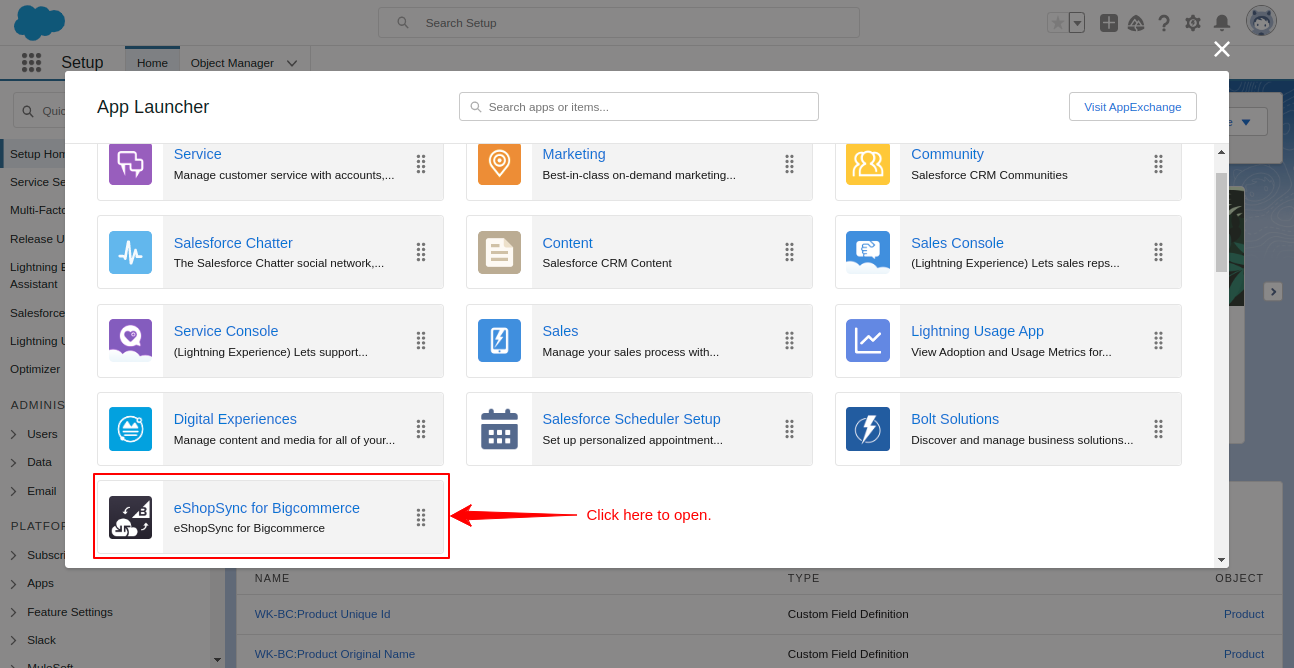
- Click on App Launcher and then click View All
- Now select eShopSync For BigCommerce
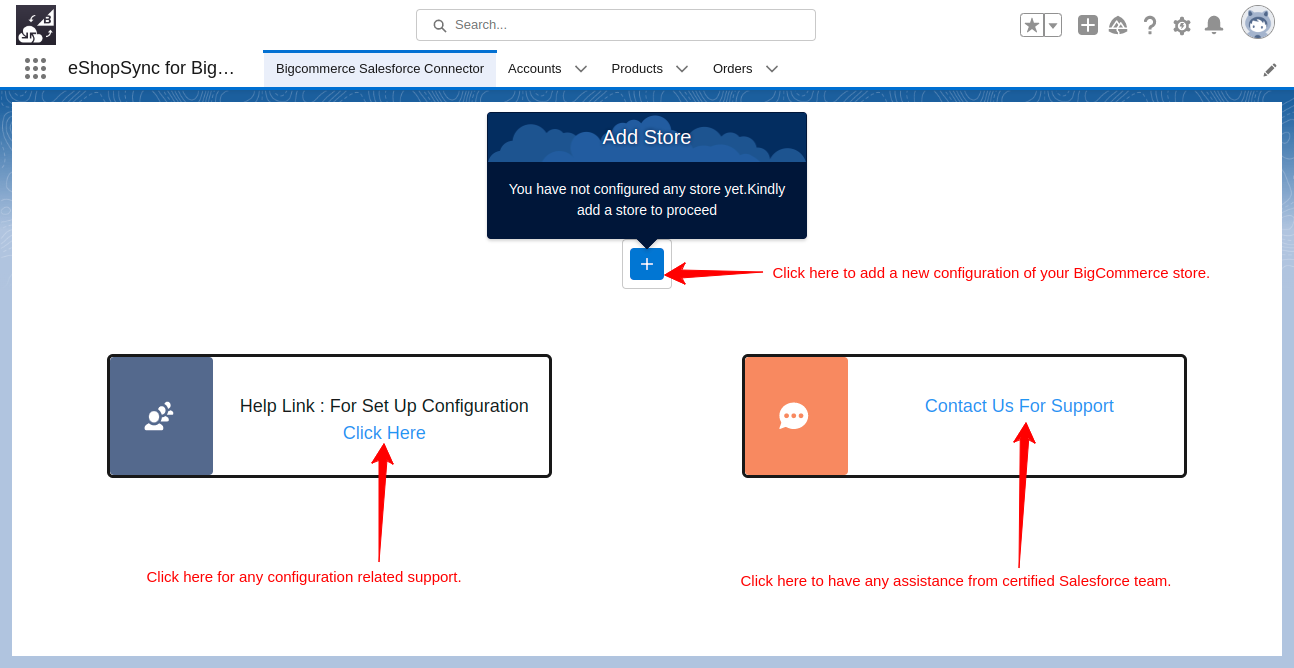
- Click on the + icon to configure the new BigCommerce store. This option will be available when you first time set up your configuration.
- At configuration window has some features listed at the top: Bidirectional, Conditional Sync, Multistore, and Sync Condition.
- If you have purchased any of these add-ons, they will be highlighted in green, or else they will be grayed out.
General tab: Mention the Store ID, Access Token, and Time Zone.

Object Settings: Do the required settings for your objects.

Note: Variants would synchronize as a product to the Salesforce ends then you are not able to change it until you have deleted all the BigCommerce products from the Salesforce end and vice-versa.


Real-time Settings: In this, you have to do the real-time settings for import and export synchronization. But for the export feature, you must connect with our Salesforce team.

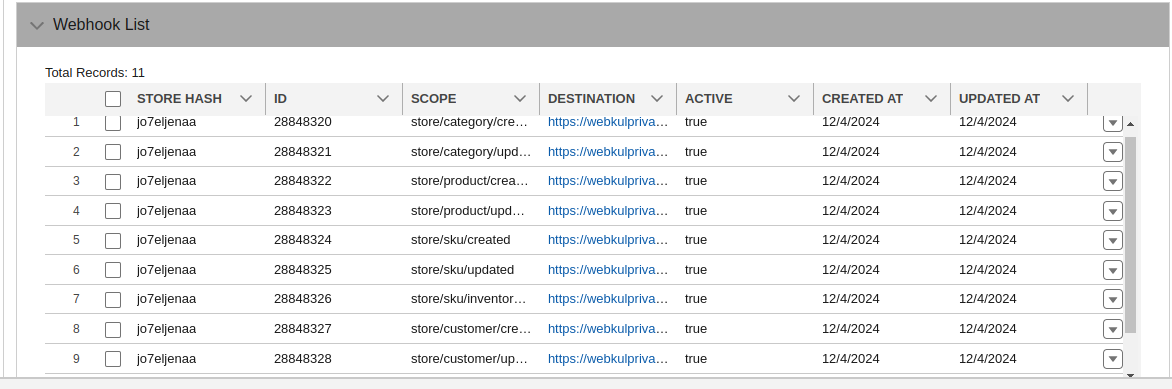
Webhook List –
Real-time Export Setting –

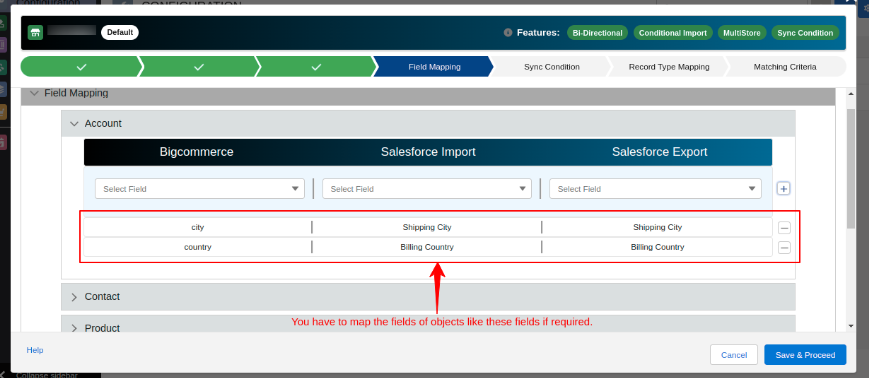
Field Mapping: Map the fields of objects to sync data correctly. You can map the fields for the objects like Account, Contact, Product, Order, Order Product, Opportunity, and Opportunity Product.
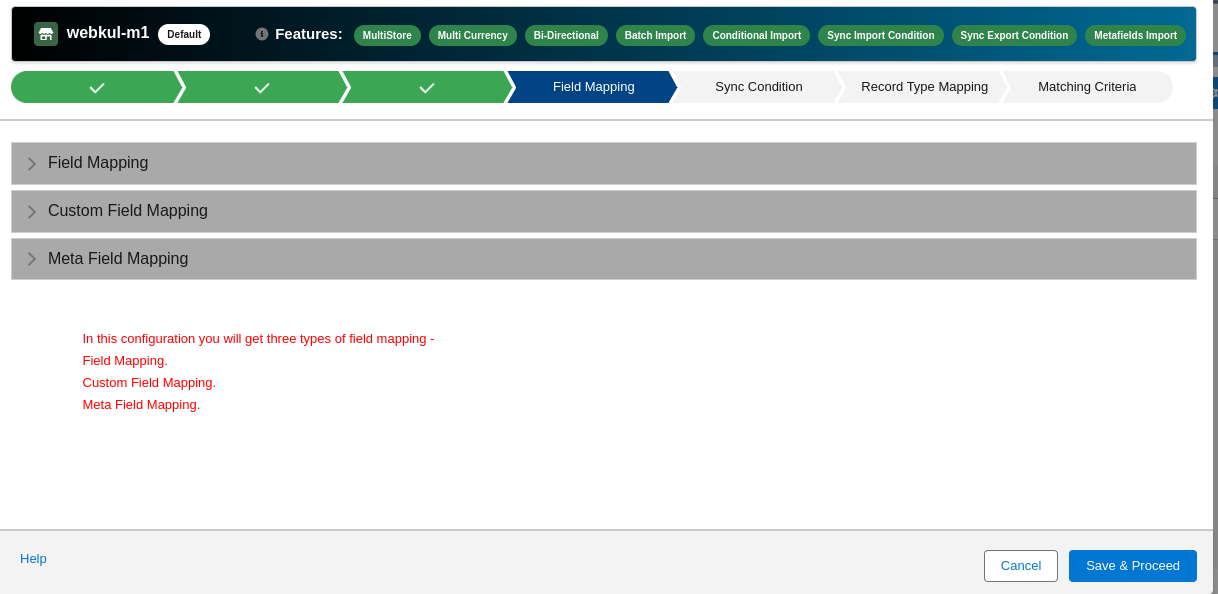
Custom Field Mapping: Map the fields of the Product in case of any additional fields.

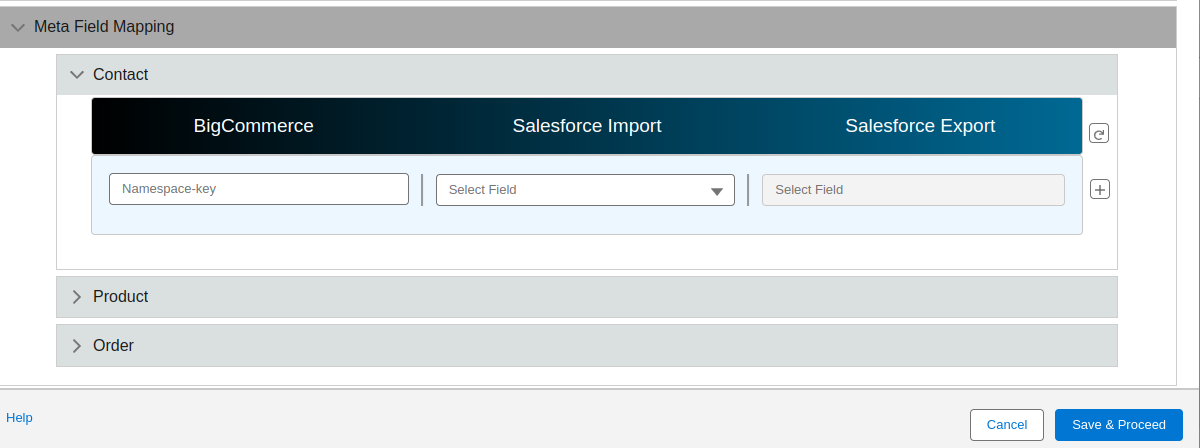
Meta-Field Mapping – Metafields are user-defined key-value pairs that can be attached to BigCommerce data objects to add custom information.
They can be used to store data about products, categories, variants, brands, and orders.
Sync Condition: This tab is available when you have purchased the Sync Condition add-on.
-
-
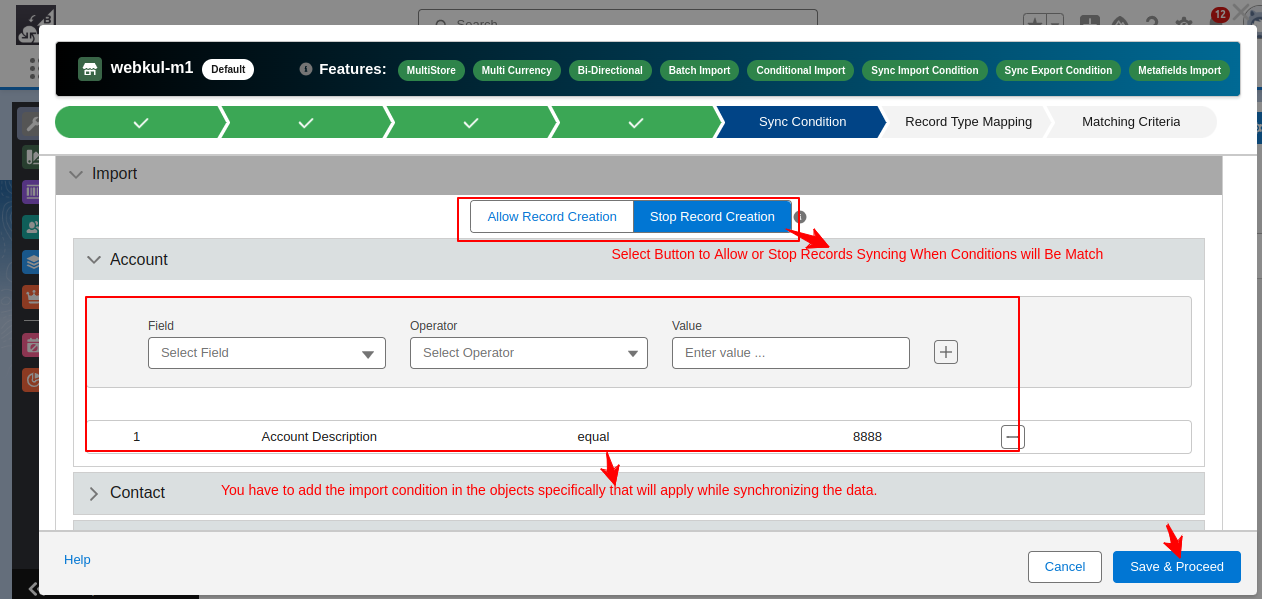
- This feature will be in green highlight at the top. In this, you can apply conditions for importing and exporting data for the objects specifically.
- You can even choose whether to allow or stop the applied condition while synchronizing data.
- The sync conditions can be applied in the import and export process.
- When done click on the Save and Proceed button.
-
Import Process –
Export Process –

Quick Action: Quick Actions in Salesforce are used to create, update, or interact with records directly from the record detail page to maintain a smooth workflow.
QuickAction Buttons Feature-
- Users will be able to export records directly from the record page.
- Users will be able to import records directly from the record page.
For Bigecommerce entities, you can create only entity-specific quick actions that are mentioned here:-
- Account- Import, Export
- Product- Import, Export
- Contact- Import, Export
- Order- Import, Export
- Opportunity- Import, Export


The processes to create Quick Action buttons are as follows:
- First, on the Salesforce Dashboard, click on Object Manager.
- Next, choose any Object in which you want to create the Quick Action.
- After that, from the left navigation panel, click on the Buttons, Links, and Actions option.
- Then, click on the New Action button located on the top right side of the screen.
- Now, enter the Action Information:
- Action Type – Lightning Component
- Lightning Web Component – Select the lightning web component
- Label – Type the name of the Action
- Once done, click on the Save button.
- Next, go back to Object Manager and choose the same object you selected earlier.
- Then, click on Page Layout from the left navigation panel.
- From here, select the Page Layout that aligns with your business needs for creating the Quick Action.
- After selecting the layout, choose the Mobile and Lightning Actions option.
- Now, drag and drop your Quick Action button into the Salesforce Mobile and Lightning Experience Actions section.
Finally, click the Save button located at the top left side of the Account Layout window.
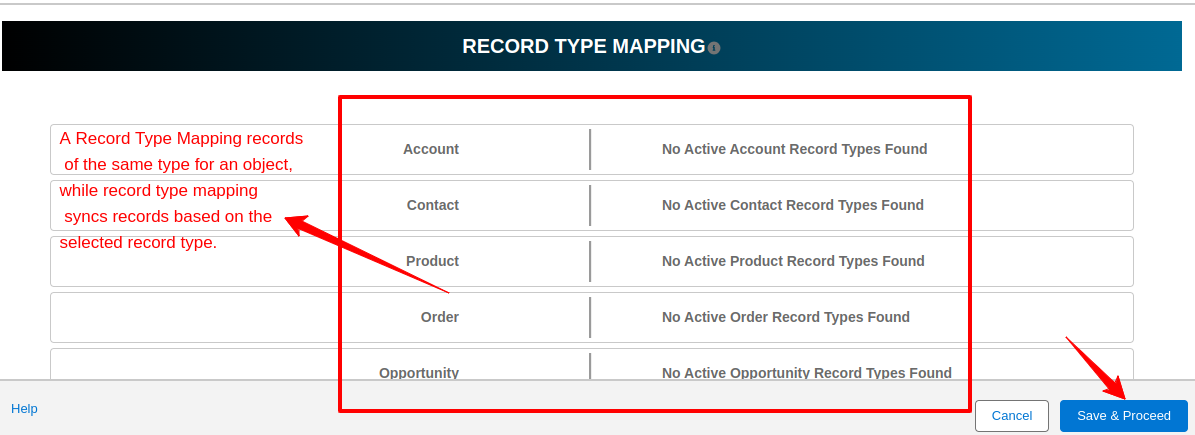
Record Type Mapping: A record type is a way to group many records of a kind for an object. Record type mapping will sync your records according to the record type you selected.
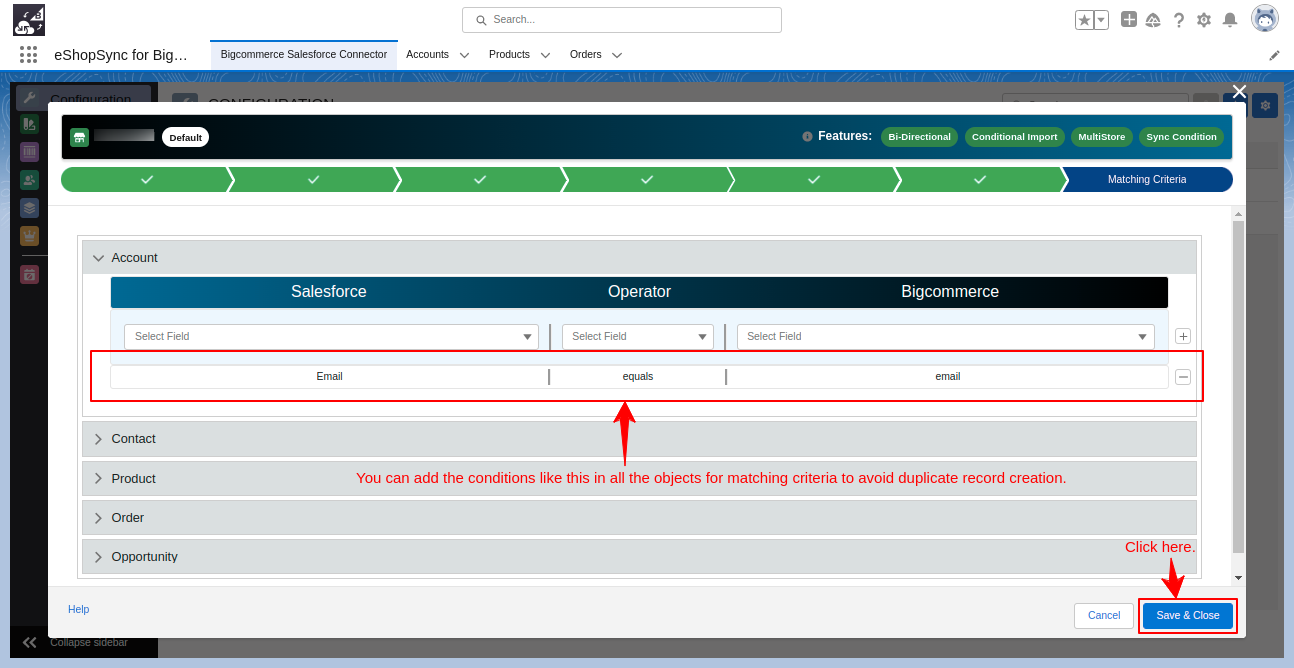
Matching Criteria: Create the conditions to match the records to prevent the creation of duplicate records.
- After this, the BigCommerce store is added and you can edit the store configurations or delete them when required.

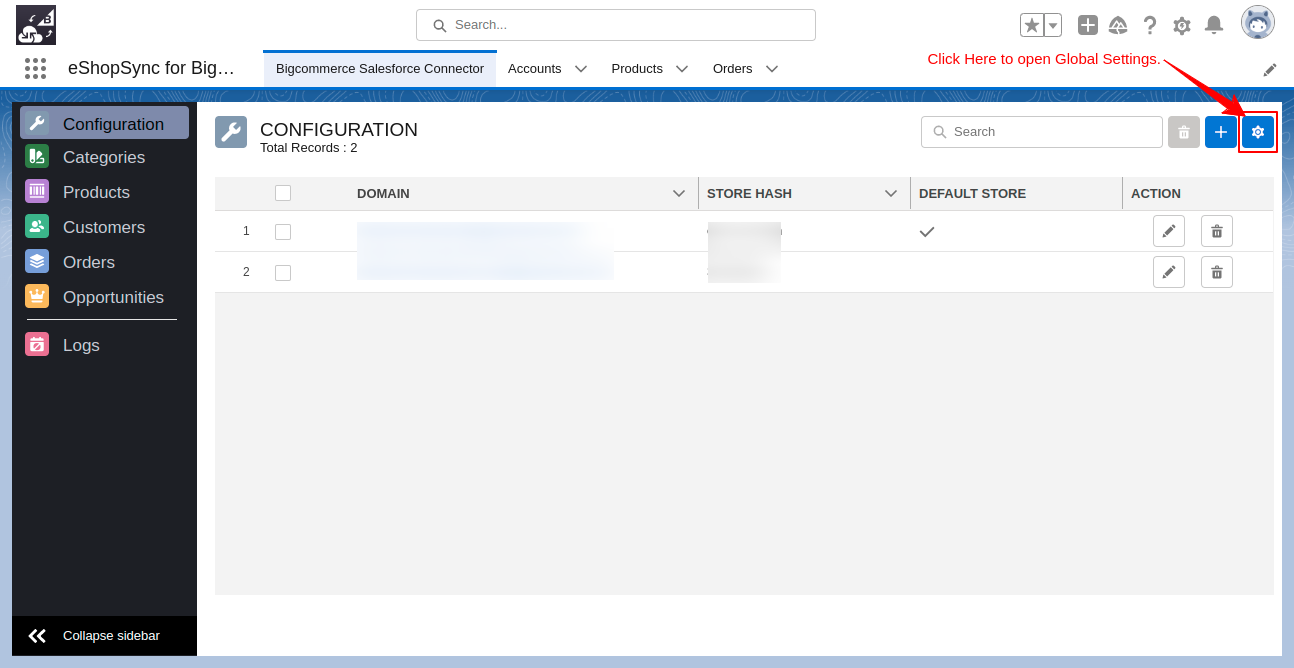
How To Set Global Settings Of eShopSync For BigCommerce?
- Click on the Gear icon from the top right side of the Configuration window.
- Webhook Status: You can check whether the webhook is enabled for all objects or not. If the objects are marked with the green tick then they are enabled, but if they are marked with the red cross then they are disabled.

- Log Setting: Mention the number of days you want to store your logs and after that, they automatically get removed.

- Verify Scopes: In this, you can see the scopes to which you have access on your store. If you have multi-store functionality then you can also check scopes as per your store selection.

Custom Notification – If you want to select the store then it will help you to define the notification settings.

API Pilot- API Pilot works like a Postman. When you enable it it helps you to get data from API to explore, debug, and test.

Screenshot Features explanation –
- Store: First, select the store on which you want to make the API hit.
- Method: Next, choose the method that corresponds to your store.
- Object: Then, select the object for which you want to make the API hit.
- Version: Afterward, select the appropriate BigCommerce API version.
- ID: Enter the unique BigCommerce ID.
- Subcategory: Additionally, select the subcategory.
- Endpoint: Specify the endpoint for the API.
- Response: Finally, input the body for the API request.
List Of Action
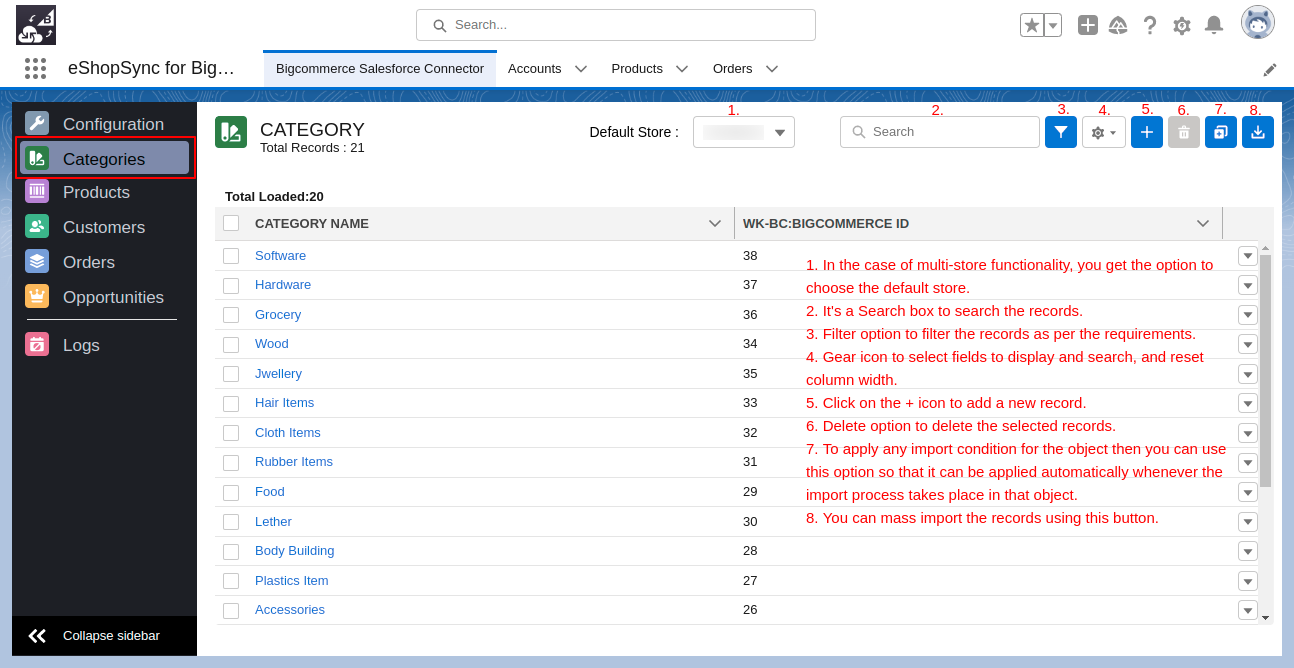
- Filter Record: Filter option to filter the records as per the requirements.

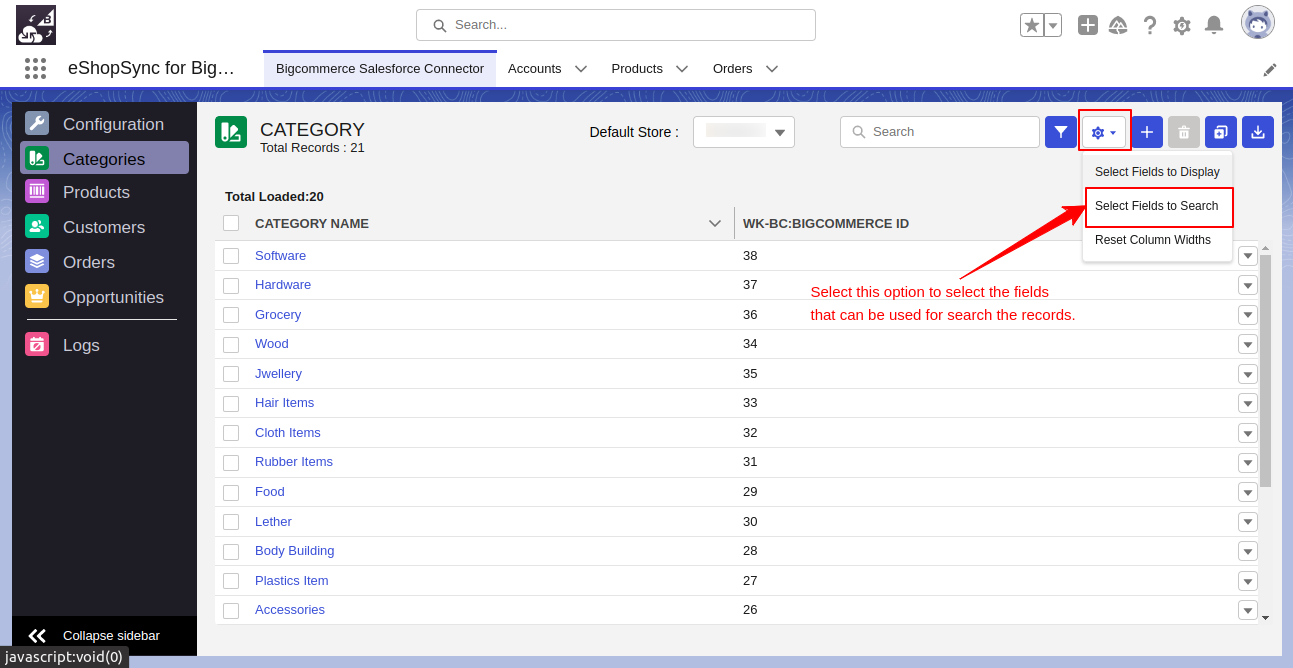
- Gear Icon: You can use this option to “select fields to display”, “select fields to search”, and “reset column width”.

-
- Select fields to display: Click on this option and then select the desired fields to display. Do this for each object in the connector specifically.
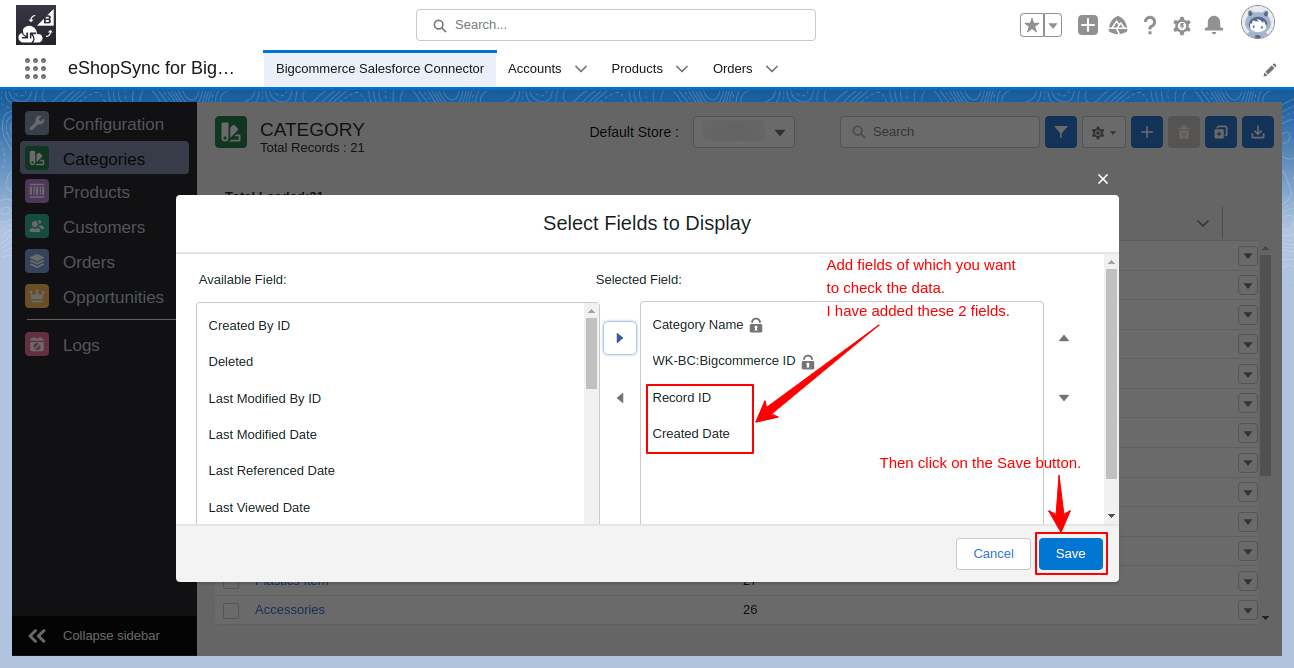
-
- Select fields to search: Particularly select this option and choose the fields you use to search your records in the object you have done in.

-
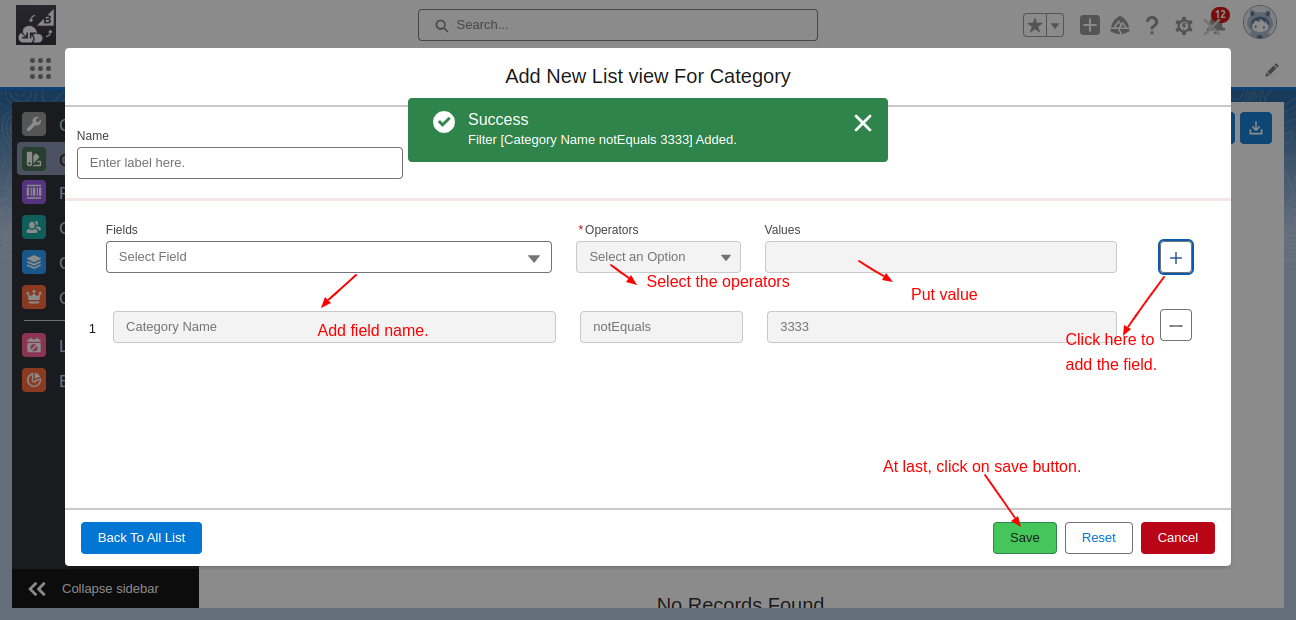
- Add list view- Firstly, add to your list in add new, then move to the next tab.

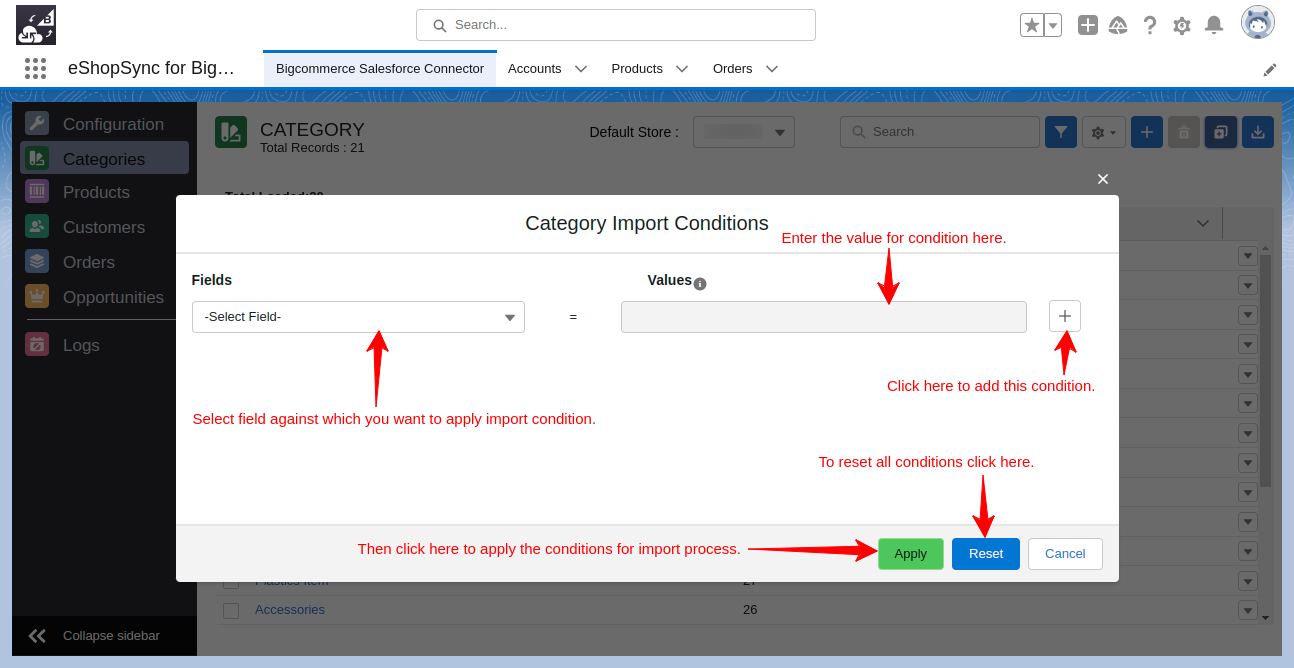
Add Condition – To apply any import condition for the object, you can use this option so that it is applied automatically whenever the import process takes place in that object.
- Mass Import: By clicking on the mass import button, you can import all the data shown on your screen in one go.

How Many Row Actions Are Available?
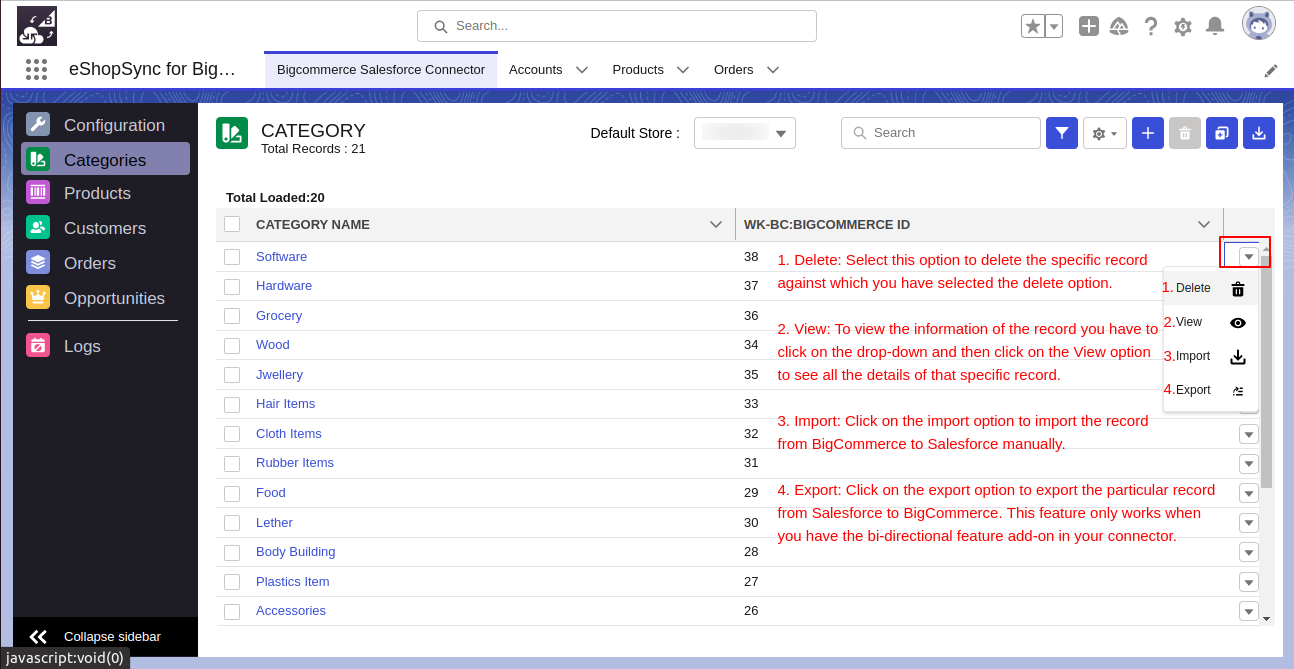 Note: Simultaneously view option is available in Categories, Products, and Logs.
Import: However, click the import option to import the record from BigCommerce to Salesforce.
Export: Similarly, click the export option to export a record from Salesforce to BigCommerce.
This feature works only with the bi-directional add-on in the connector.
Note: Similarly, in Logs, the “Import” action plays a key role, therefore making your work easier.
Once you’ve resolved record issues in the “Logs,” you can then select the import option for that record and directly import it into the corresponding object.
List View Of All The Objects
Here is the list view of all the objects in the BigCommerce Salesforce Connector:
- Categories: Shortly list view of synced categories from BigCommerce to Salesforce using eShopSync for BigCommerce.

- Products: Whereas a list view of synced products from BigCommerce to Salesforce is available using eShopSync for BigCommerce.

- Customers: Undoubtedly, list view of synced customers from BigCommerce to Salesforce using eShopSync for BigCommerce.

- Orders: Simultaneously, list view of synced orders from BigCommerce to Salesforce using eShopSync for BigCommerce.

- Opportunities: Similarly list view of synced opportunities from BigCommerce to Salesforce using eShopSync for BigCommerce.

- Logs: Simultaneously list view of logs that include the records that won’t sync. Then, view the errors and then fix them.

Batch Import – Batch import in Salesforce is a feature that allows users to import data in groups. It can be useful for handling large data sets while respecting the platform’s governor limits.

- Delete: Firstly, select this option to delete the specific record for which you have selected the delete option.
- Import: It plays an important role, which making your work easy and convenient. Similarly, if you resolved the issues of records shown in the “Logs,” then you can specifically select the import option against that record and directly import it into the object to which it belongs.
- View: Similarly you can also view the information of the record by clicking on the drop-down and then selecting the View option to see all the details of that specific record.
Support
- Simultaneously for any specific query, Click To Create Ticket
- To know the feasibility of specific requirements, Request For Customization
- To view all our applications in Appexchange, go to Webkul Appexchange Apps

Be the first to comment.