How to integrate QuickBooks and Salesforce?
Updated 14 October 2025

QuickBooks is a leading accounting software platform developed and marketed by Intuit.
It is a financial software development company that helps businesses develop and sell financial, accounting, and tax preparation software, as well as related services.
Salesforce is the world’s most popular CRM platform that helps you implement automation, data validation, manage, and configure sales & services.
It delivers great shopping experiences, allows you to automate your tasks, and helps you to get your customers’ needs and concerns.
You can use personalized marketing to attract more customers, which helps your business to grow.
QuickBooks and Salesforce Integration depict how your business is operating and where it could be optimized. Salesforce, chiefly the #1 cloud enterprise platform.
It empowers businesses to run their enterprise in the cloud and works hand in hand with QuickBooks.
Generally, it shares information between sales and accounting, including client data, sales orders, costs, and invoicing.
After all, this is not all; some of the diminishing features of our QuickBooks Salesforce Connector are:
- Synchronize QuickBooks data with Salesforce for CRM benefits.
- Also, sync Estimates and Invoices as Opportunities from QuickBooks to Salesforce.
- The Vendors can be synced as Accounts into Salesforce CRM.
- Synchronize and unify customers as accounts and names with Salesforce.
- Real-time data synchronization is available for all entities such as Products, Payments, Credit Memos, Estimates, Sales Receipts, Refund Receipts, Invoices, and Customers.
- It provides a unified platform for managing QuickBooks and CRM data.
- Salesforce-centric configuration concept for a seamless environment.
- Interactive design with user interfaces at the end of Salesforce, ensuring efficient data usage.
- Field Mapping helps you sync the data of QuickBooks to Salesforce as per business requirements.
- The Matching Criteria feature is available to match the data before sync that avoid creating duplicate records in Salesforce Sales Cloud.
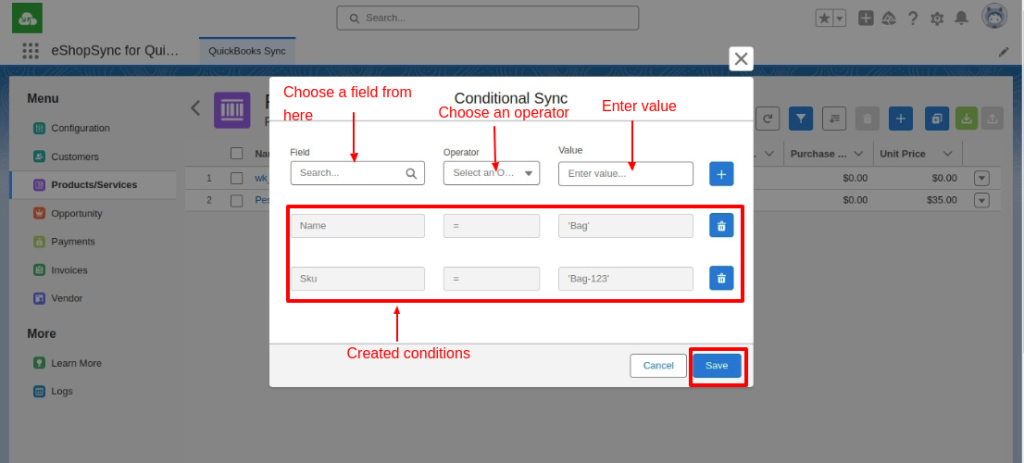
- Add conditional sync for the Product, Vendor, Customer, Invoice, Opportunity, and Estimate.
Features (PAID)
- Export Synchronization.
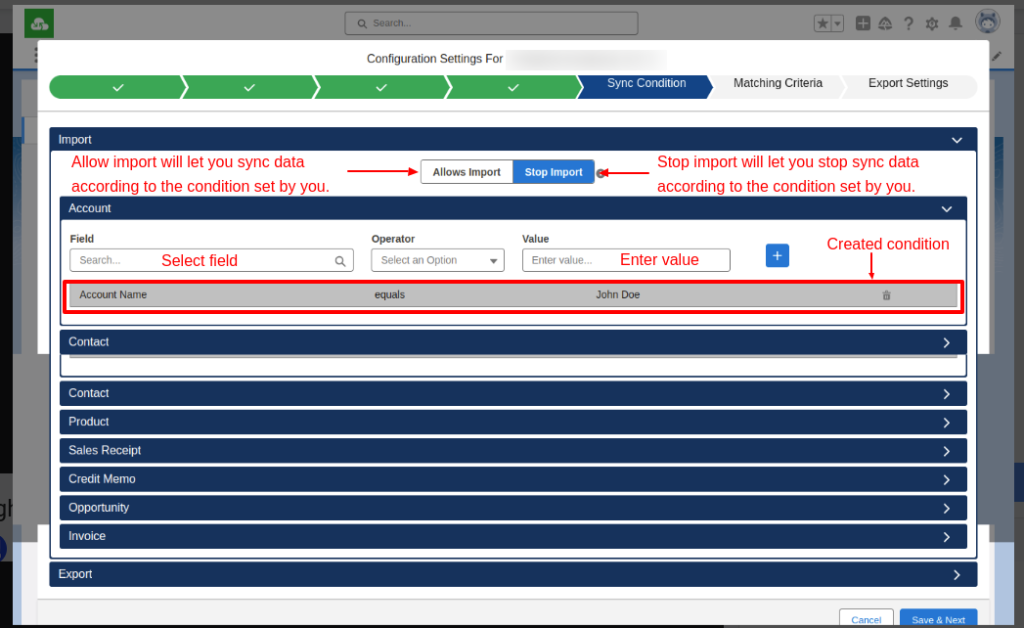
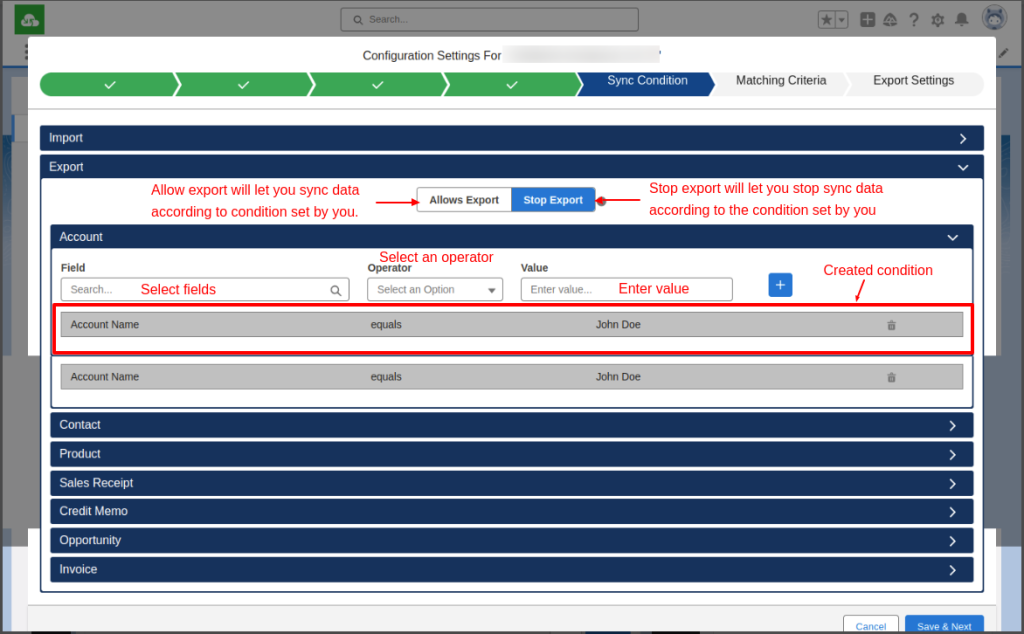
- Sync Condition: Allows export and import of data based on a condition set by you. It also lets you stop the export and import of data based on conditions set by you.
Note: These are paid features (Contact us for price)
How to Integrate QuickBooks and Salesforce Application?
Integrate eShopSync for QuickBooks application with QuickBooks and Salesforce to grow your business.
This connector works as a bridge between both applications so that you can easily sync all your data.
To use this connector, you have to install and configure it first. After that, it automatically syncs all your data.
Let’s Get Started!!
You have to follow a few steps to integrate the QuickBooks Salesforce connector as shown below:-
- Install the eShopSync for QuickBooks
- Create and configure the app in the Intuit Developer Account
- Connect QuickBooks Company
- Global/Application Configuration
- Company Configuration
- Real-Time Configuration
- Synchronization Process
How to Configure QuickBooks and Salesforce Connector:
How to Install and Set up QuickBooks Salesforce Connector?
Install the eShopSync for the QuickBooks application and then do the setup to integrate the application. This makes your sync process easier and more comfortable.
For this, you must require a QuickBooks application and a QuickBooks Company. So you can create a new QuickBooks company or add an existing QuickBooks Company.
After that, configure it to proceed further with the sync process. For real-time synchronization, configure Salesforce settings by creating a site and assigning permission sets to users.
If you have not installed the eShopSync for QuickBooks application yet, then you can get it now from the AppExchange.
How to Create and Configure the App in an Intuit Developer Account?
Configure a new QuickBooks App if you have not added or configured any apps yet. The steps to create and configure a new app are as follows:-
- To create and configure a new app, sign in or sign up here.
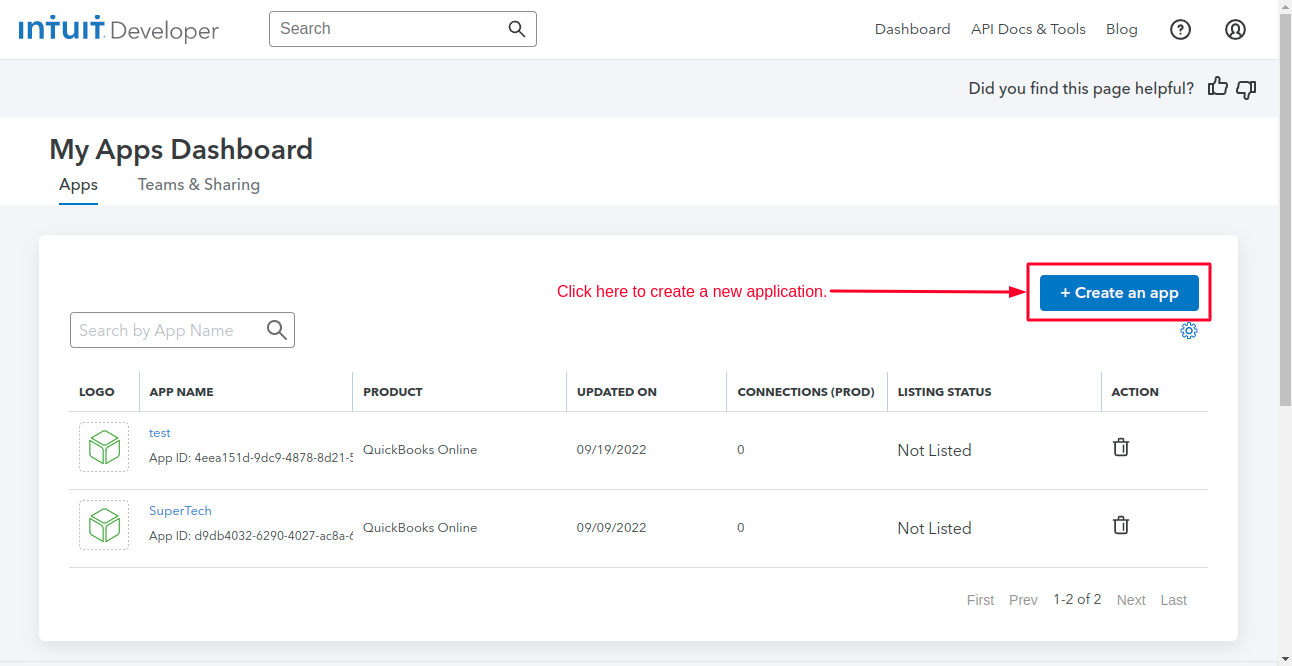
- Click on the Dashboard option from the top right side options.
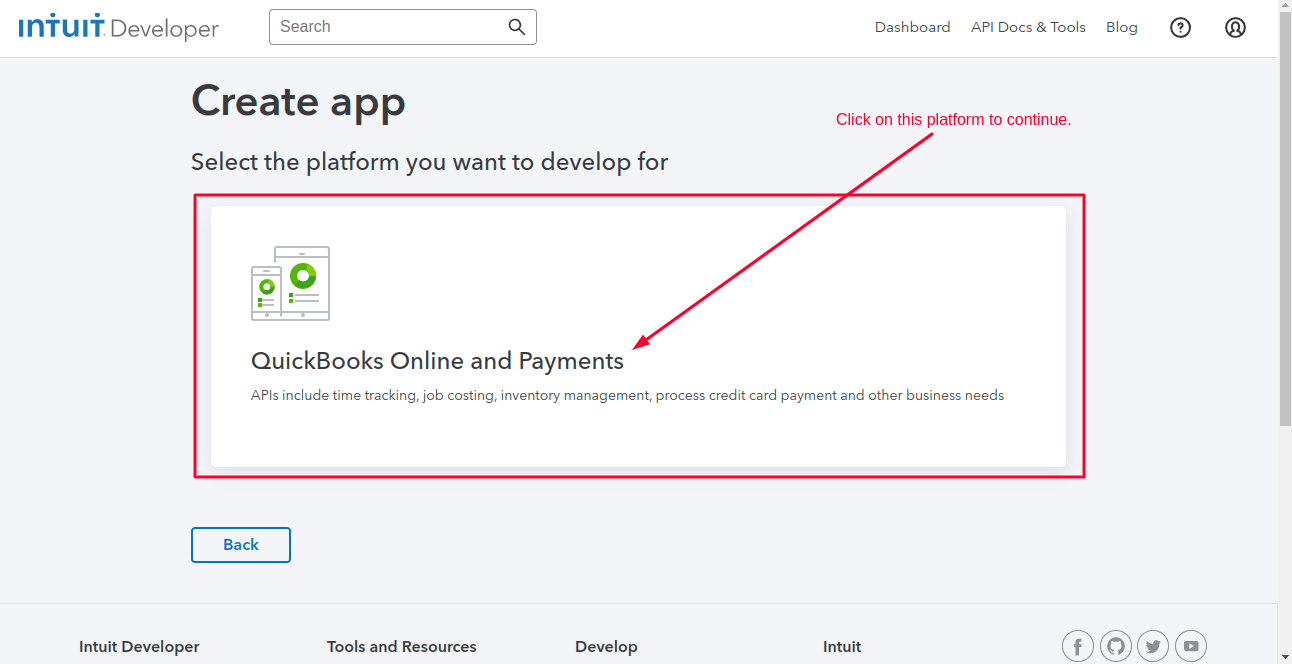
- Click on the button Create an app.
- Now select the QuickBooks platform to proceed further.
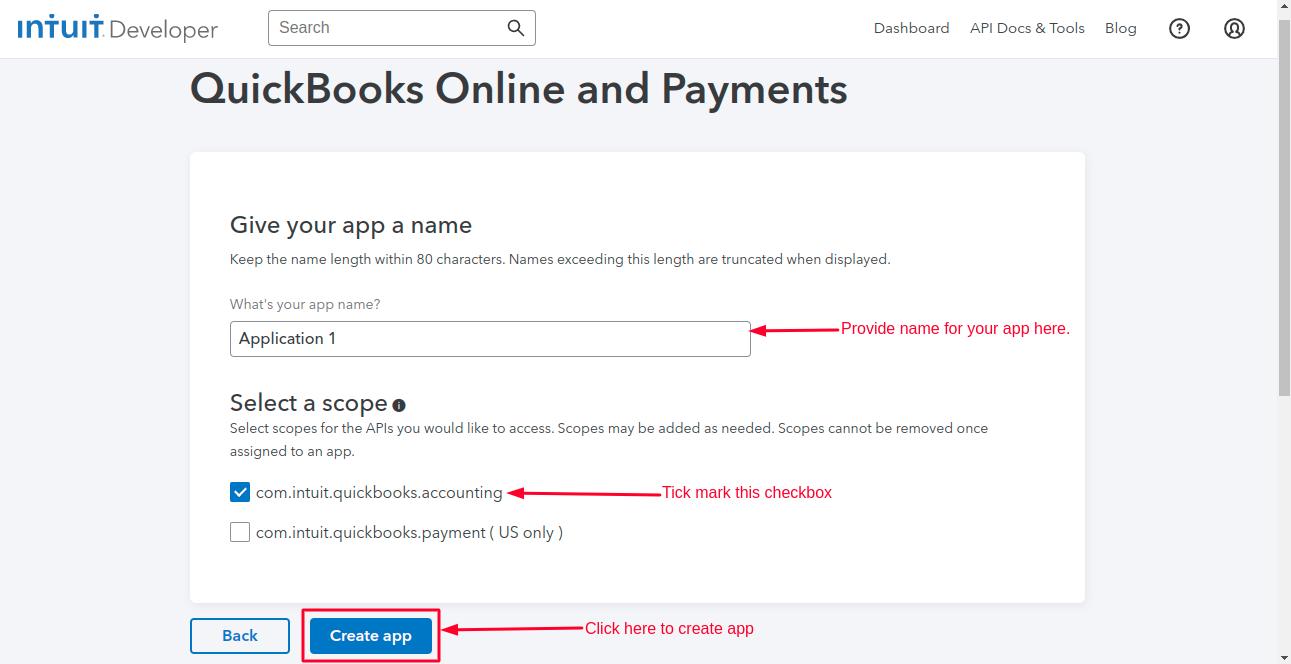
- Then, in the open-up form, provide the name of the application, select the scope, then click on the Create app button.
- Now, you are in the application screen that you have created.
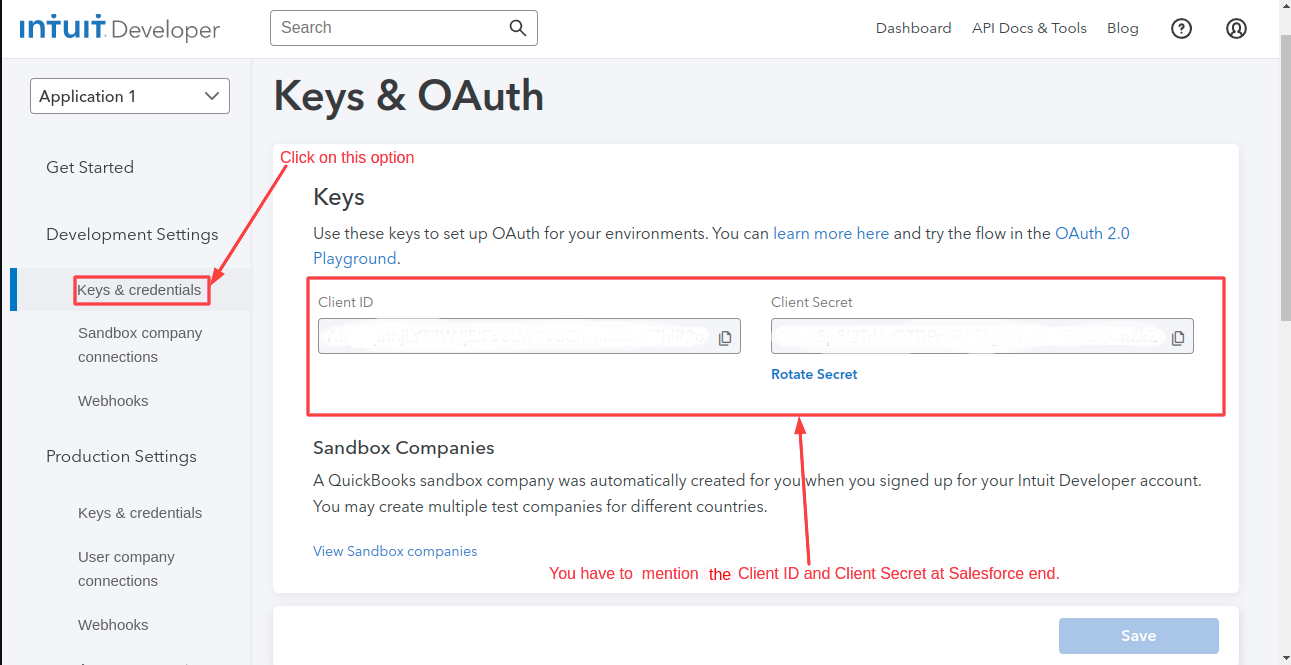
- Thereafter, go to the left navigation panel and click on Keys and Credentials under the Development Settings option.
- You have to use the Client ID and Client Secret in Salesforce.
- In the Redirect URIs under the Keys and Credentials section of QuickBooks, you have to add URIs and paste URLs from the Salesforce company Edit View, and then click on the Save button.

- Go to the Webhooks settings and paste the Salesforce site URL, and then click on the Save button.
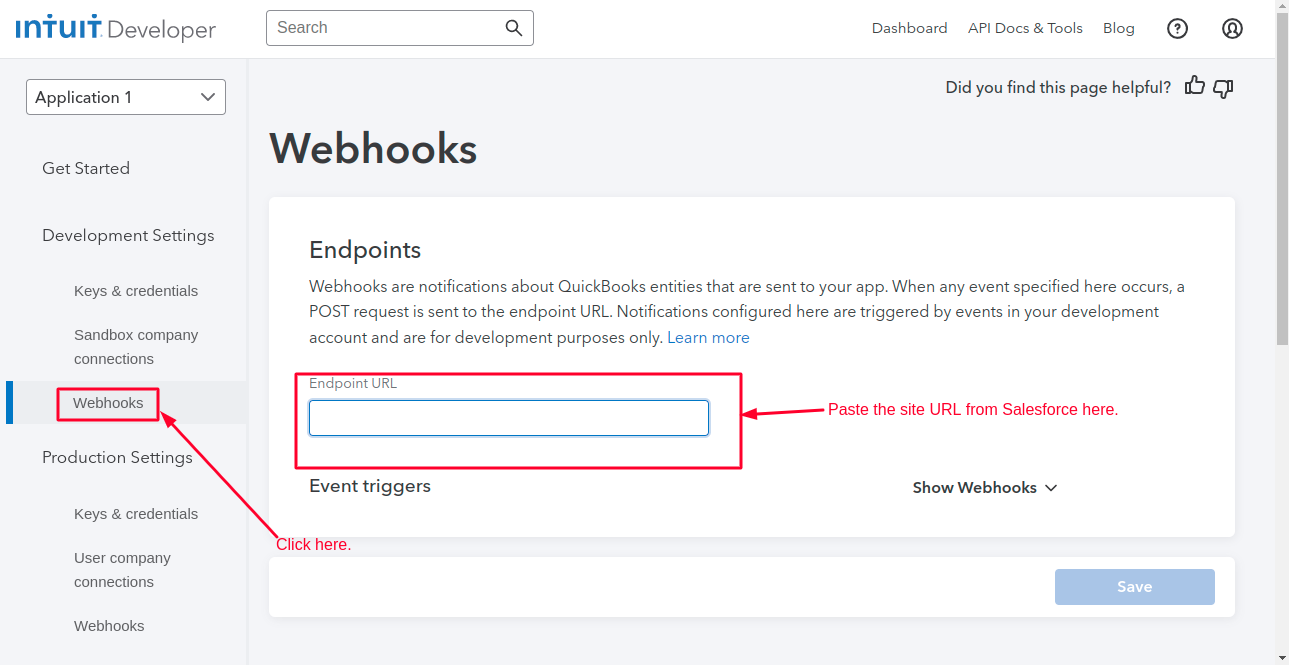
- When you add the URL of the Salesforce site then it provides you a Verified Token that you can see in the image below.

- Now, proceed further to add this company to Salesforce.
How to Add a QuickBooks Company at Salesforce End?
There are a few steps to follow for adding a new QuickBooks company in Salesforce:-
- Open your Salesforce Org by logging in.
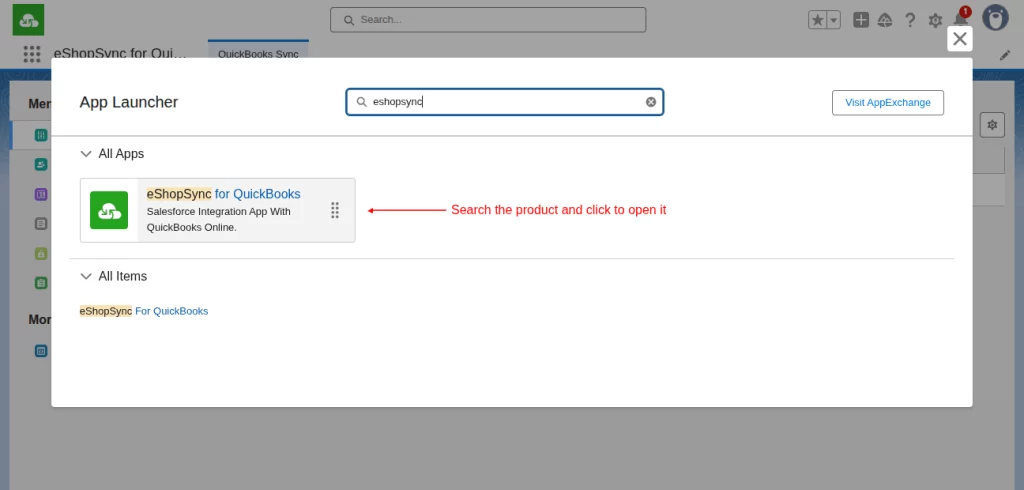
- Click on the App launcher button in the top left corner
- Search for eShopSync for QuickBooks, then click on it to open it.
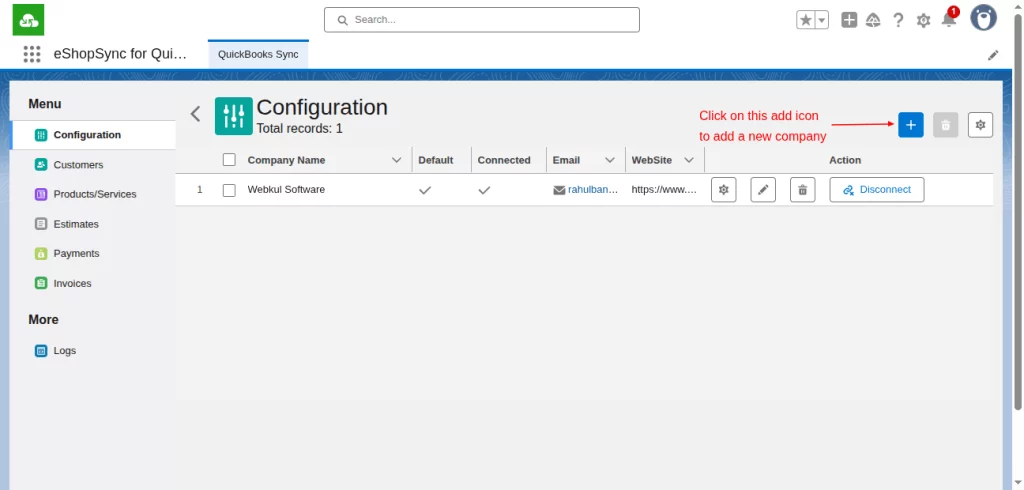
- The connector opens up, and then you have to add the company.
- In the configuration, click on the + button to add a new QuickBooks company to Salesforce.
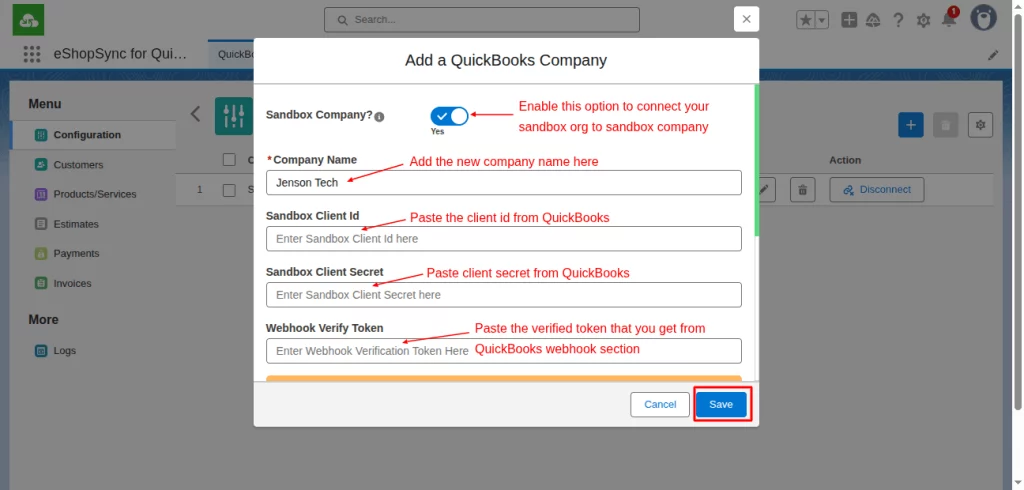
- It opens up a form window where you have to provide the details from your QuickBooks company
- Enable the Sandbox Company toggle and disable it if you have QuickBooks Production Company. If you have a Salesforce Production Org, then it won’t connect with QuickBooks Sandbox Company.
- Provide Company Name
- Client ID
- Client Secret
- Then click on the Save button.
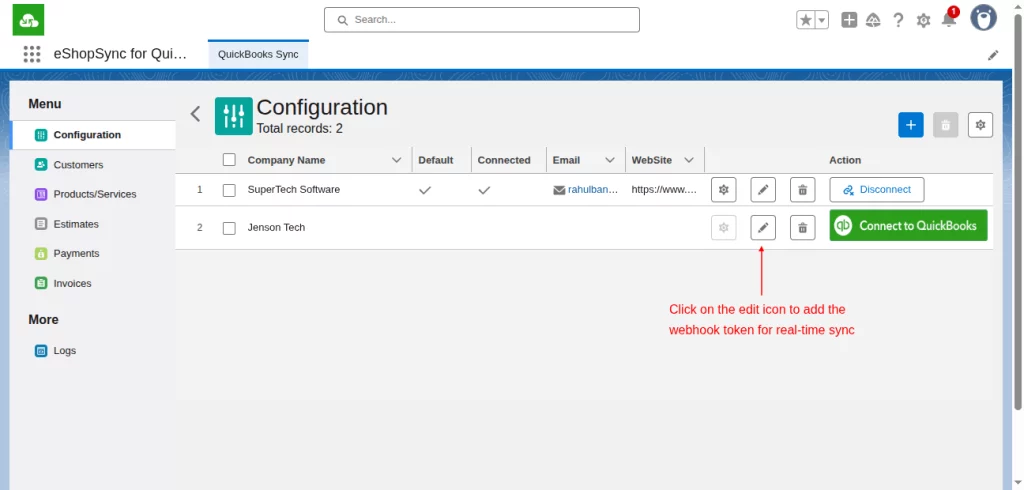
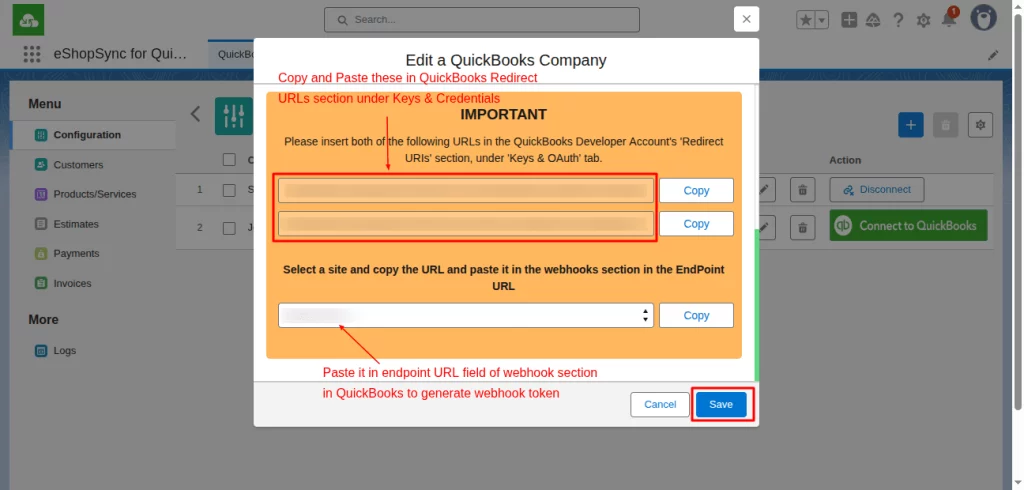
- The company was added to Salesforce. For the Webhook token, click on the edit option in front of the added company.
- The below 2 links need to be added in the QuickBooks Redirect URIs section under Keys and Credentials. Without this, you are not able to establish the connection.
- Add the Webhook verify token in a real-time sync scenario. For this, you have to add the Salesforce site URL into the QuickBooks Webhook section in the Endpoint URL field..
- Now, you are done with adding a QuickBooks company into Salesforce Org.
Note:-
- If you connect the production org with the Sandbox Company. Then, in that case, it shows you an error as it won’t connect.
- The configuration of Webhook is optional. For real-time synchronization of QuickBooks to Salesforce, you have to configure the Webhook.
How to Connect QuickBooks Company?
To connect the QuickBooks company with Salesforce, you just have to click on the Connect to QuickBooks button.
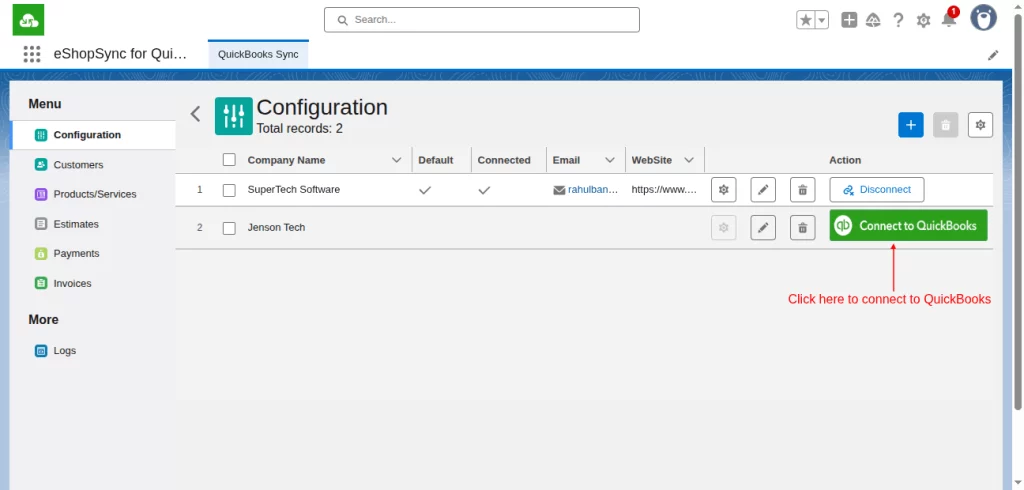
After connecting to the company, the button changes to Disconnect.
Meanwhile, clicking on the Connect button redirects you to QuickBooks, and when everything works well, it again redirects you to Salesforce.
This means you are done with connecting QuickBooks and Salesforce.
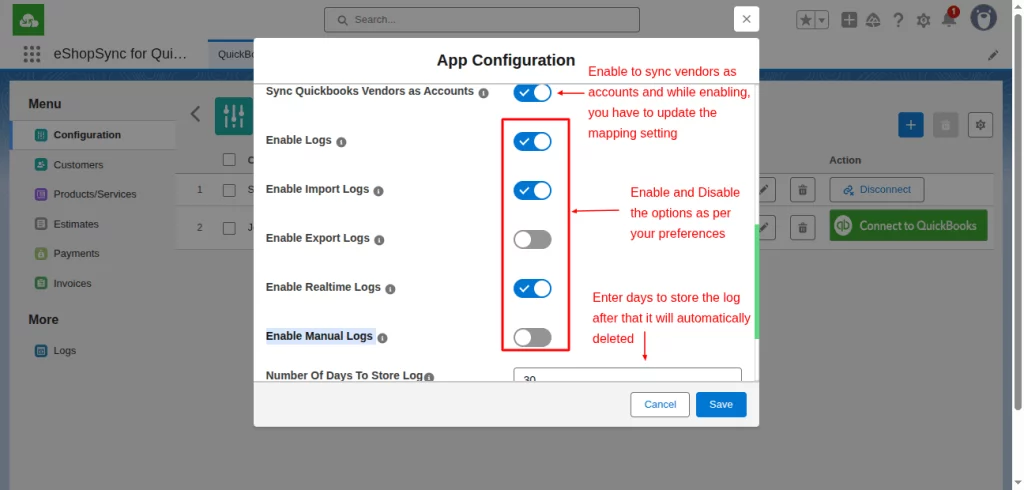
How to do Global/Application Configuration?
These configurations are for the whole application and can be set once, as per your requirements. It applies to all the companies that you added to Salesforce. For details, check the images below:-
- Enable Logs- If you have enabled the toggle of Logs in global settings, only then does it create log entries of synchronization.
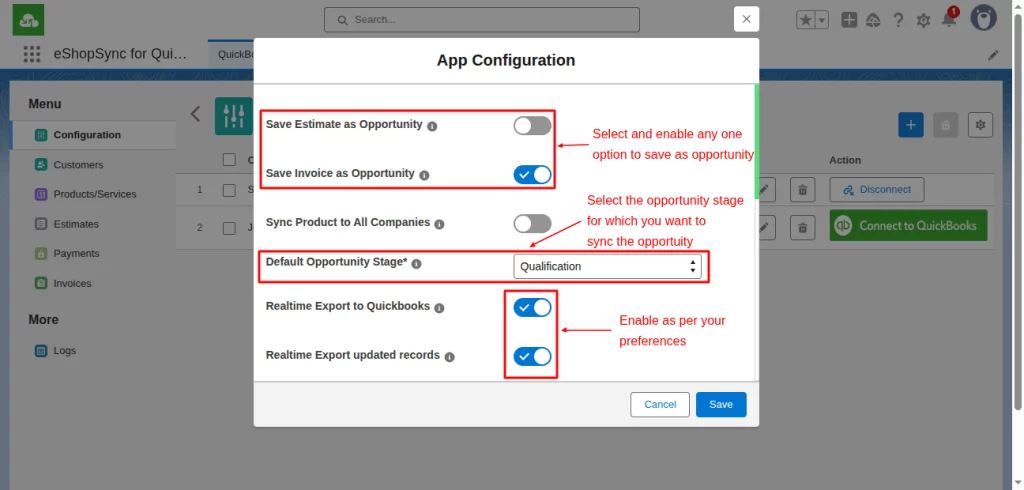
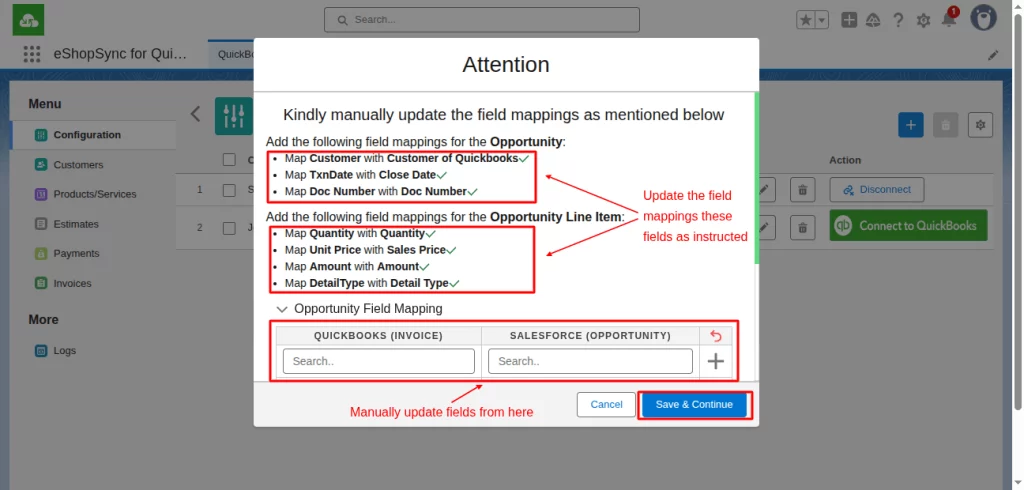
- When you enable any option from “Save Estimate as Opportunity and Save Invoice as Opportunity,” then it shows a pop-up that says to map the fields accordingly so that you can use this enabled configuration properly. The pop-up information is shown in the image below.

How to do Company Configuration?
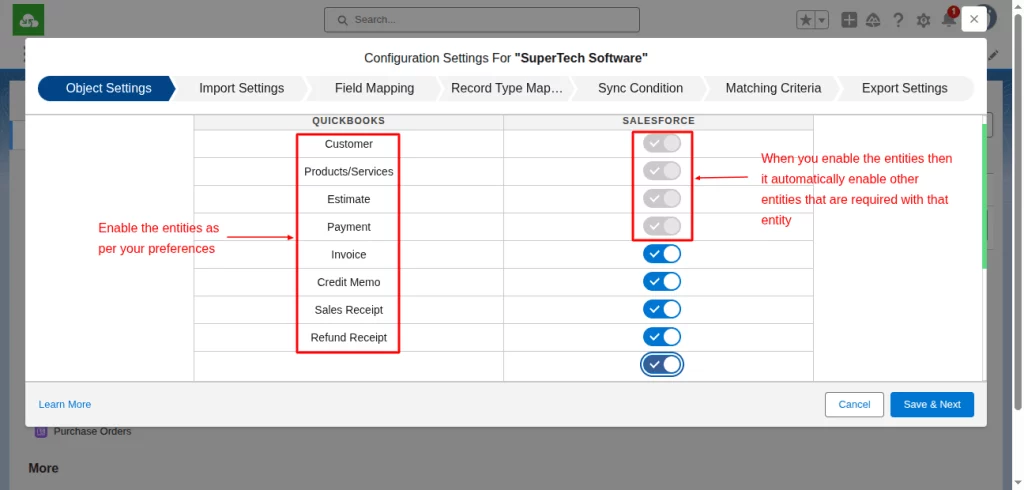
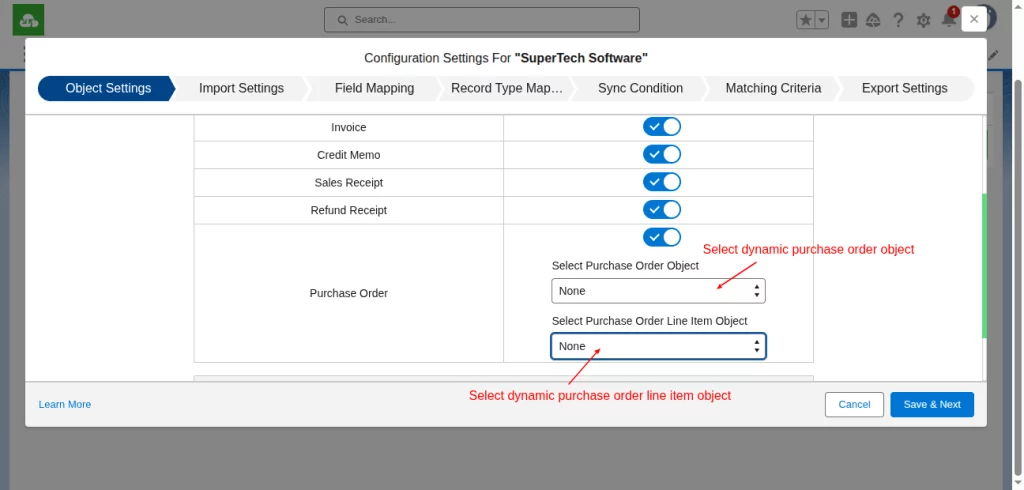
- Object Settings- Enable the QuickBooks entities that you want to sync in Salesforce. Some entities are dependent on other entities, so when you enable the entity, the dependent entities for enabled automatically. Such an Invoice enables Customers, products, estimates, and payments that are required in that entity. Thereafter, click the Save & Next button to save your Object settings.
- Estimate, Credit Memo, Sales Receipt, and Refund Receipt are dependent on Customer and Product/Services entities.
- Invoice is dependent on Customer, Product/Services, Estimates, and Payment.
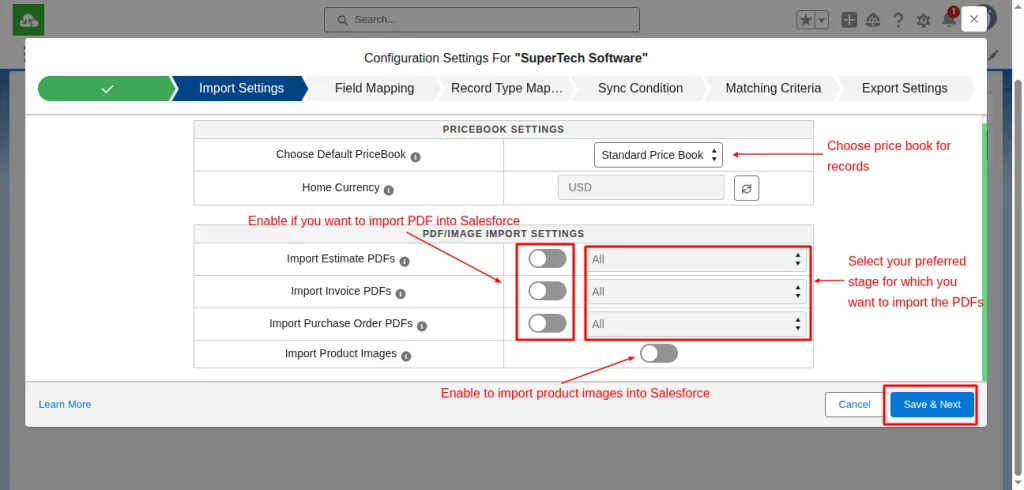
- Import Settings- Set the fields according to your business needs to import the data from QuickBooks to Salesforce.
- Choose the price book that you have for your records.
- After that, enable the PDF settings if you want to have PDFs for import estimates, invoices, and import purchase orders.
- Enable the import of product images from QuickBooks to Salesforce.
- Also, set the stage status to what status you want to import the PDF for the estimate and invoice.
- When you are done with import settings, save it using the Save and Next button.
- Some fields are already mapped as default and are shown in read-only mode.
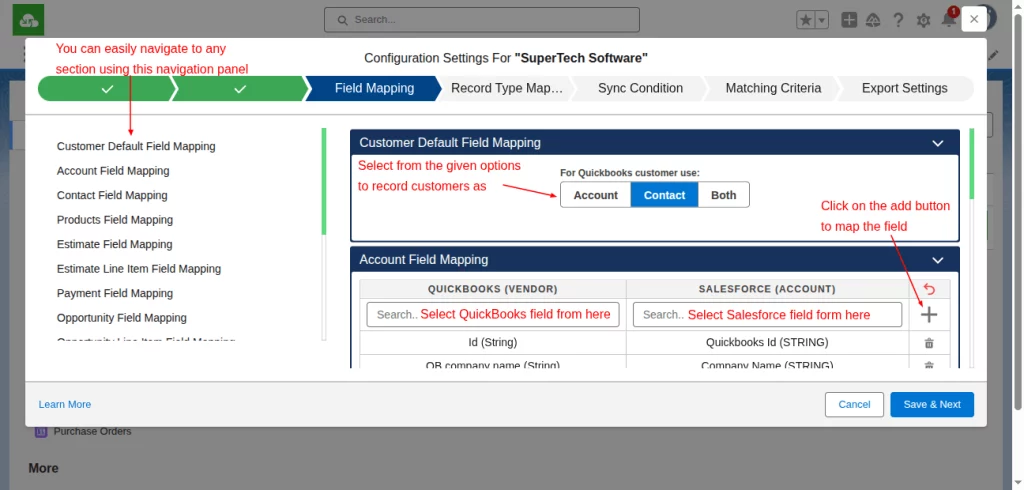
- Field Mapping- You can easily map the fields for importing the data from QuickBooks fields to Salesforce fields accordingly. You can easily go to the entity using the left-side navigation panel.
- In the customer field mapping, select any one option that you want to choose. If you choose the Account option, then it imports as accounts; if you choose the Contact option, then it imports customers in contact; but if you choose both, then both fields are created in Salesforce for your QuickBooks customers.
- If you have set the vendor as accounts in global settings, then here you get only one option, which is Contact, as vendors got synced in the Salesforce Accounts Object.
- In other fields, do map the field names of QuickBooks to Salesforce, and then click on the + add button to add to the list below them.
- In the customer field mapping, select any one option that you want to choose. If you choose the Account option, then it imports as accounts; if you choose the Contact option, then it imports customers in contact; but if you choose both, then both fields are created in Salesforce for your QuickBooks customers.
-
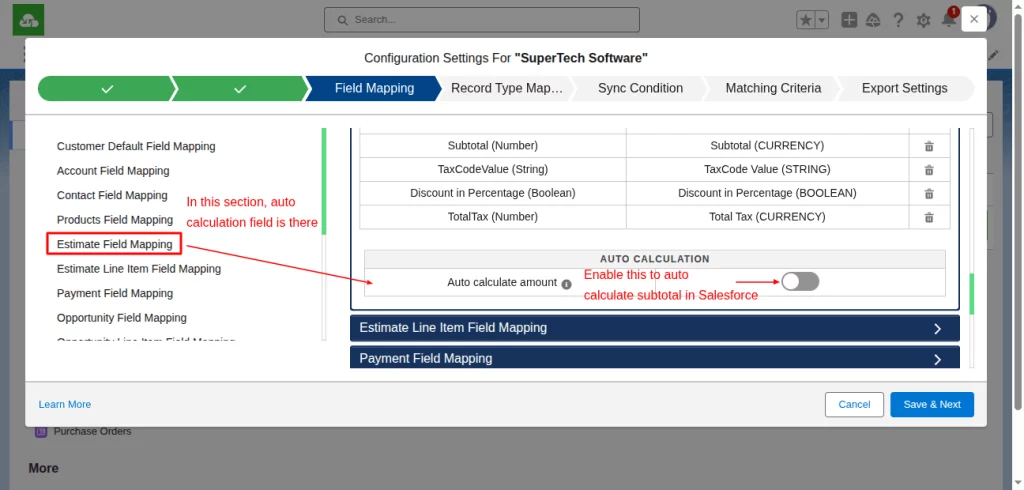
- You get an option of Auto Calculation. If you enable that option, then your sub-total is calculated automatically at the Salesforce end. The fields in which you get this option are Estimate, Invoice, Credit Memo, Sales Receipt, and Refund Receipt field mapping. After all the settings, click the Save & Next button.
- Record Type Mapping- In this, you have to choose the record type in which you want to create the records. There is also an Accounts option, so you can do record type mapping as per the availability of record types that are selected in the customer map. Afterwards, select the record type mapping, and click on the Save and Next buttons to continue.

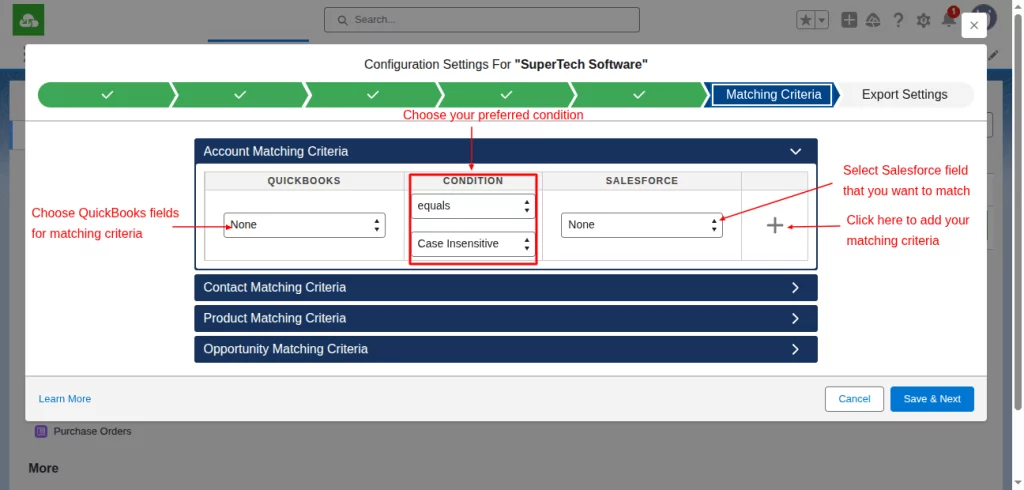
- Matching Criteria- In this setting, matching criteria are for Account, Contact, and Product.
- You have to select the QuickBooks field.
- Then choose conditions that are- start with, end with, or equal.
- Also, choose whether the values are case-sensitive or case-insensitive.
- Choose the Salesforce field to match.
- Click on the + add button to add the matching criteria you have set.
- Click on the Save & Next button.
- With this, it matches the records while syncing. It creates and updates existing records as per the matching criteria applied in Salesforce. If you already have many records for that criteria, then it shows you a message on your screen to resolve or merge those, and then go with this criteria.
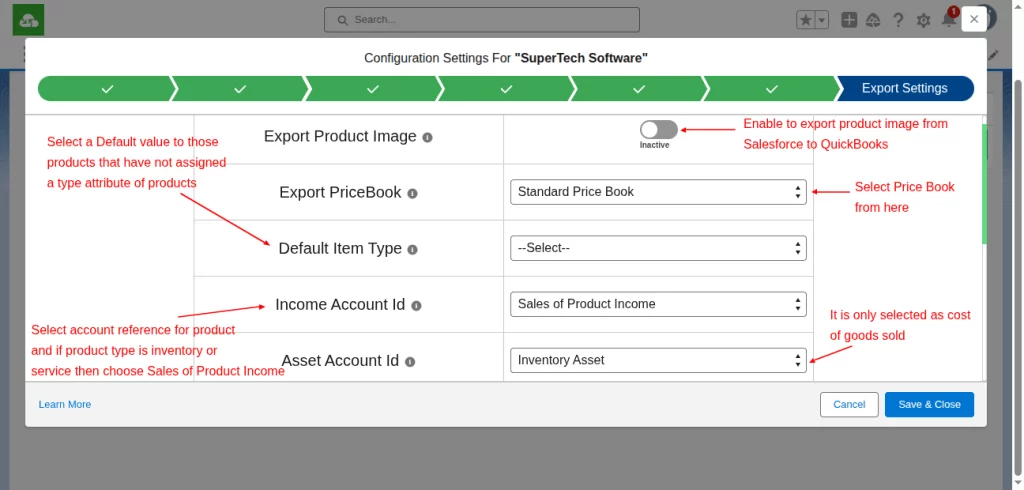
- Export Settings- These settings are applicable when you export data from Salesforce to QuickBooks. You have to select all the fields shown in the image below and then click on the Save & Close button.
How to use row actions in eShopSync for QuickBooks?
There are 7-row actions shown and can be performed easily:-
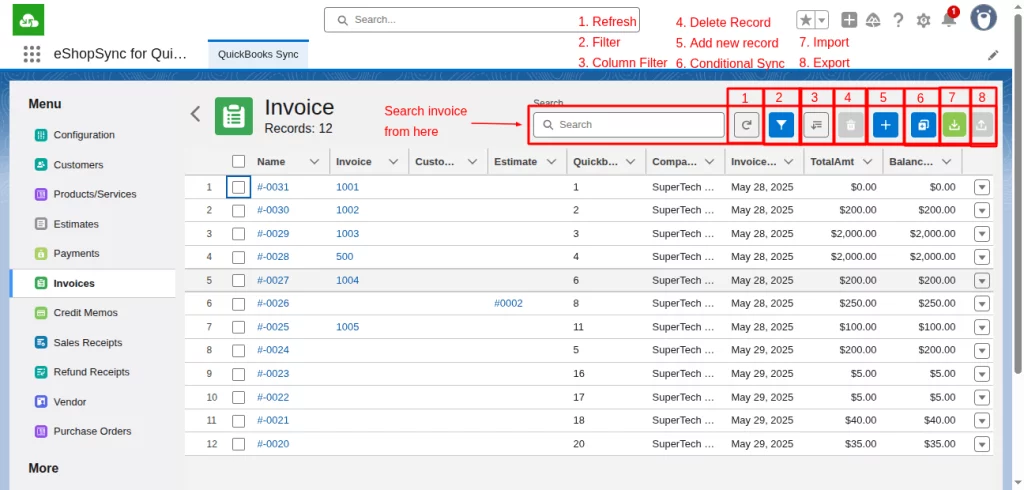
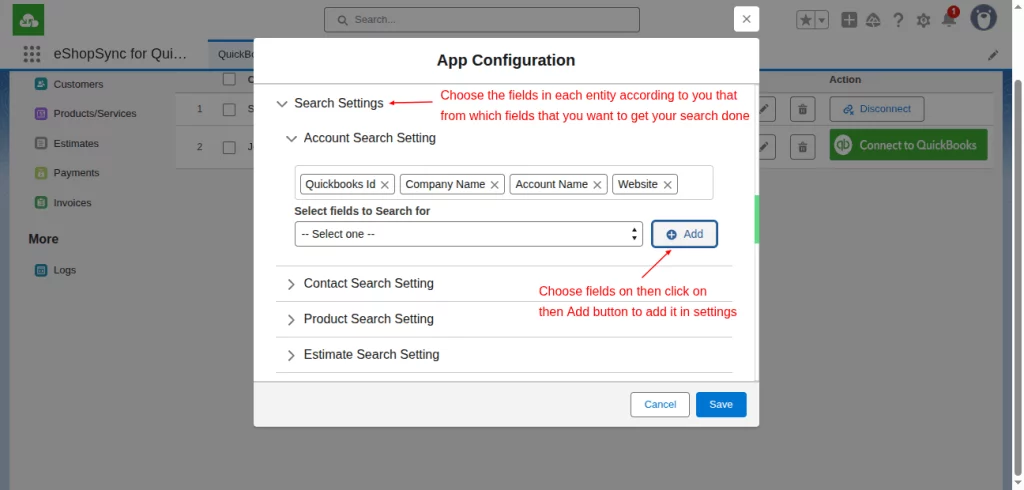
- Search- Use the Search option to search for records, as you have already set the settings for search in the App configuration.
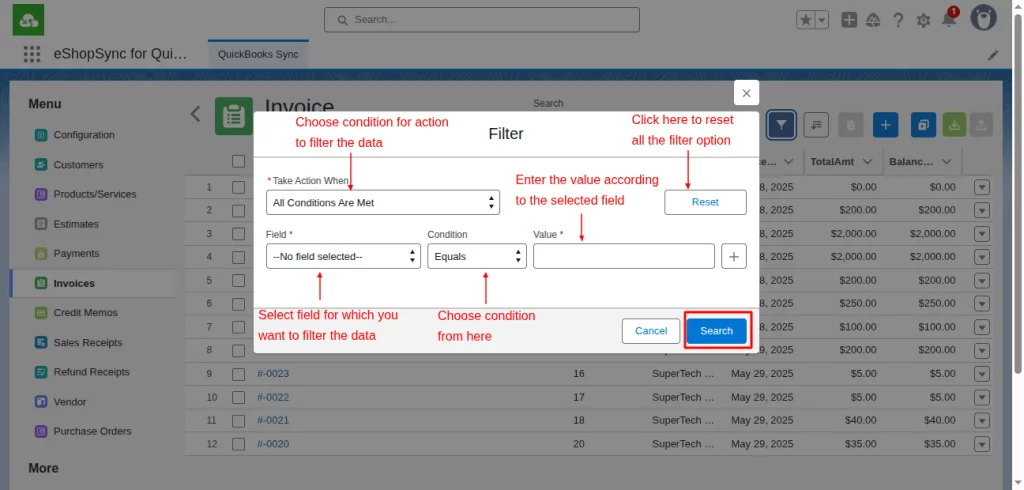
- Filter- Use this option to filter your data as per your requirements whenever you want to. In this, you get a few options that are:-
-
- Take action when- In this case, you get 2 options: “All conditions are met” and “Any conditions are met,” so the filter shows data accordingly.
-
- Field- Select the field for which you want to filter the data, such as company name, discount percent, due date, total tax, total amount, and more fields.
-
- Condition- Choose conditions such as equals, does not equal, greater than, or less than.
-
- Value- Enter the value according to the field selected to apply the filter.
-
- Reset- Click on the reset button to reset all the filter settings.
- Search- Click on the Search button to apply the filter to your records.
Note- The fields particularly with the * sign are compulsory.
- Column filter – Use this feature to add temporary columns that you want to see in the records you are working with. When you refresh the page, the temporary columns fade away.
- Delete – Select the records you want to delete and then click the Delete button to complete the action. The records will not only disappear from the mapping but will also be permanently removed from Salesforce.
- Add a new record- You can add records manually by clicking on the + button to add a new record whenever you want to.
- Import- Click on the Import button to import all your records from QuickBooks to Salesforce.
- Export- Click on the Export button to export the selected records from Salesforce to the QuickBooks application.
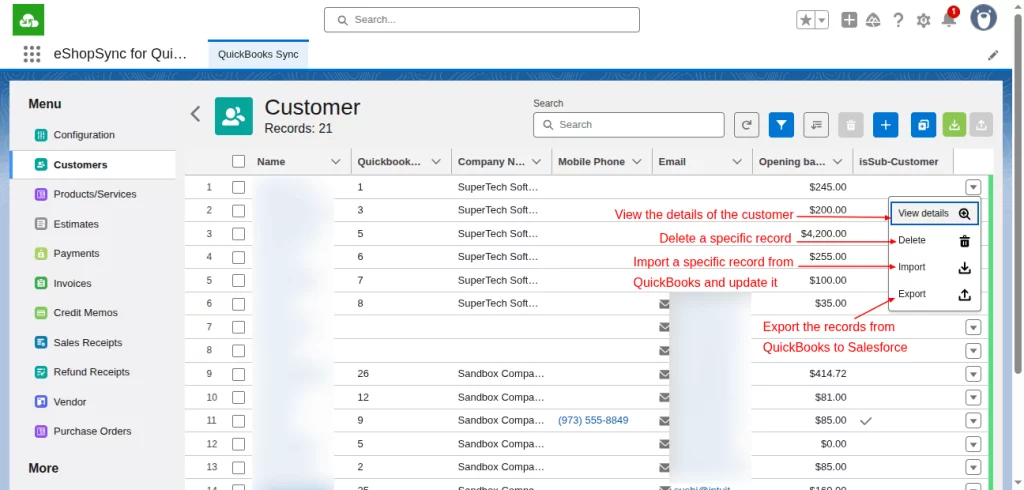
Row actions against each row:-
Real-Time Configuration
- Create a site
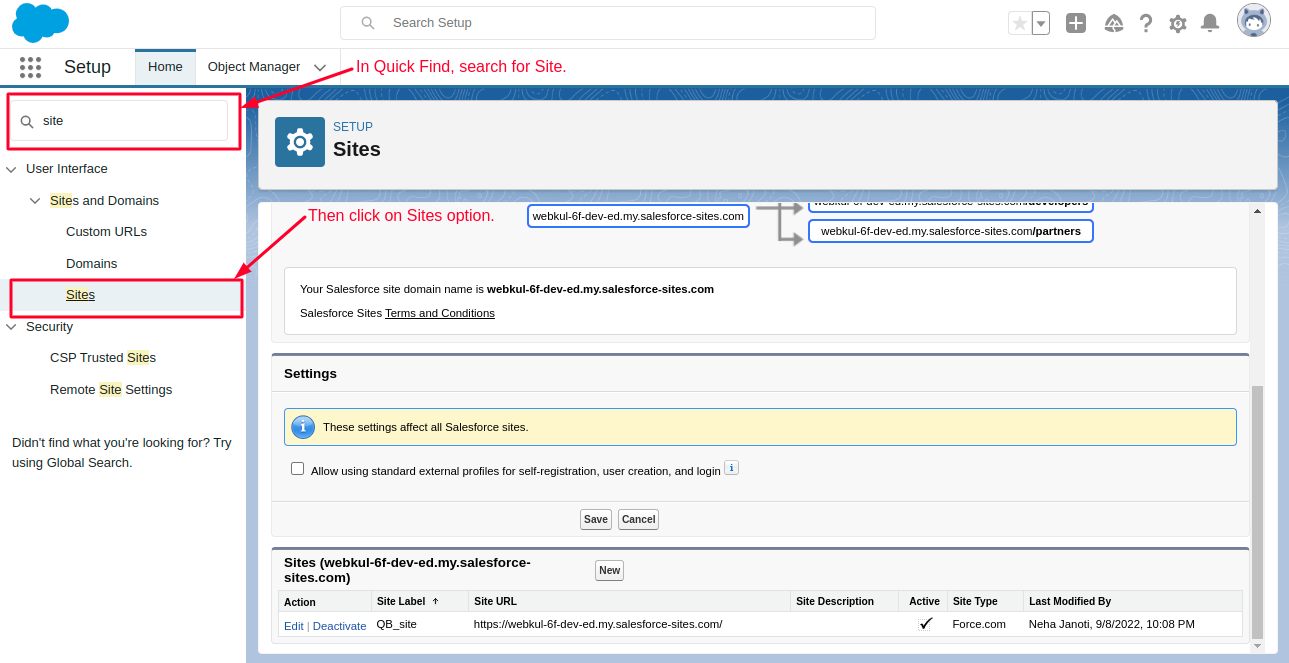
- In Salesforce Setup, go to the Quick Find field.
-
- Enter Site and then from shown options click on Sites.
- Afterwards, scroll down and click on the New button to create a new site.

-
- Then fill up the required information in the form and click on the Save button.
- Meanwhile, again go to Sites, scroll down and click on the QB_site to open it.

-
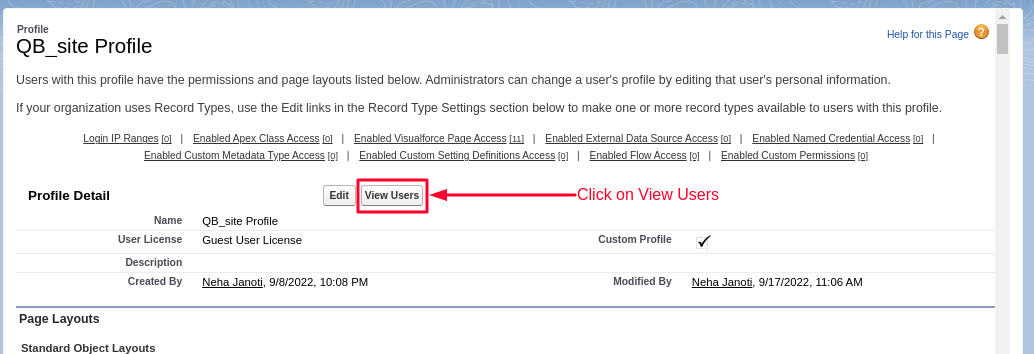
- Now click on Public Access Settings.

-
- Click on View Users.
-
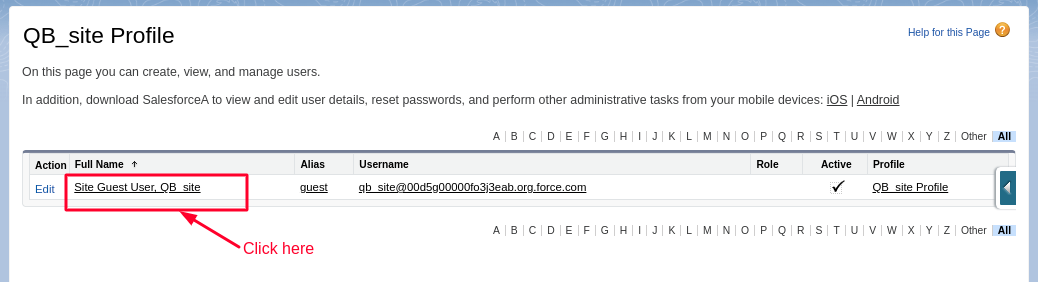
- Click on Site Guest User to add permission sets
-
- Now click on Permission set assignment then click on Edit assignment
- Select the permission set to Add them to enable the permission set
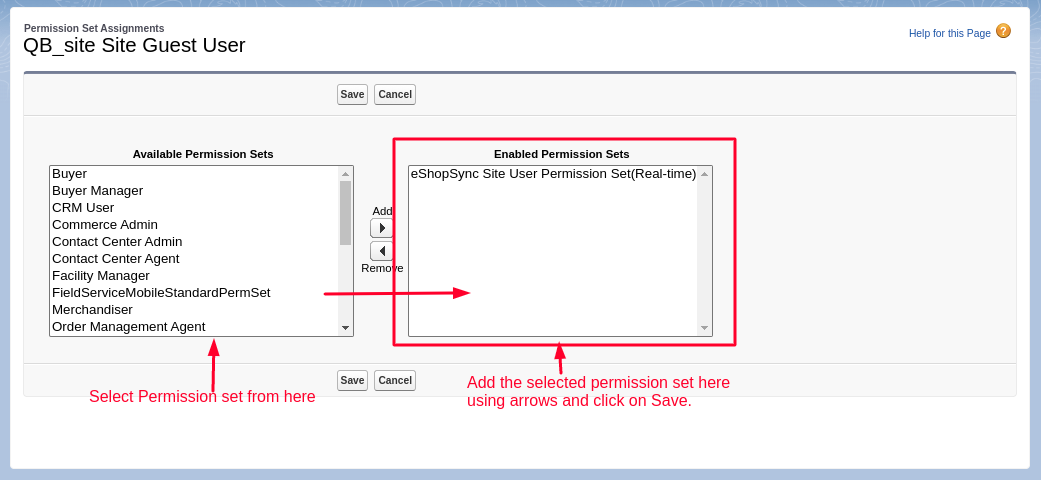
- Assign permission Set to users
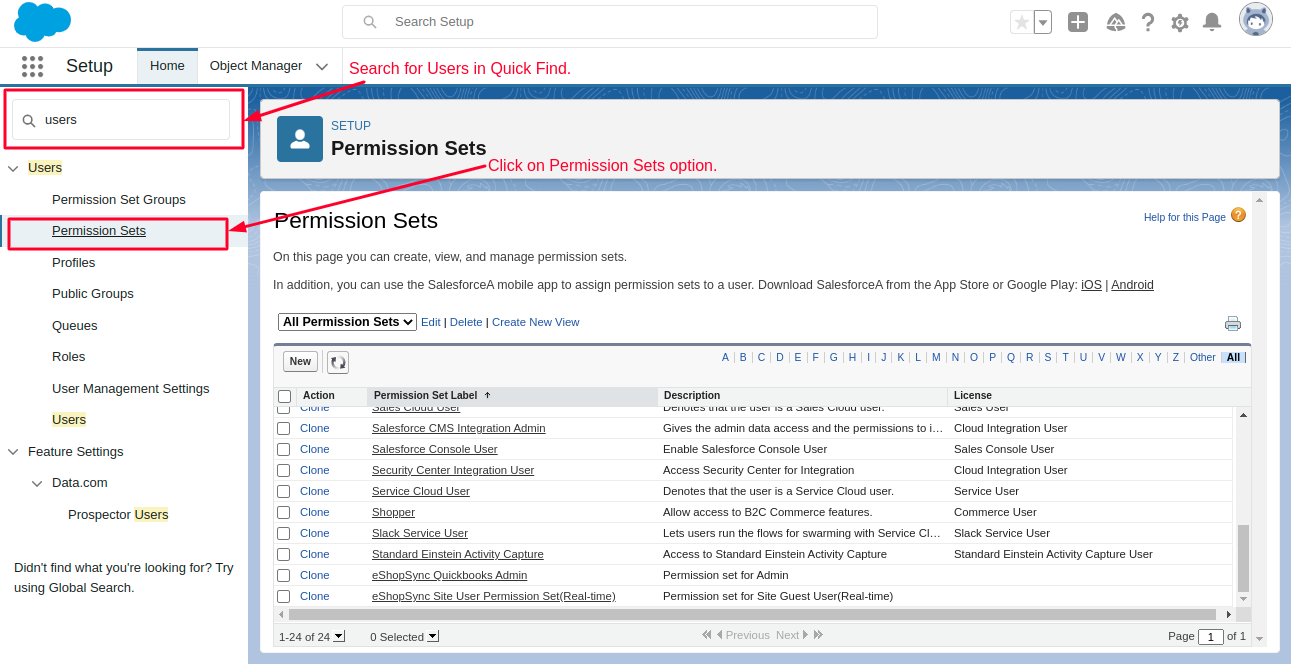
- In Salesforce Setup, click on the Quick Find field
- Type User and from the shown options click on the Permission Sets option
-
- Then look for eShopSync for QuickBooks and click on it

-
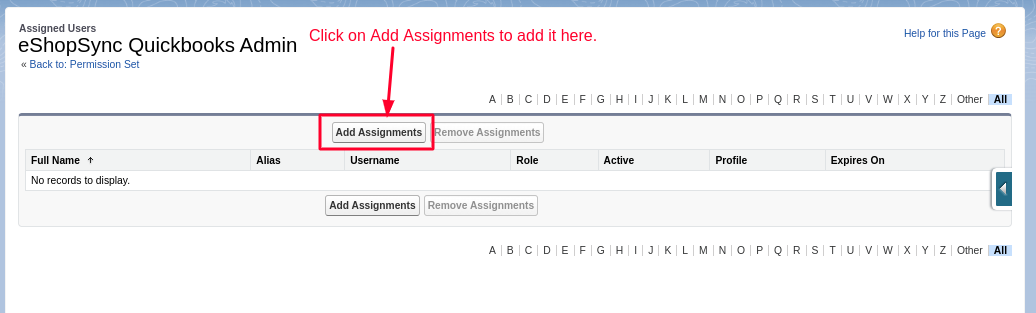
- Click on Add Assignment button
-
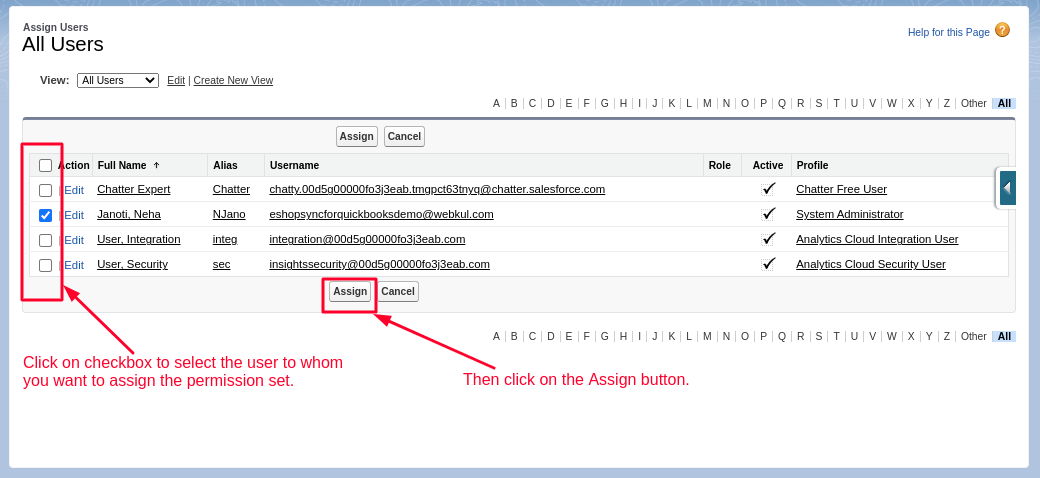
- Now select the checkbox to whom you want to assign permission sets
-
Click the Assign button to assign the permission set to the specific user(s).
Synchronization Process
- Product/Services- View of Product/Services at Salesforce end.

Conclusion
Salesforce QuickBooks integration provides an automated process of creating and sending invoices in QuickBooks.
It is easier to share financial data, check accounts, view customer sales and touchpoints, and discover sales opportunities.
If you are looking for comprehensive Salesforce QuickBooks Integration solutions, eShopSync is the right place for you offering a wide range of Salesforce services.
The firm provides integration, customization, migration, and implementation services.
- For any further queries, Click To Create a Ticket
- To know the feasibility of specific requirements: Request For Customization
- To view all our applications in Appexchange, go to Webkul Appexchange Apps.

Be the first to comment.