
Introducing you to the Xero Salesforce Connector user guide to help you connect your accounting and CRM.
When these two platforms work as a unified system, they could do miracles in improving the efficiency of your business. But when they don’t talk to each other, a gap forms.
This gap isn’t just an inconvenience; it’s a source of costly errors, wasted time, and frustrating experiences for both your team and your customers.
This guide is here to bridge that gap. We’re going to walk you through everything you need to know about Xero Salesforce integration.
We’ll cover everything, from installing the connector and mapping data between the two platforms to troubleshooting common issues.
What Are The Benefits Of Xero Salesforce Connector?
Some of the benefits of integrating Xero and Salesforce include the following:
- Streamlined processes: Integrating Xero and Salesforce can help automate processes such as invoicing and payments, reducing the need for manual data entry and saving time.
- Improved visibility: Integrating Xero and Salesforce can provide a complete view of a customer’s financial history, helping businesses make better-informed decisions.
- Collaboration: Integrating Xero and Salesforce can improve the collaboration between finance and sales teams, as both teams have access to the same data.
- Accurate data: Integrating Xero and Salesforce can help ensure that data is accurate and up-to-date, reducing errors and minimizing the risk of financial mistakes.
Features of Xero Salesforce Connector
- Eliminate manual data update with Real-Time, Two-Way Sync.
- Automate sync for Customers, Products, Invoices, Quotes, and more.
- Support price book entries for all products to import and export.
- Prevent duplicate record creation with Smart Matching Criteria.
- Error logs for every transaction, providing simple and transparent troubleshooting.
- Convert Opportunity in Salesforce into an Xero Invoice ready to share with the customer.
- Map the standard and custom fields in Salesforce to their corresponding fields in Xero.
- QuickAction button on the Record page to download the invoice.
- Schedule Bulk Export of historical data for Invoices, bills, and opportunities (Invoices).
Installation & Setup at Salesforce’s end
- First of all, get the application eShopSync For Xero from AppExchange
- Click on Get it now button
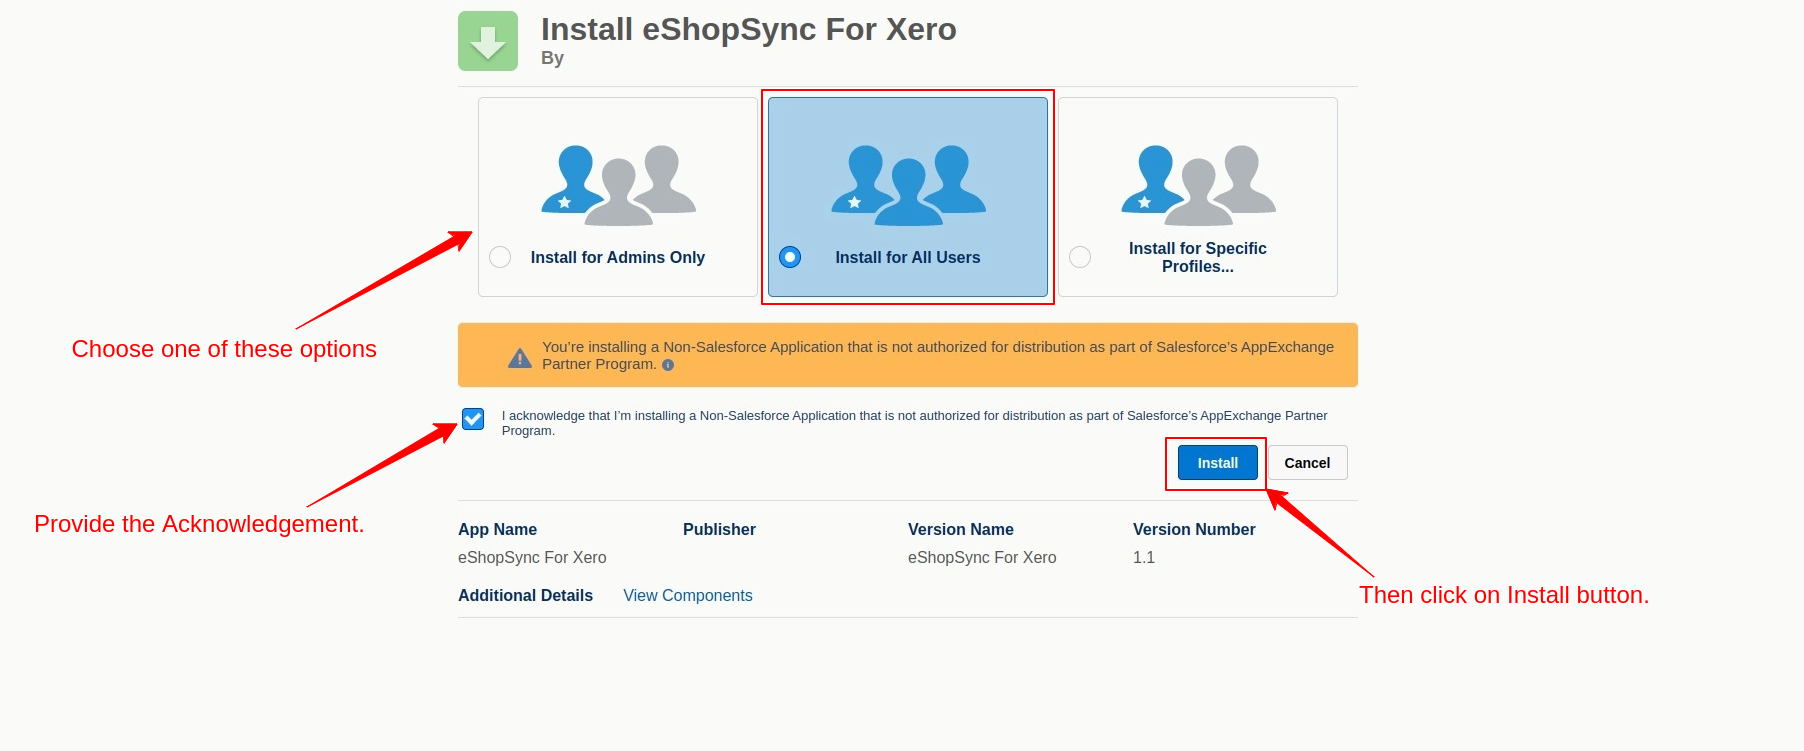
- It redirects you to the screen where you have to choose the user type you want to do the installation
- Then select the acknowledgment and click on the Install button.

- Now give the installation access and click on the Continue button.


- After successfully installing the application from the Appexchange.
- You have to assign permission sets to the user, so their roles can be more specialized.
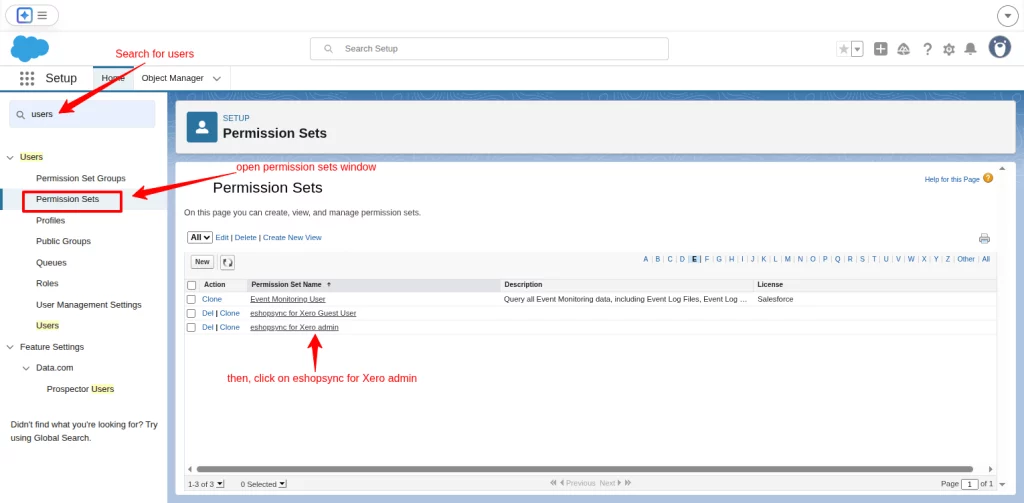
- Start from the gear icon, click on setup and search for the users in the quick search bar.
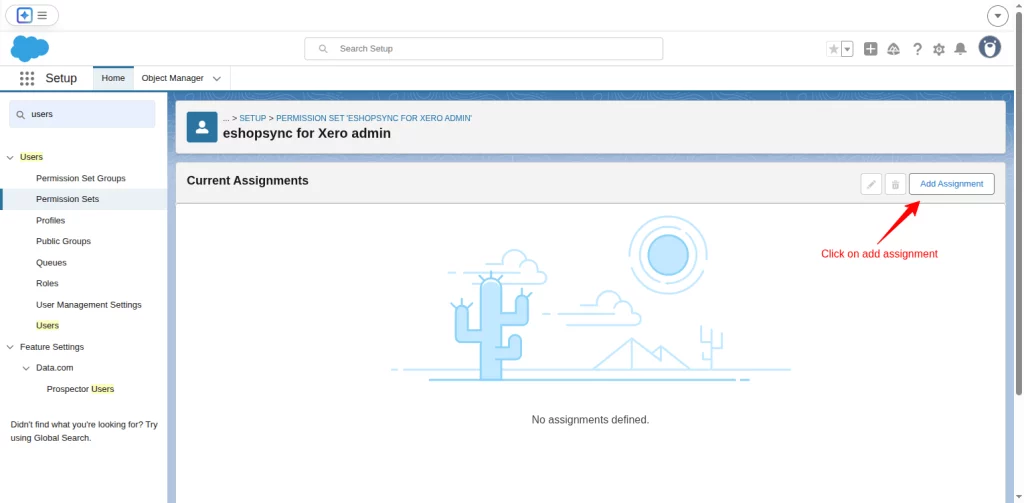
- Select permission sets and click on the eshopsync for Xero admin.

- Open Manage Assignments
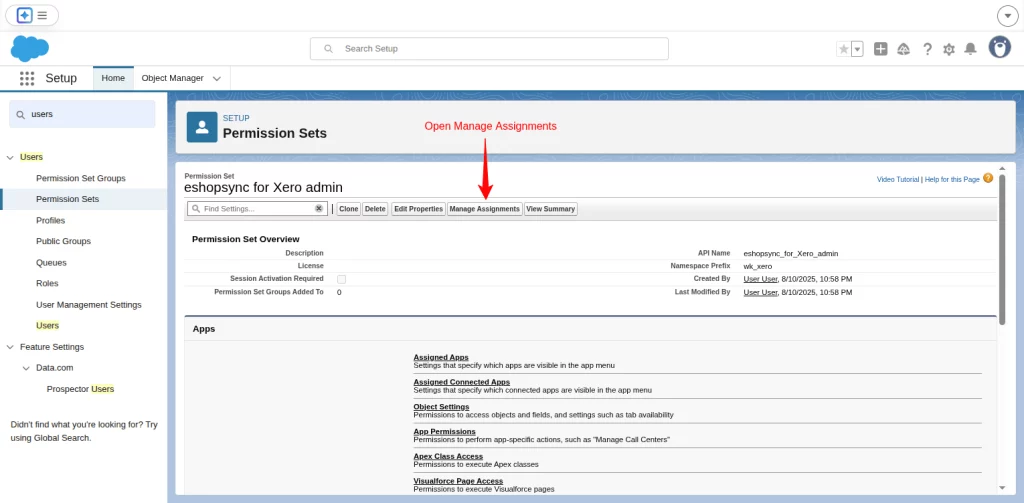
- Next, click on the Add Assignment button.
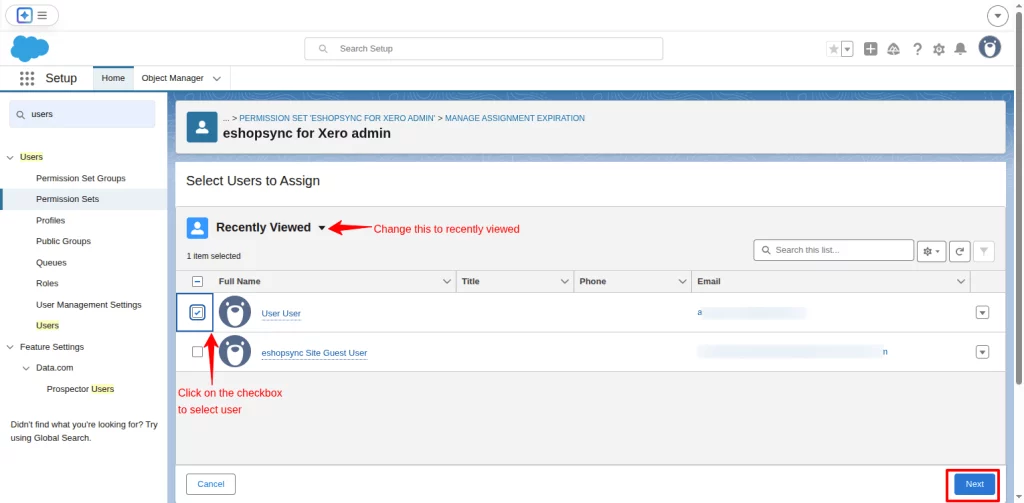
- In the next window, tick on the checkboxes to assign the users and click on next.
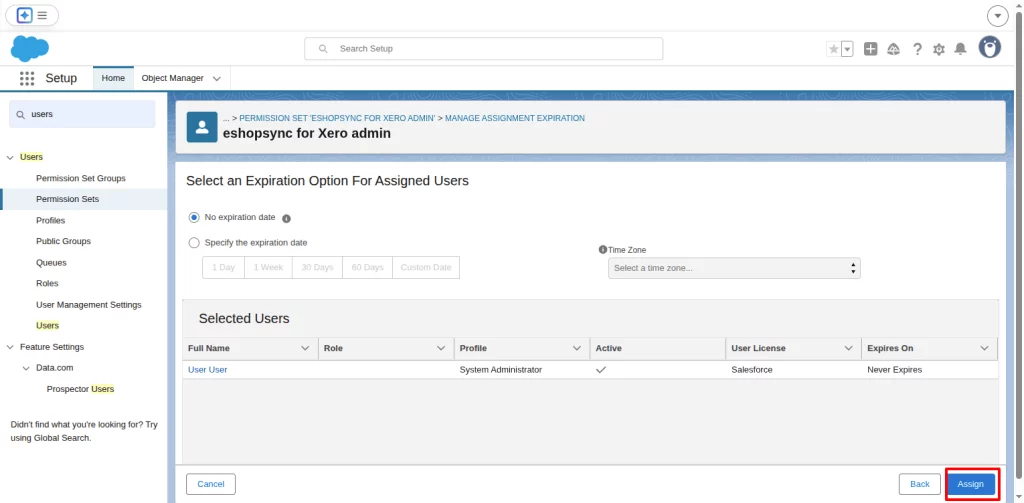
- Finally, click on the assign button to save your changes. A success message will open in the new window showing the status successful.
Create A New Organization in eShopSync for Xero
If you already have an existing organization, you can continue using it, or if needed, you can create a new organization by following the instructions provided below:
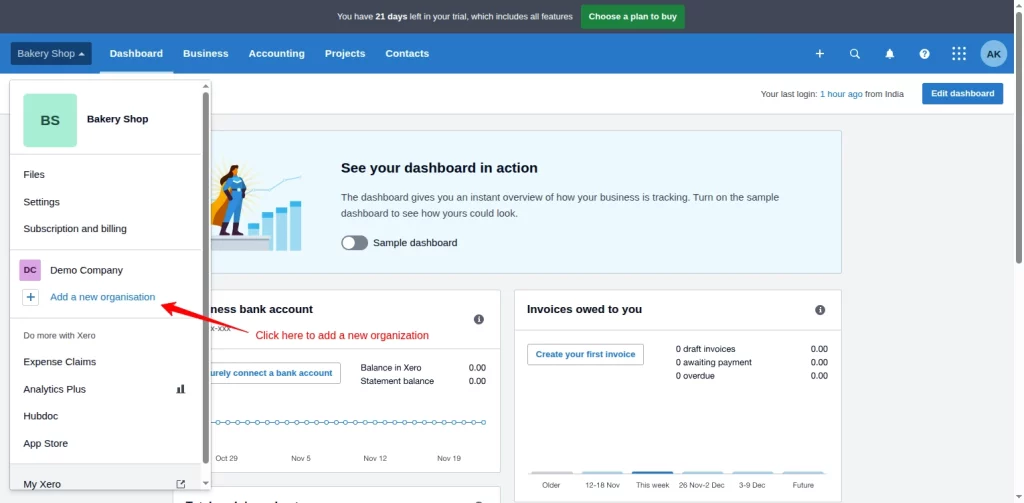
- To create a new organization, visit https://go.xero.com
- Then, from the top left side, click on the drop-down arrow and further select “Add a new organization”.
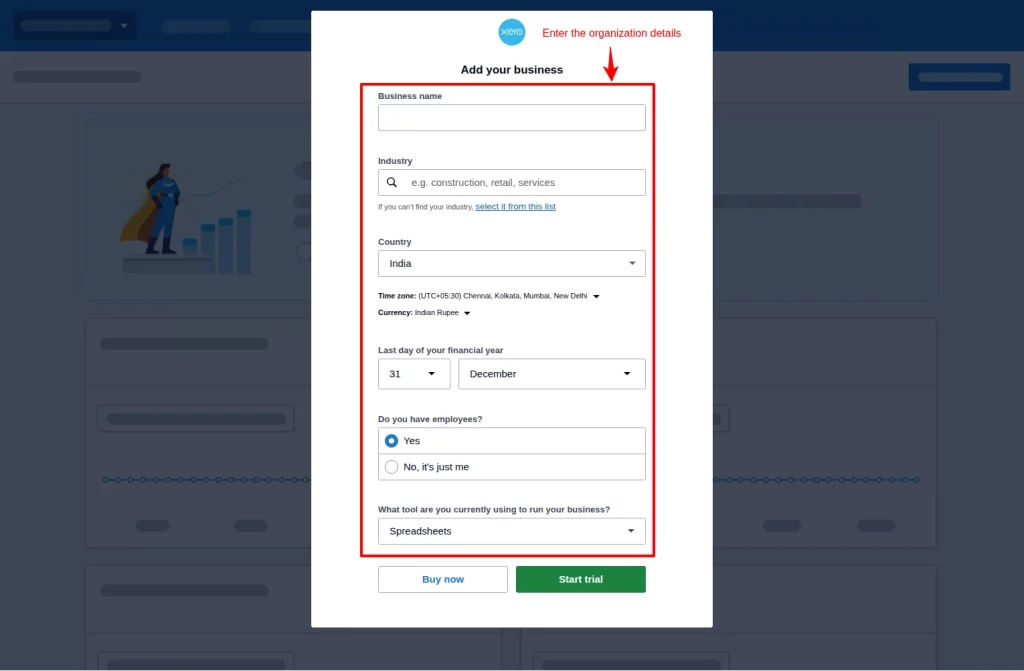
- Now a form opens up on your screen.
- Fill in the required details in the form and save it.

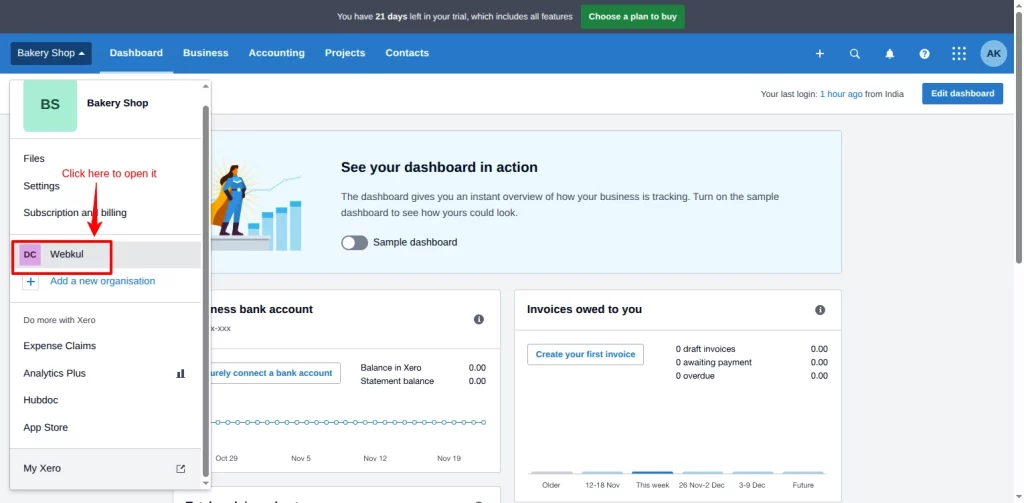
- The new organization is shown in the drop-down menu. Click on it to open it.
Create a Site in Salesforce
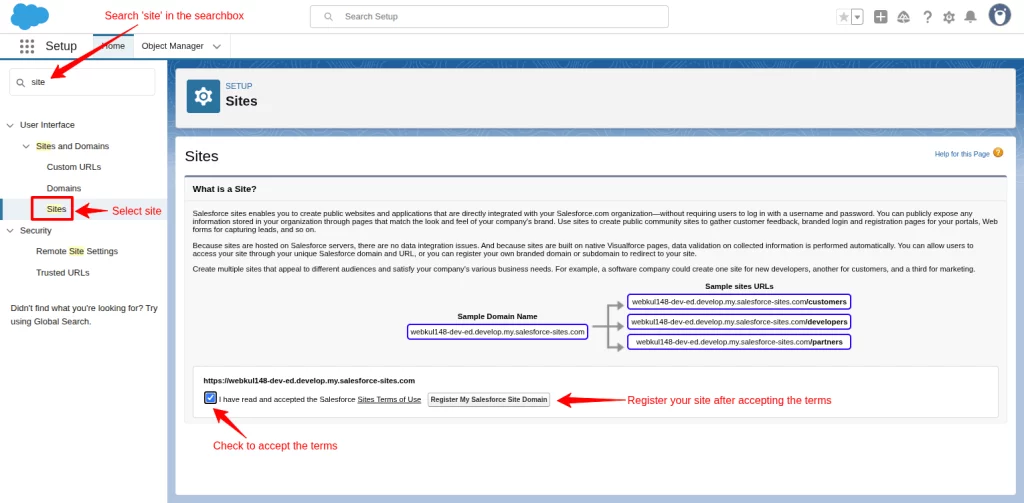
The site creation is neccessary to enable the real-time functionality of the connector. To create a site in Salesforce, go to the quick action bar and search for ‘site’.
When you click on the ‘sites’ in the result, you will see the sites section on the right-hand side of the org.
(Note: The option to accept the Site’s terms of use will be visible only when you’re registering for the first time.)
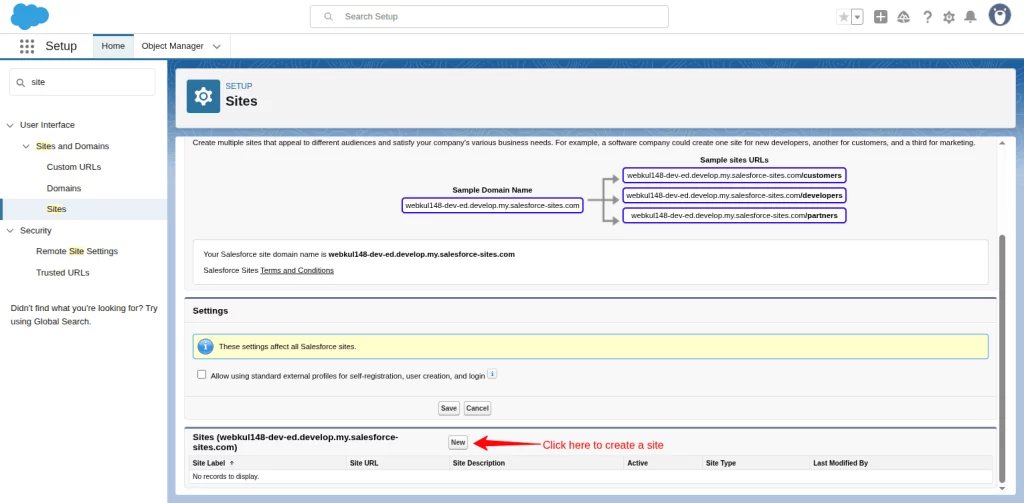
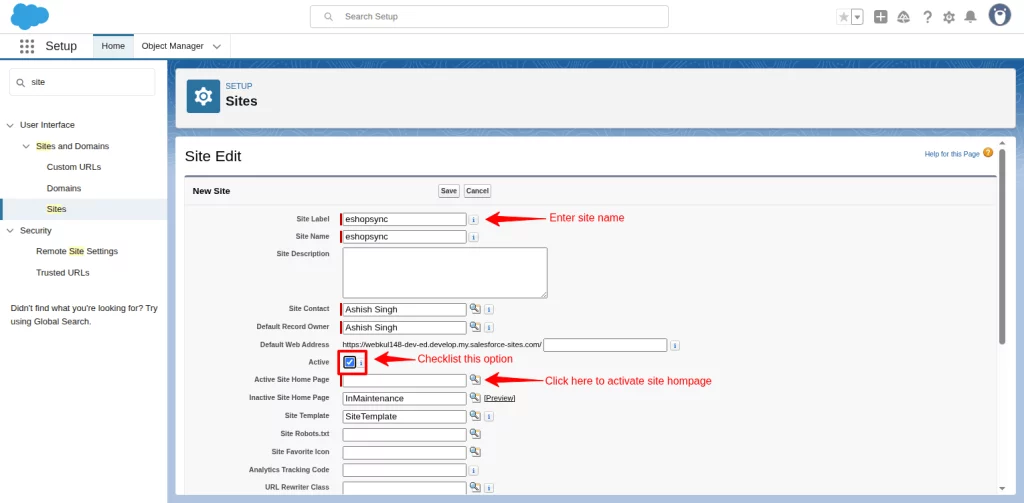
Next, click on the ‘New’ button to create a site.
Enter your site name here and mark the Active checkbox option. Then, click on the icon in front of the Active site homepage. You can refer to the screenshot given below.
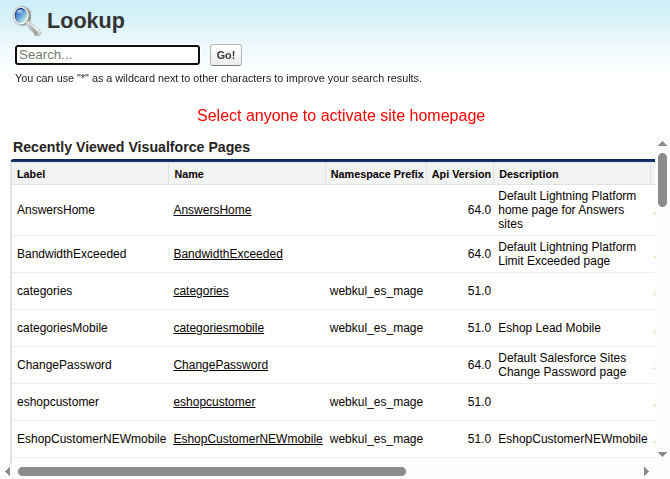
Further, select any one of the homepages.

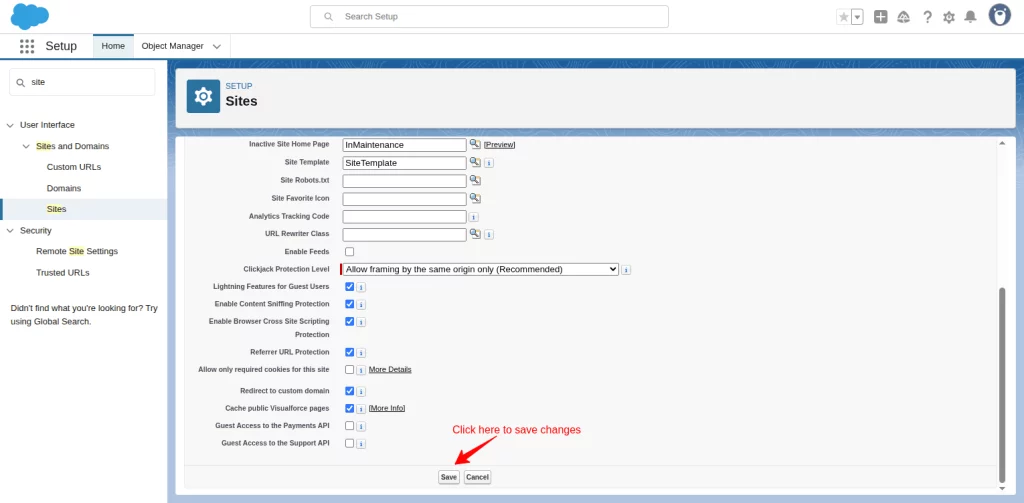
Finally, click on the save button to save the changes.
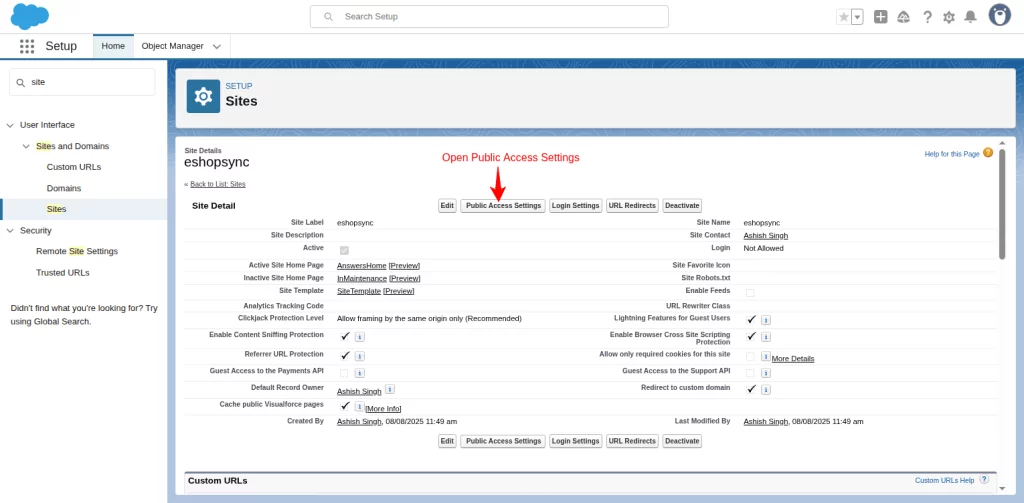
Now, open ‘Public Access Settings’.
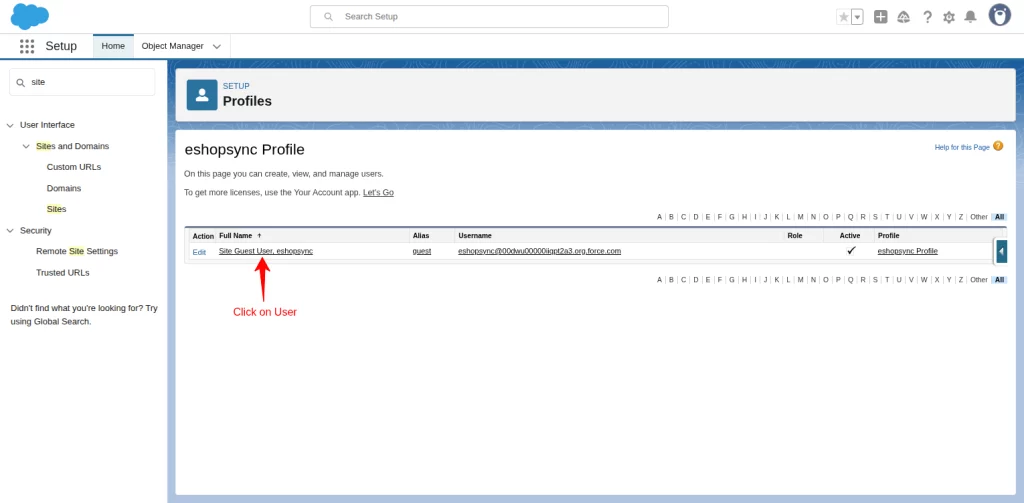
Click on the View User, and you will be on the profile page.
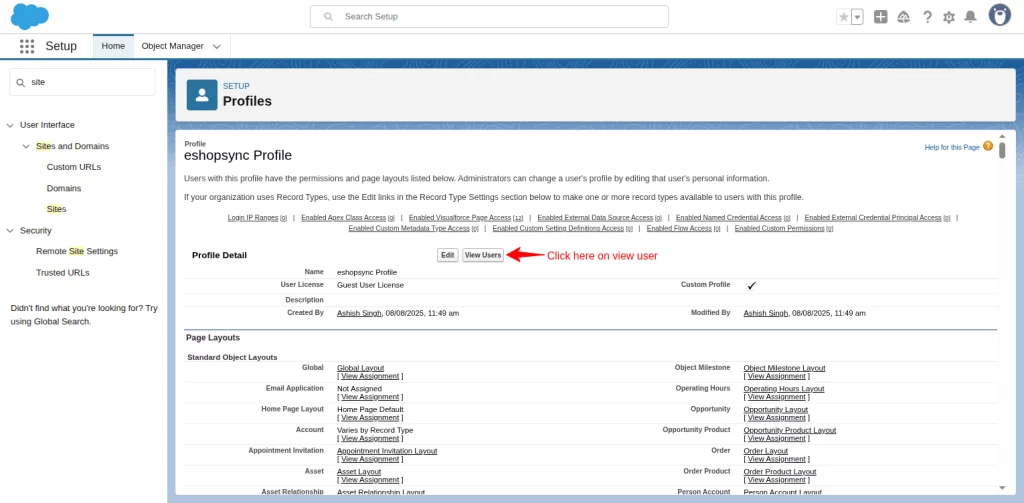
Select the Guest user profile.
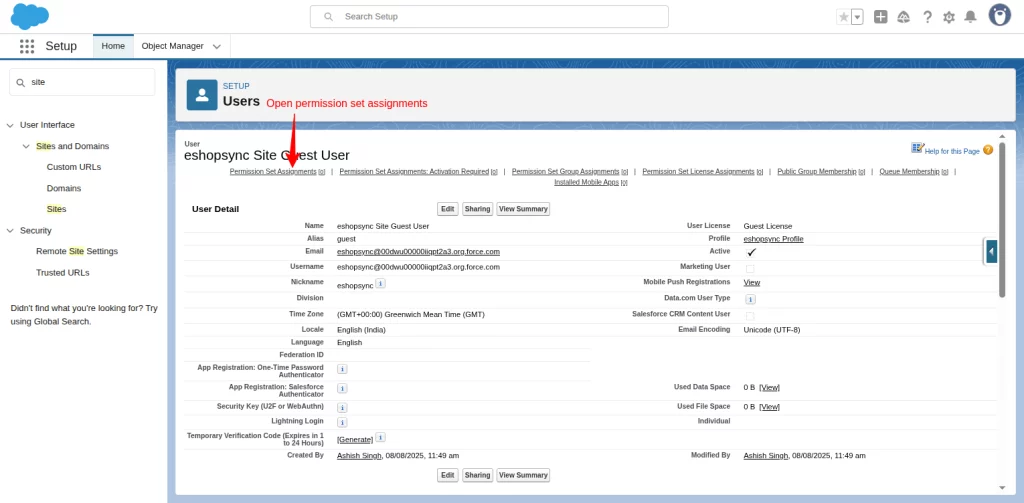
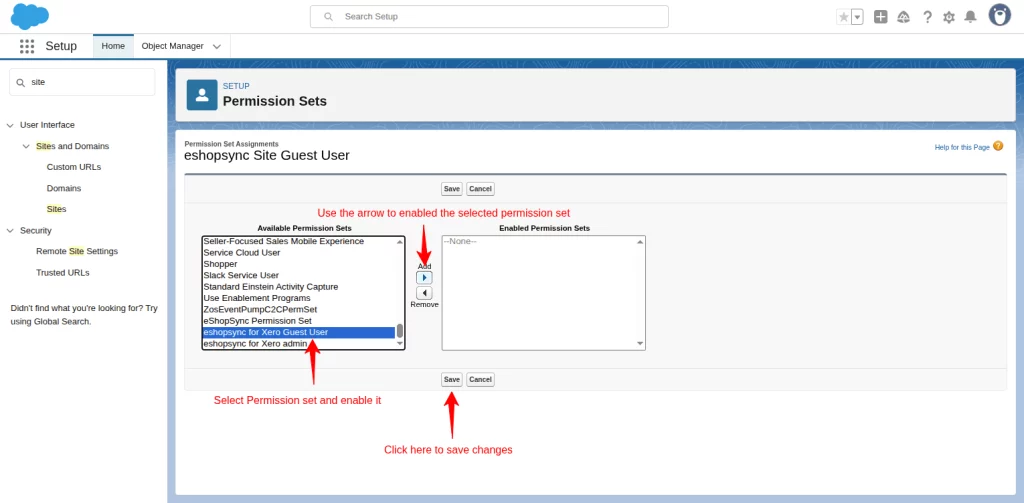
Then, on the next page, click on Permission Set Assignment.
Click on the Edit Assignment button to select and enable the permission set.
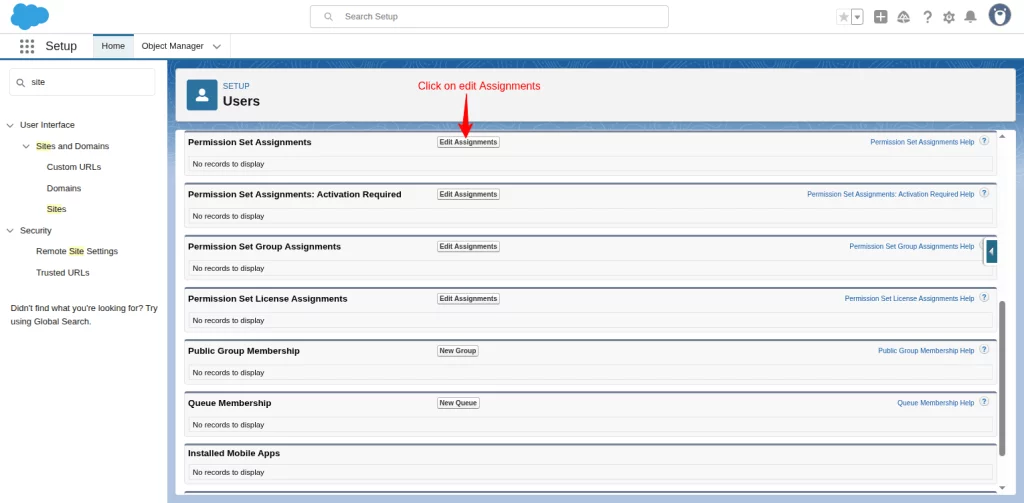
Finally, select “eshopsync for Xero Guest User” and click the arrow button to enable it, as shown in the screenshot below. Then, click on the Save button.
Now, your site has been created.
How To Add Xero Organization To Salesforce?
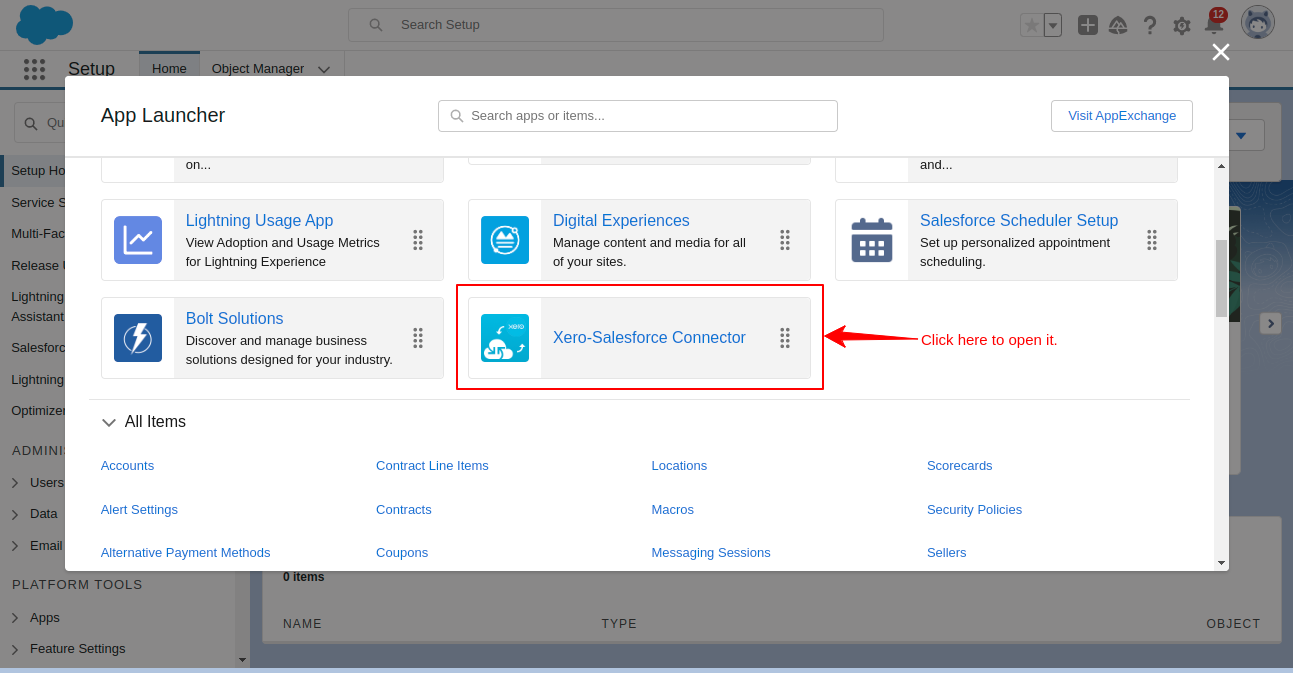
- Open Salesforce Org and click on the App launcher.
- Then click on the Xero Salesforce Connector to open it.

- Add a new company by clicking on the Add button.
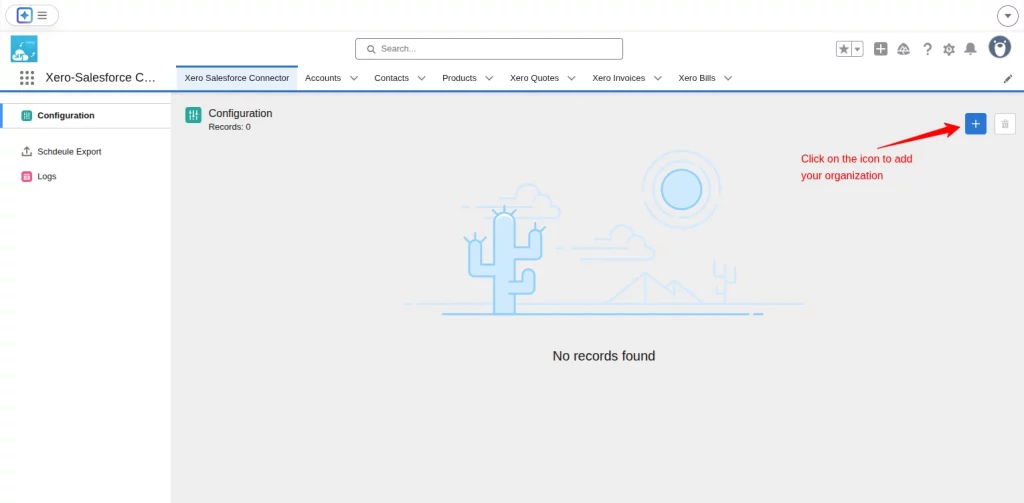
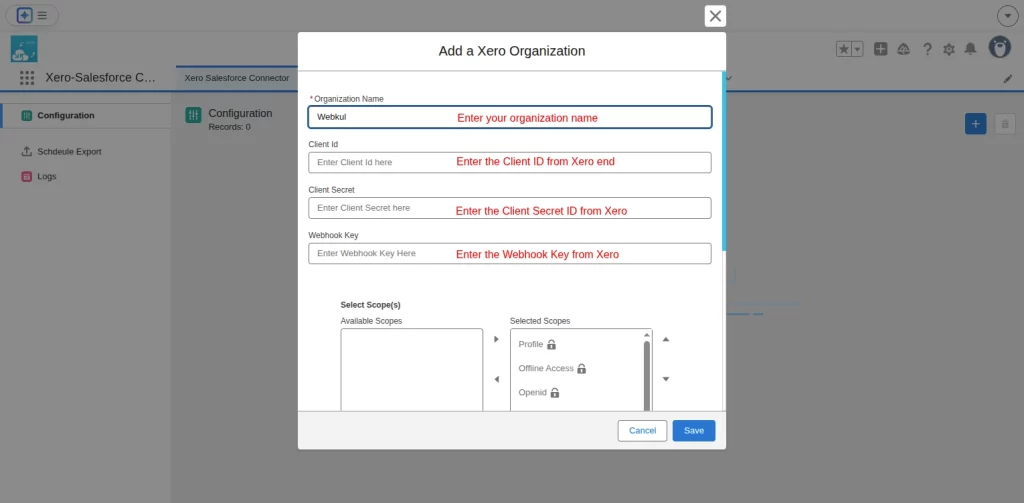
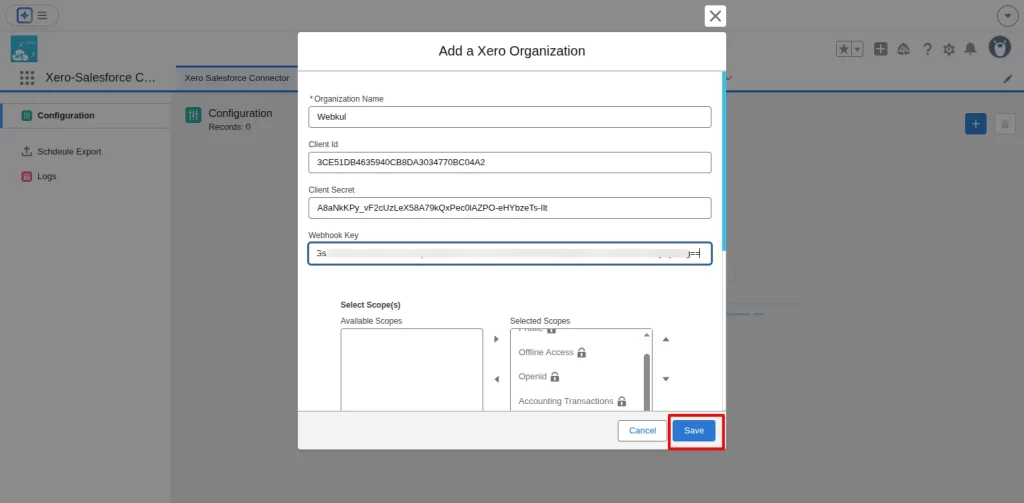
- A form named “Add a Xero Organization opens up.
- Provide the required information, such as Organization name, Client ID, Client Secret, and Webhook Key.
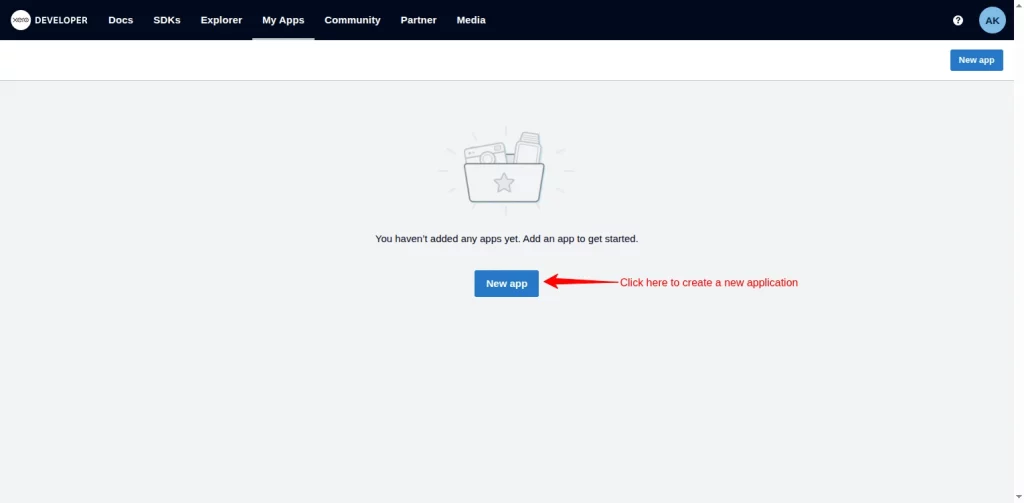
- For Client ID and Client Secret, visit https://developer.xero.com
- Click on the New App button to create a new application in Xero.
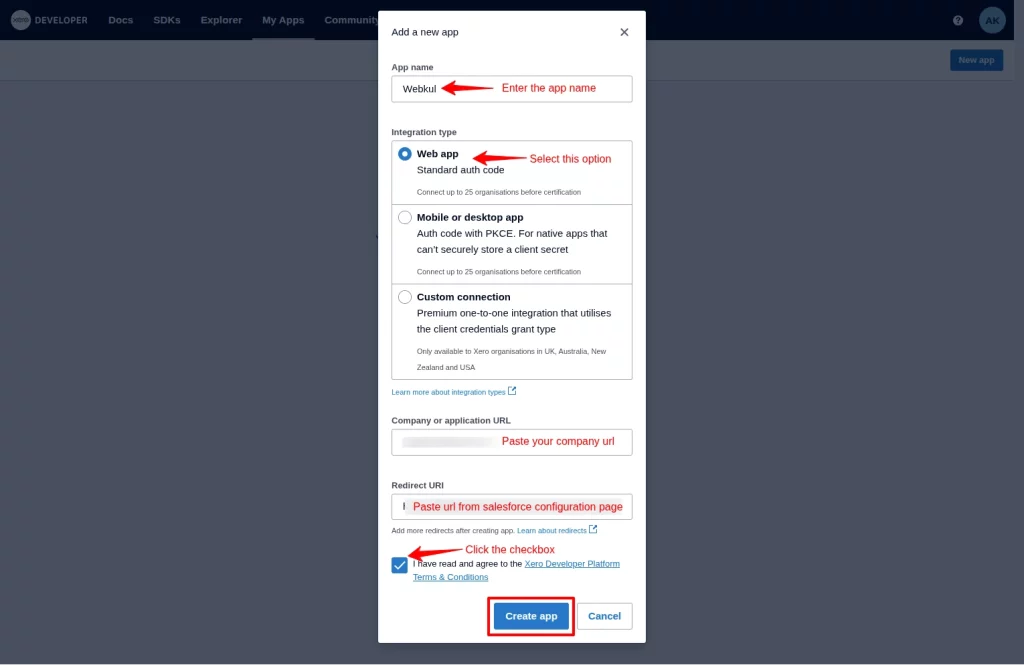
- In this new window, enter the details like app name, Company URL, and select the integration type. You can refer to the screenshot below.
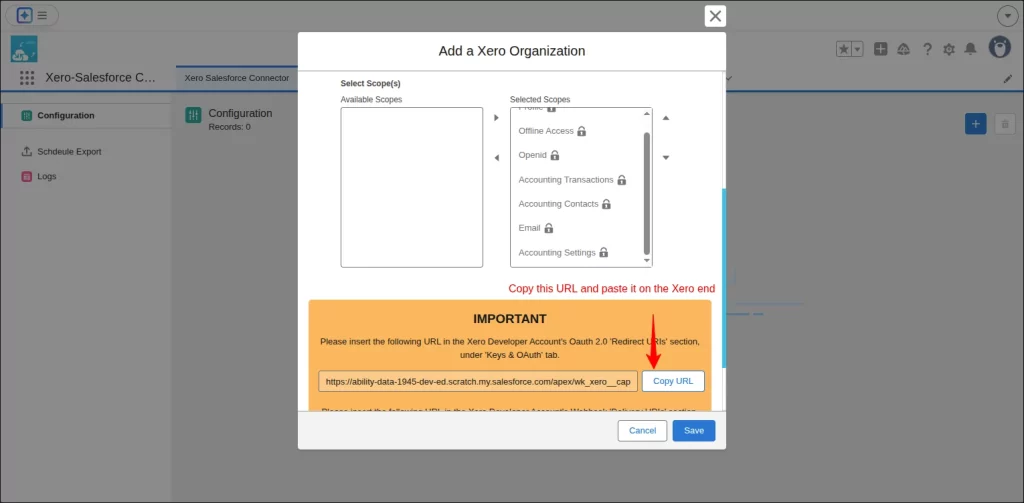
- Then, in the Redirect URL section, copy the URL from the connector configuration page, see configuration screenshot below.
- And after marking the checkbox, click on the create app button.

You have created the app. Now, go to the Xero configuration page.
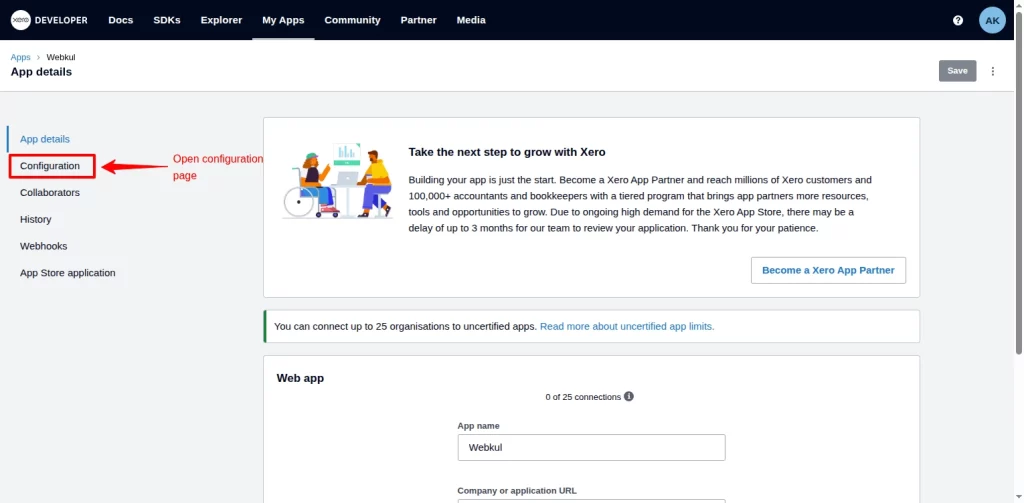
In the configuration page, you can find the Client ID that needs to be added to the Xero Organization window at the Connector end.
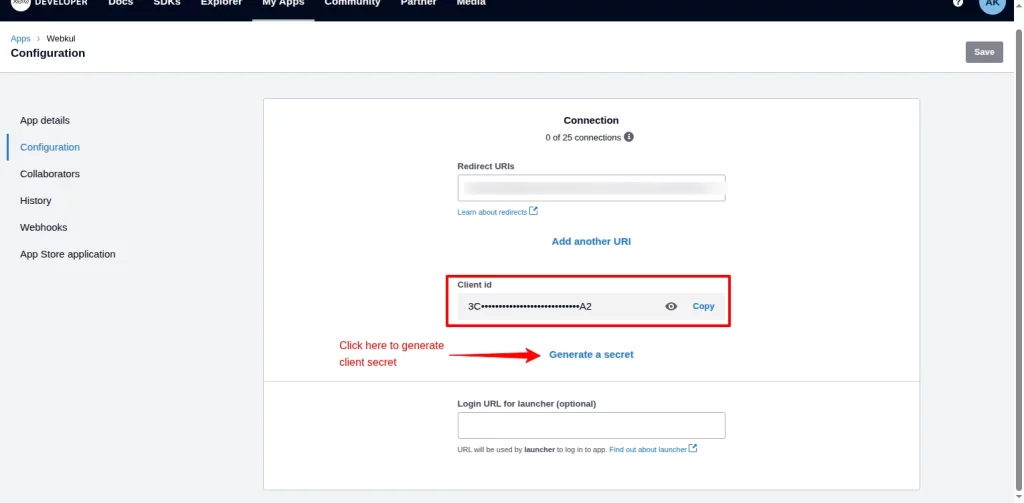
Furthermore, click on ‘Generate Client Secret,’ which also needs to be added to the Xero Organization window. Copy the Client ID and Client Secret.
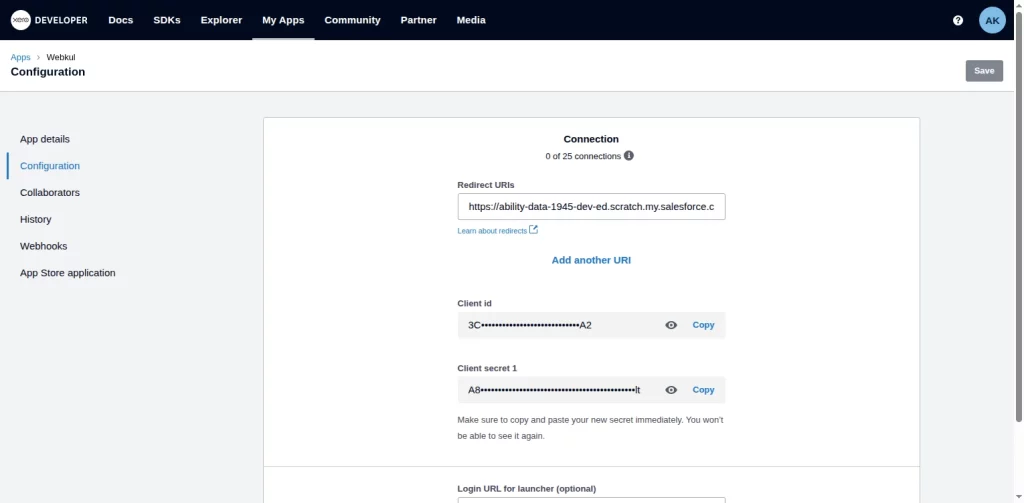
Now, paste the copied Client ID and Client Secret here in the Xero Configuration window.

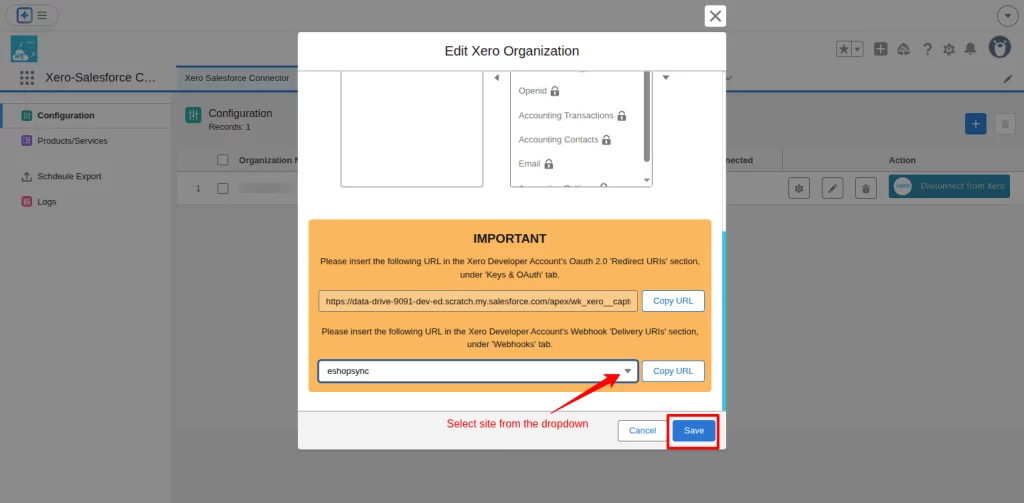
Next, for the webhook key, scroll down and select the site from the dropdown, and copy the URL.
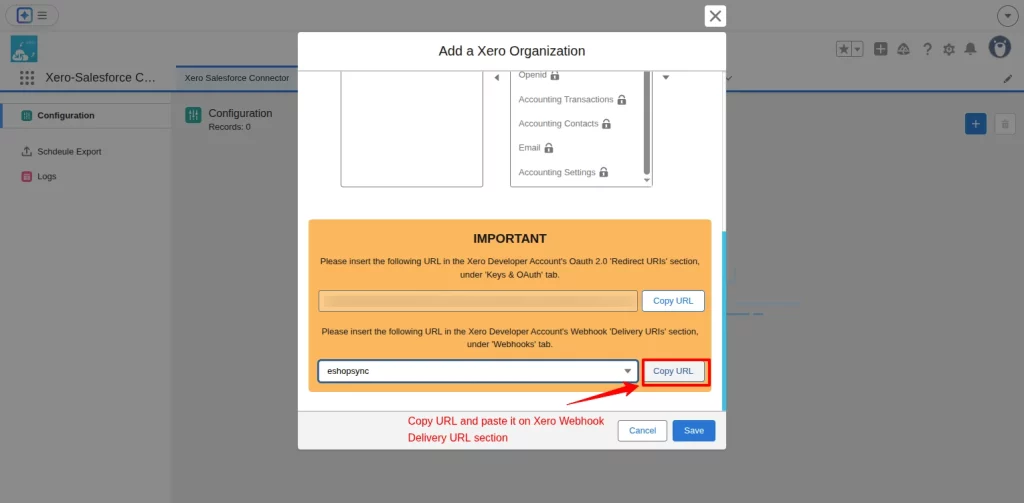
Paste the copied URL in the Xero Webhook Delivery URL section and click on the save button to save changes.
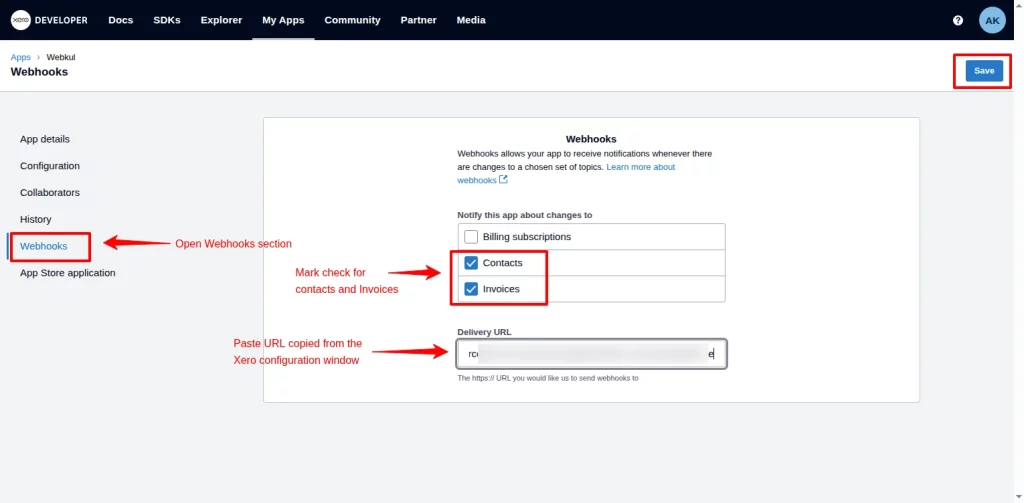
Now, you can see that the Webhook key is generated. Copy the Webhook key.
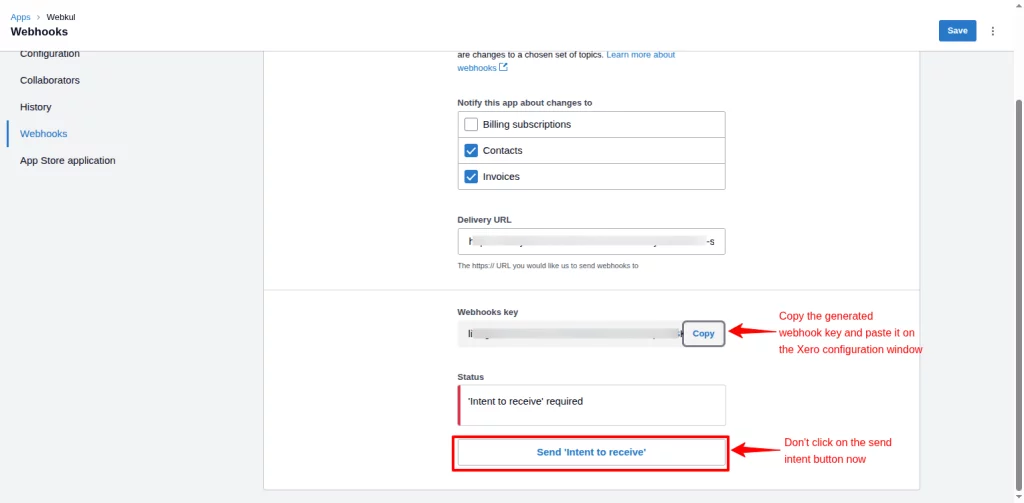
Paste the copied Webhook key into the configuration window and then save your changes.
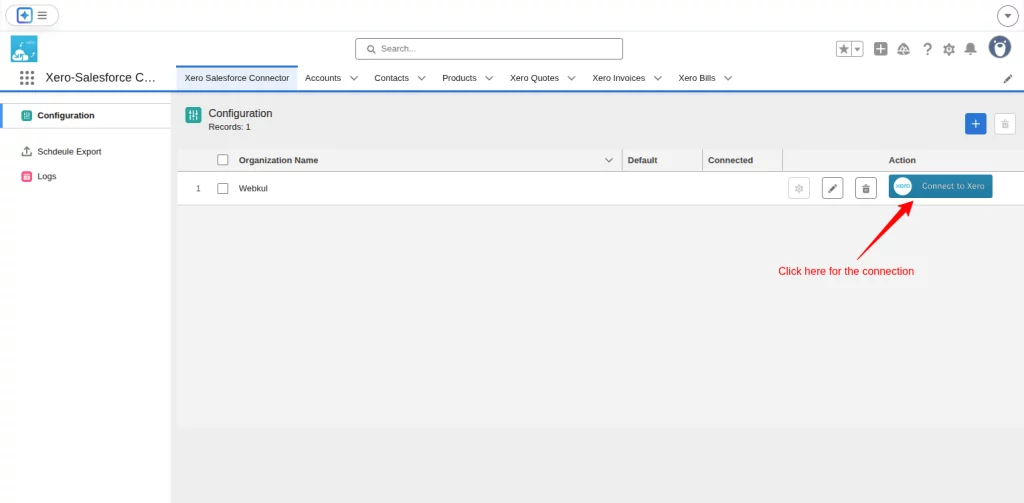
In the next window, click on the Connect to Xero button.
A pop-up message will open; you have to provide access for the connection.
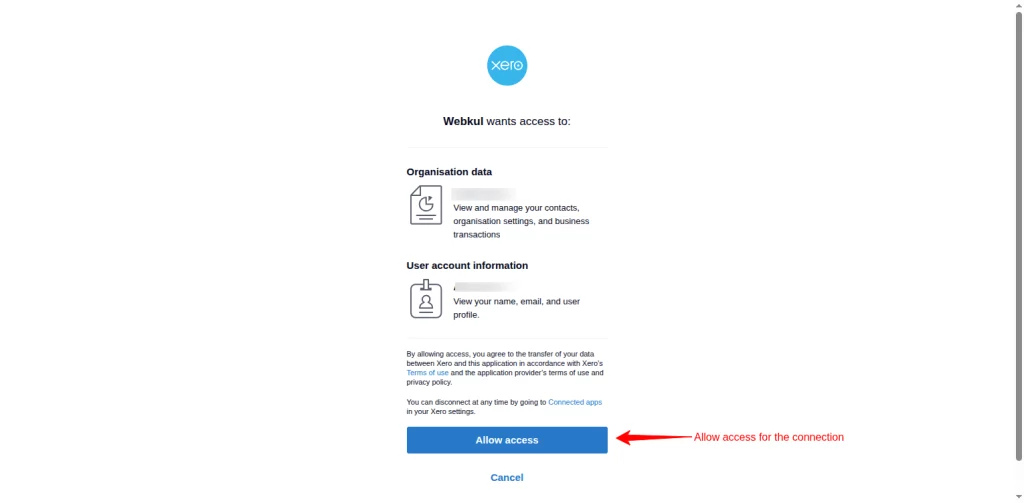
You can see that the connection has been established successfully.

Next, click on the dropdown icon to select the site and save changes.
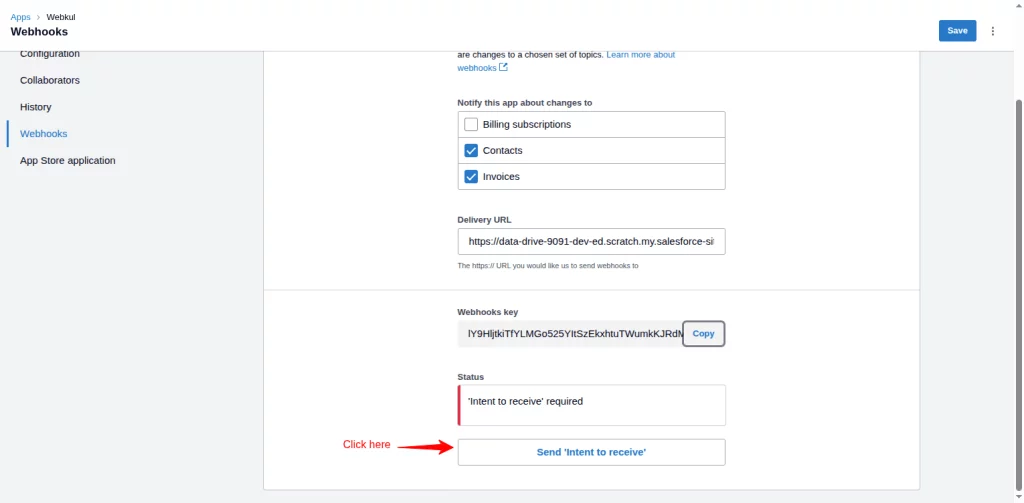
Now, go to the Xero dashboard and click on the Send Intent to receive. This will enable the real-time sync feature.
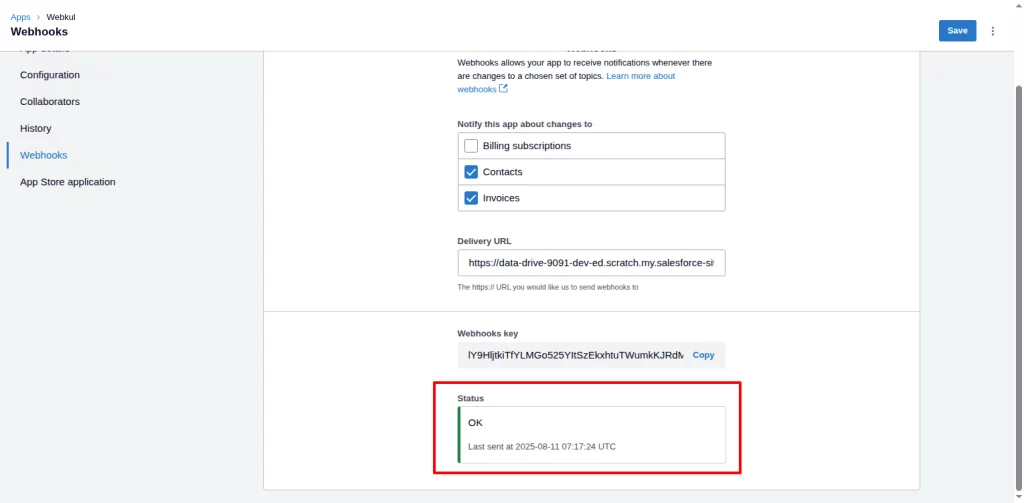
You can see the status is successful.
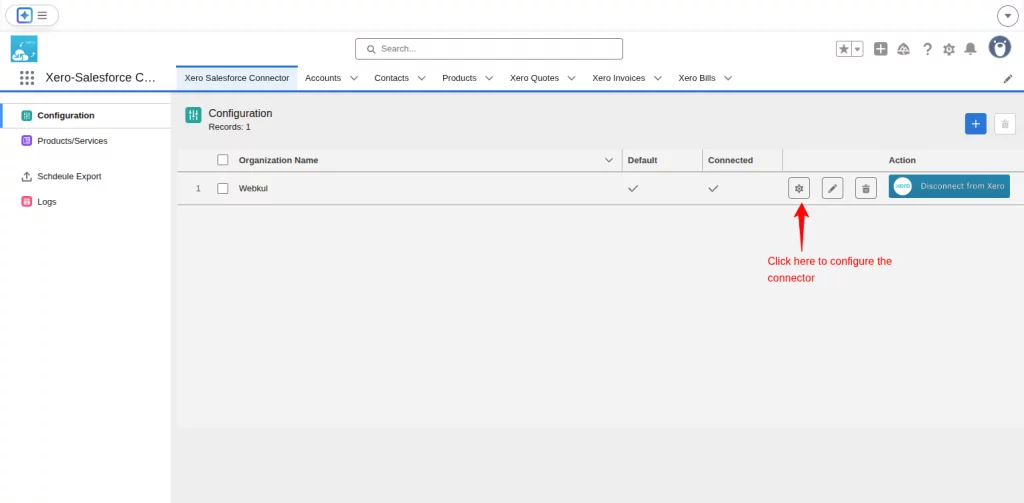
Xero Salesforce Connector Application Configuration
In Xero Salesforce Connector, click on the Configuration button to do the settings of the application.
The configuration box opens up; in this, you have to select the object you want to sync.
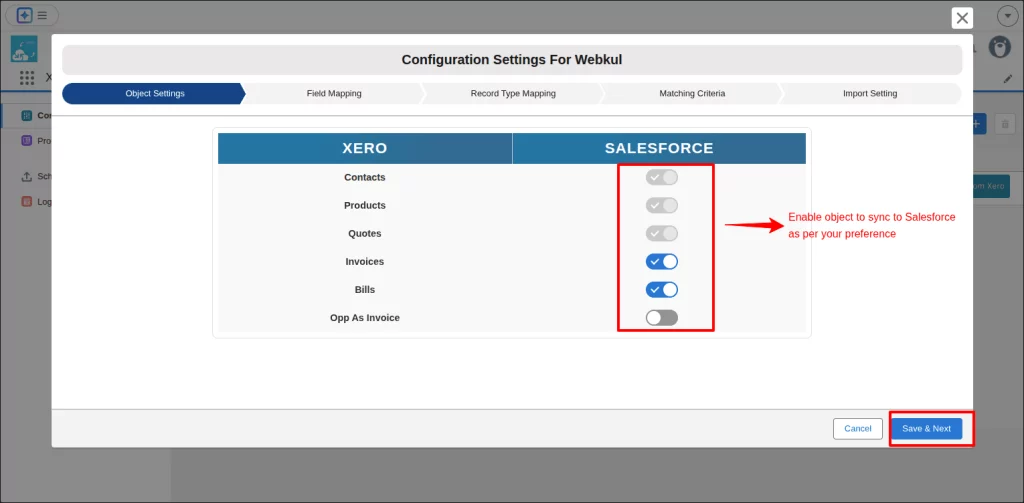
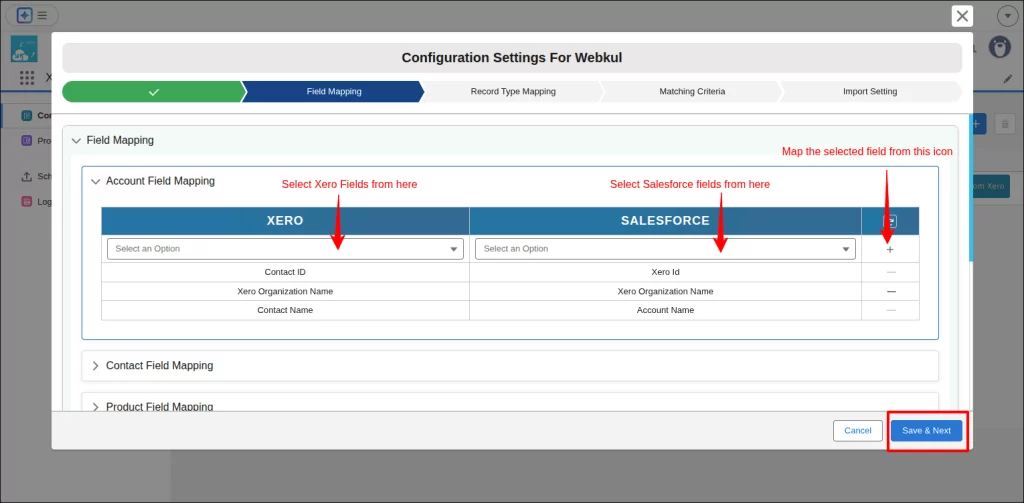
Now, click on Save and Next, then it takes you to the Field Mapping tab.
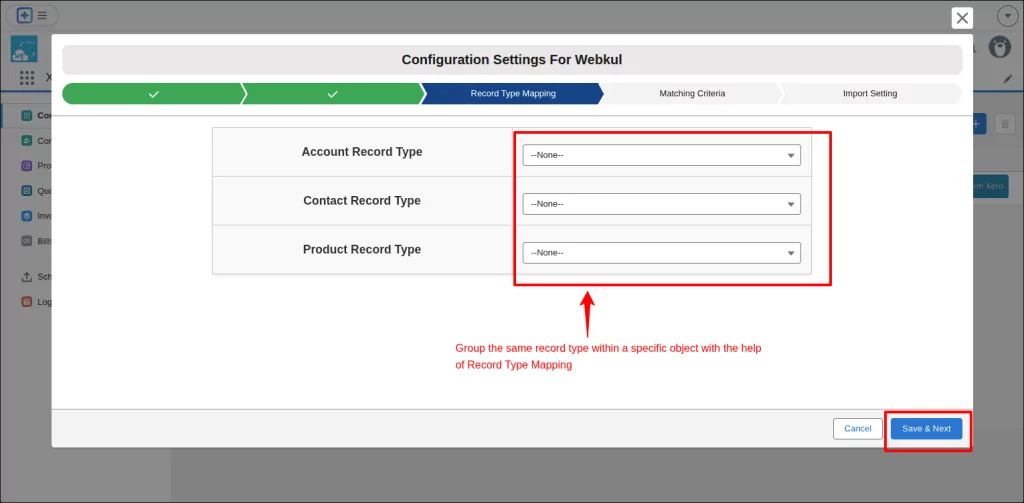
Next, group the same records within a specific object with the help of Record Type Mapping.
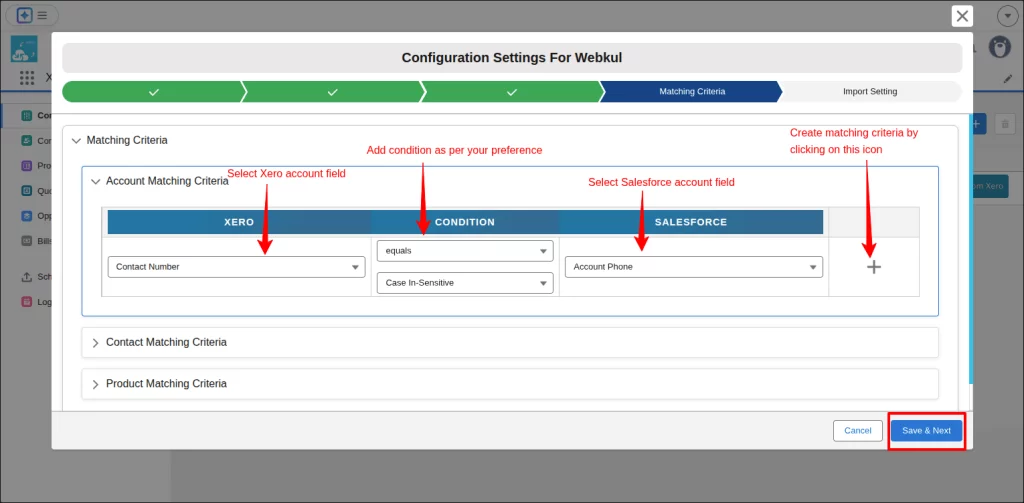
Further, add a condition in the matching criteria option for removing duplicates in the records.
Finally, set import settings for products. Here, you can schedule a daily product import by selecting a specific time of the day.
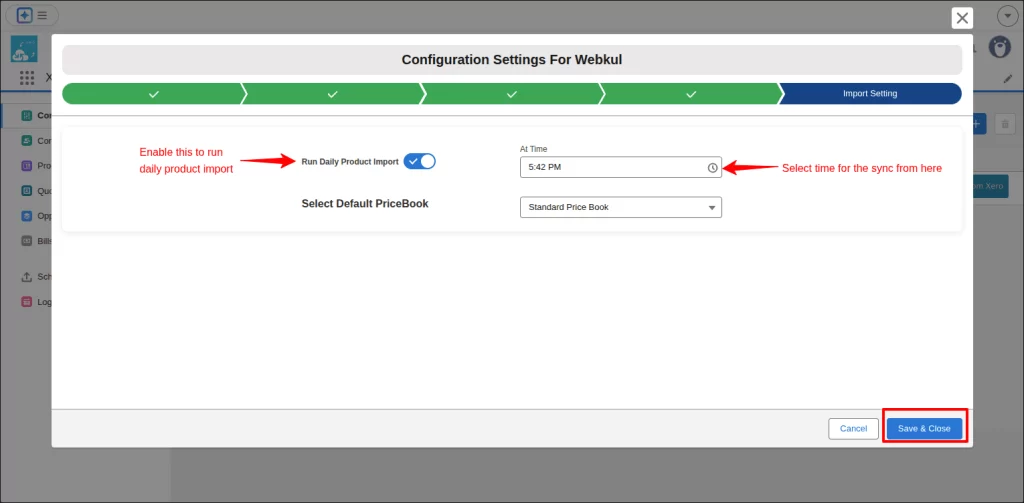
All the configuration is done, and you are ready to sync all your records of contacts, bills, quotes, invoices, and products & services from Xero to Salesforce.
How To Use Row Actions In Xero Salesforce Connector?
Here are the row options that you can use in all the entities, such as contacts, products, bills, invoices, and quotes.
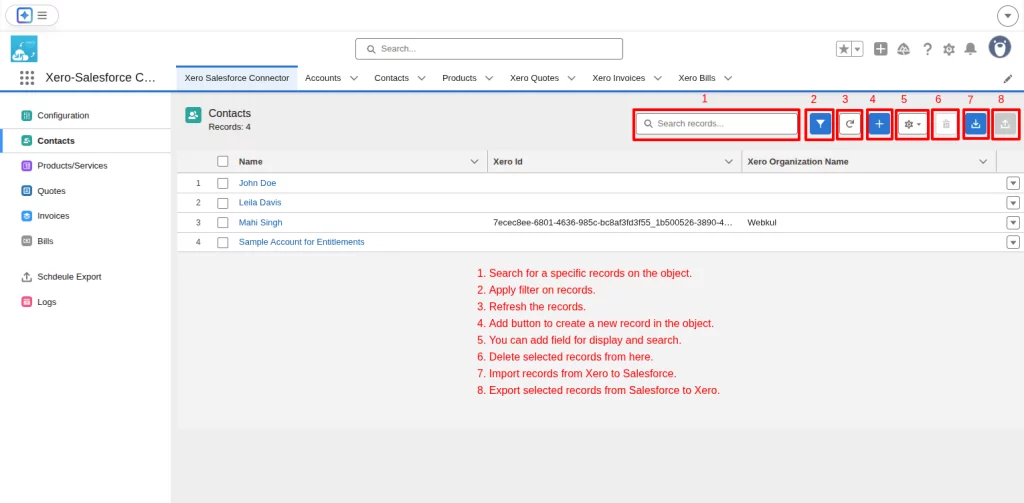
There are 3 specific drop-down row actions as follows:-
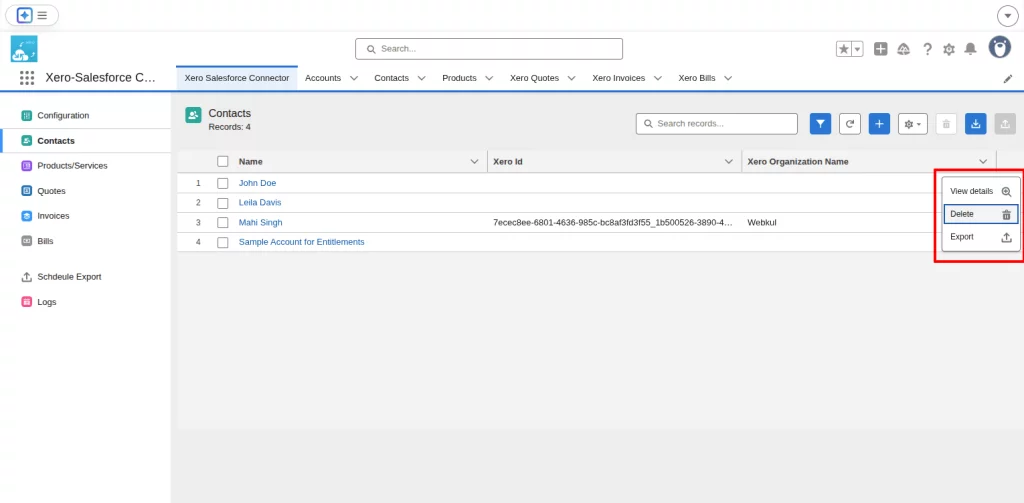
- View Details: View the full information of the record you selected.
- Delete: Delete the record for which you selected this option.
- Export: Export the record from Salesforce to Xero for which you selected this option.
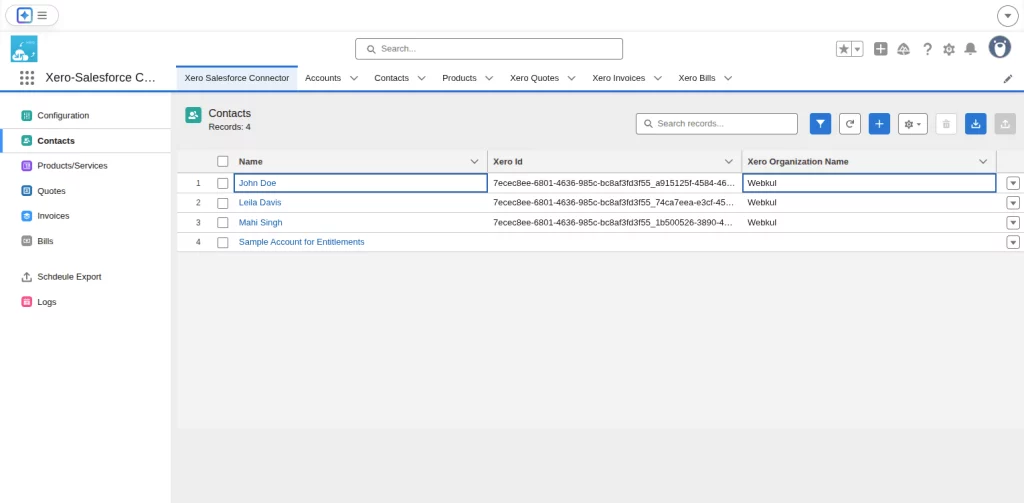
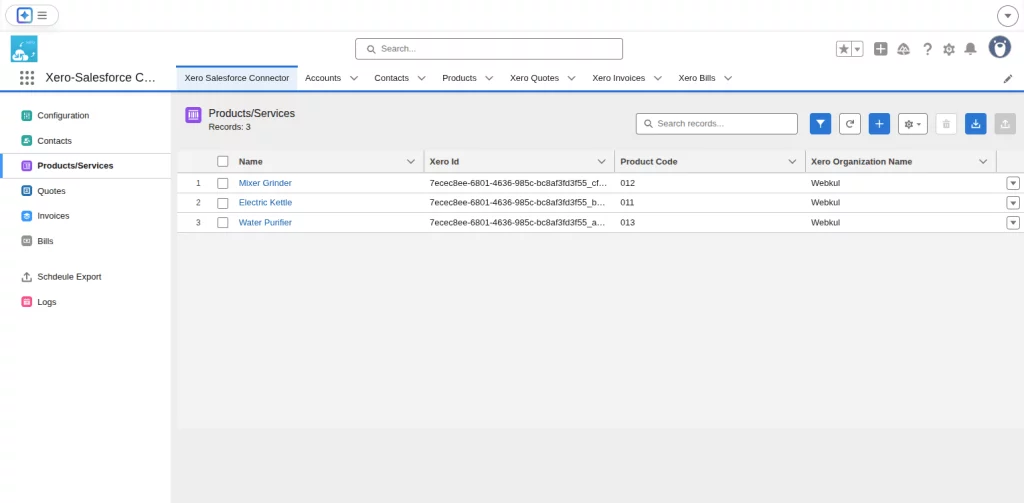
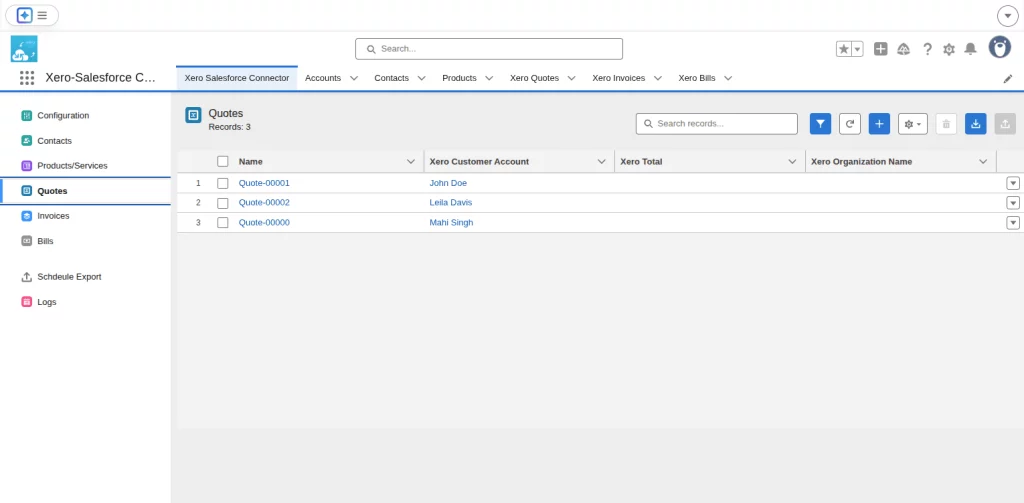
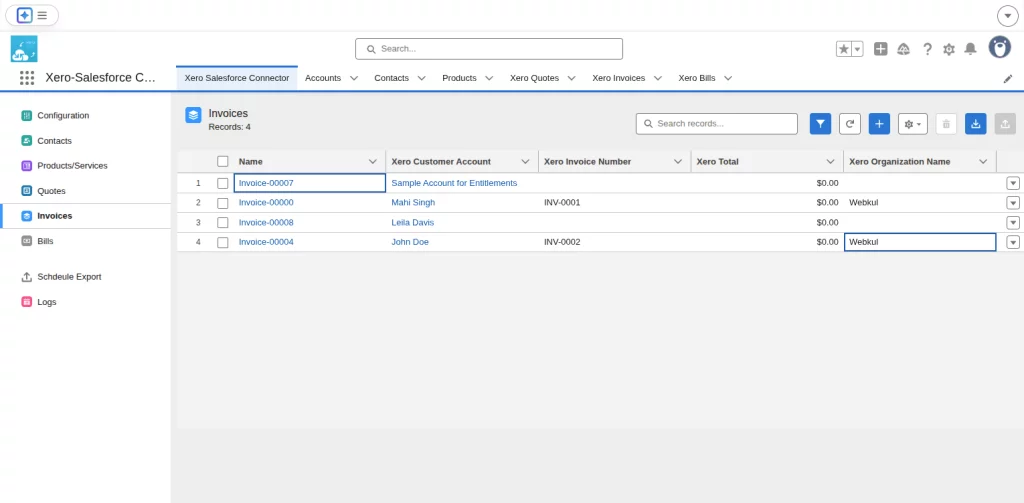
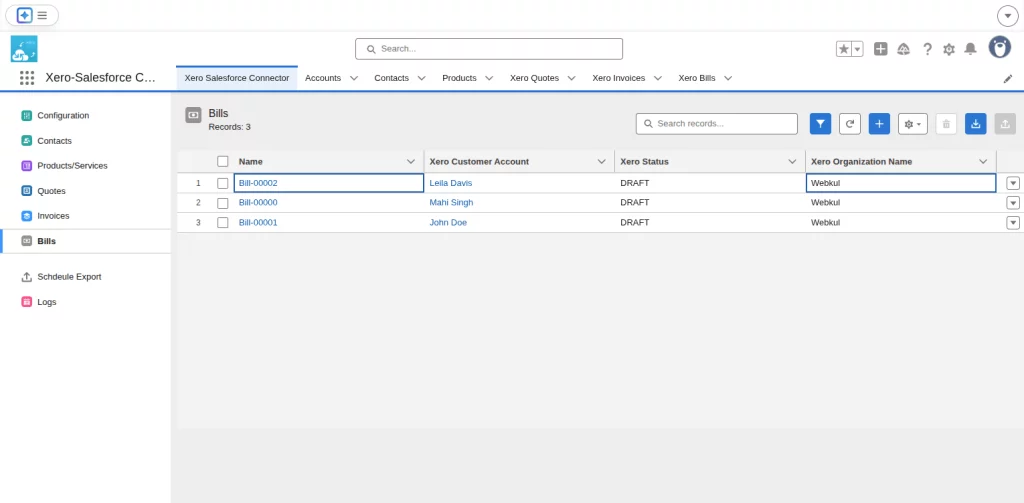
View Of Synced Entities in Xero Salesforce Connector
- Contacts- View of synced contacts shown in the application.
- Products and Services- View of synced products and services shown in the application.
- Quotes- View of synced quotes shown in the application.
- Invoices- View of synced invoices shown in the application.
- Bills- View of synced bills shown in the application.
Conclusion
Xero Salesforce Connector helps you sync all your data from Xero to Salesforce in no time on a real-time basis.
This leads to an increase in the sales process, no duplicate records, running automated campaigns, and more.
We provide the ideal option if you’re seeking Xero Salesforce Integration services. Because we are skilled in developing Salesforce integration solutions.
As eShopSync is a brand of Webkul, these solutions are made by qualified Salesforce developers, allowing you to operate in a hassle-free setting.
Salesforce AppExchange Consulting Profile
We are a business software development, consulting, and PDO firm with 13+ years of experience.
We provide services for different Salesforce clouds such as Sales Cloud, Marketing Cloud, Health Cloud, Commerce Cloud, Service Cloud, and Experience Cloud.
Also, we have a team of certified Salesforce developers and dedicated Salesforce Consultants. There are more than 10 applications that we have published on the Salesforce AppExchange.
Please visit the Webkul Consulting Profile to check our expertise and partner navigator achievements
Support
For any further queries, Click To Create a Ticket
To know the feasibility of specific requirements: Request For Customization
To view all our applications in AppExchange, visit Webkul Appexchange Apps.