
The Salesforce Salla Connector makes integration effortless. Let’s explore how it can become a game-changer for Salla’s eCommerce stores.
Businesses that run an online store on Salla already know how easy it is to launch and manage an e-commerce business.
But as your business grows, so does your data. New customers sign up every day. Orders keep flowing in. Product details change.
That’s where Salesforce often comes in – the world’s leading CRM to manage customer relationships, sales data, and service operations.
Many Salla merchants utilize Salesforce to gain a comprehensive view of their customers and make more informed business decisions.
Yet, the challenge remains: How do you connect Salla and Salesforce so that your data flows freely between them?
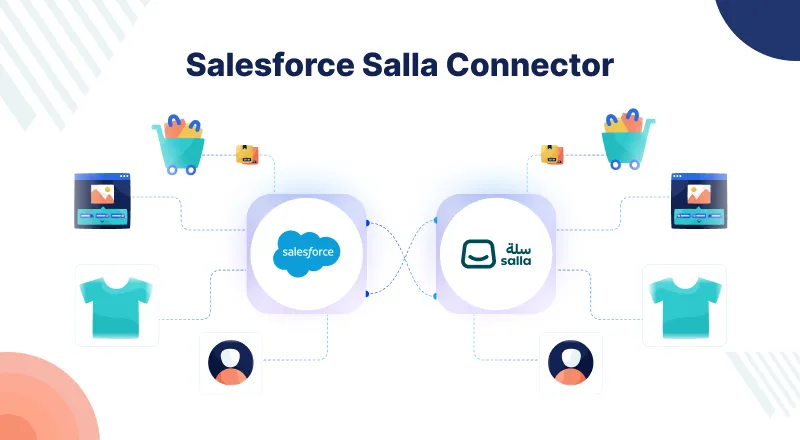
That’s the gap the Salesforce Salla Connector fills. It bridges your Salla store and Salesforce CRM, letting your products, customers, and orders sync from Salla to Salesforce.
With this connector, you get one source of truth for your business — right inside Salesforce.
Key Features of Salesforce Salla Connector
- Import Products, Customers, Categories, and Orders from Salla to Salesforce.
- Lightning Web Component (LWC) enables you to view, manage, and track your sync activities directly within Salesforce.
- Handle large data imports easily with Salesforce batch jobs running in the background.
- Connect to Salla’s API using Named Credentials that meet Salesforce’s top security standards.
- Match Salla and Salesforce fields to ensure accurate record syncing and avoid duplicates.
- Select the Pricebook with which you want to sync your product prices in Salesforce.
Note: For the Real-time bidirectional sync feature, you can contact us at support@webkul.com.
Moving on further, the installation and setup process of the Salesforce Salla Connector.
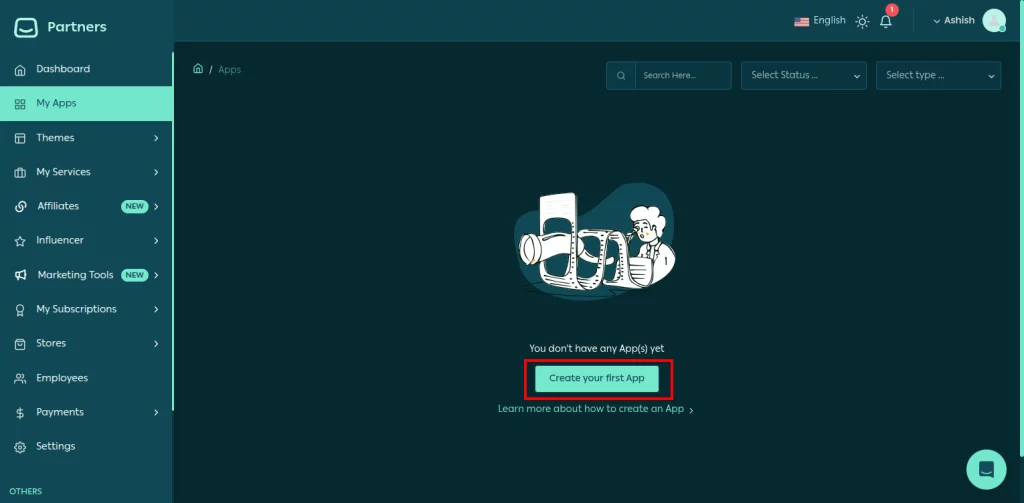
Create a Salla Application
Log in to your Salla Partner Account and go to the My Apps section. Click on the Create your first app button.

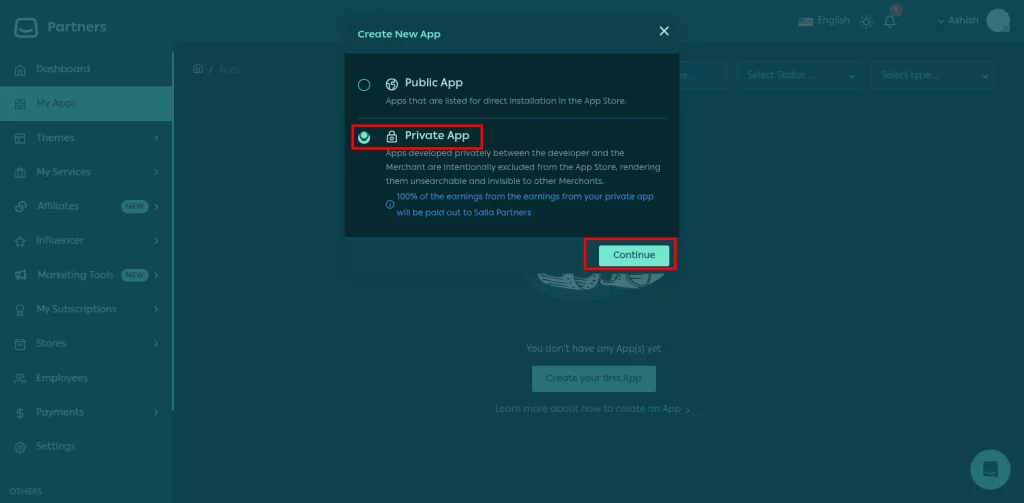
Next, a pop-up will show; select the Private App option and continue.
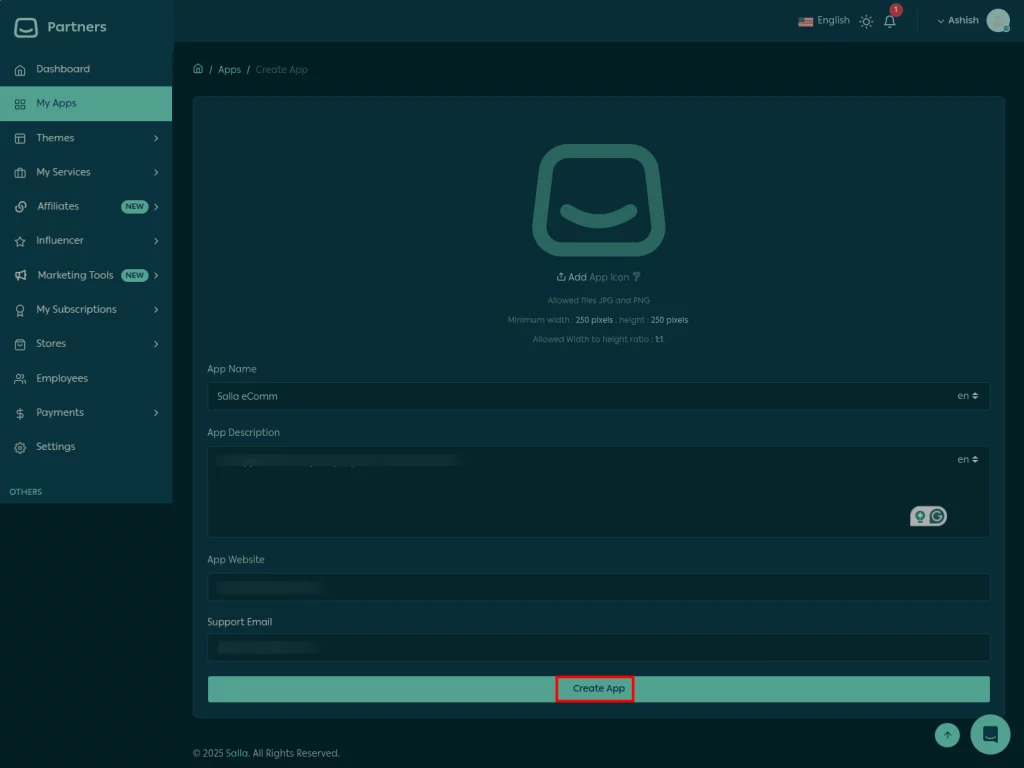
Further in this new window, enter the app name, description, website, and support email. Once done, click the ‘Create App’ button.

You have created a new app with your Client ID and Client Secret.
Now, note them down — you’ll need these details later to connect Salesforce with Salla. Select the custom mode and enter a standard Salesforce callback URL.
Standard Callback URL for Salesforce: https://login.salesforce.com/services/extidp/callback
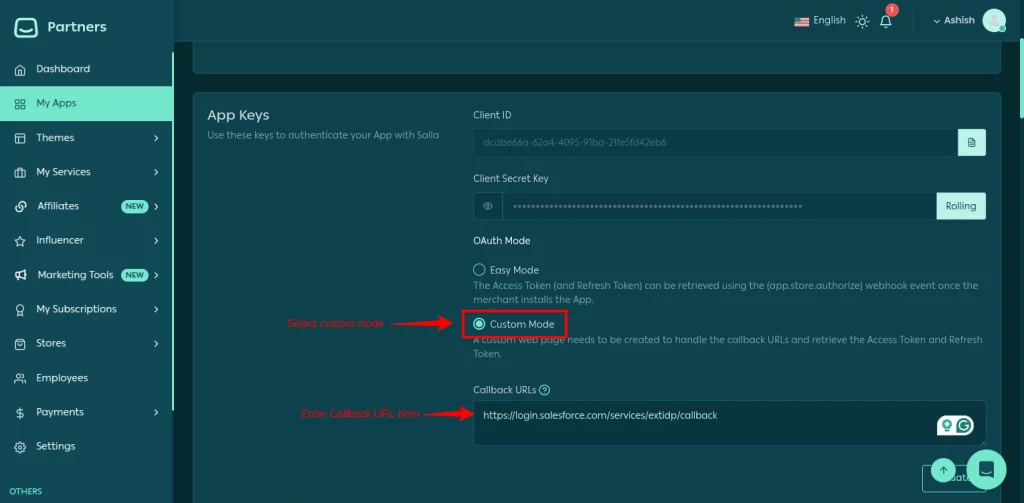
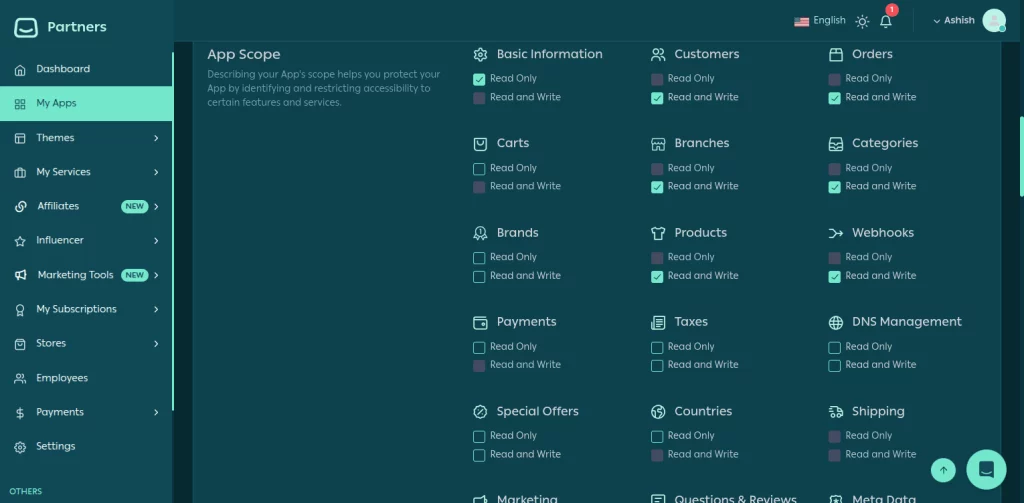
Finally, scroll down the page and set the app scope. Give permission access (Read only or Read and Write) for different data and save changes.
Install the Salesforce Salla Connector App
- Go to the Salesforce AppExchange or the installation link provided.
- Click Install and choose your target environment (Production or Sandbox).
- Complete the installation process, and once installed, the Salla Connector App will appear in your App Launcher.

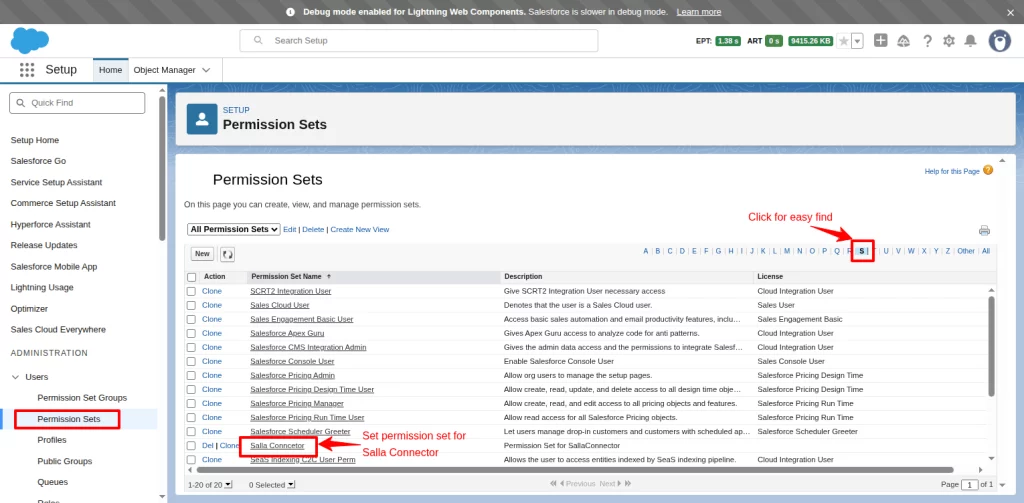
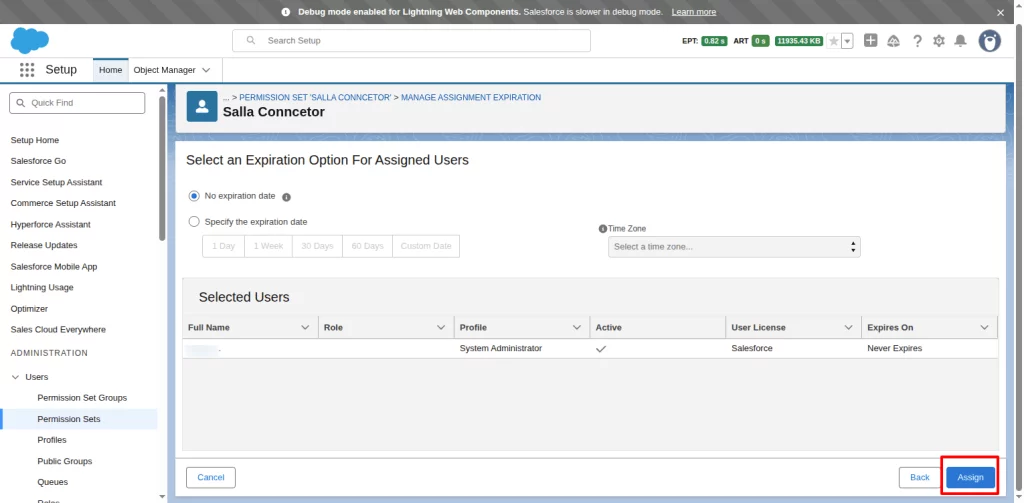
Assign Permission Set
Click on the Gear Icon → Go to Setup → Users → Permission Sets. Find and open the Salla connector for the permission set.
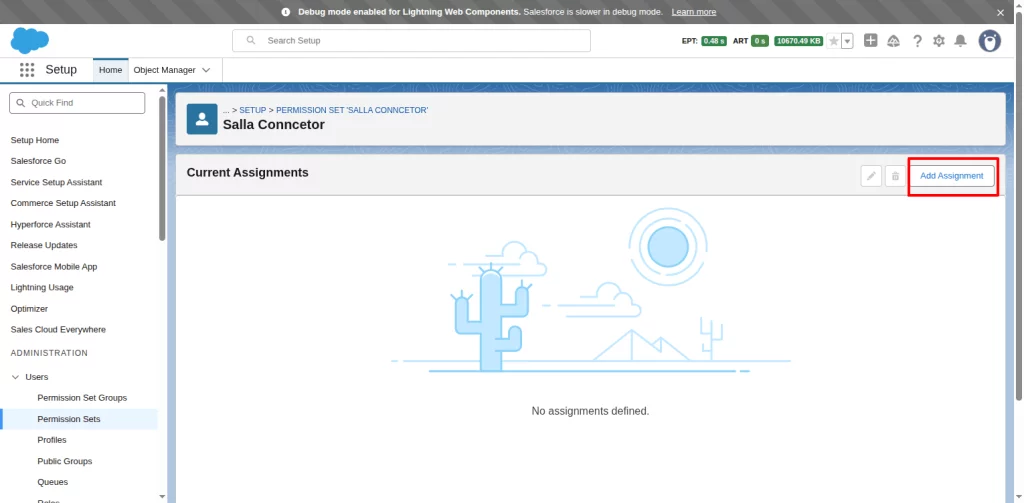
Click Manage Assignments.

Next, add your user by clicking on the ‘Add Assignment’ button.
Click on the checkbox to assign a user, and move forward with the ‘Next’ button.

Finally, select an expiration option for the user and assign the user.
Configure the Connection
From the App Launcher, open the Salla Connector App. Go to the Connector Connection Page. Click the ‘Configure Name Credentials’ button.
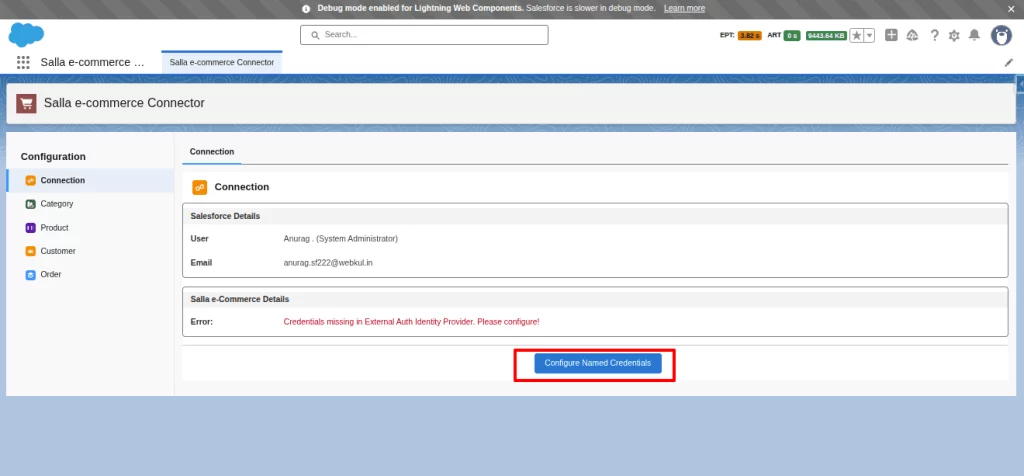

It will take you to the Name Credential page. Click on the edit button.
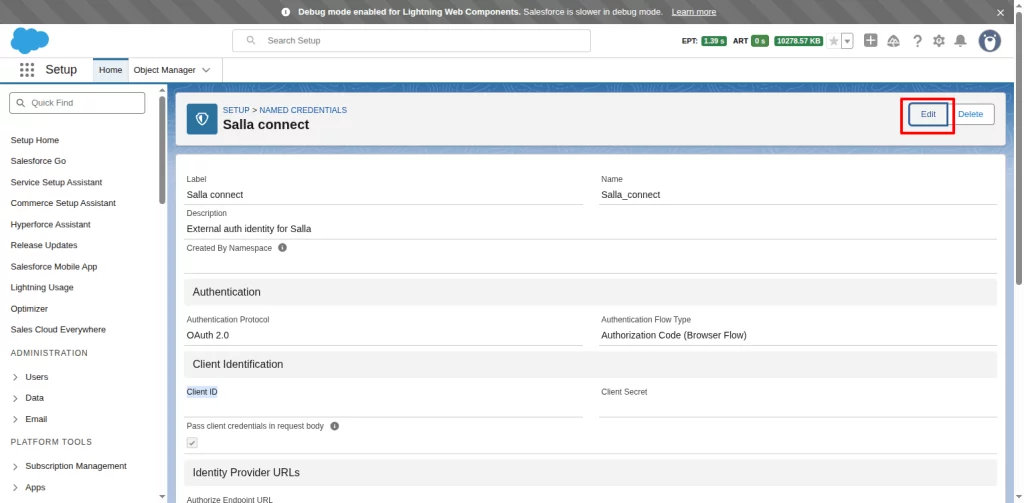
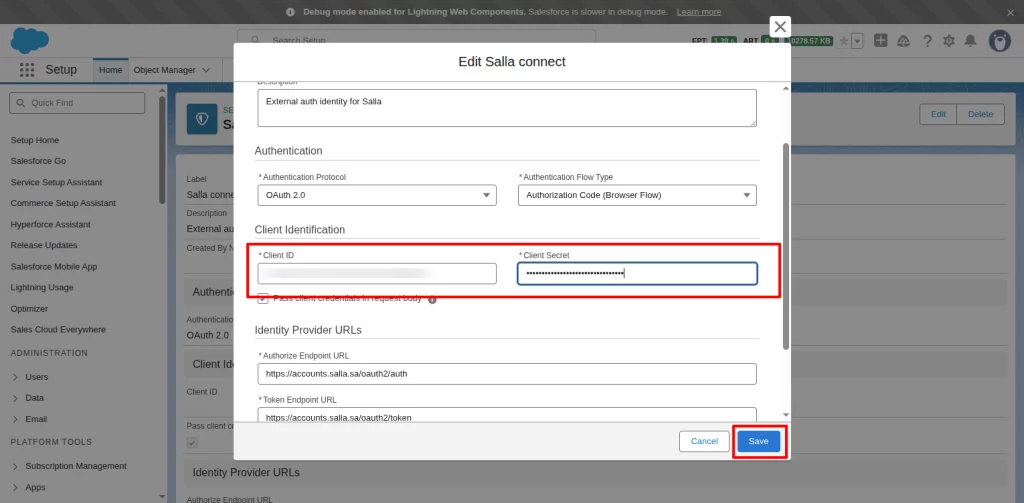
Enter your Client ID and Client Secret that you generated in Step 1. Don’t forget to save changes.
Set Up Named Credentials
After successfully entering the Client ID and Client Secret Key.
Now, go to the Salesforce Salla Connector, and you will encounter a pop-up message to set up named credentials.
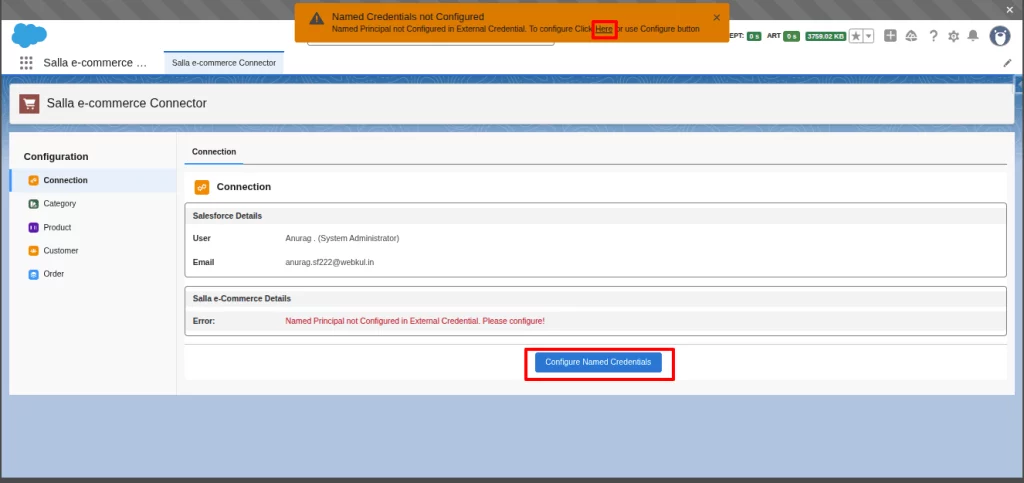

Click on the link or the ‘configure named credential’ button; both will redirect you to the Salla External Creds page.
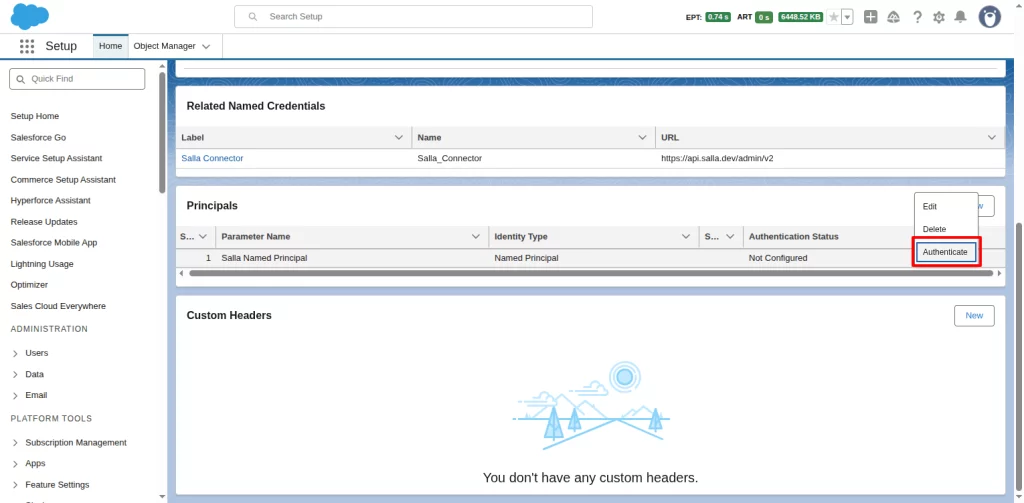
Scroll down to the Principals section and click under the action icon to authenticate.
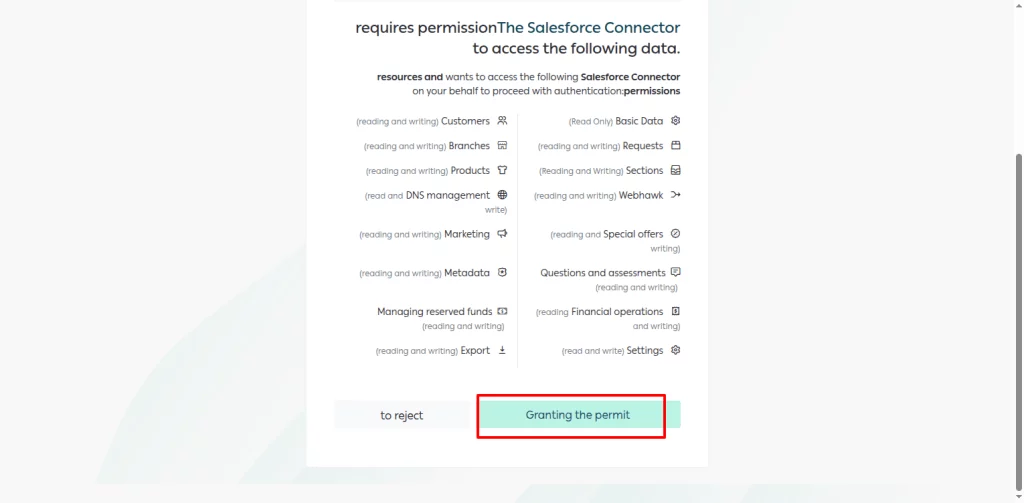
On this new tab, enter your store details to log in.

Grant permission to the connector to access the data.
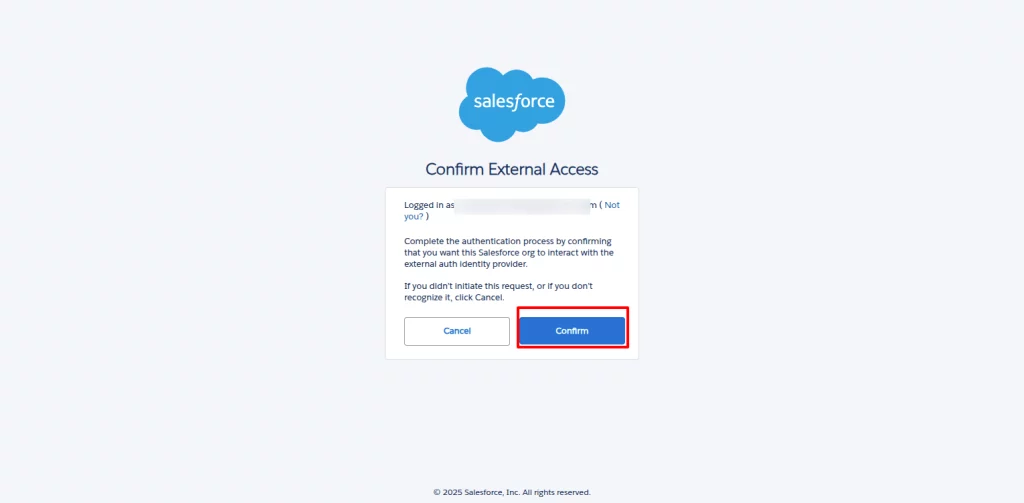
Finally, click on the confirm button to complete the authentication process.
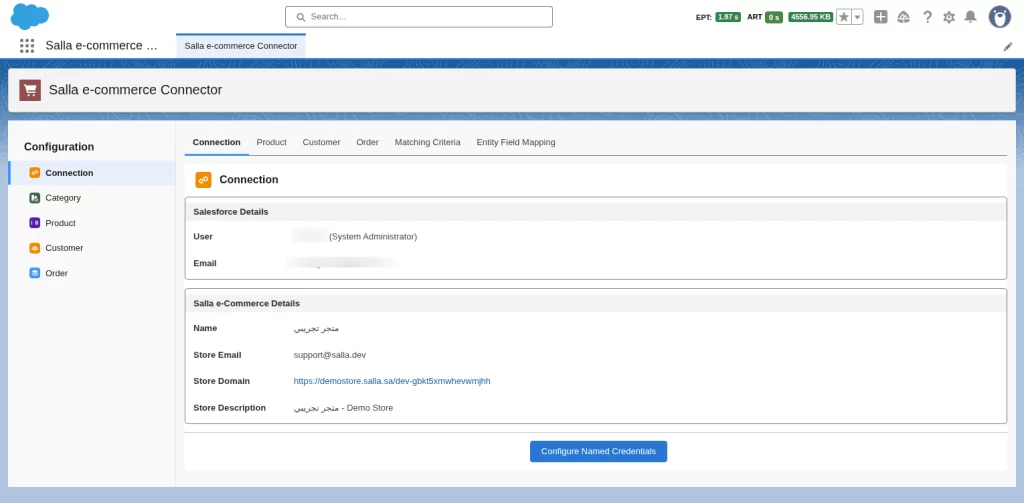
Go to the connector configuration page. Here, you can see the store is successfully connected to the connector.
Start Syncing Data
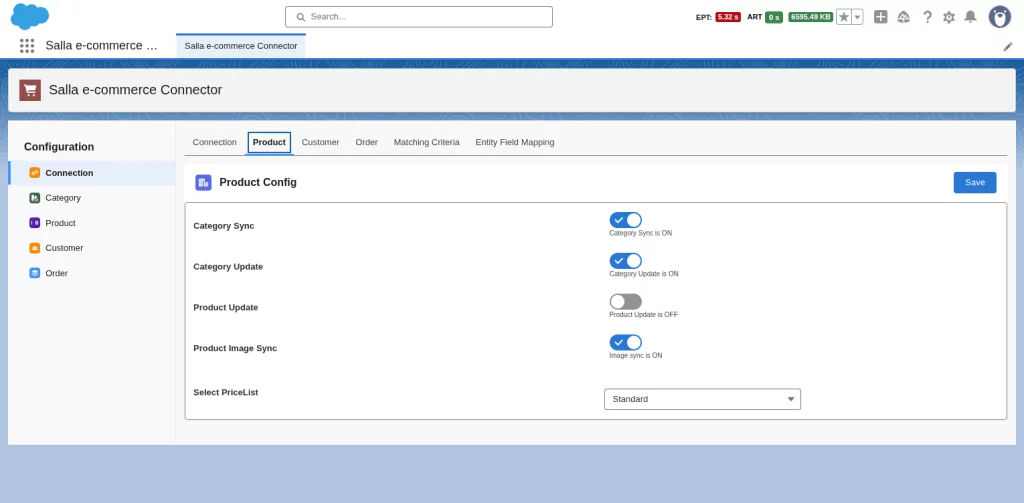
Once the connection is active, open the Product tab to set product sync settings. Choose what you want to import: Category, Product, and Product Image.
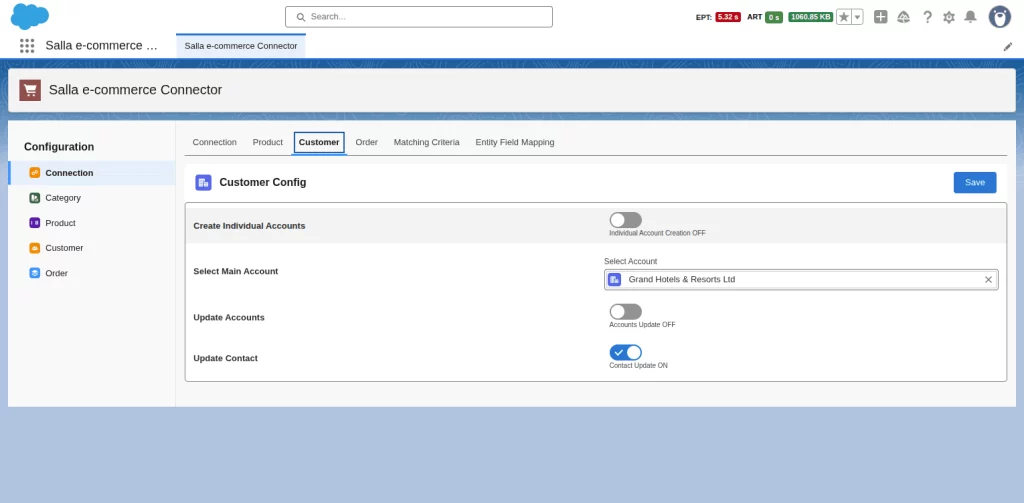
Click on the Customer tab for Customer sync settings.
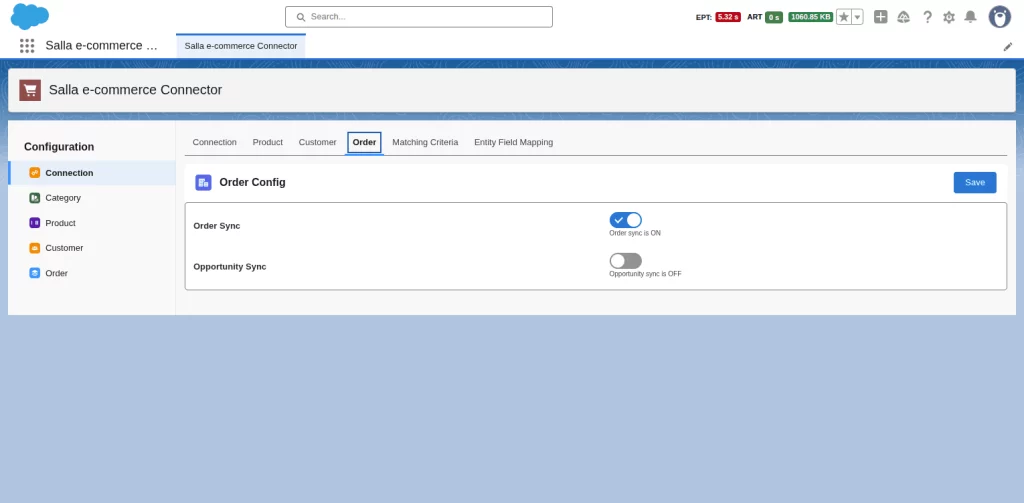
Enable Order Sync and Opportunity sync from the Order tab.
Next, remove duplicate records with the help of Matching Criteria.
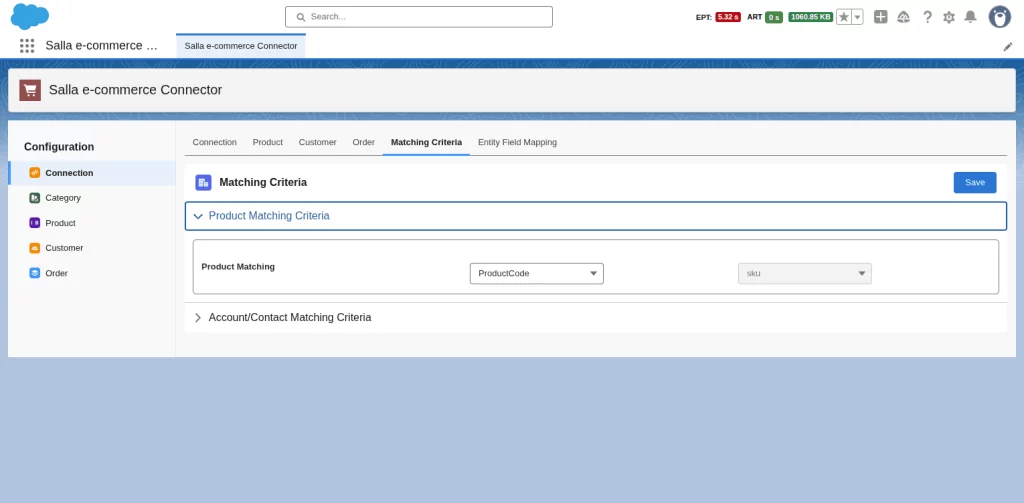
Go to the Entry Field Mapping tab to see mapped Salesforce and Salla fields.

After setting up the object settings tabs, go to the object tabs on the left side panel and import your Salla eCommerce data to Salesforce.
In every object section, you can sync all data for that object in one go, or you can also select specific data to sync the updated information in the imported product.
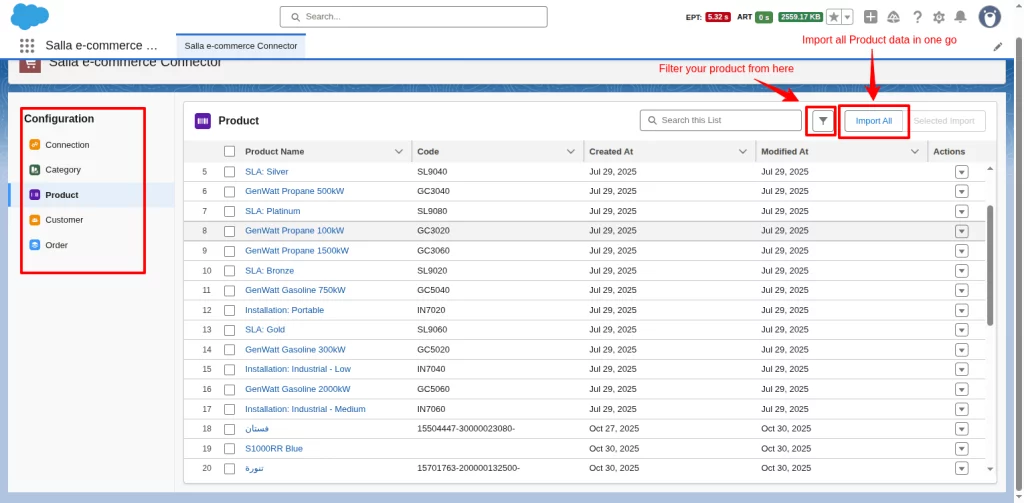
You can use the same process to sync the data for all objects in the configuration panel.
That’s it — your Salla store is now integrated with Salesforce CRM. You can now manage your eCommerce and CRM data in one place.
Support
If you face any issues or need assistance with setup:
- Raise a ticket to reach our Support Team — we’re always ready to help.
- You can also explore our other eCommerce Solutions by visiting the Webkul AppExchange Profile.