

Version 1.0
Features Of FHIR Connect
- Patient Search Component:
- Users can search for any patient from the EHR system.
- Visualize complete patient information.
- Option to create respective patients from the EHR in Salesforce.
- No headache of custom mapping for Salesforce Health Cloud and EHR Integration.
- The integration maps the patient info and clinical data as per the standard Salesforce health cloud clinical data model based on the FHIR standards.
- A custom component is built, which can be placed on the patient detail page to import patient-related clinical data from the EHR.
- Currently, the application supports 2 EHRs:
- Epic
- Cerner
Pre-requisites For Salesforce Health Cloud And EHR Integration – FHIR Connect
- Salesforce Health Cloud org with licenses.
- Application package installed in the org.
Installation and Configuration
Still, if you face any issues then our Salesforce Consultant Team is here to help you.
Epic Systems
For our testing purposes, we will be utilizing [Epic on FHIR] sandbox ( https://fhir.epic.com/ ).
- Epic on FHIR https://fhir.epic.com/ provides free resources for developers to create and test healthcare apps for patients and healthcare organizations based on FHIR Standards.
- If you are a new user then you have to do it from scratch by creating a new account. If you are an existing user, who already has an account of Epic on FHIR then they can directly skip to the login process.
- To get started, sign up for a new account on ‘Epic on FHIR’
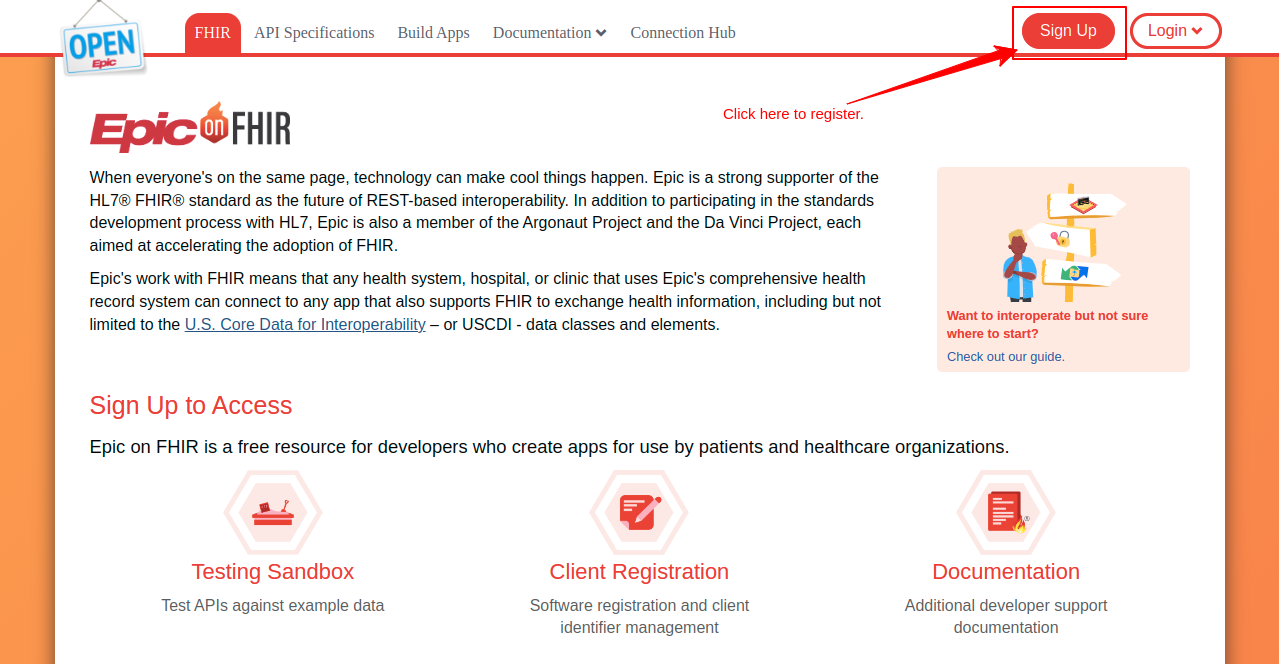

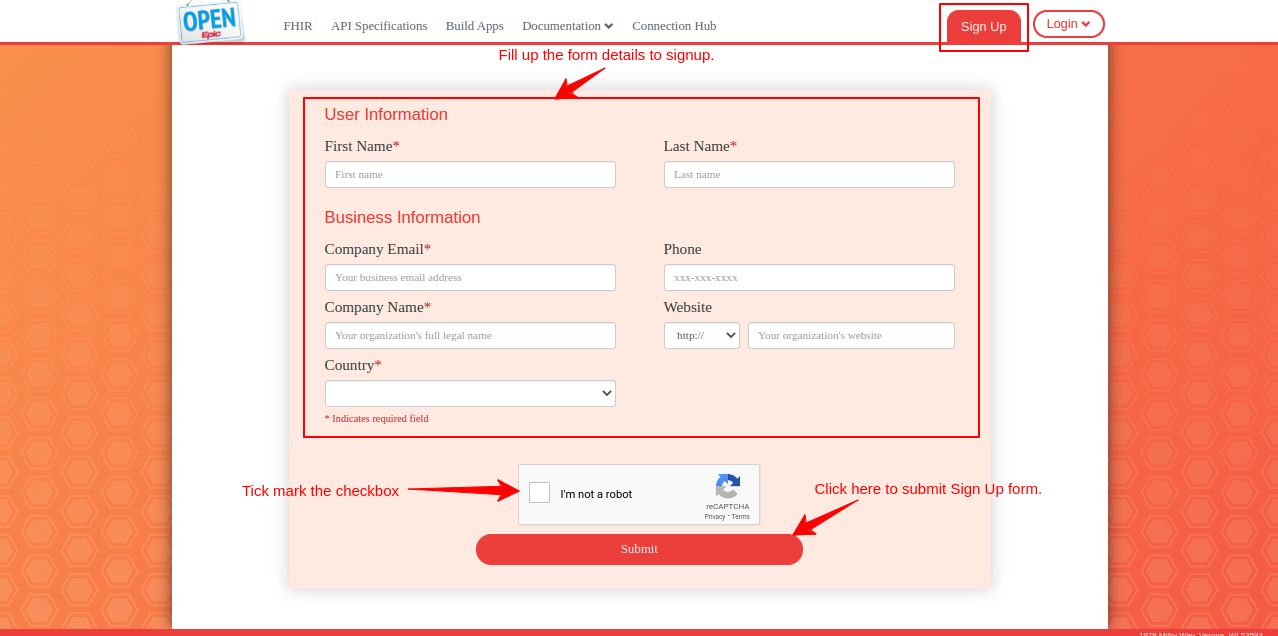
- Now provide the details in the signup form.

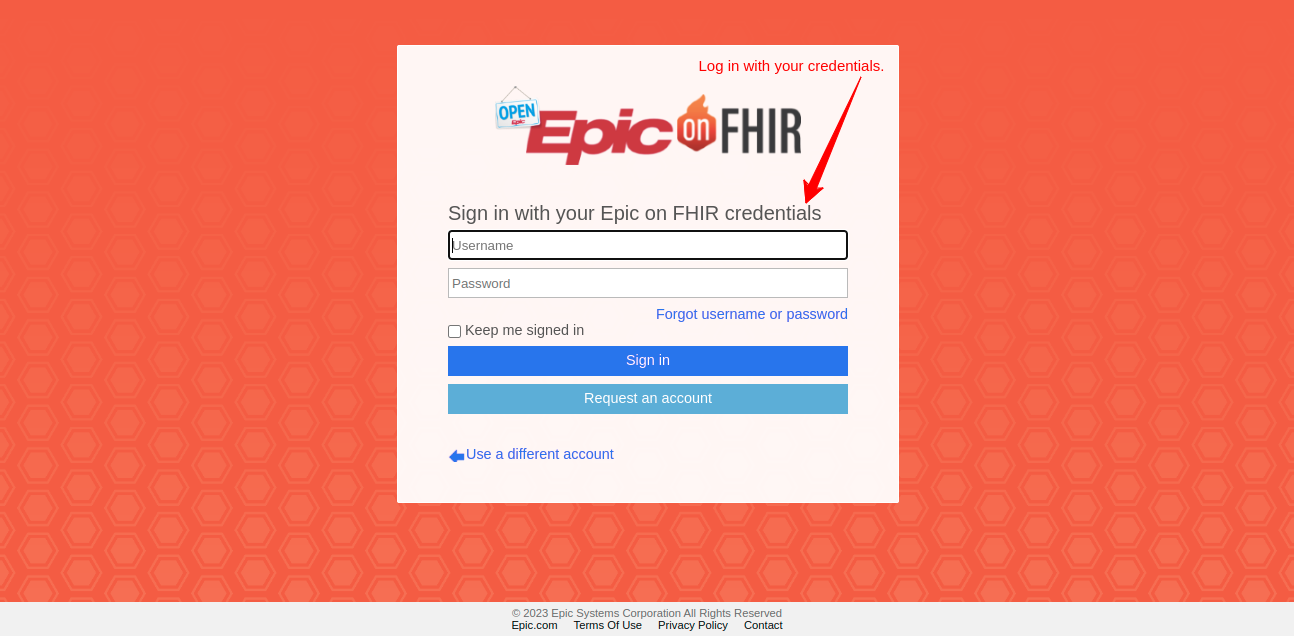
- After registration or sign up, click the login button from the top right side and select Epic on FHIR
- Now, log in with your credentials.

- In the navigation menu click on ‘Build Apps’.


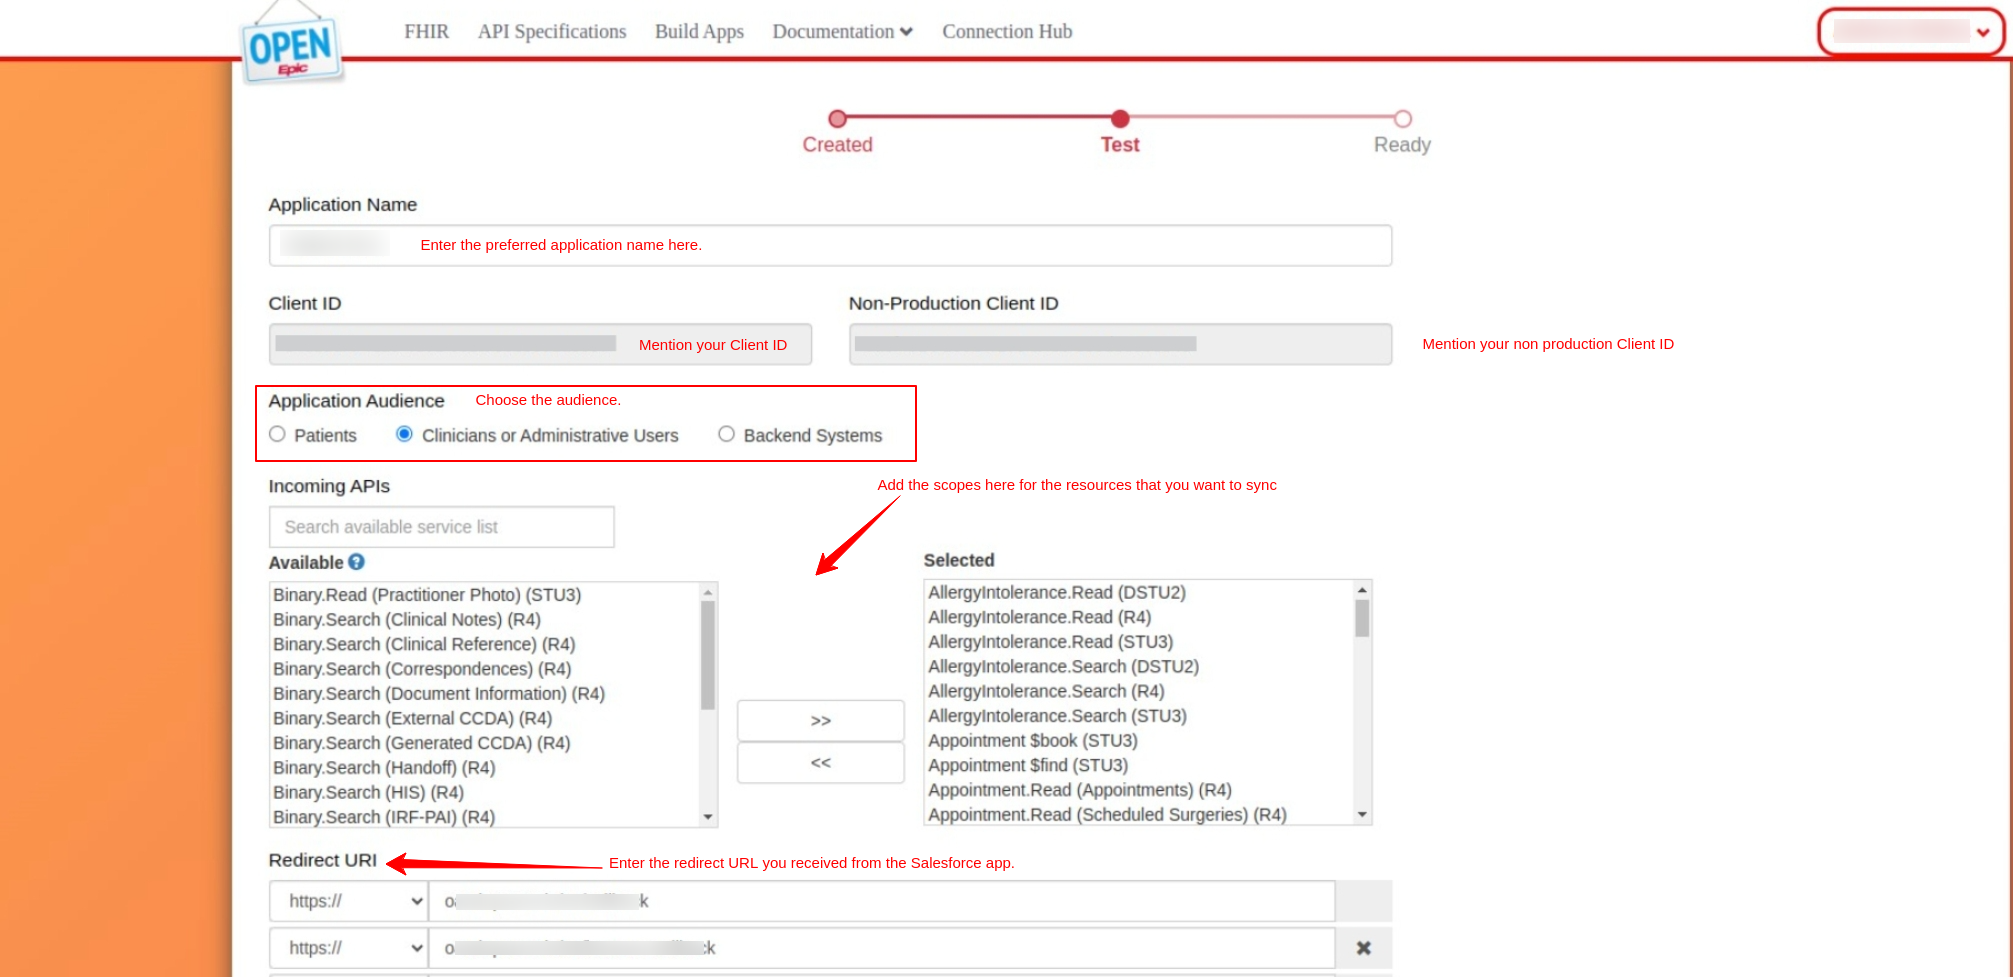
- Now, create a new app with the following details:
| Field | Value |
| Application Name | Enter a preferred name |
| Application Audience | Clinicians or Administrative Users |
| Incoming APIs | Add the scopes for the resources to be synced |
| Redirect URI | Enter the redirect URL you’ll receive from the Salesforce app |
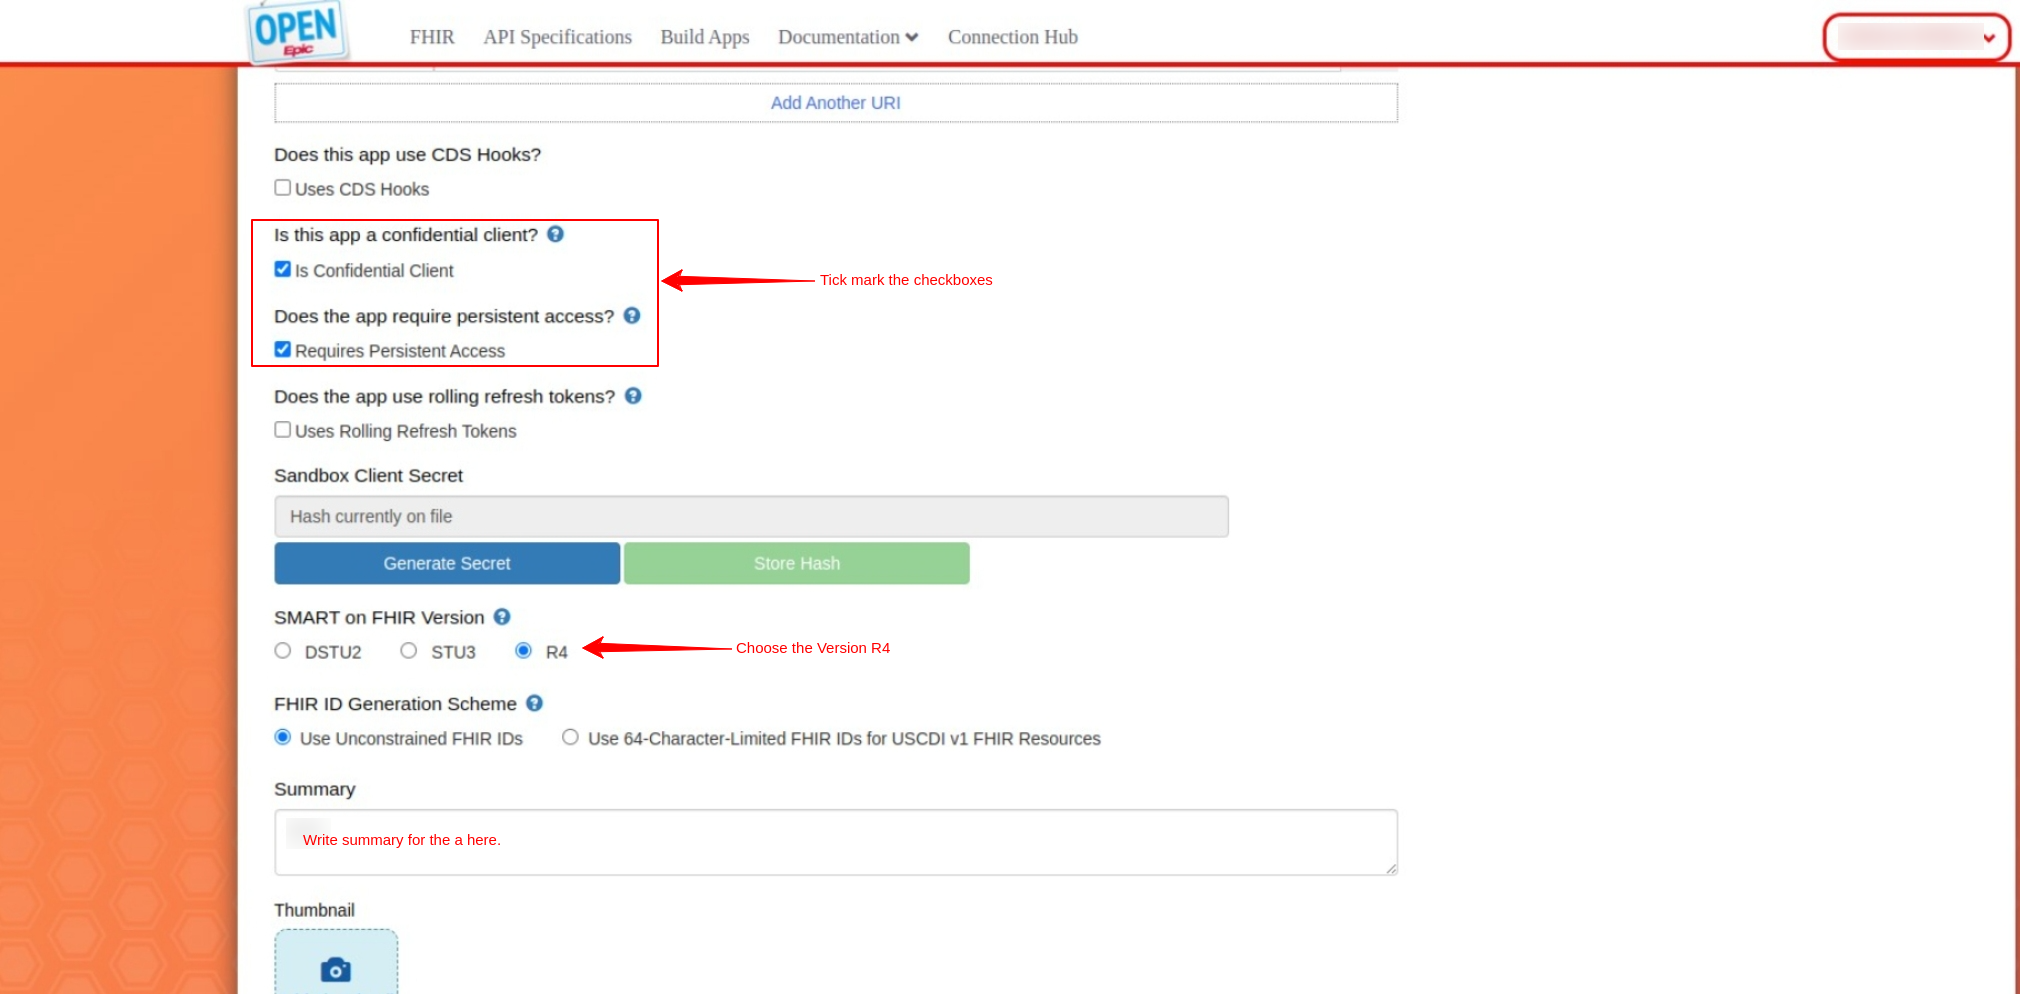
| Is this app a confidential client? | True |
| Does the app require persistent access? | True (You’ll find a refresh token available. Save as it would be used later) |
| SMART on FHIR Version | R4 |

-
Production Client ID:
-
-
- Use the production client ID when you start deploying FHIR integration in a live, real-world healthcare environment where patient data is sensitive and critical.
- This client ID is intended for accessing patient records and healthcare data in a secure and production-ready manner.
- It should be used for applications that are meant for clinical use and have undergone the necessary security and compliance checks.
-
-
Non-Production Client ID (e.g., Sandbox or Development Client ID):
-
- Use the non-production client ID, which is associated with a development, testing, or sandbox environment.
- This client ID is used during the development and testing phases of your FHIR integration to avoid impacting actual patient data and healthcare operations.
- It is typically used for debugging, testing, and training purposes.
In Epic’s context, they often provide a dedicated FHIR sandbox environment for developers to test their integrations without accessing real patient data. Once your Salesforce Health Cloud And EHR Integration has been thoroughly tested in the non-production environment, you should switch to using the production client ID when deploying in a live, healthcare setting.

- Accept the Terms & Conditions and click on ‘Save & Ready for Sandbox’. (Since we are using it for testing purposes)
Note: The credentials generated would take some time to become functional. (It can take more than 24hrs as well).
- Enter the credentials (Client ID and Client Secret) for testing purposes:
Note- Enter the Client ID and Client Secret to the FHIR Connect in Salesforce while adding the new EHR system.
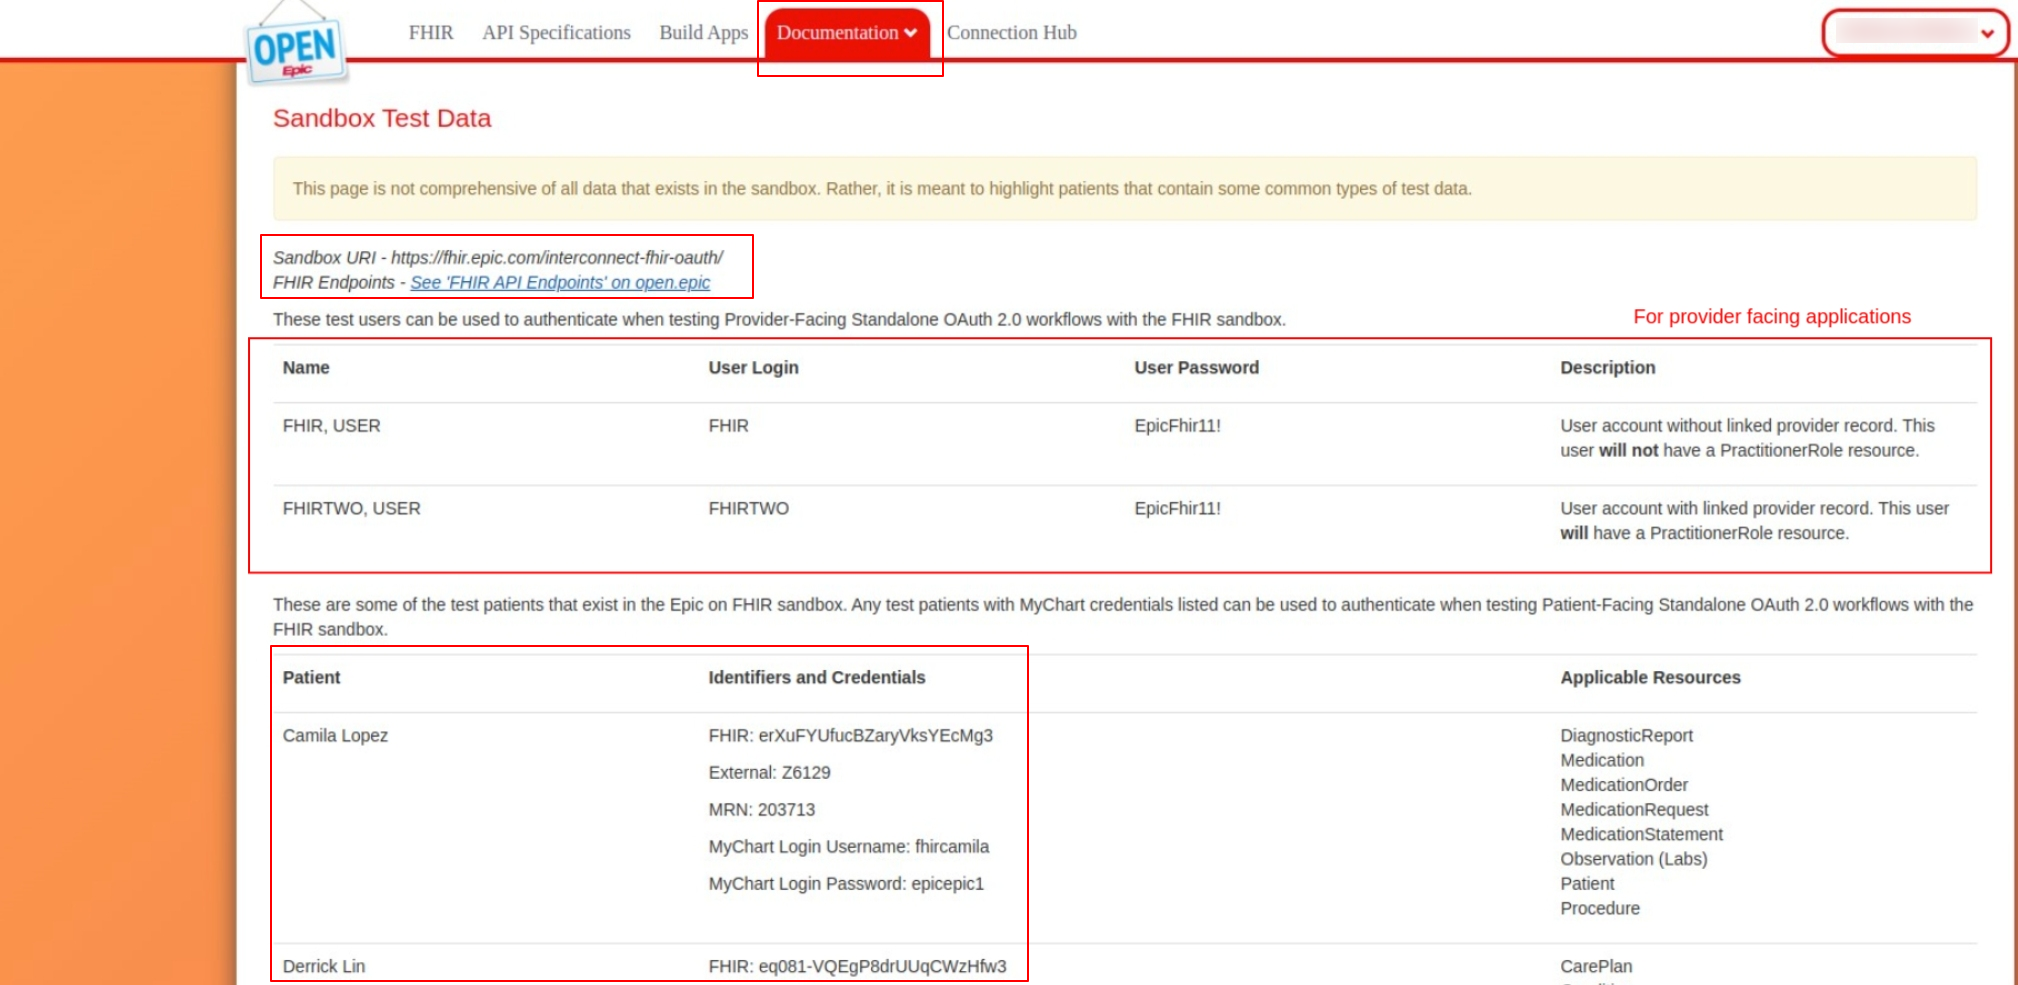
- FHIR Sandbox Server URL: https://fhir.epic.com/interconnect-fhir-oauth
- FHIR Sandbox Test Data: https://fhir.epic.com/Documentation?docId=testpatients

FHIR Connect (Salesforce Health Cloud- EHR Integration)
- Install the Application in your Salesforce organization
- In Quick Search, type Permission Sets and open it
- Click on the Permission set named ‘FHIR Connect Permissions’ to open it
- Hit on Manage Assignments >> Add Assignment
- Select the user to whom you want to assign the permission set
- Click the Next >> Assign >> Done button
- Assign the permission set named ‘FHIR Connect Permissions’
- Create a remote site entry for https://fhir.epic.com/
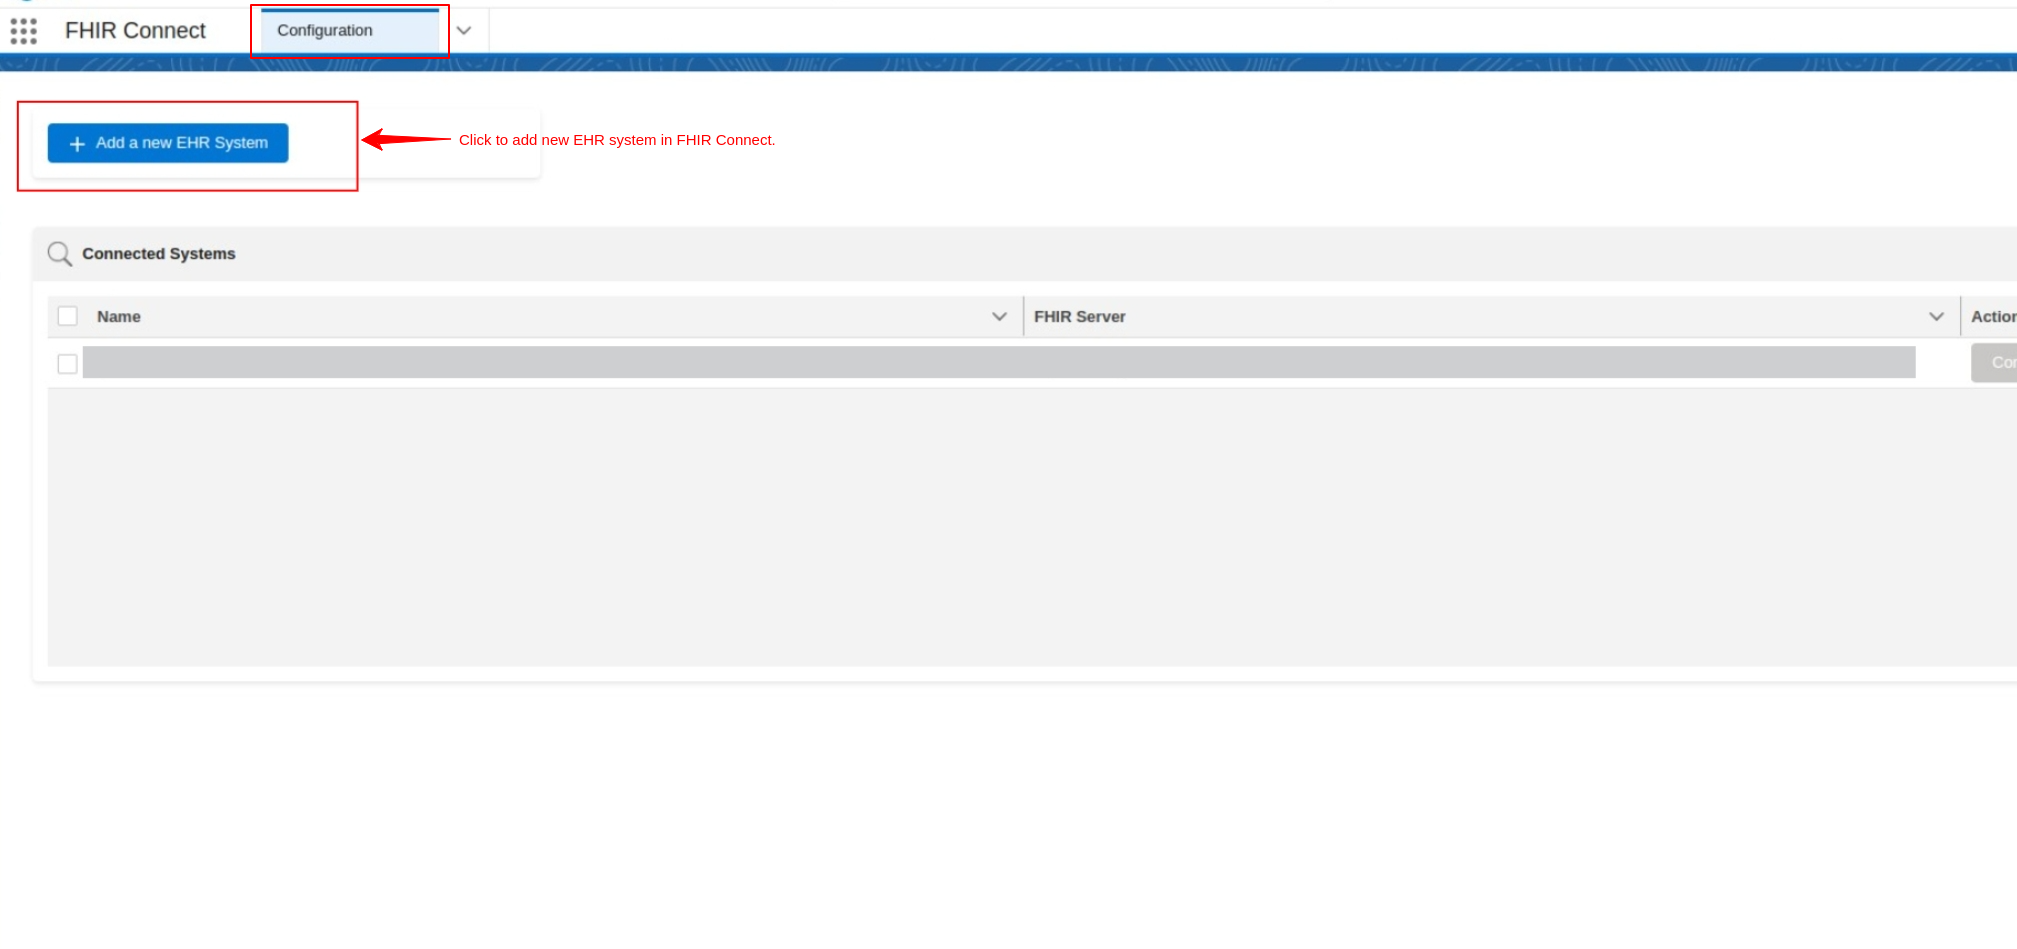
- From the App Launcher, search for FHIR Connect.
- Then click on it to open it.


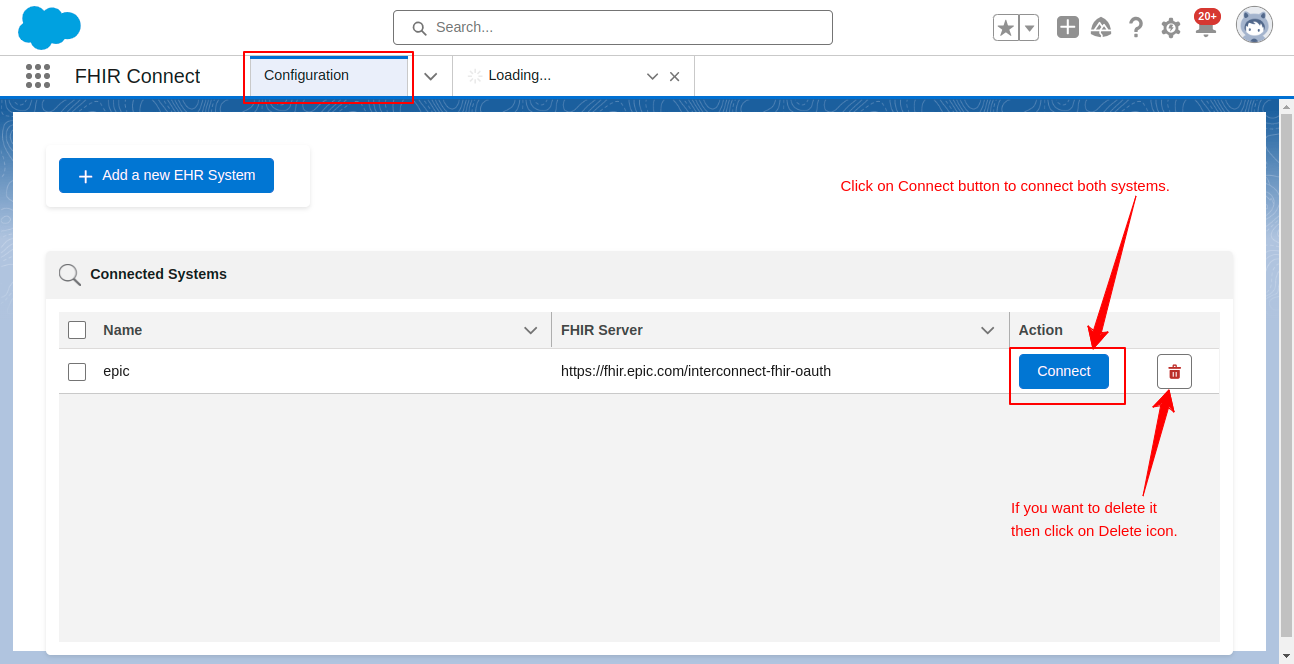
- Under the Configuration tab, click on the ‘Add new EHR System’ button.

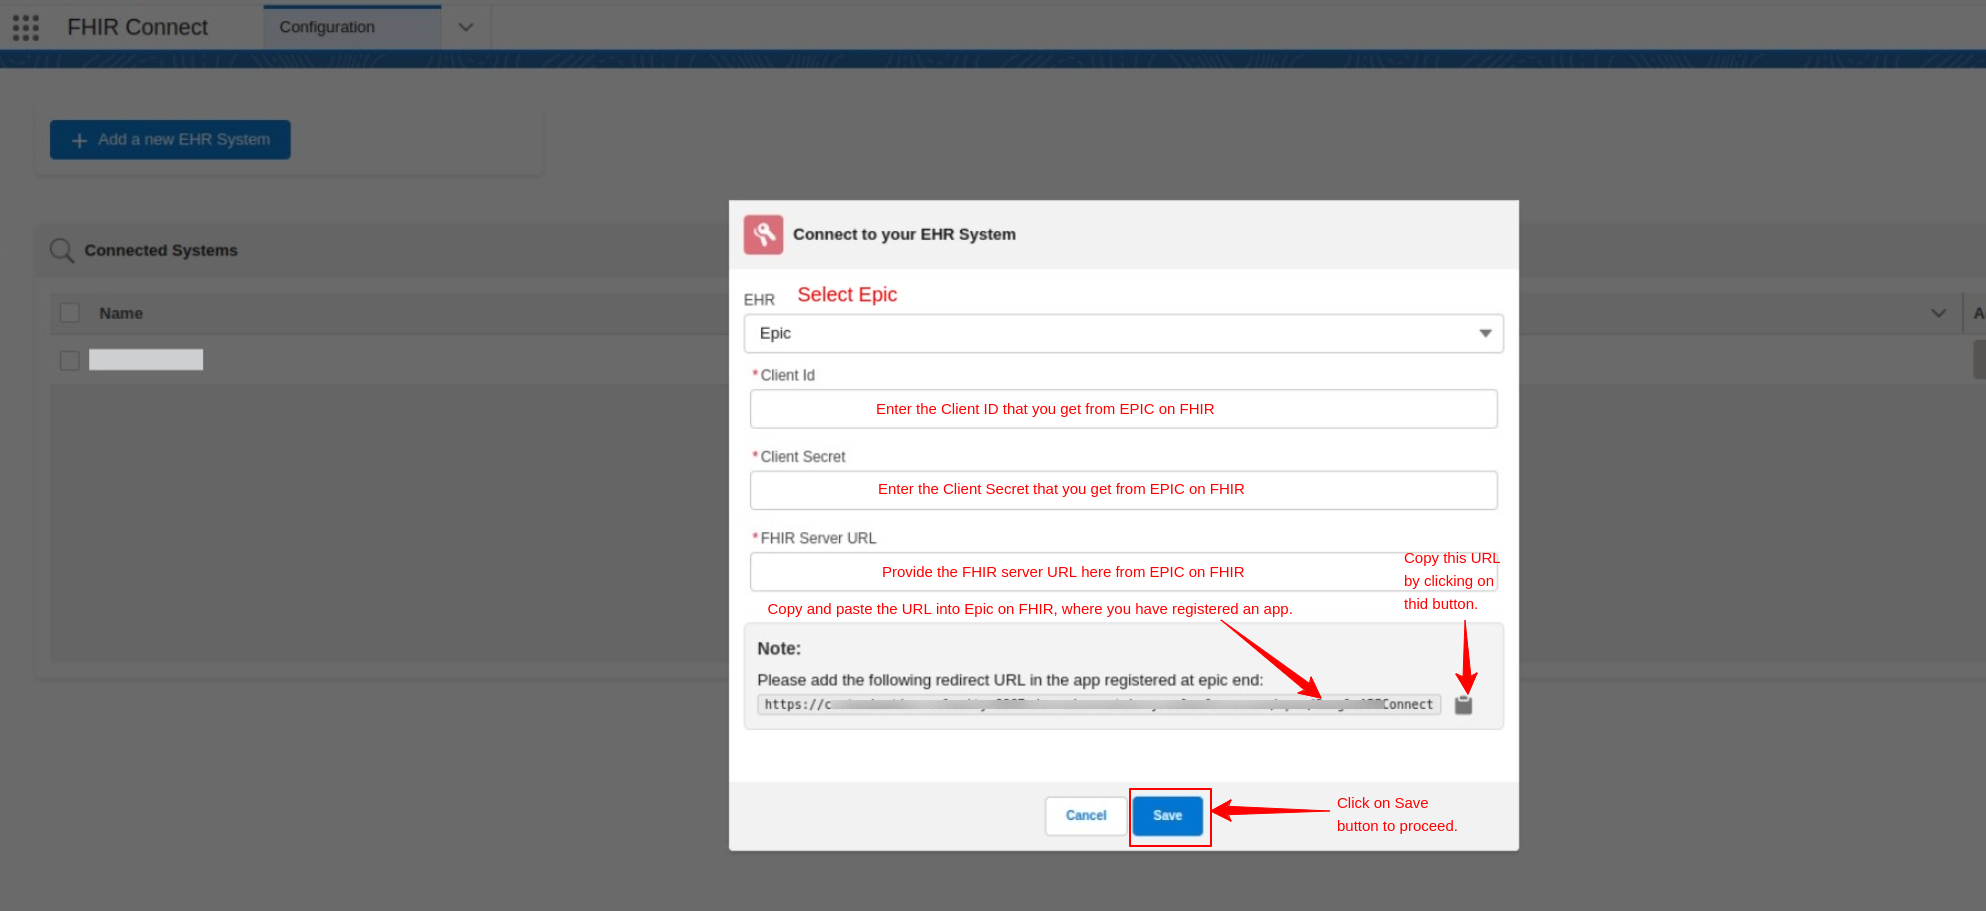
- A form opens on your screen where you must mention the
- In EHR, select the EPIC option
- Provide OAuth credentials such as Client ID and Client Secret
- Paste the FHIR Server URL from the EPIC on FHIR
- Also, copy the provided URL and paste it into the app registered at Epic end.
- Click the Save button to continue.

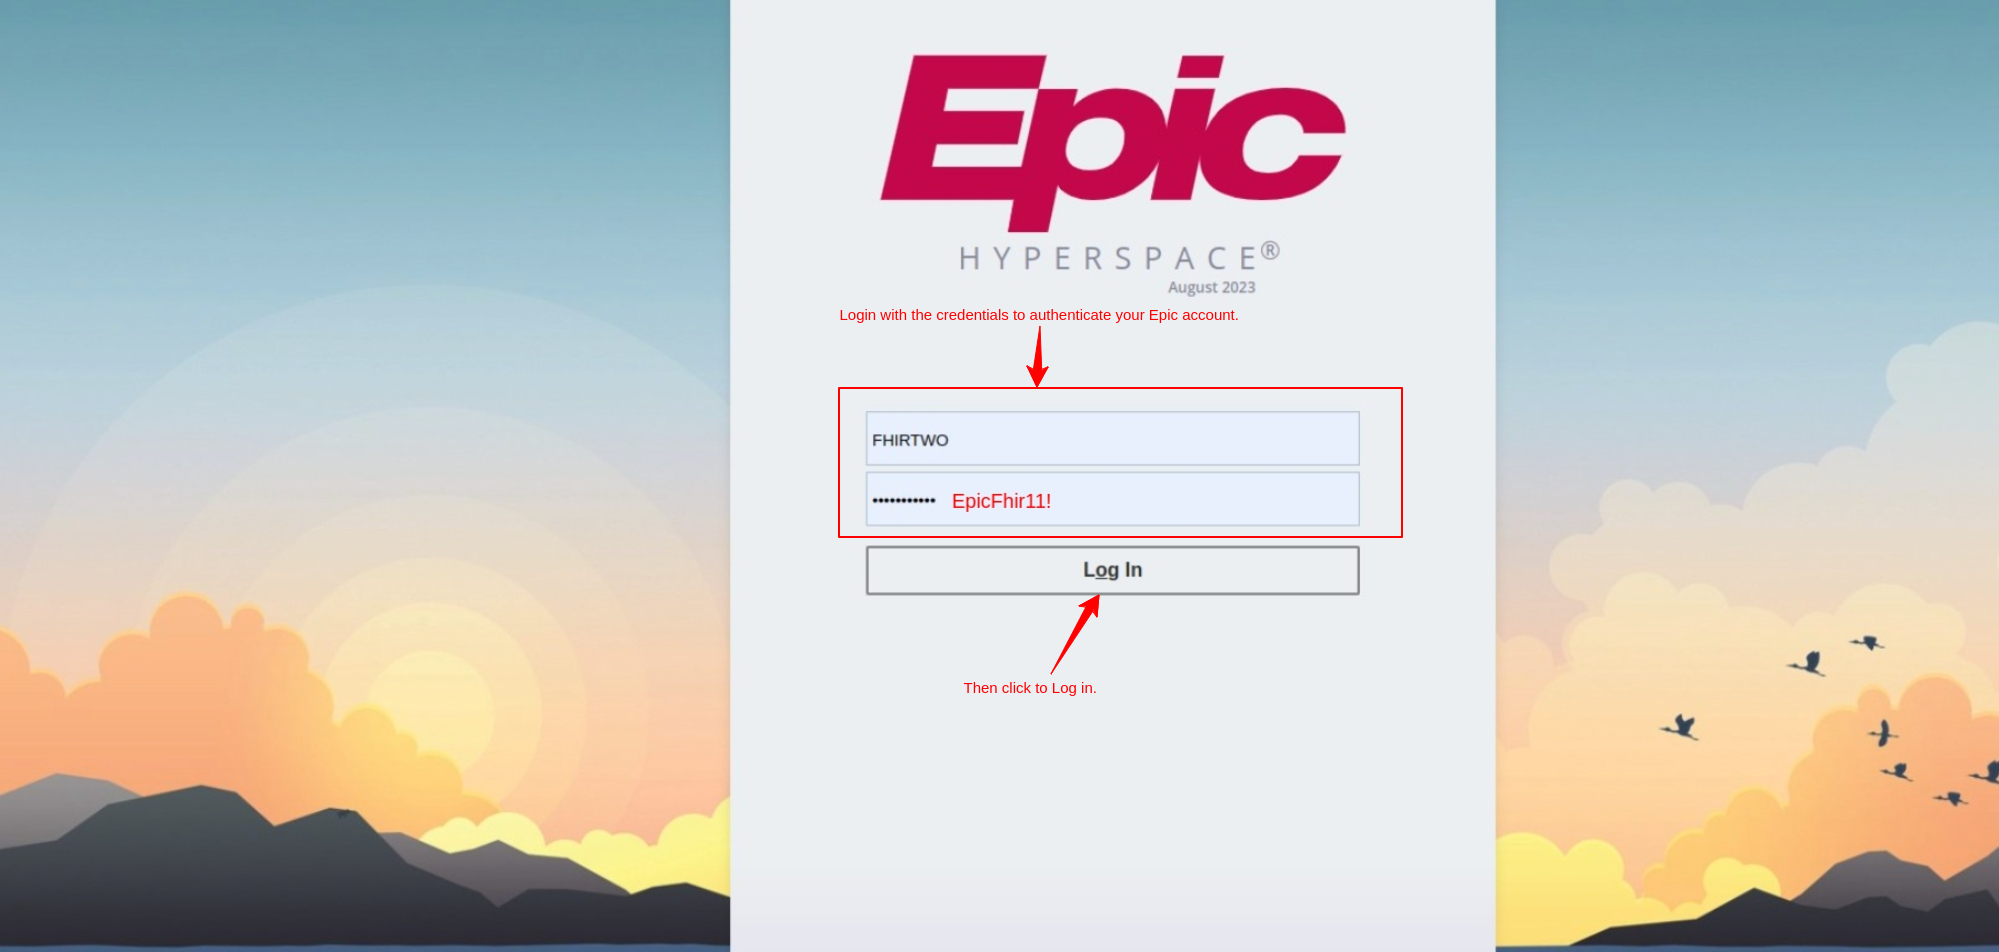
- Click on the connect button to authenticate the system in FHIR Connect.

- Use your Epic login credentials to authenticate with Salesforce Org.

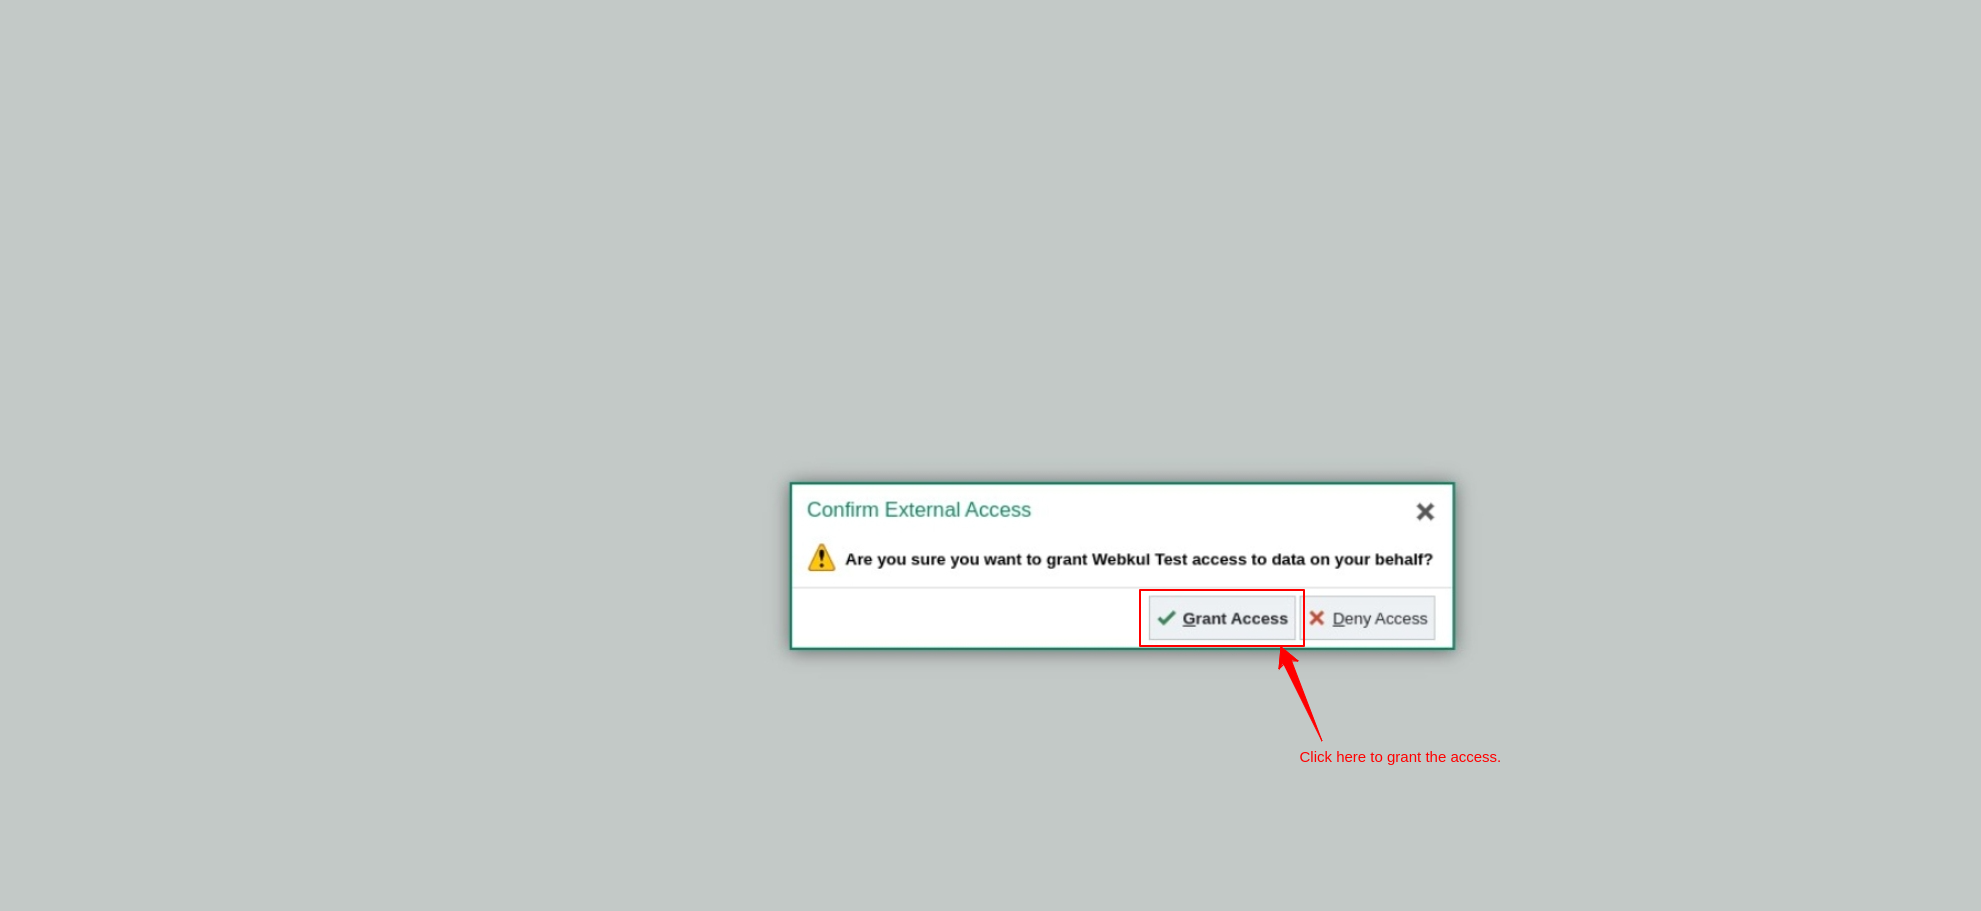
- Click on the ‘Grant Access’ button.

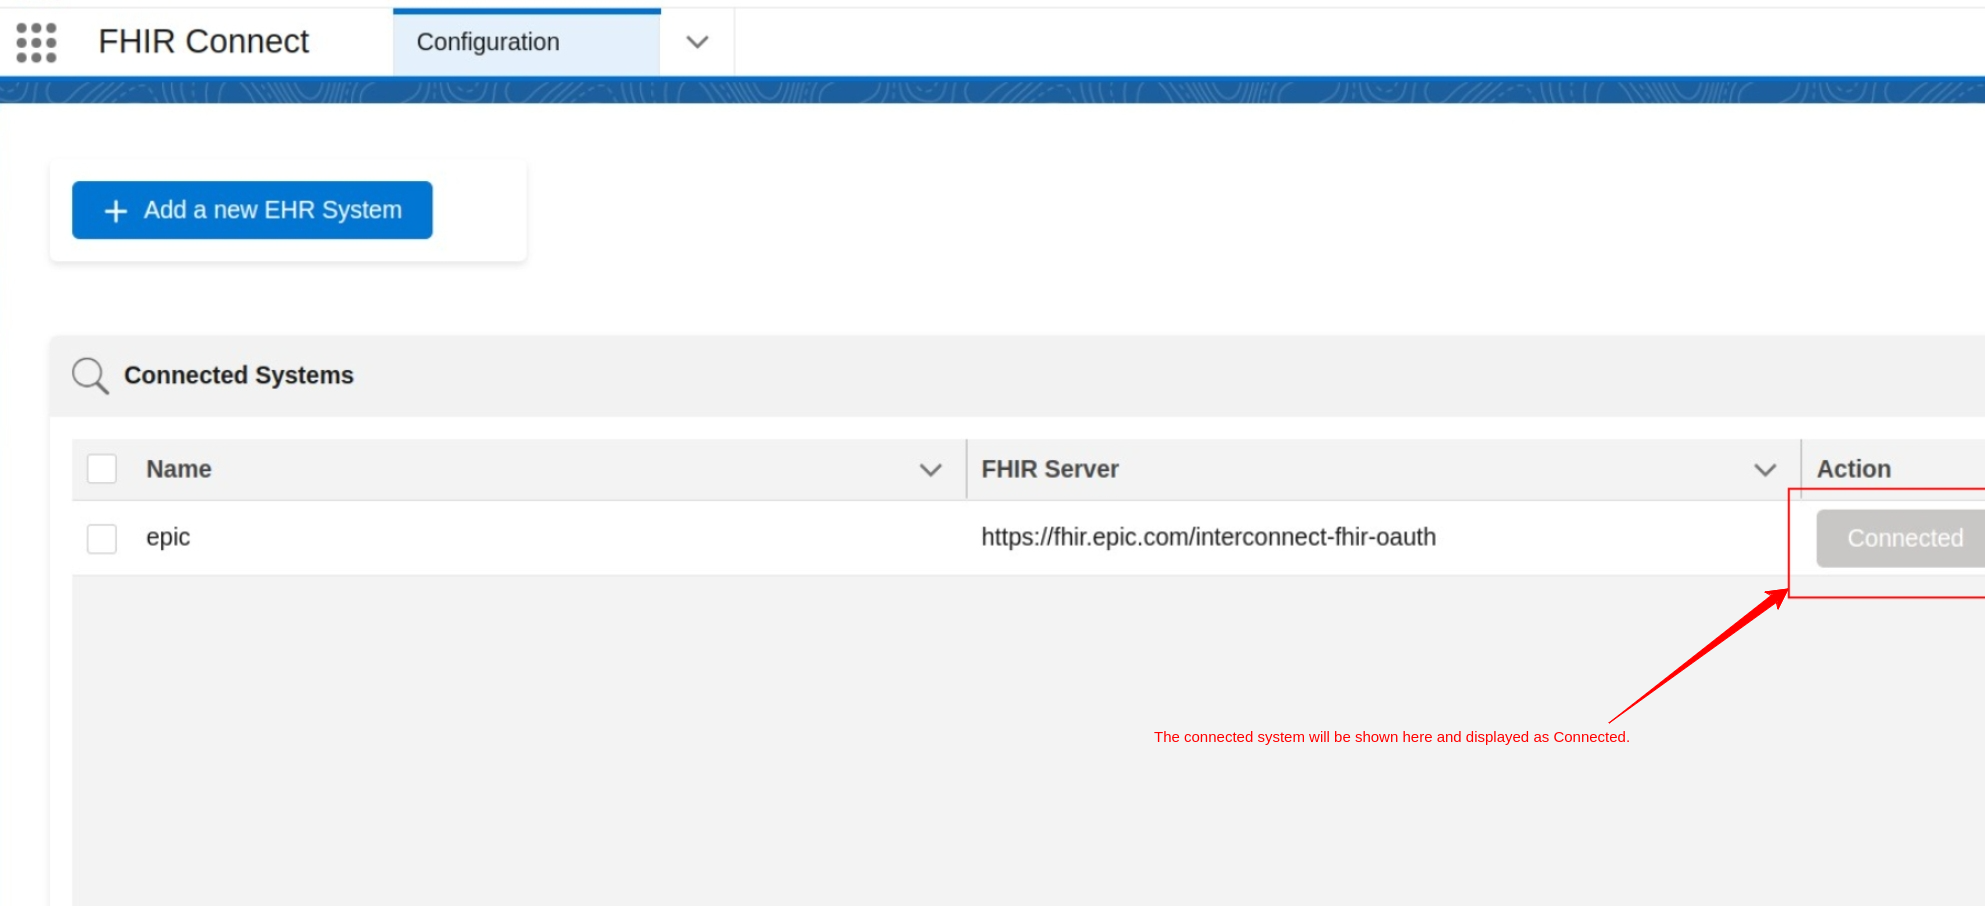
- The connected system will be displayed in the data table.

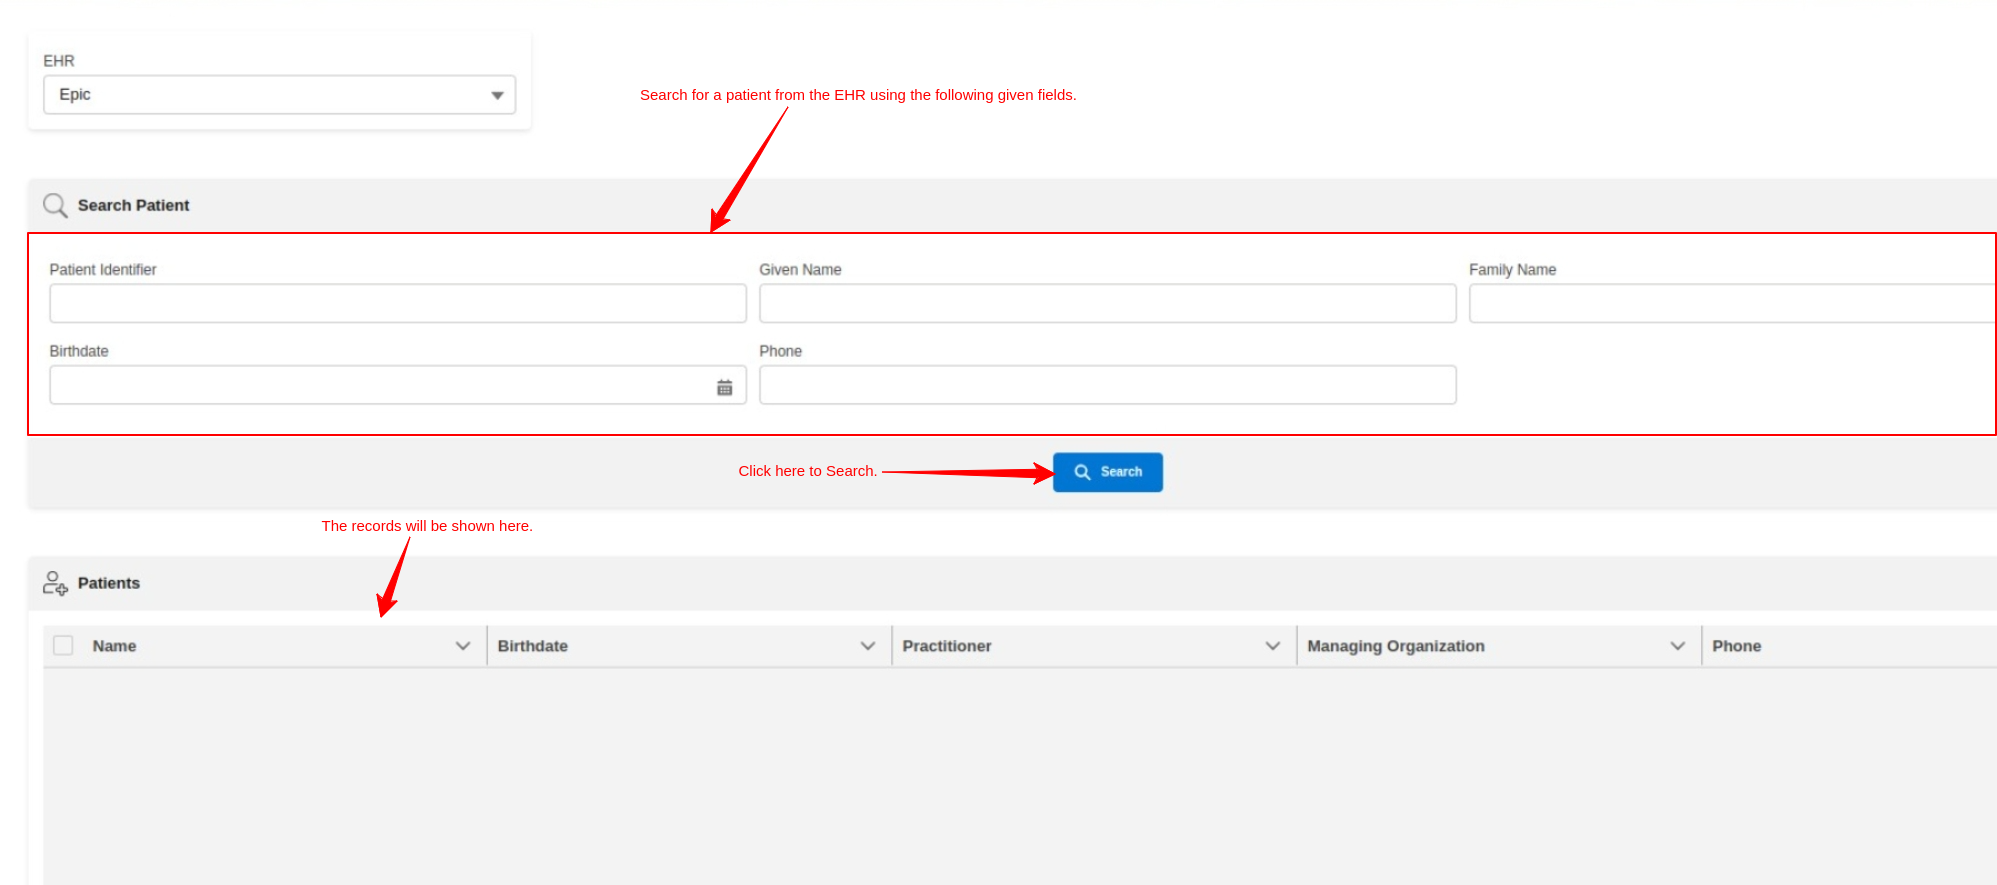
Search Patient Component
The user can easily search for any patient from Epic using the different fields available. The search for a patient works on the basis of demographics and Identifiers, such as Medical Record Number (MRN). Using MRN is beneficial as it is a unique identifier so you won’t face any issues while finding the patient.
- Choose the Epic option in EHR.
- Then in Search Patient Component, mention the MRN in the Patient identifier field
- You can also use other fields to search for patient
- Then click the Search button

- You will see the patient record search result as shown in the snapshot below.
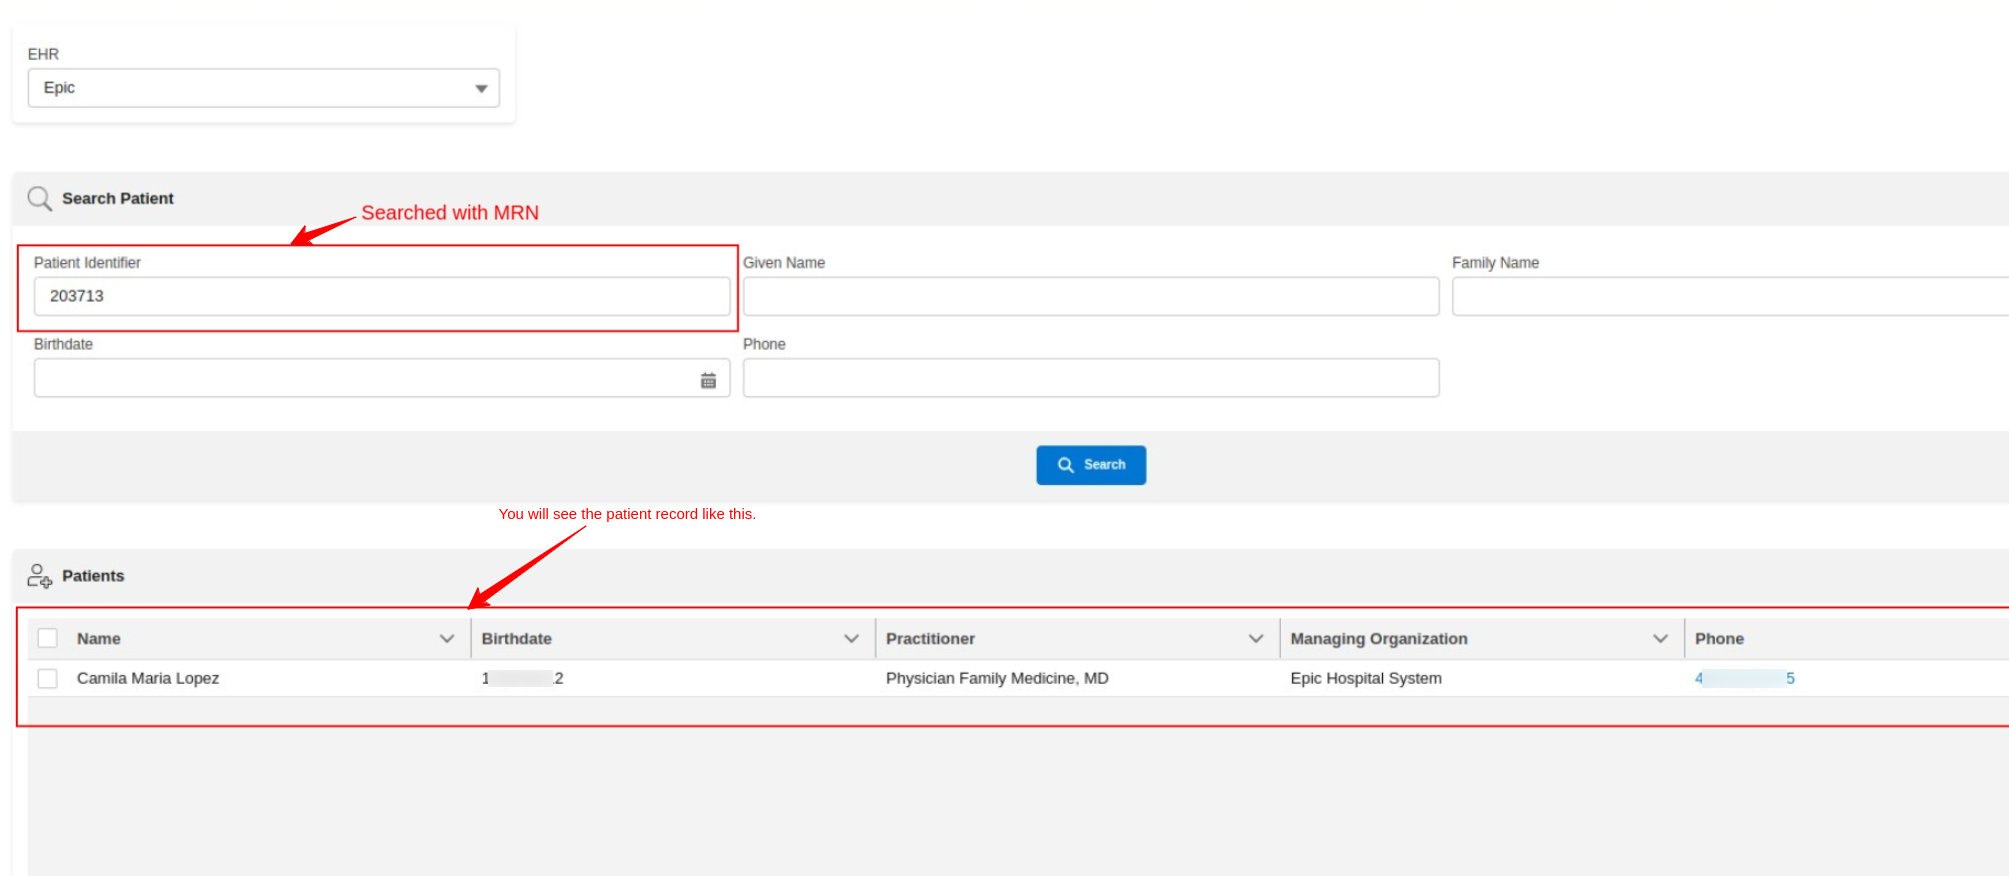

- Against the searched patient, you have an actions drop-down available that is:
- View Complete Info
- Create a Record in Salesforce
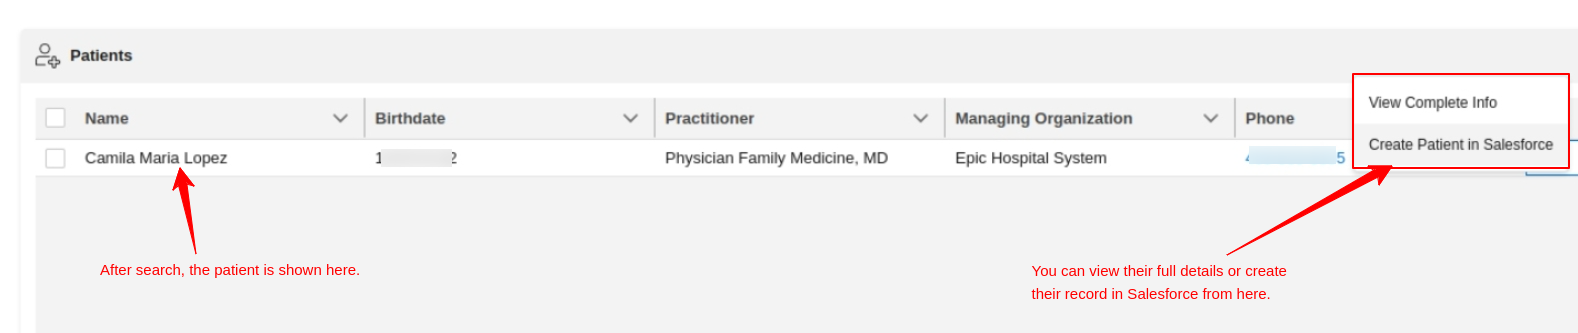

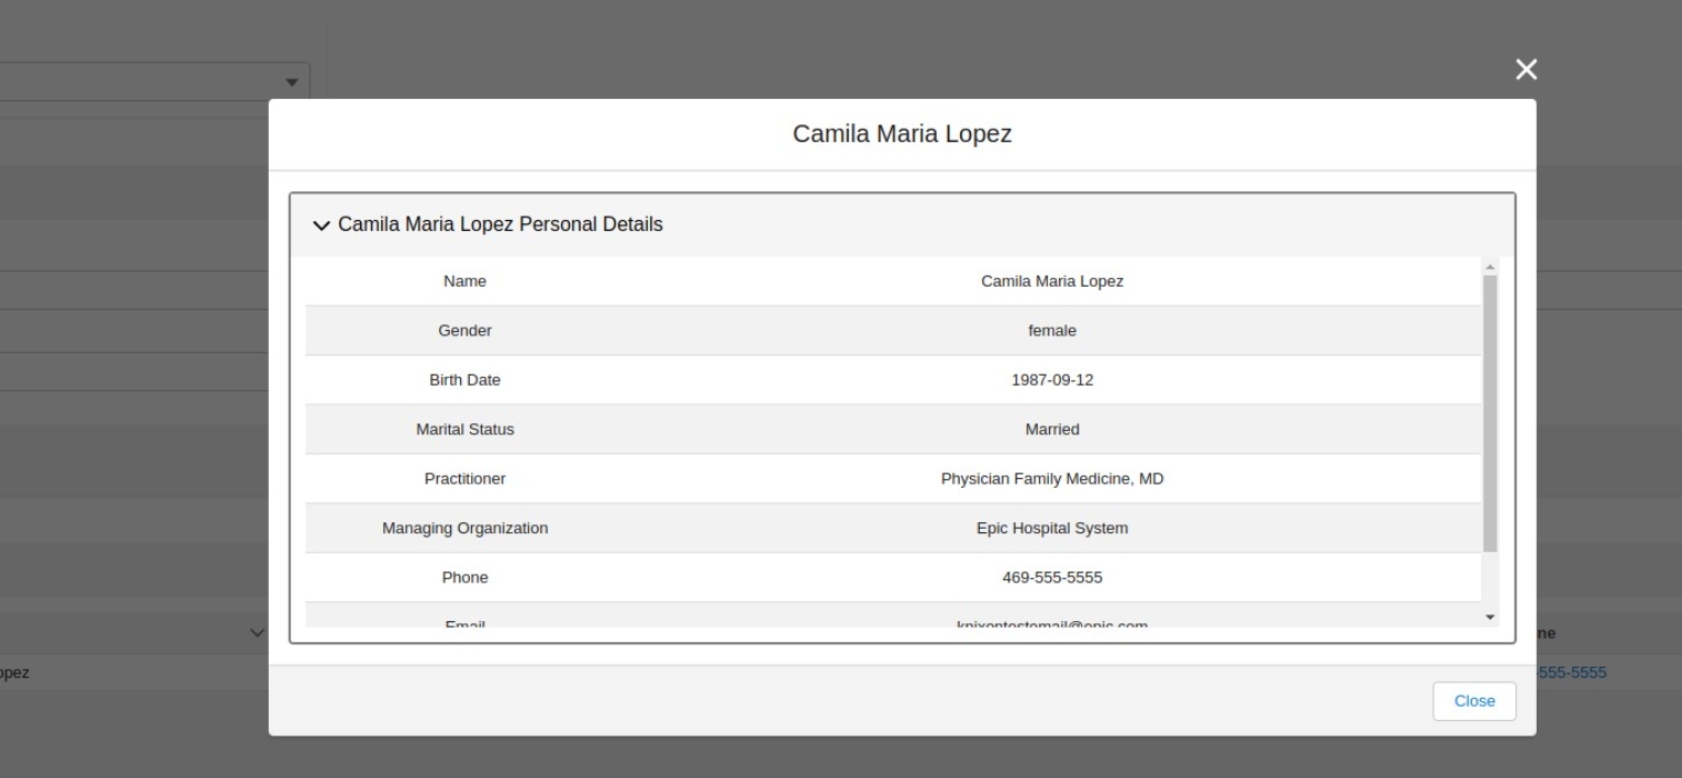
- Using the View Complete Info option, you can review complete patient information before creating the patient in Salesforce.

- To create a patient record (Person Account) in Salesforce, click on Create Patient in Salesforce.
Created Patient Records in Salesforce
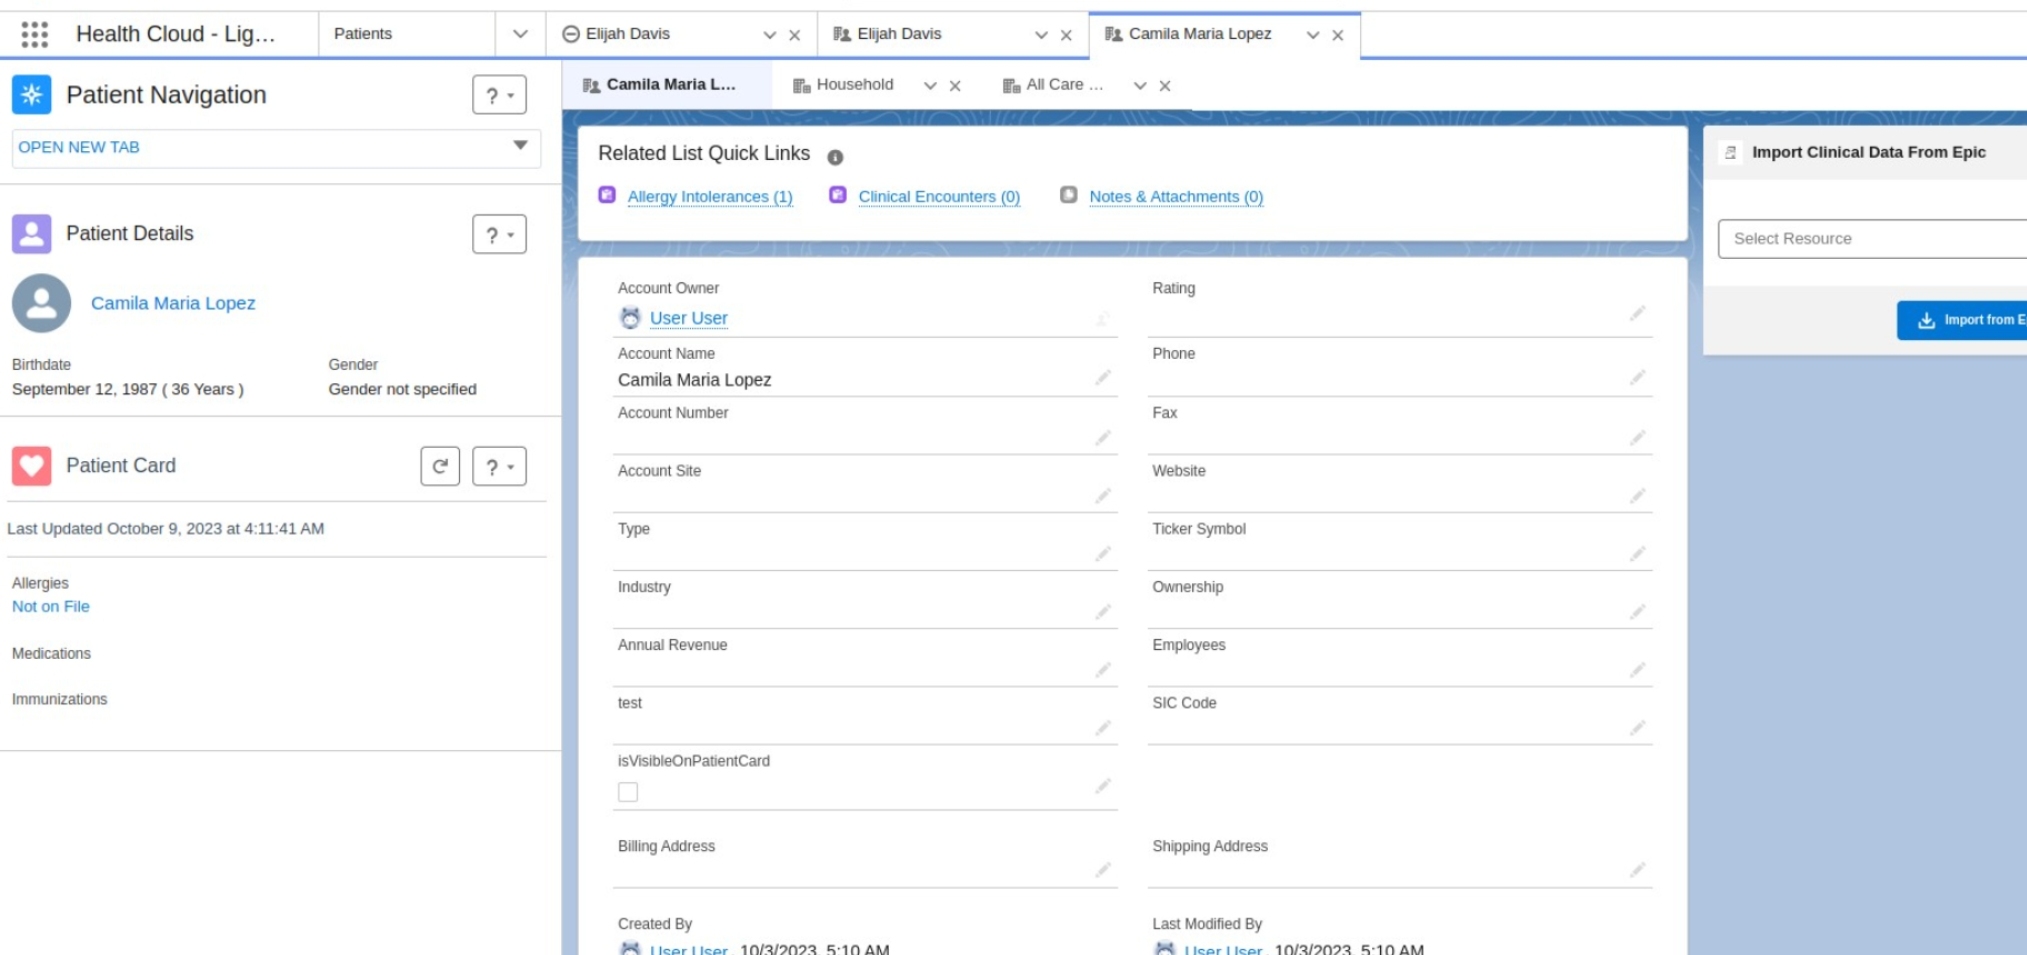

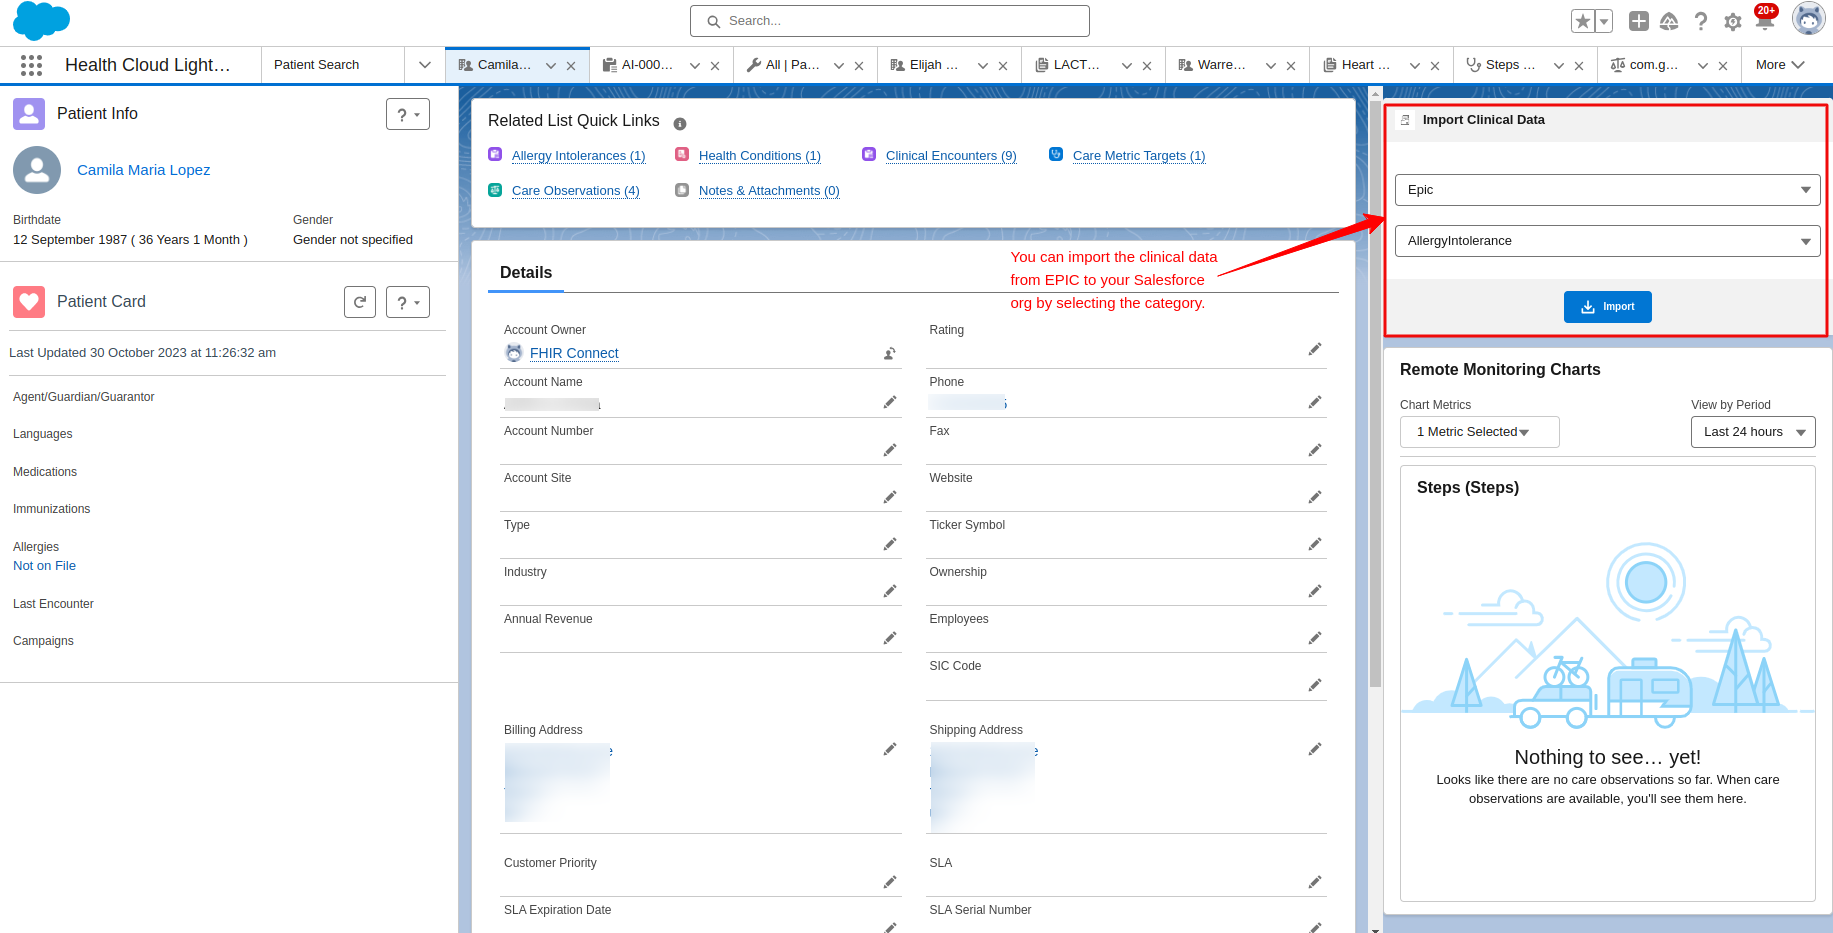
Import Clinical Data From Epic
You can easily import your clinical data from the EHR into your Salesforce health cloud Org.
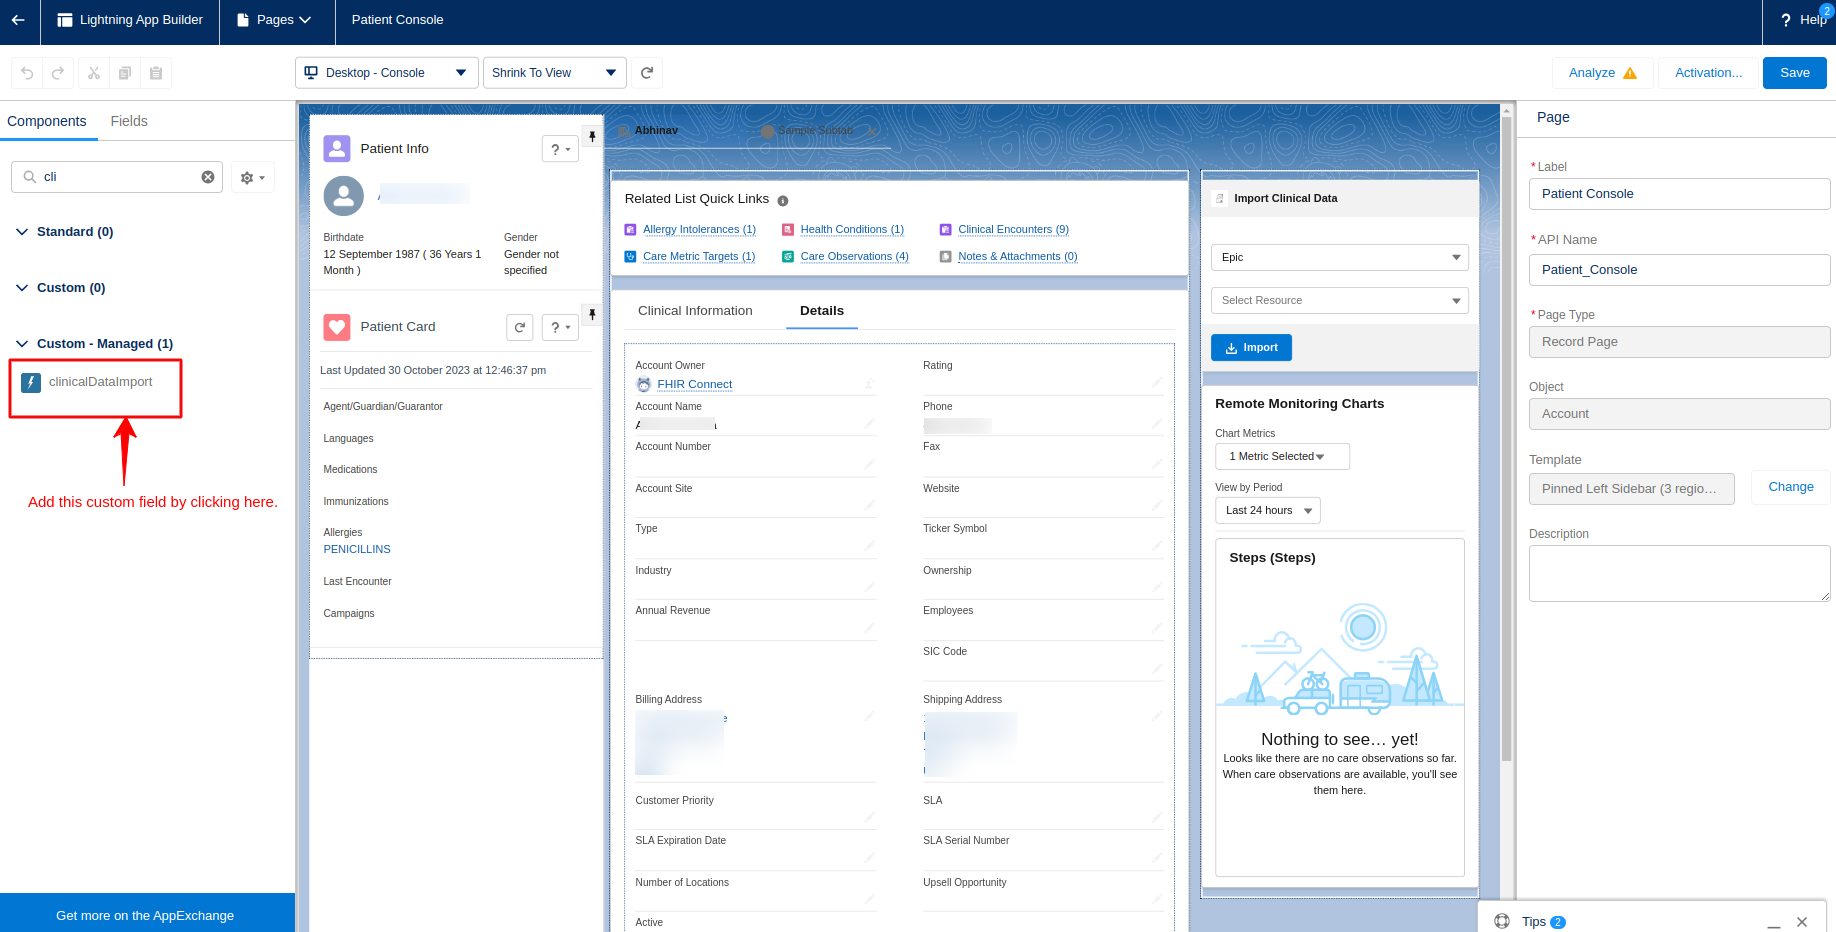
You need to add the custom component named “clinicalDataImport” using the Lightning app builder in your Patient page(Person Account) to import the Clinical information.

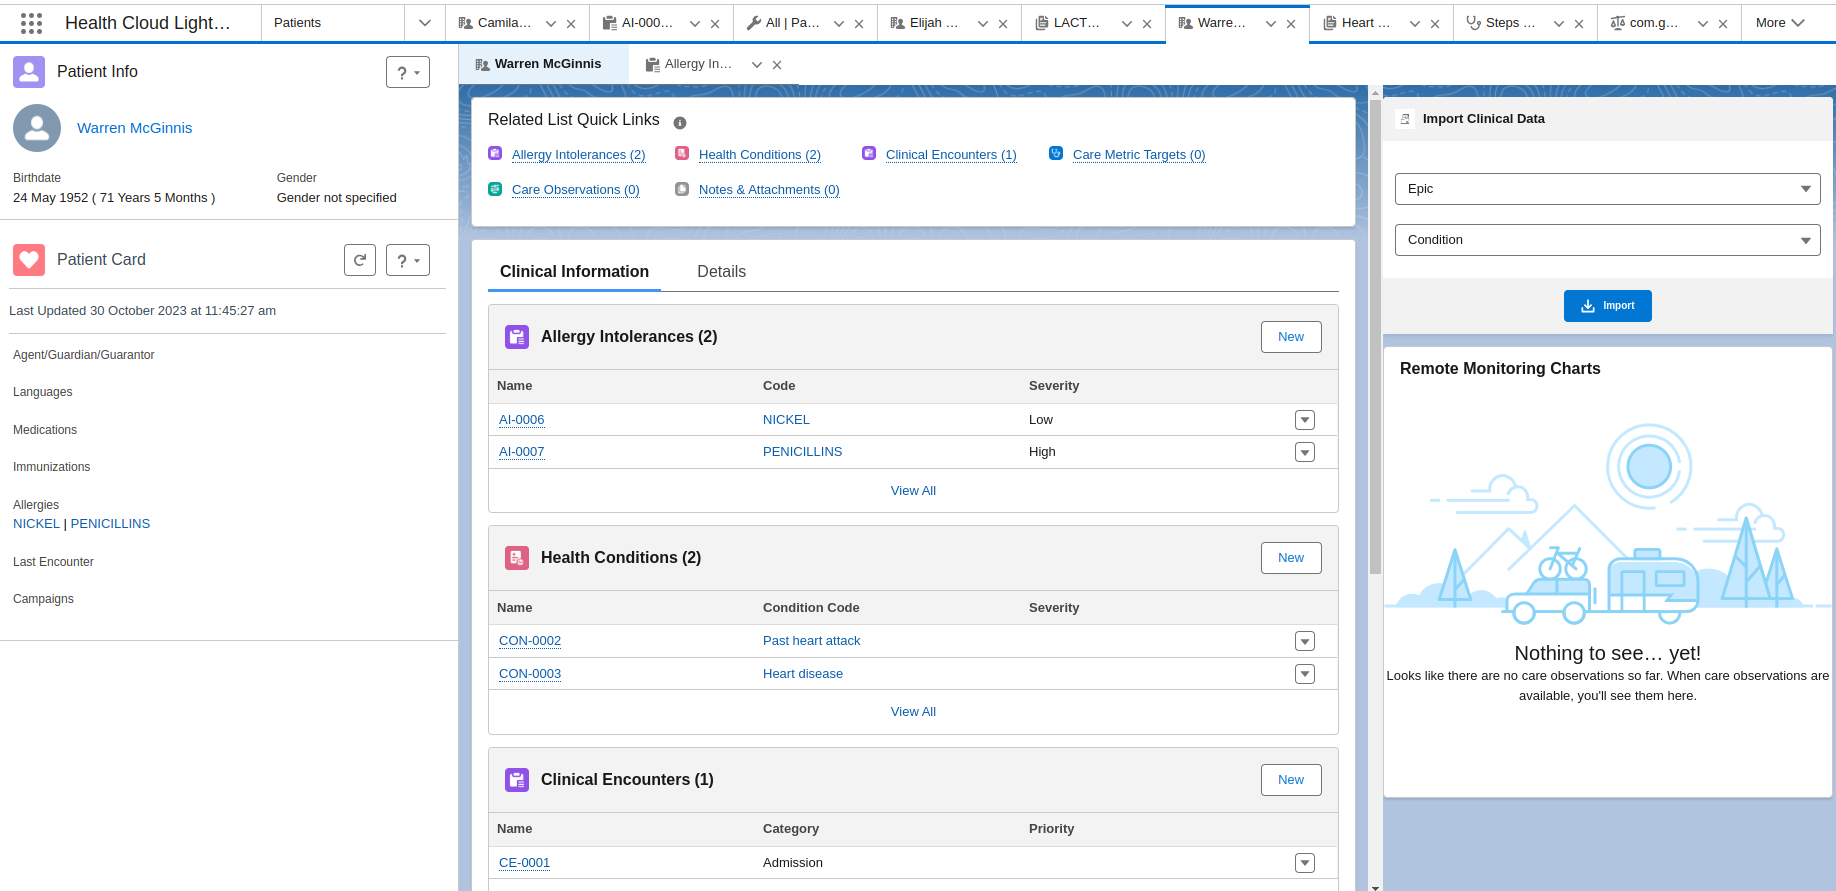
Then you have to select the EHR option and select the FHIR resource.
Click the Import button to import the respective clinical information.


Salesforce AppExchange Consulting Profile
Support
- To view all our applications in Appexchange, go to Webkul Appexchange Apps.
- For any further queries, click on Create a Ticket.