
Running two online stores on different platforms is tough. It’s stressful.
If you’re juggling between Salesforce Commerce Cloud and Shopify. You know the data gets messy, you repeat work, and customers get confused. It’s frustrating.
Our new Shopify Salesforce Commerce Cloud Connector fixes this. It syncs everything, your customers stay consistent, and products match up. The orders are correct, and the categories are organized.
It’s a huge relief. This connector makes things easy, boosts your efficiency, and gives customers a great experience.
In this way, you can focus on what matters most: growing your business.
Features of Shopify Salesforce Commerce Cloud Connector
- Catalog Sync: Sync product catalogs between Salesforce Commerce Cloud (SFCC) and Shopify, so your data is always up to date.
- Product Sync: Be consistent with your product. Keep product listings in sync between SFCC and Shopify.
- Customer Sync: Sync customer data, so both platforms have the latest customer info.
- Order Sync: Sync orders between SFCC and Shopify, so fulfillment is smooth.
- Real-Time Sync: Get real-time updates on products, customers, and orders.
- Pricebook: Choose your default pricebook at SFCC and map it to Shopify Markets so pricing is consistent across platforms.
- Inventory: Map SFCC inventories to Shopify inventories by location so stock is managed and available.
- Attributes: Map SFCC product attributes to Shopify product fields for flexible product setup.
- Picklist Value: Match SFCC Product Picklist Attributes to Shopify Product Picklist Attributes. In this way, product variations will be accurate.
- Records: View synced, unsynced, and errored records with search sort and filter options.
Pre-requisites of Installation
- Node version 12. x.x is required to install the application successfully.
- Keep the “app_storefront_base” cartridge in the root directory of the project.
Installation of Shopify Salesforce Commerce Cloud at Salesforce
The installation of the connector involves two steps.
- Salesforce Commerce Cloud Cartridge setup
- Site Import for metadata
- OCAPI Permission
We will explain all three steps comprehensively so that you can follow the process on your own.
1. Salesforce Commerce Cloud Cartridge Setup
First, you need to upload the cartridge to the Salesforce Commerce Cloud instance. For that-
- Go to the root directory of the project.
- Run the ./install.sh command to upload the cartridges to the instance and make sure that the node version is 12. x.x.
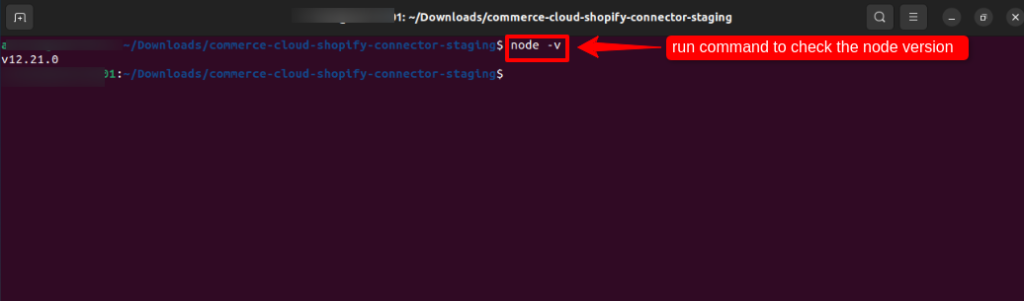

- Enter the details of the Hostname, Username, WebDAV key, and Version one by one as shown in the image below.


- The Success message will be shown in the terminal.


Now, add the cartridge to the cartridge and the business manager path.
Add the “eshopsync_sfcc_shopify_connector_site” cartridge to the cartridge path of the respective site. (recommended to add in the beginning) Configure Cartridge Path
Follow the steps below to add a cartridge.
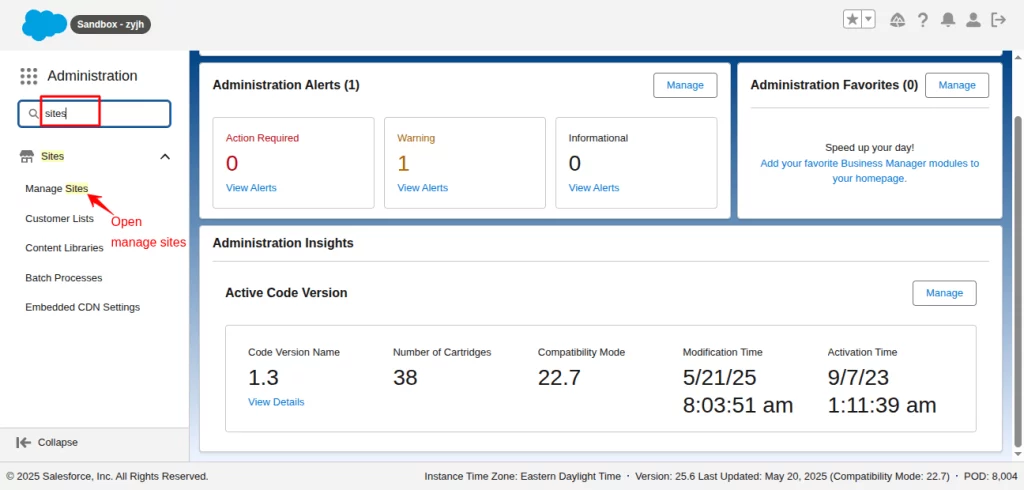
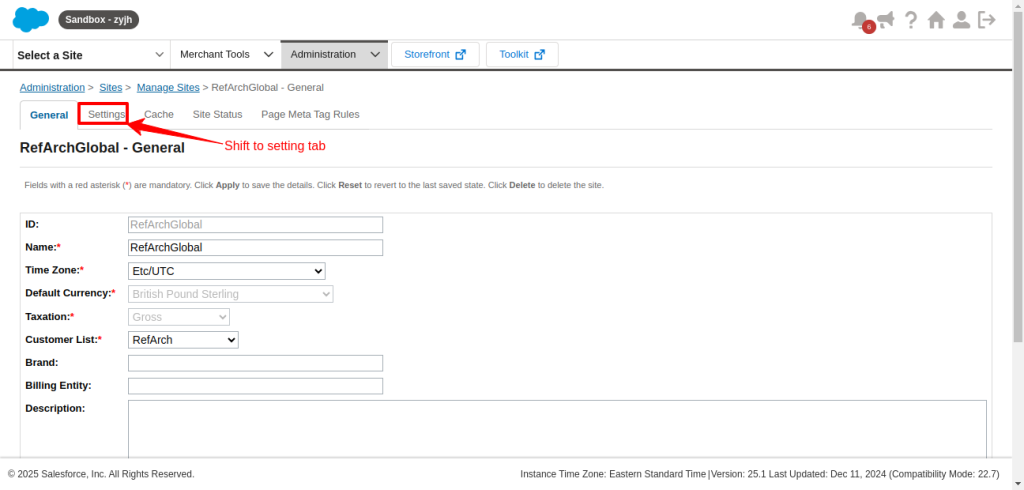
Click on the Administration and under the Site section, open Manage Sites.
Important Note: Salesforce has added a new user interface on Commerce Cloud. You can change it by going to Profile Icon > Preferences > Select Preferred UI Style.
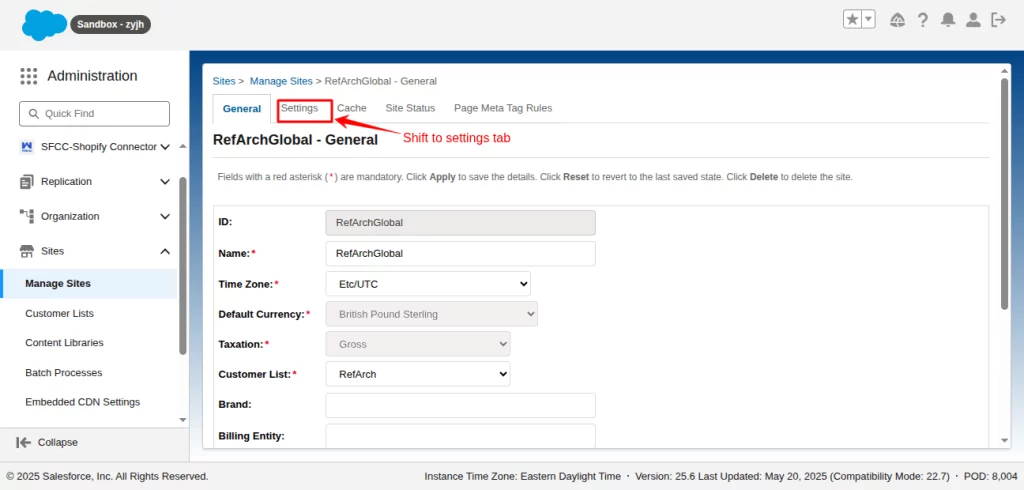
For the New UI Style, you can change it to ‘Modern’ and ‘Classic’ for the Old UI Style. The Screenshots are taken in both Classic and Modern UI styles. Refer to the captions below the images.


Choose your preferred storefront site from the site list.
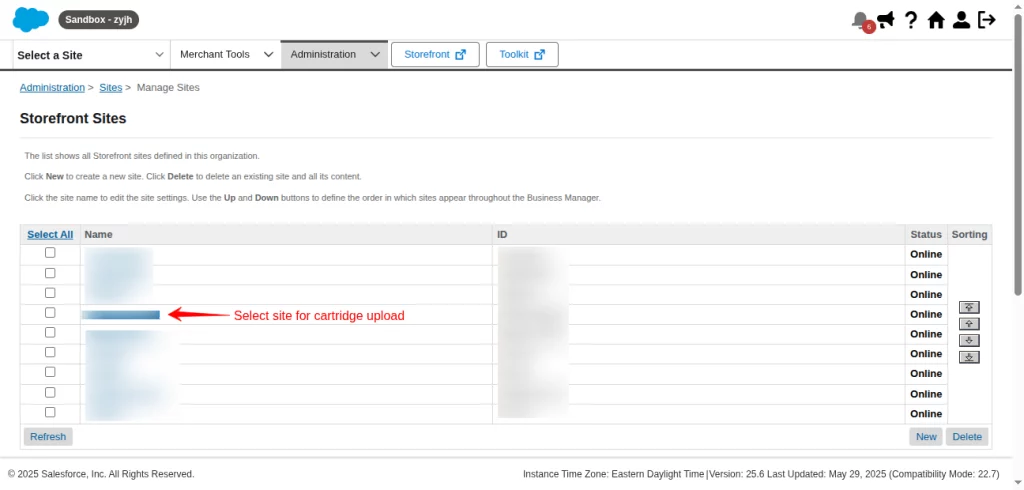
Then, shift the tab from the General to Settings.
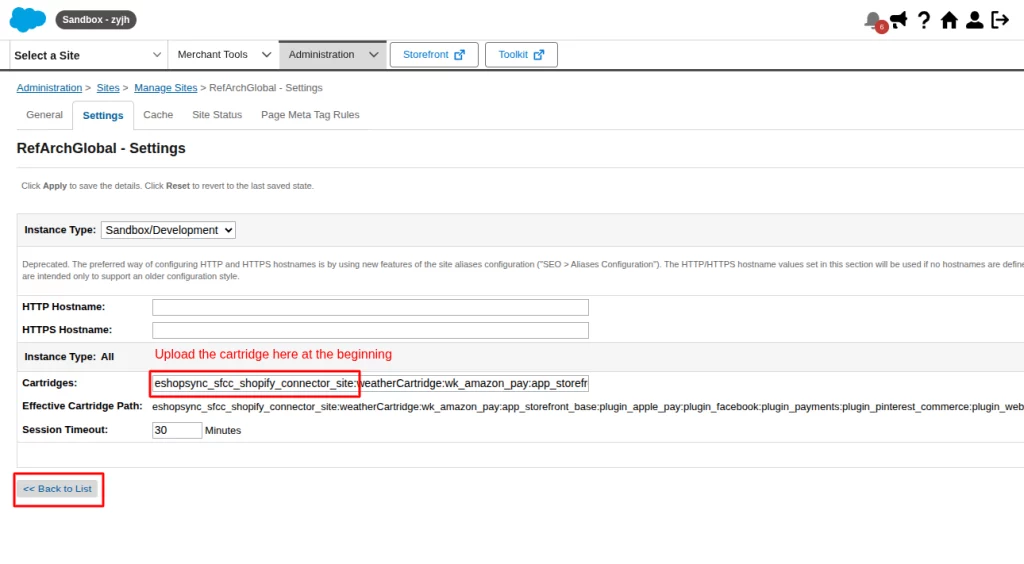
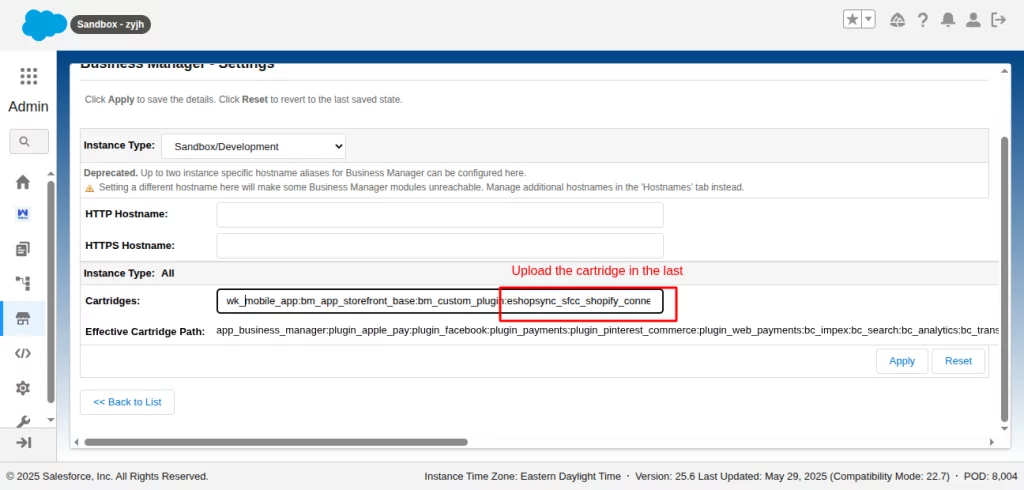
Now, paste the cartridge “eshopsync_sfcc_shopify_connector_site” at the beginning, put a separator (:) between them, and click on the Save button.


Paste another cartridge in the Business Manager. For that, click on the Back to List button below.
Then, click on Business Manager.
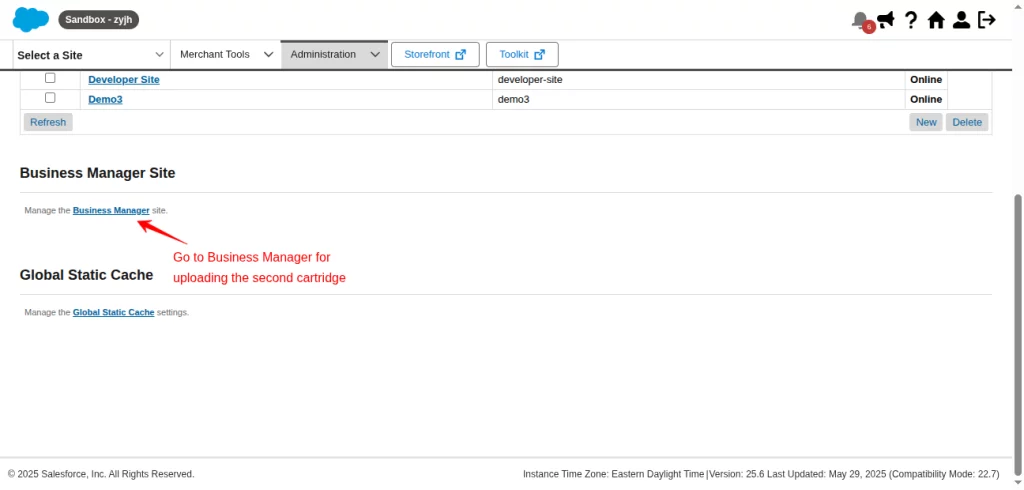
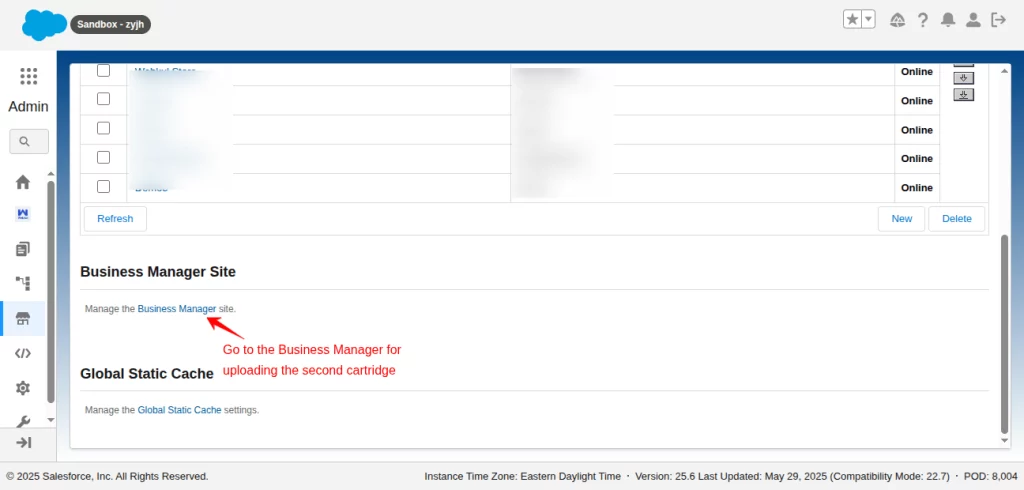
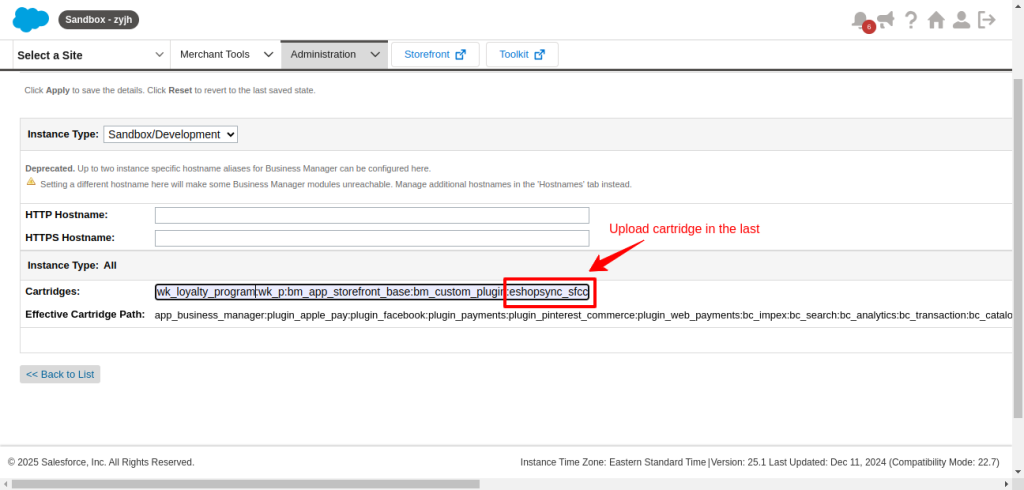
Paste the cartridge (eshopsync_sfcc_shopify_connector) in the last separated by (:). Then, click on Apply to save changes.
2. Site Import for Metadata
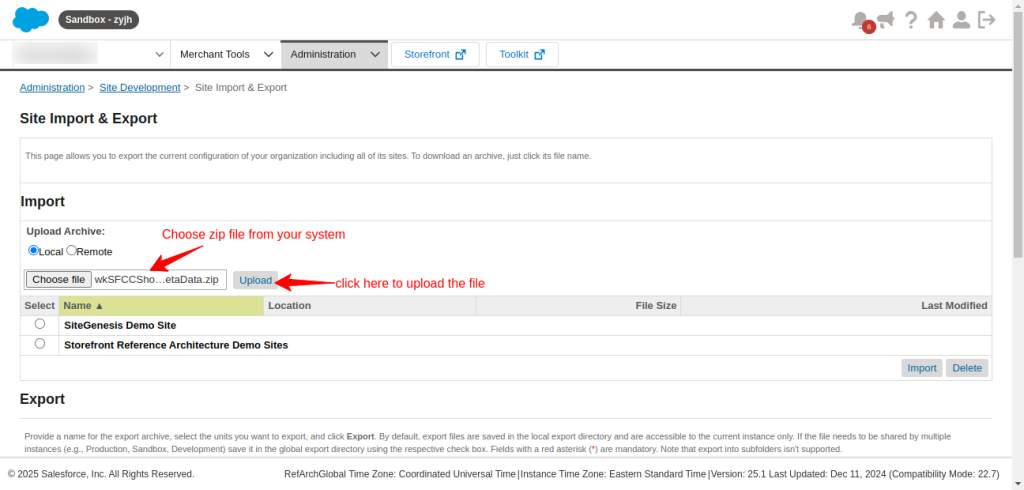
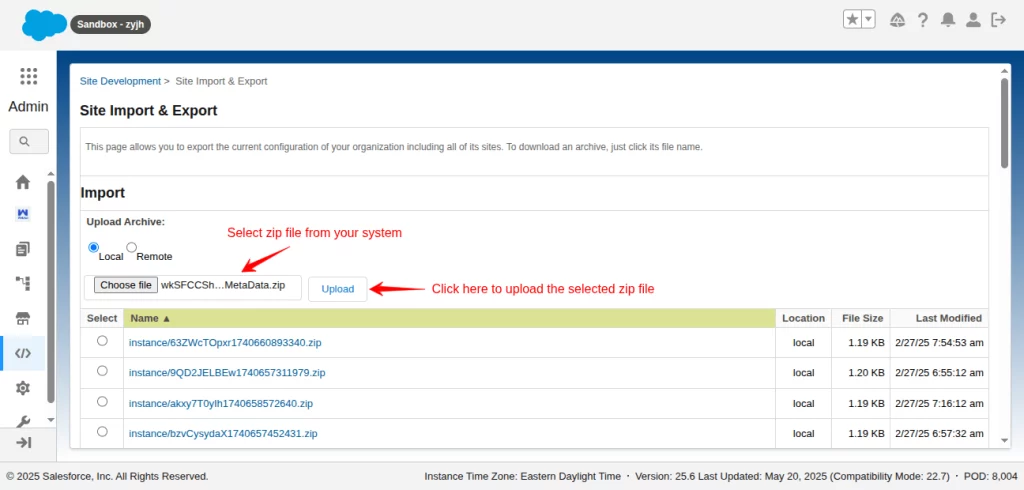
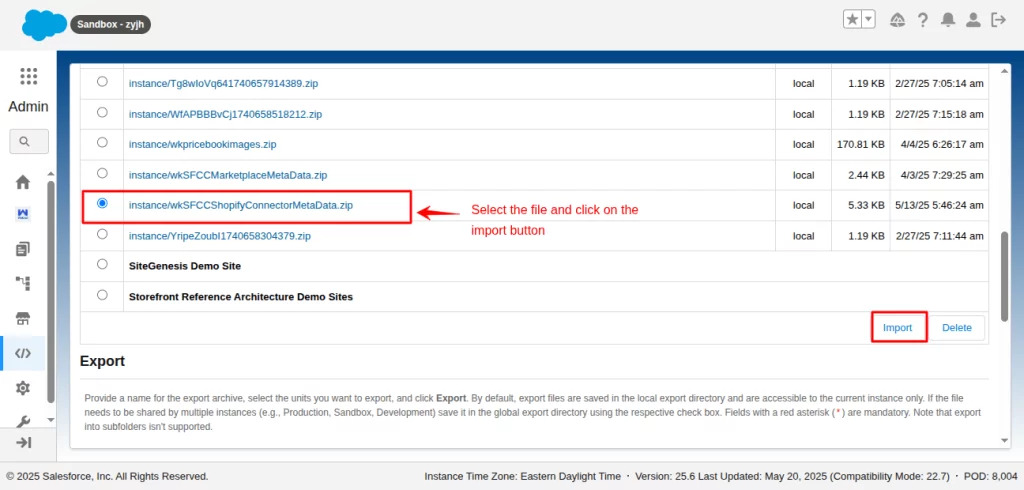
Upload the metadata file, saved in the root directory of the application named “wkSFCCShopifyConnectorMetaData.zip”
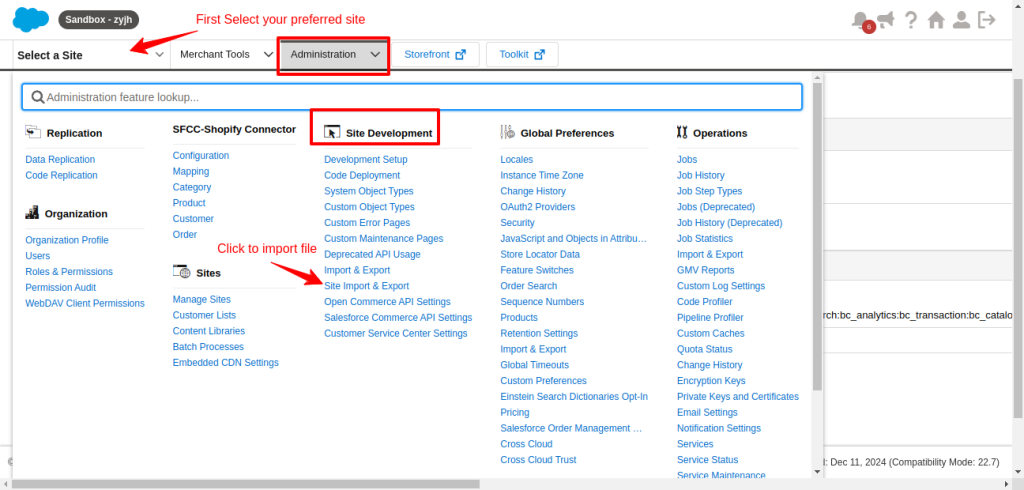
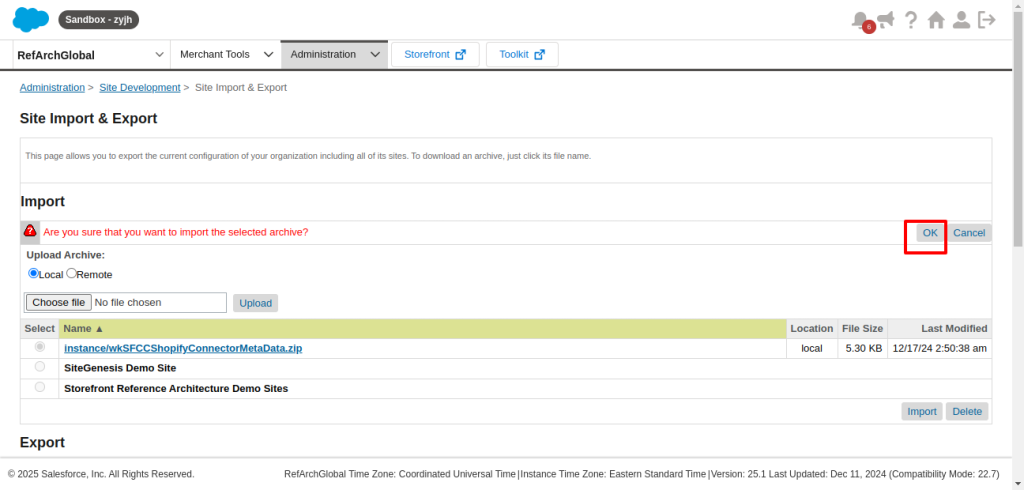
Click on the site import and export under the Administration option.
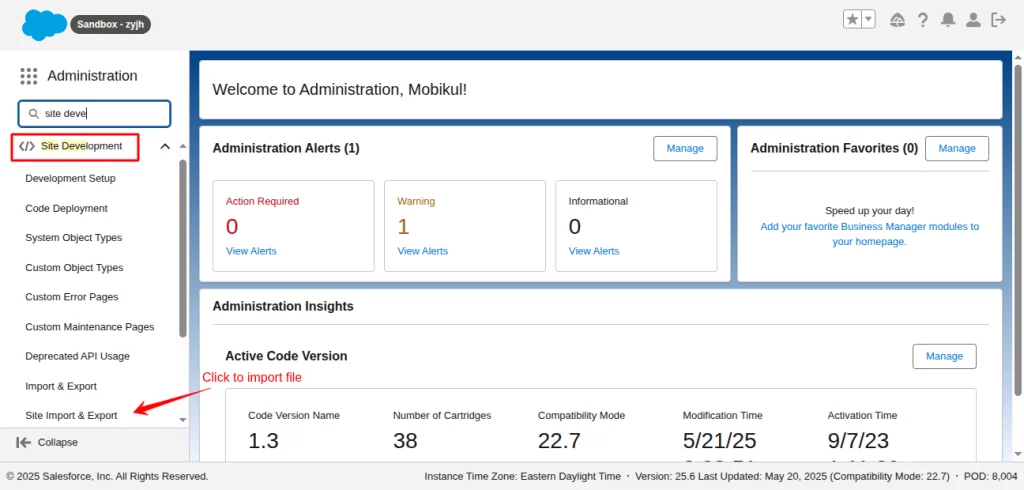
Choose the metadata zip file and upload it.
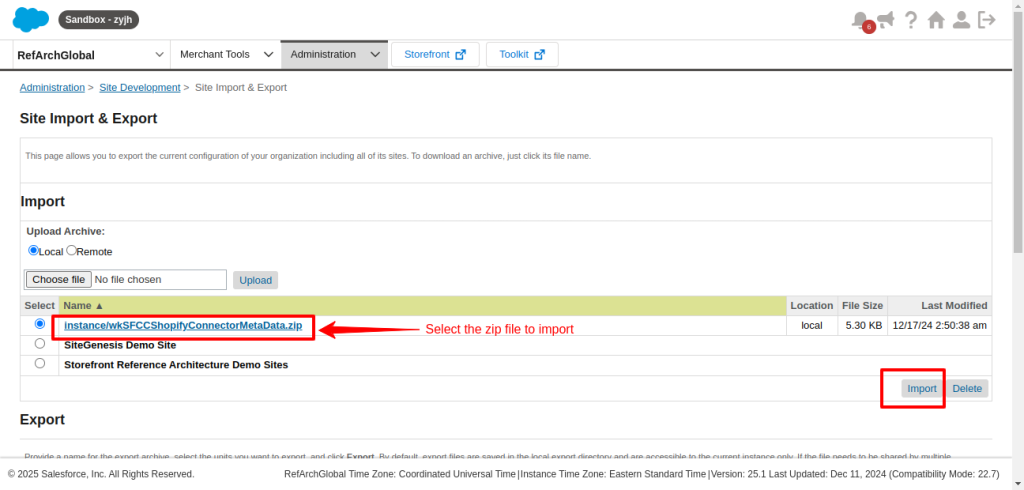
Select the uploaded metadata zip and click on import.
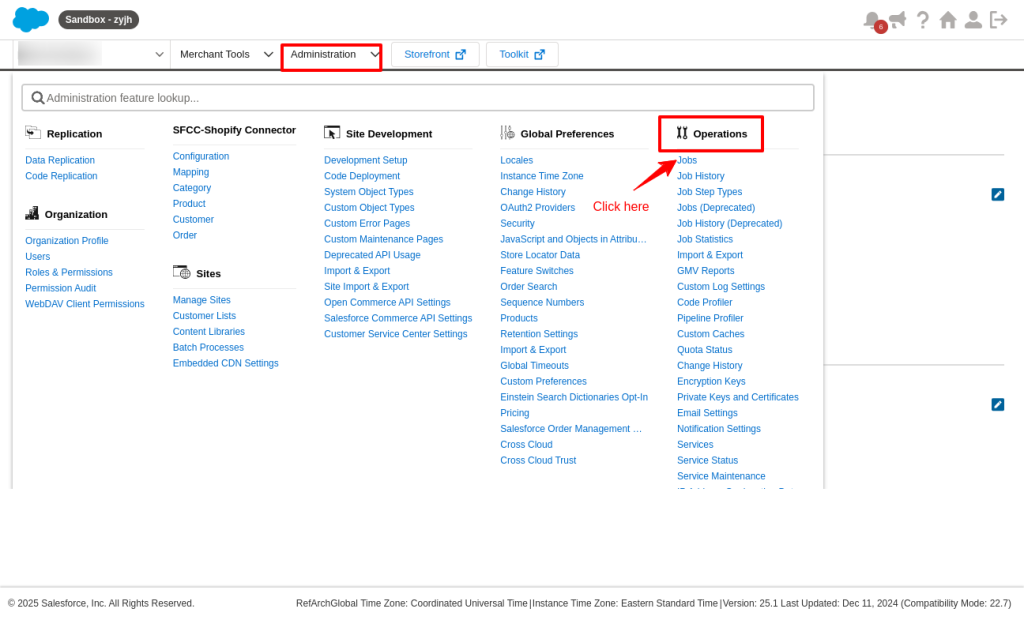
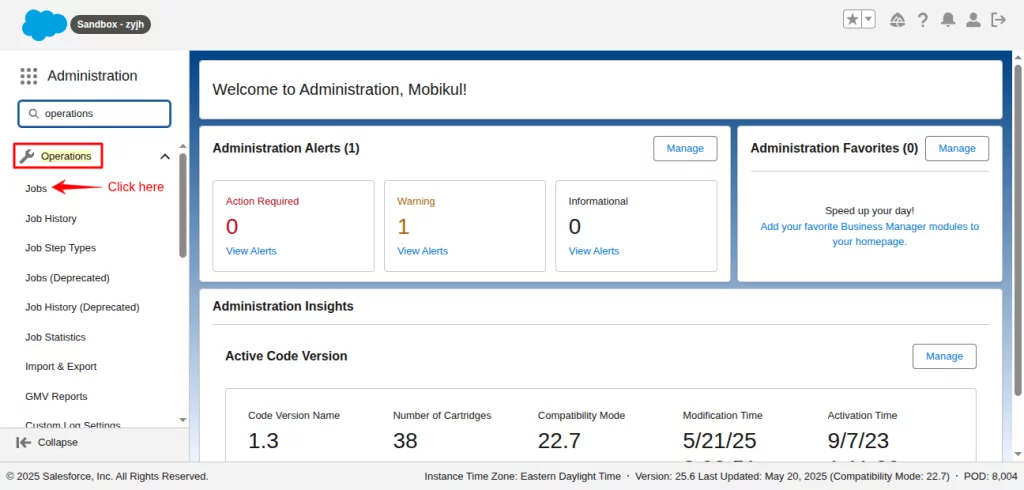
Further, you need to change the Execution Scope of the Jobs.
1. For that, click Jobs under the Administration option.

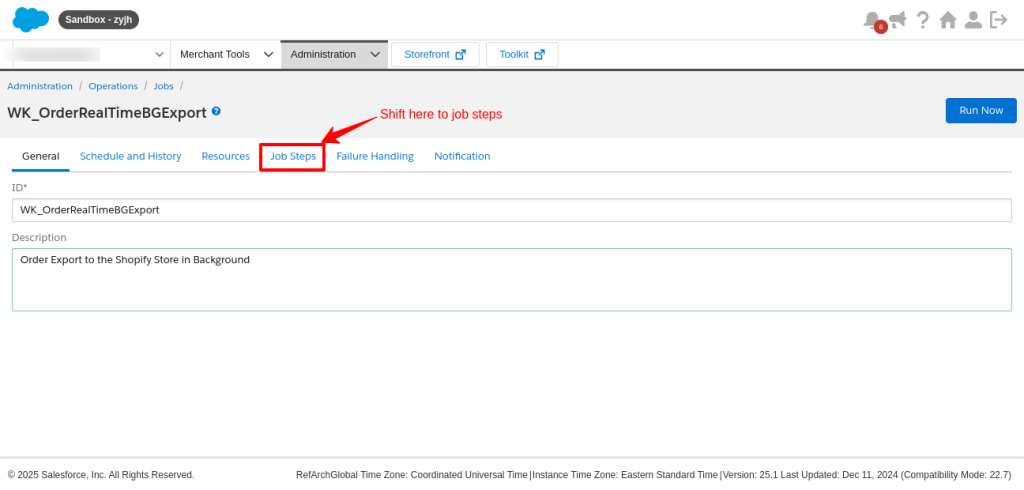
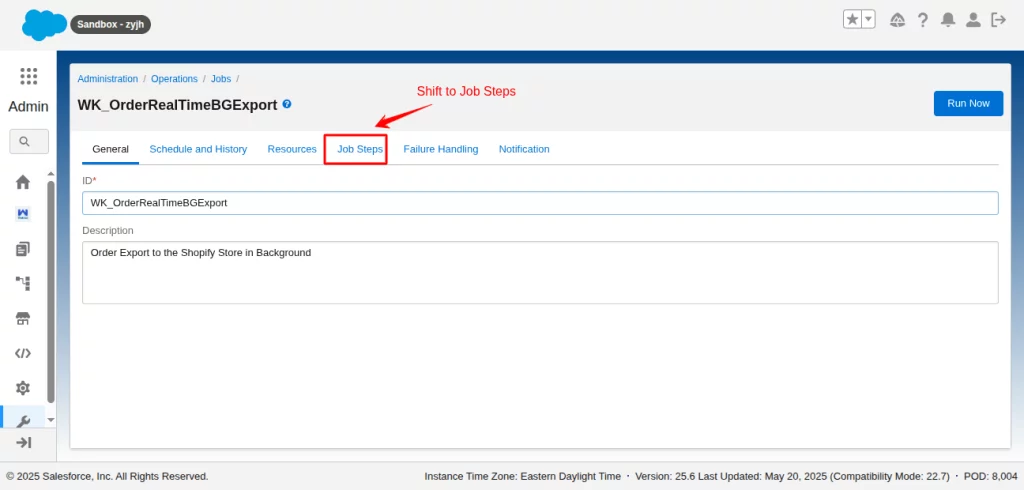
2. Click on WK_OrderRealTimeBGExport job
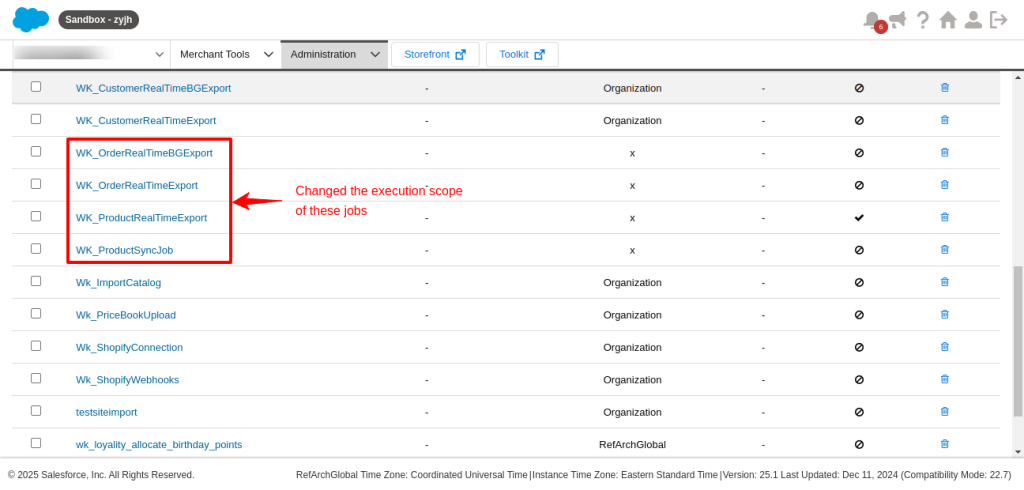
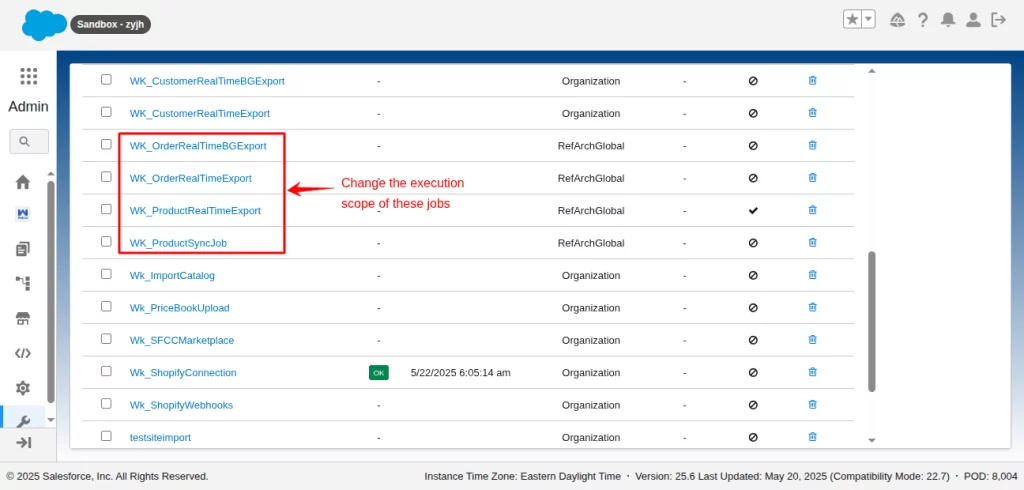
3. Go to Job Steps
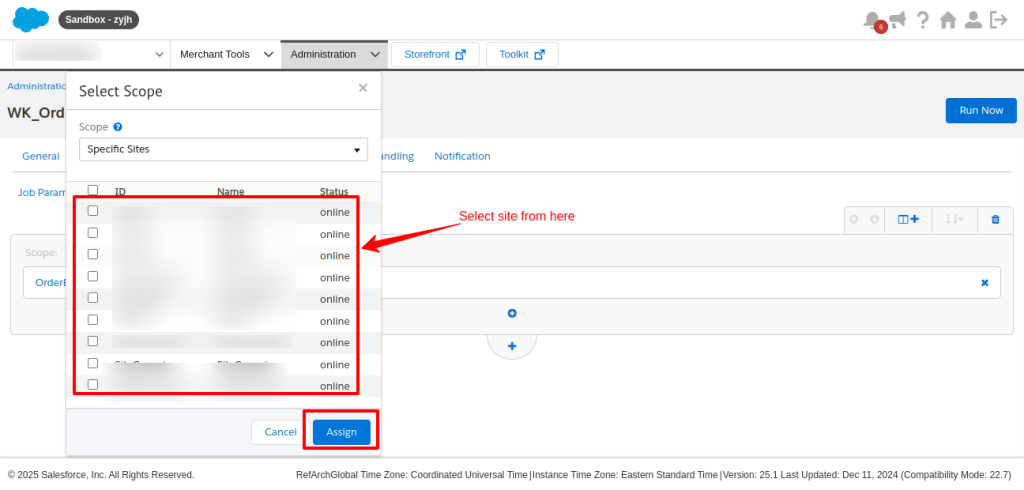
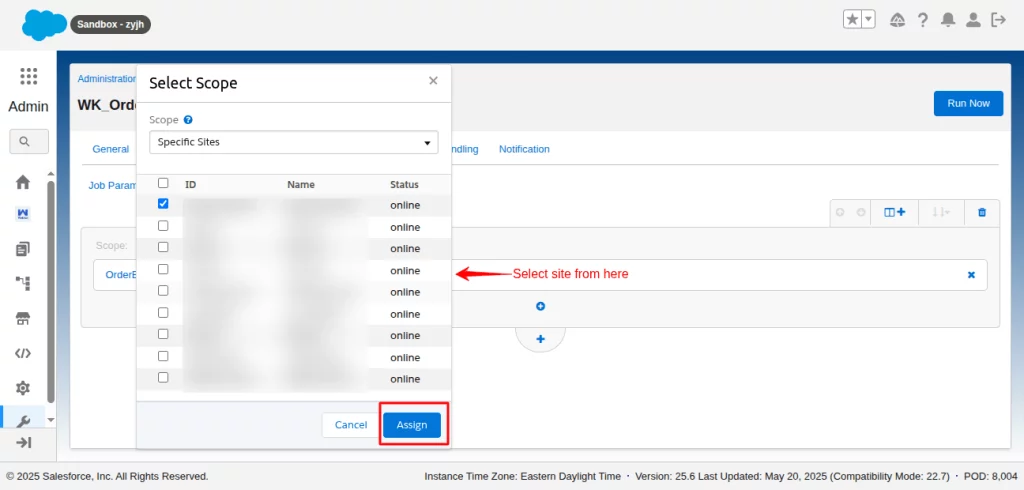
4. Click on the Scope section, select any site, and then click Assign.
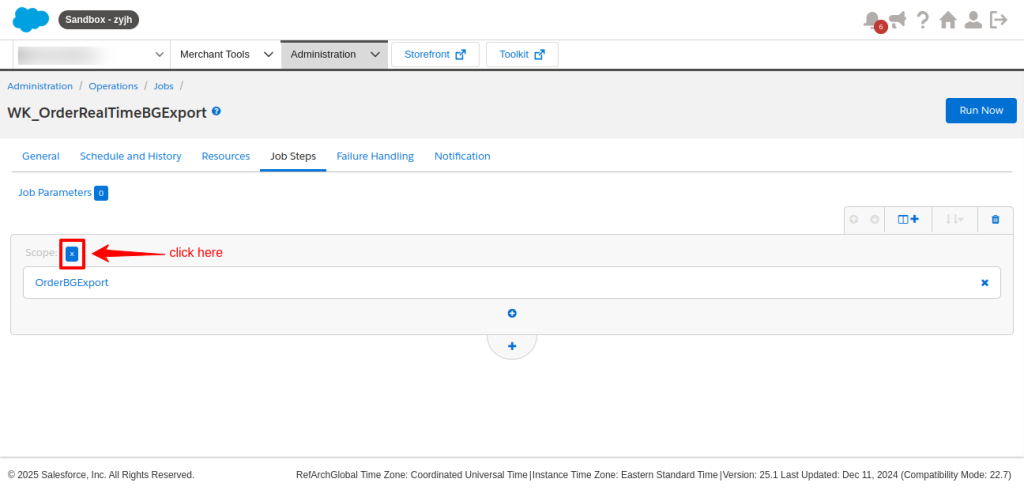
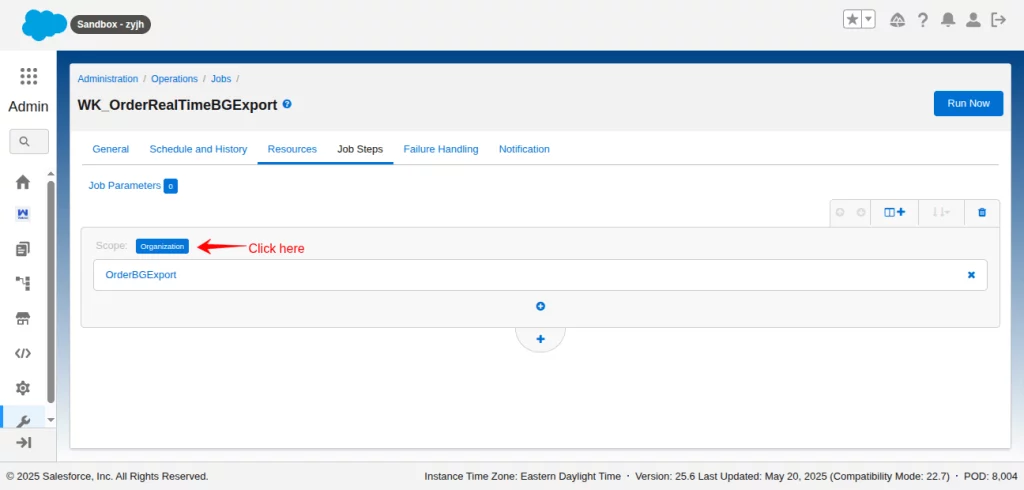
5. Similarly, change the Execution step of other jobs as well. (Refer to image under step 2).
3. OCAPI Permission
OCAPI permission is needed for the connector to work.
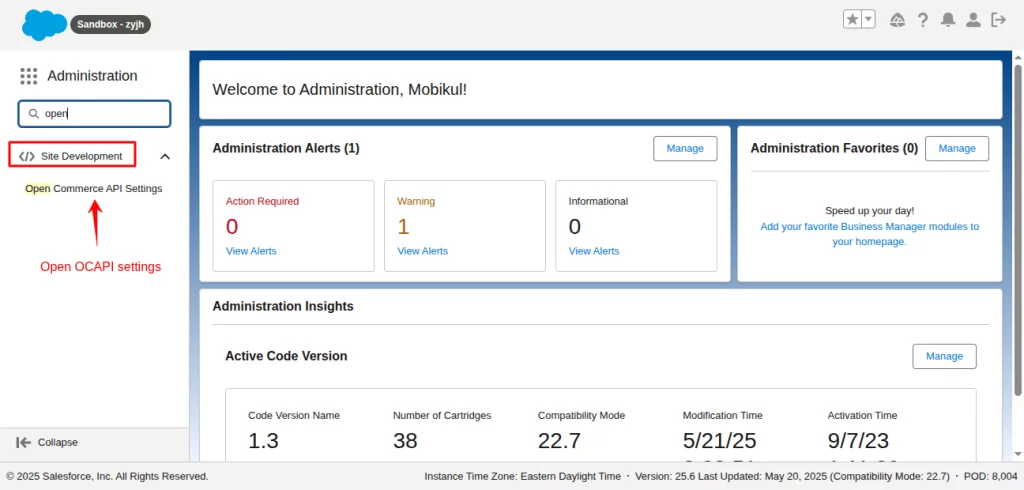
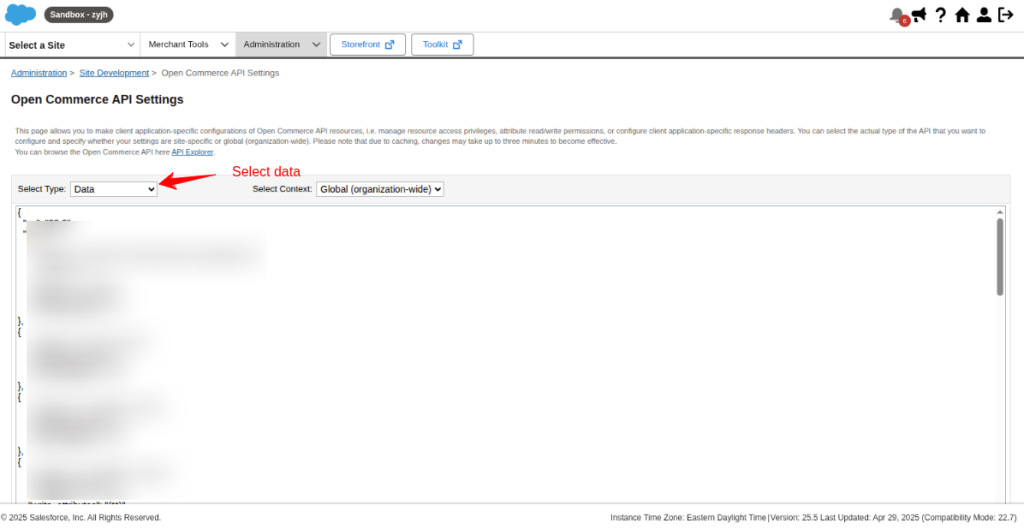
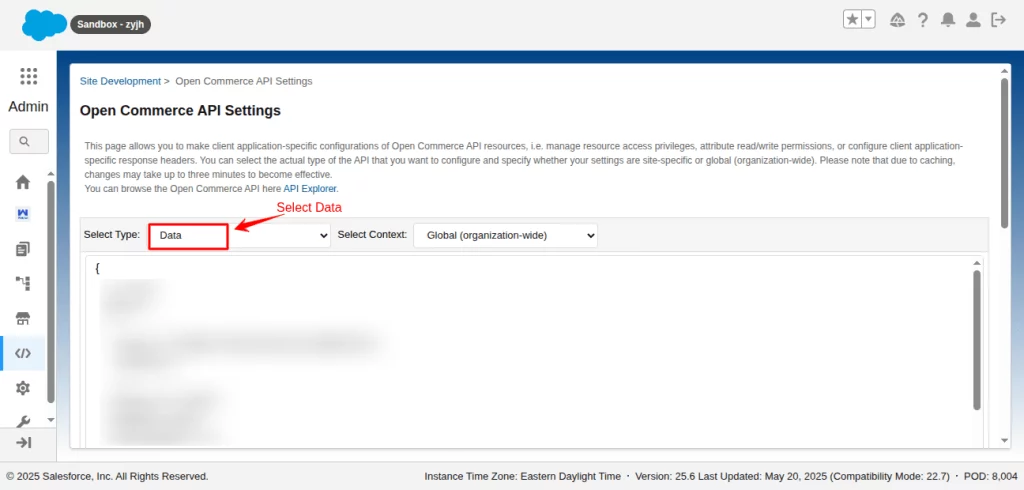
Click the Open Commerce API settings under the Administration option.
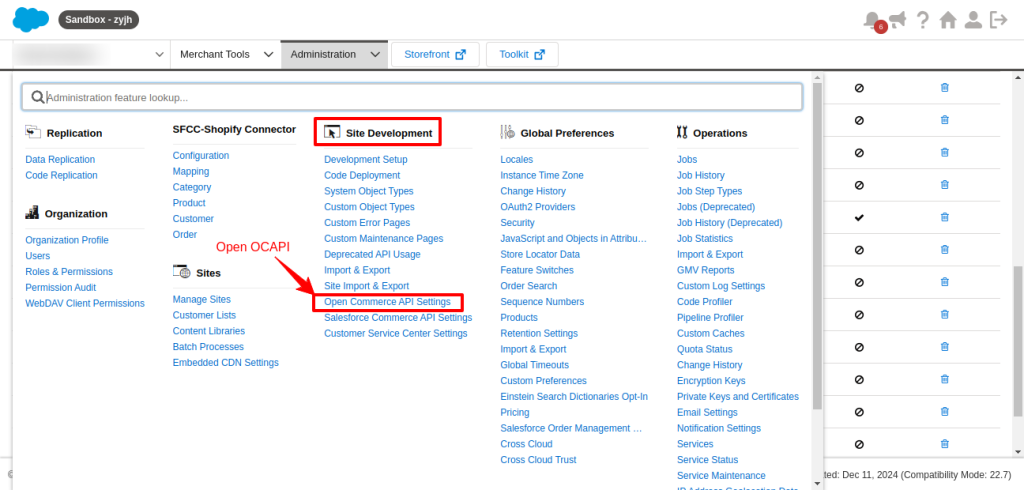
Save the below resource as the resource value in the Shop API first, and then save it.
{
  "_v": "23.2",
  "clients": [
    {
      "client_id": "Enter Client ID here",
      "allowed_origins": [],
      "resources": [
           {
                  "resource_id": "/order_search",
                  "methods": ["post"],
                  "read_attributes": "(**)",
                  "write_attributes": "(**)"
            }
       ]
    }
  ]
}
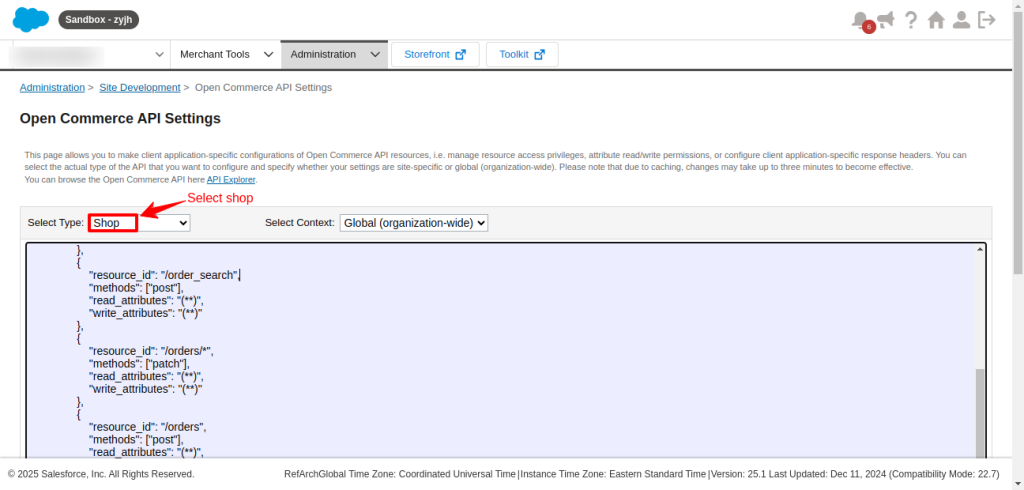
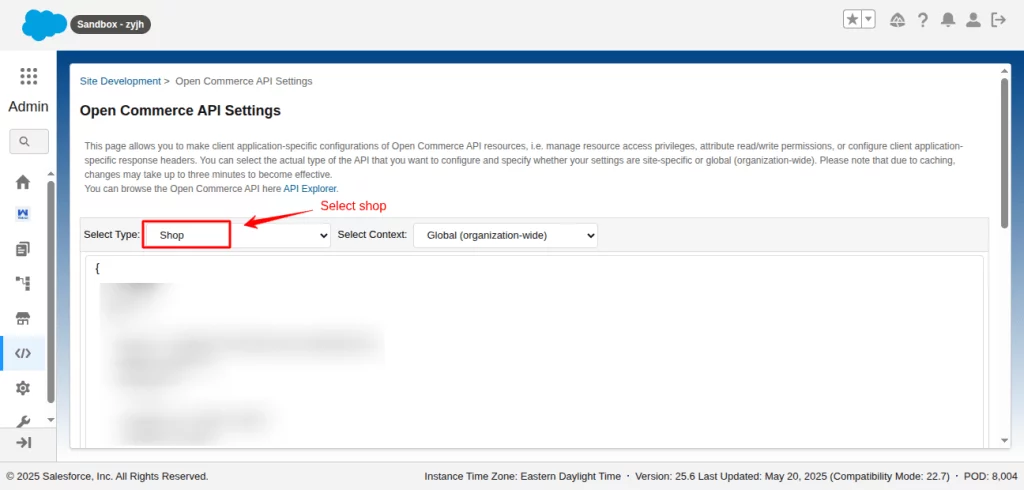
Now switch to the Data API by selecting the Data option from the dropdown (refer to the last image, clicking Shop will open the other options.)

Download and add the resources to the Data API as the resource value and save it.
Click here to download the file.
How to Set Up and Make the Connector Visible
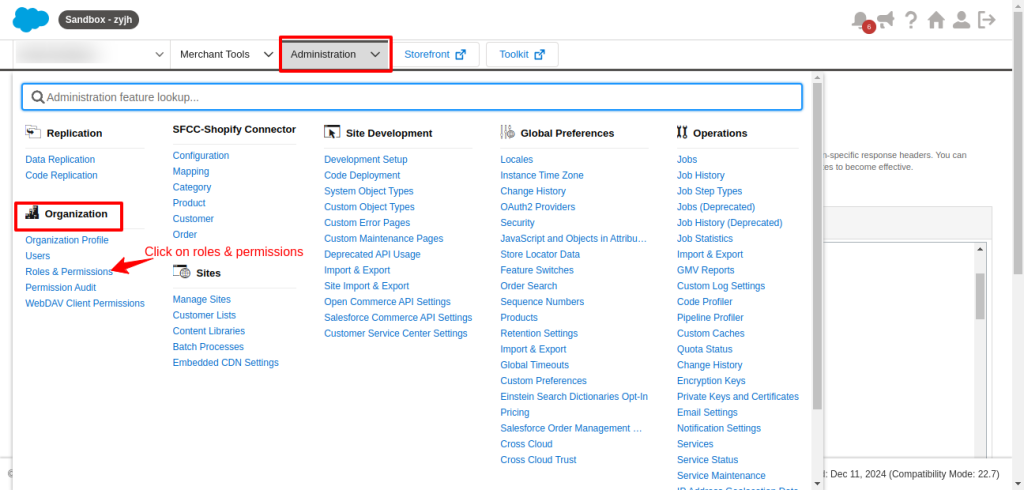
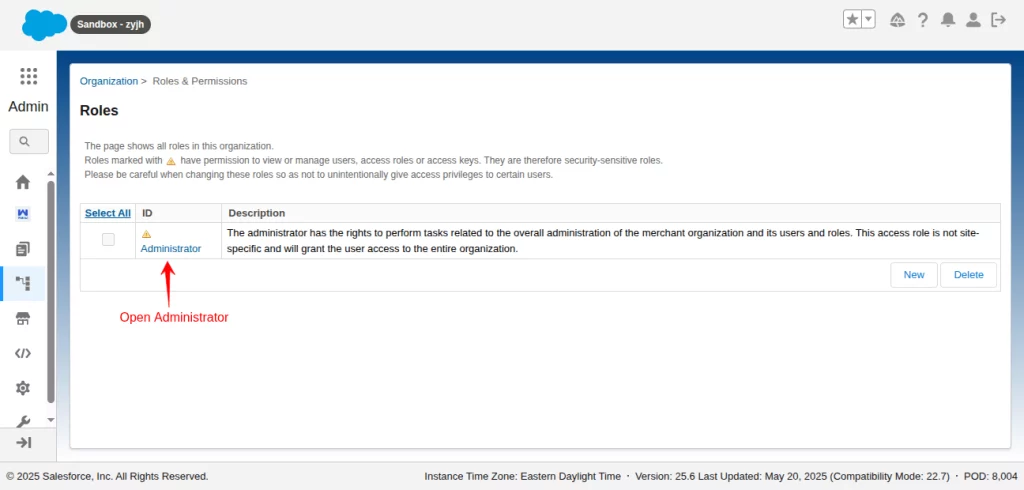
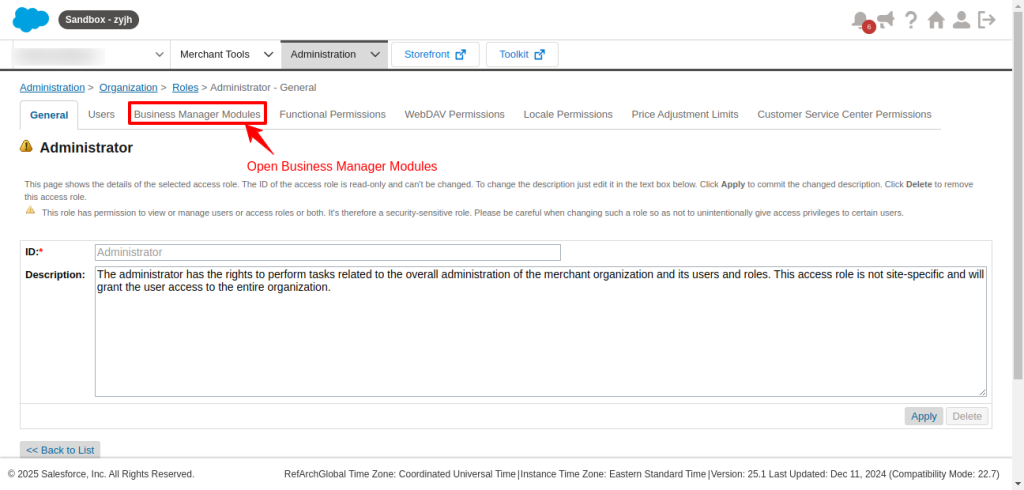
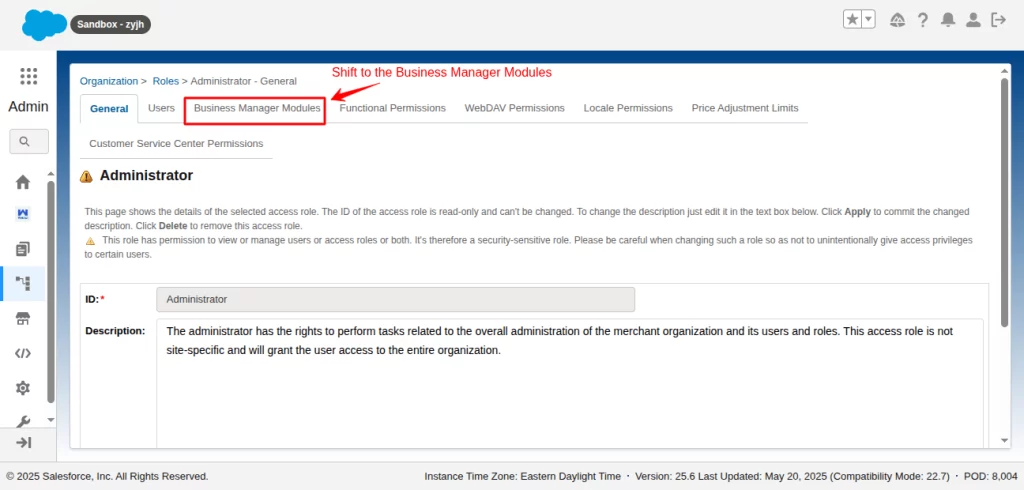
Make the connector visible on the instance. Click on Administration, and under the organization option, go to Roles and Permissions.

Open Administrator

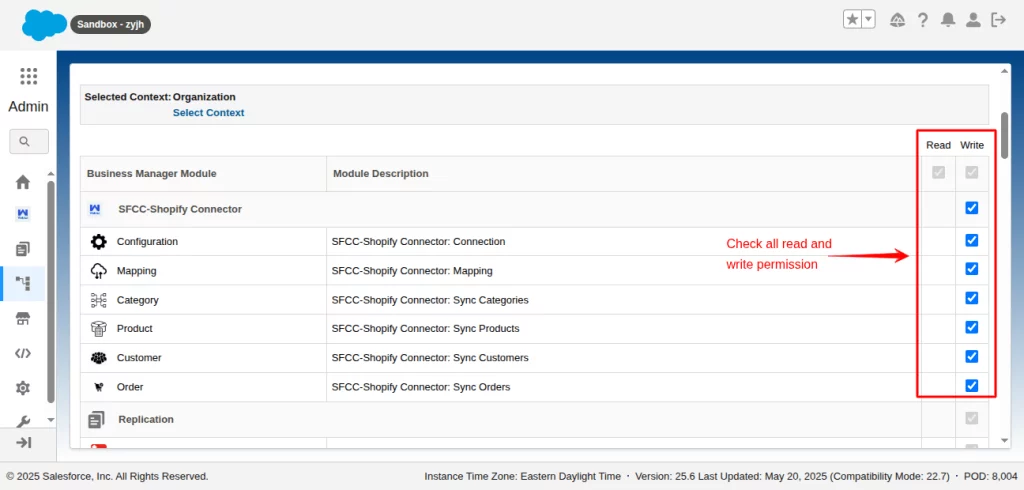
Shift the tab to Business Manager Modules.
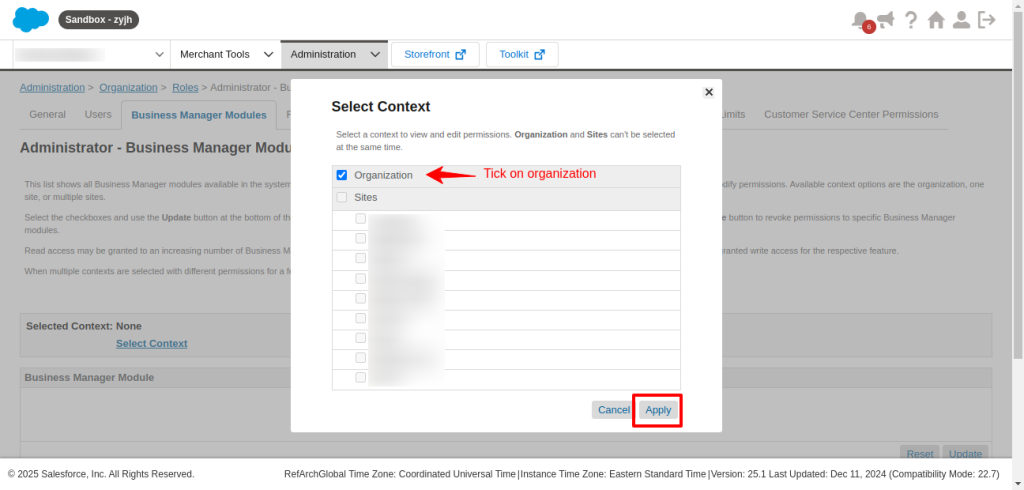
Select the Organisation Context when prompted.

Check all highlighted checkboxes under Shopify Salesforce Commerce Cloud Connector and save it.
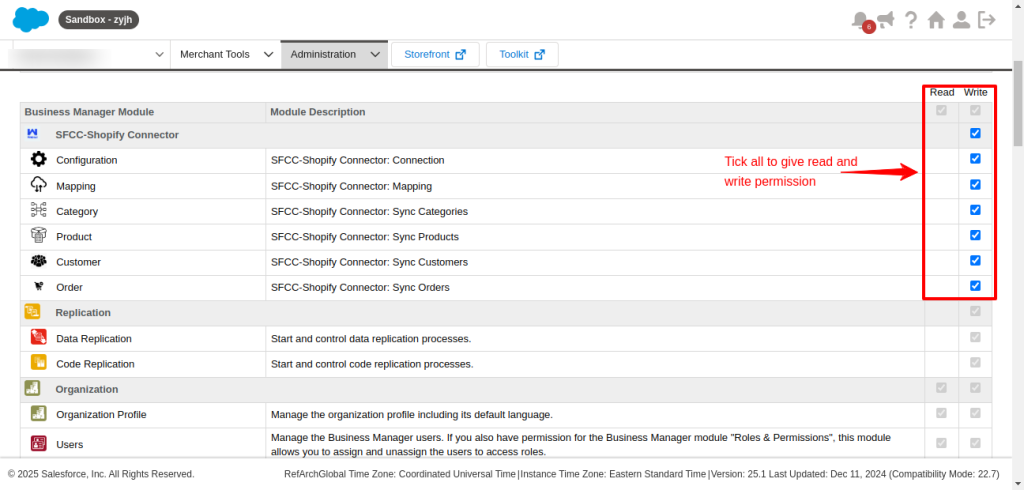
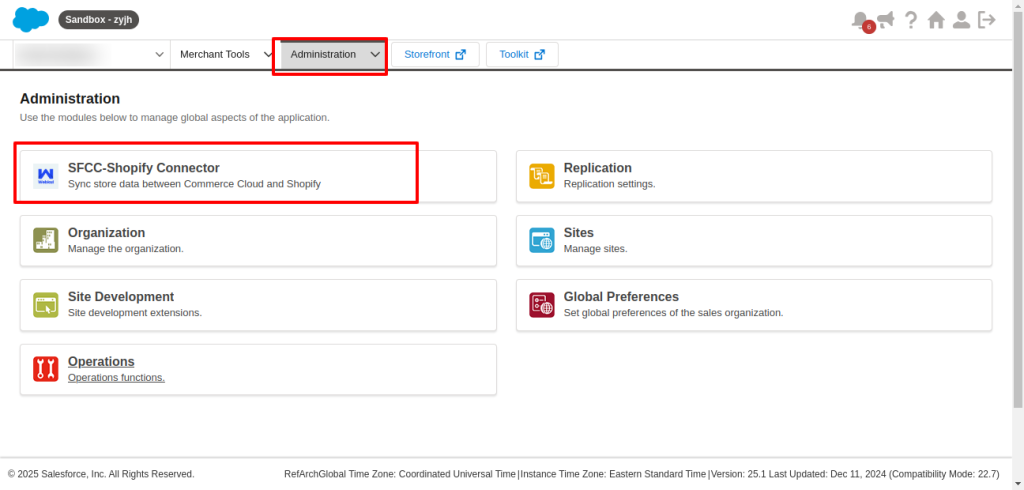
Finally, the SFCC-Shopify Connector will be visible on the Administration page.
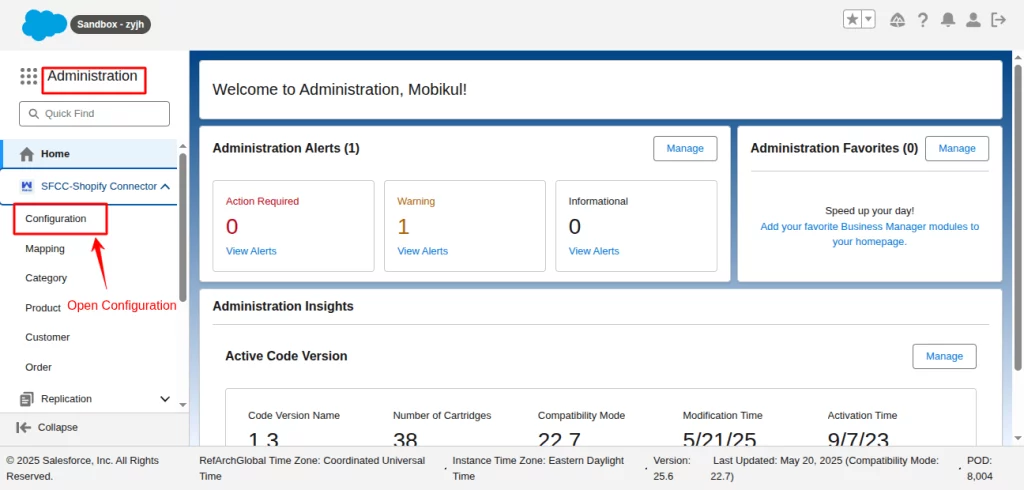
Furthermore, save the configuration by following these steps.
- Go to the Configuration Page of the Connector
- Enter the values as per your instance and save it.

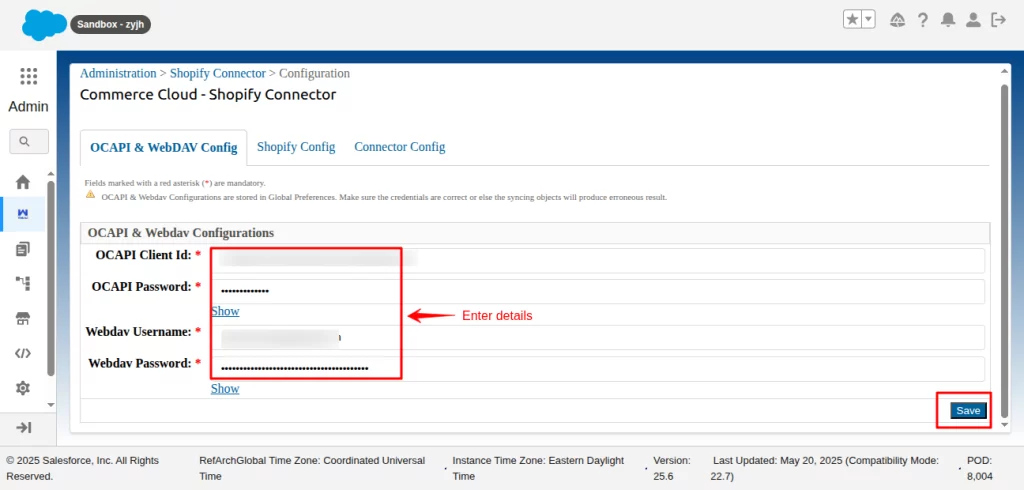
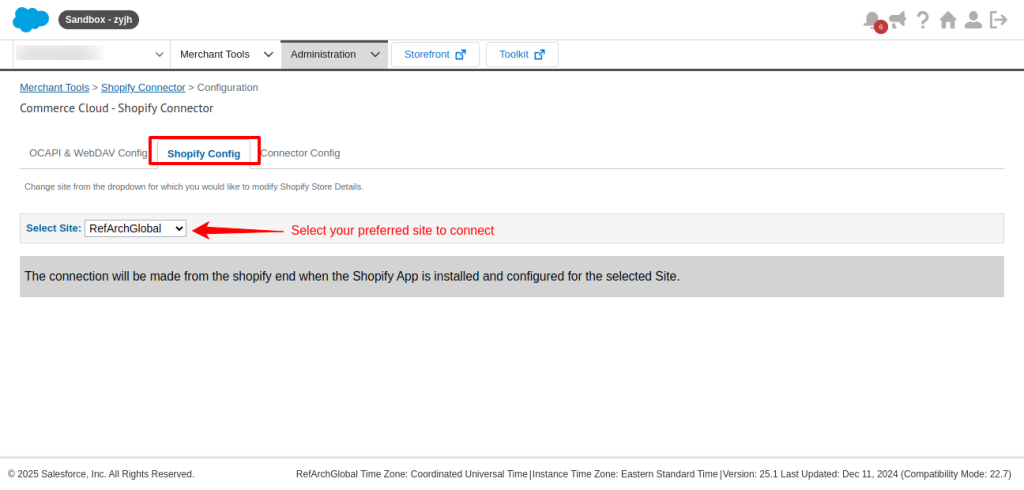
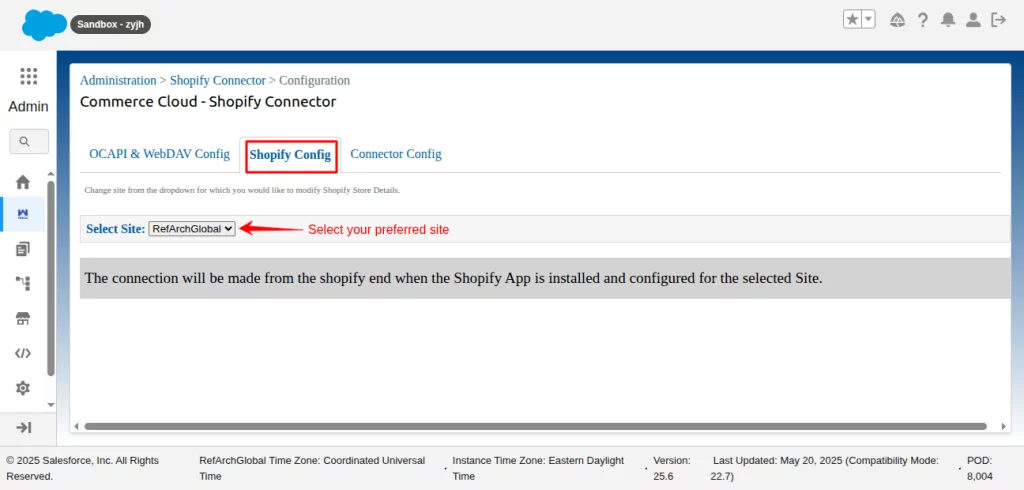
- The view below will be rendered when you click on Shopify Config.
Finally, the setup of the application is done from the SFCC end.
Shopify Application Installation and Setup
First, you need to install the Salesforce B2C Integration Application in the Shopify Store.
- After successful installation, you’ll be redirected to the subscription page.
- Here, click on Choose Plan and select from the available plans that are suitable for your requirements.
- Now, go to the Dashboard option (the first option in the left-side menu bar).

- Further, click on Configuration to connect your store to the SFCC instance.
- Enter the configuration details and click save. A message will show that ‘license key not verified’.
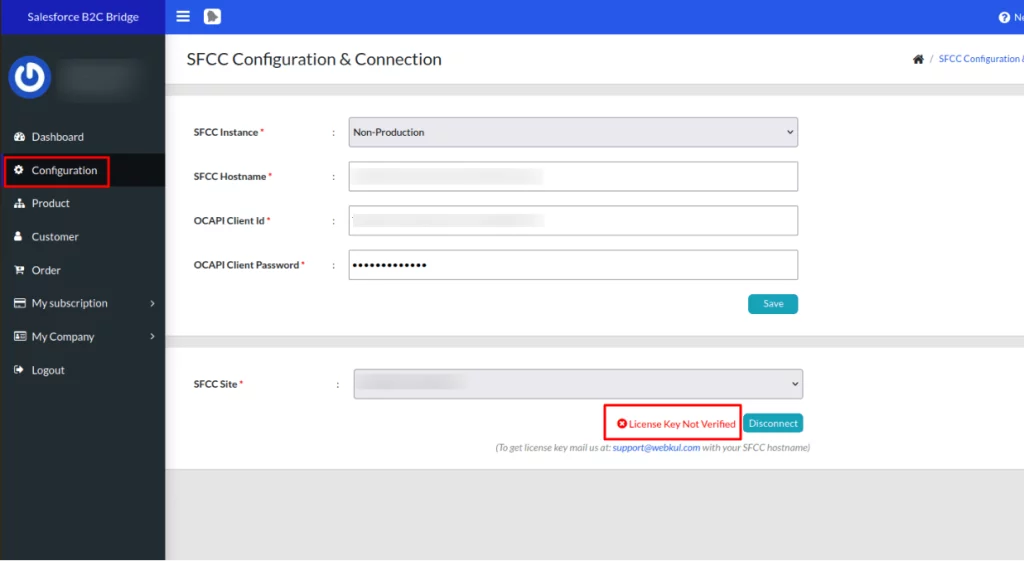

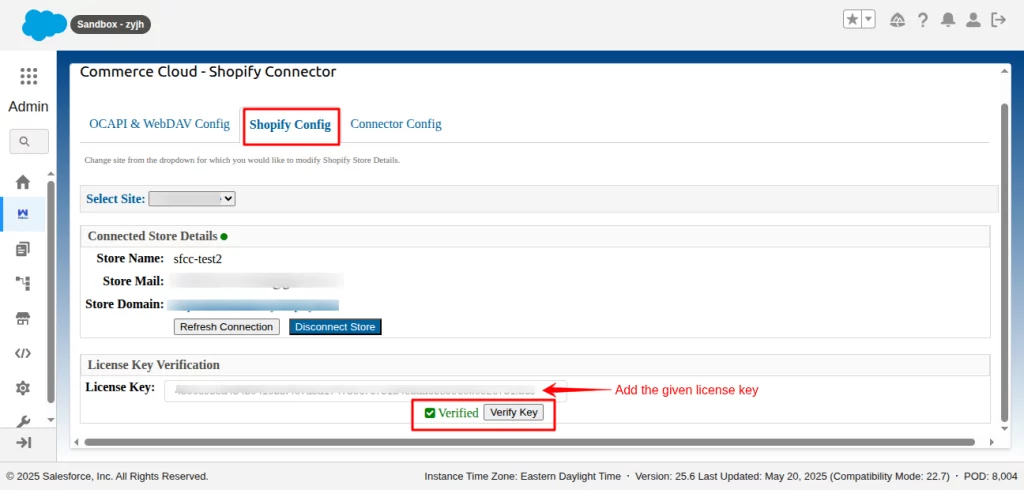
- To verify the license key, go to the Shopify Commerce Cloud Connector instance and under Shopify Config. Add your license key there and verify it.
Note: To get the license key, email us at support@webkul.com.
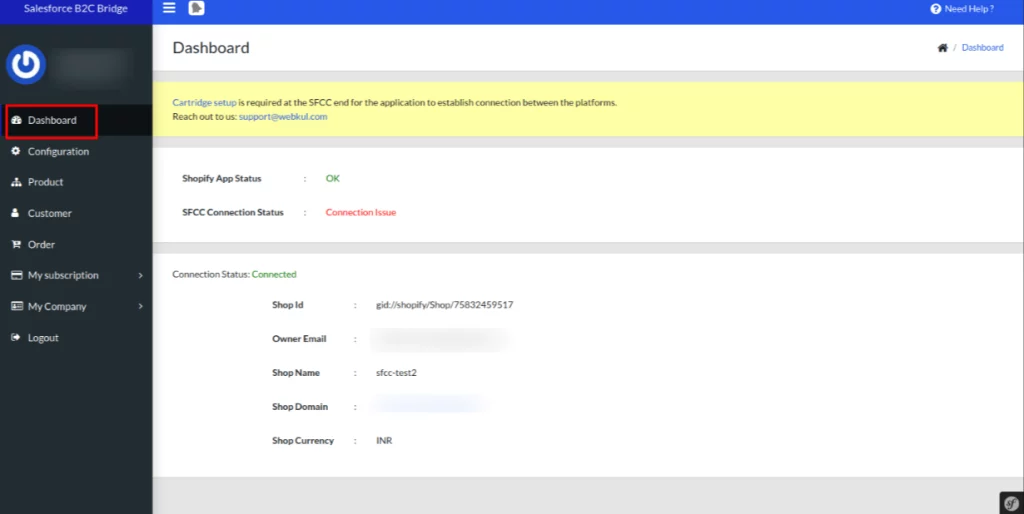
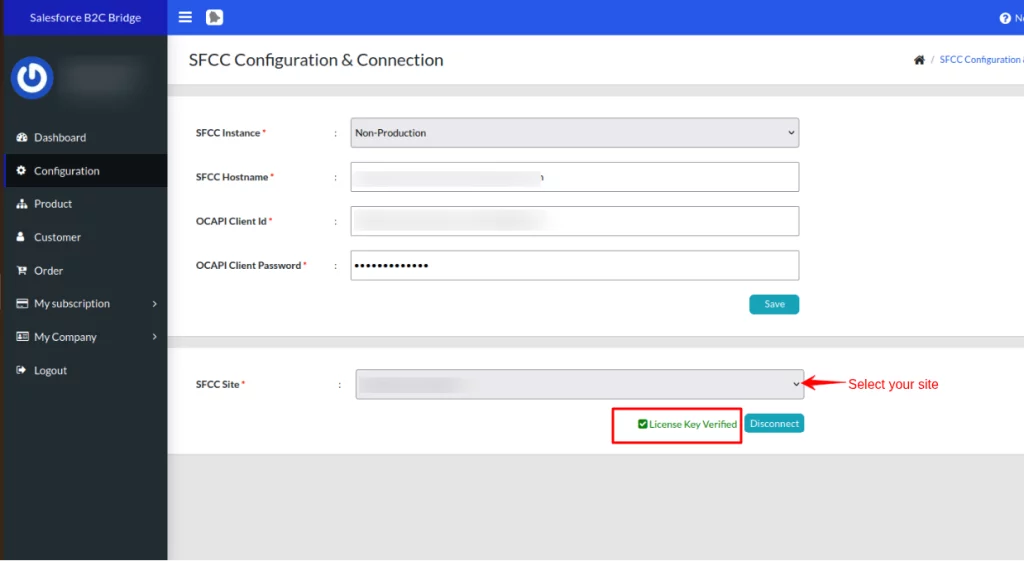
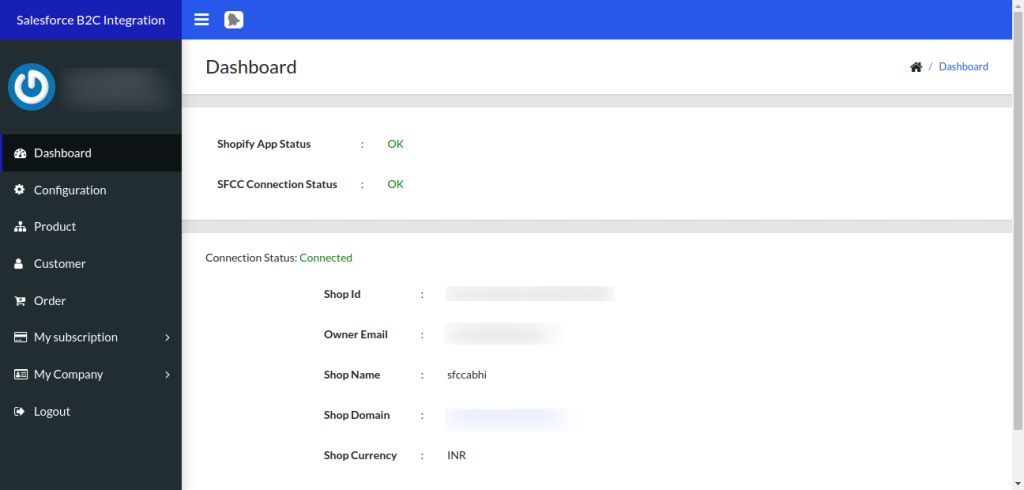
- After verifying from the Commerce Cloud end, go to the Shopify application dashboard.
- Select the preferred SFCC site to connect to the Shopify store. You can view a successful established connection.
Shopify End
Workflow of Shopify Salesforce Commerce Cloud Connector
After completing the installation process successfully, you can sync your data to the Shopify store.
So let’s dive into the process.
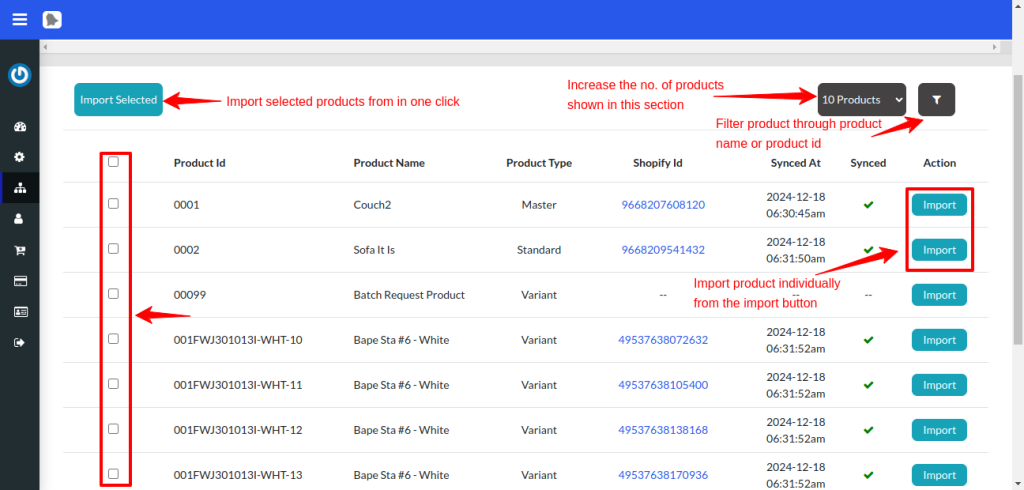
Go to your Shopify store, open the SFCC connector, then click on the Product option in the Navigation panel.
You can sync products from the Salesforce B2C commerce cloud to your Shopify store from here.
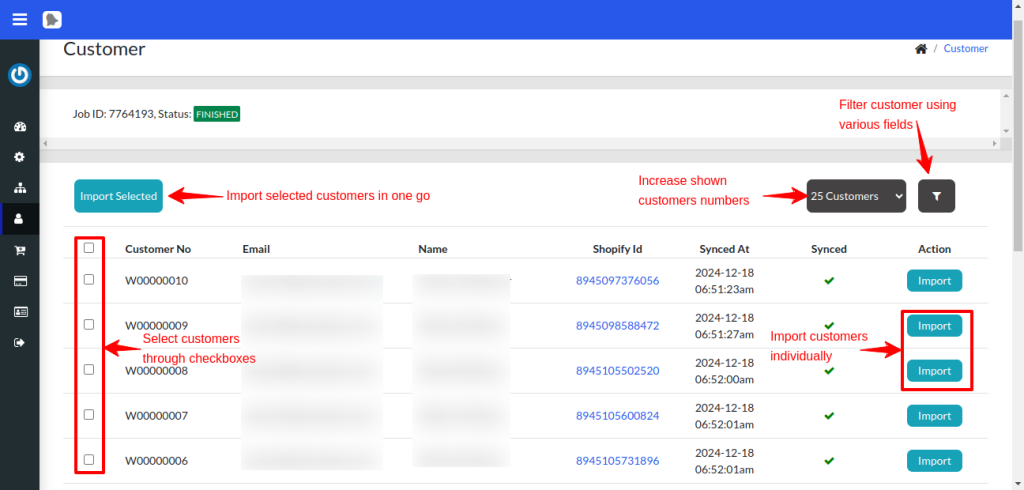
Similarly, you can sync your customer from the Salesforce Commerce Cloud to Shopify.
The application gives you various options to sync your data seamlessly. You can see this in the image below.
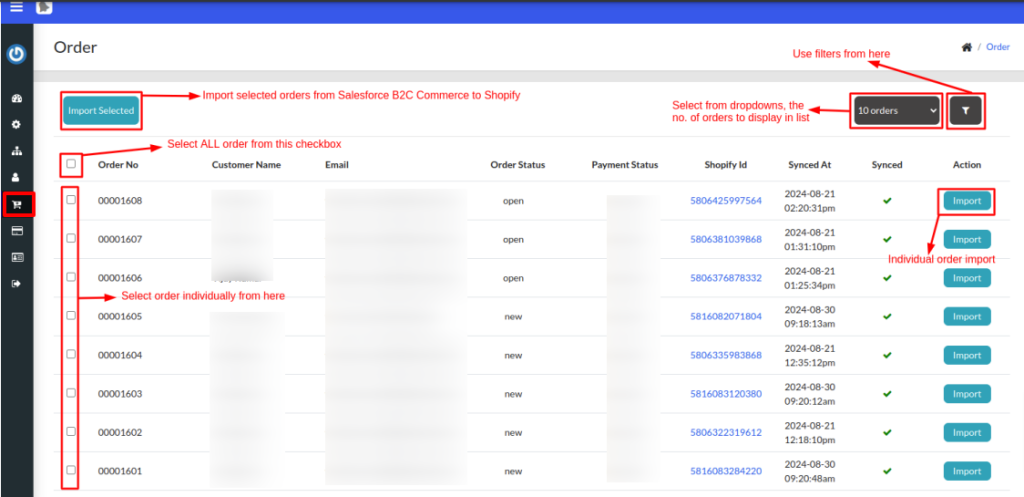
Finally, in the orders section, sync your order-related data to your Shopify store.

Workflow of the Application on the Salesforce Commerce Cloud End
Remember the dashboard after installing the application on the SFCC. For syncing your SFCC store data, go to the application dashboard again.
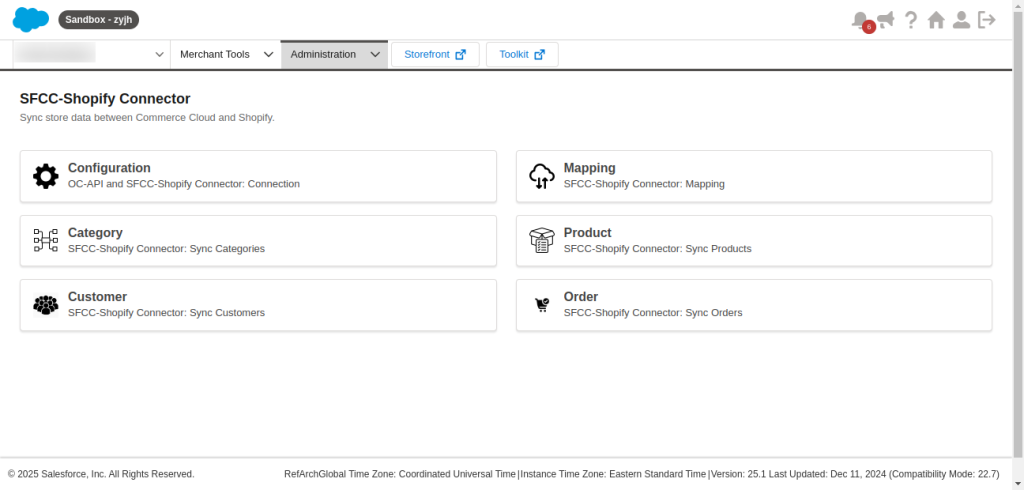
Open Administration, then click on the Shopify Salesforce Commerce Cloud Connector.

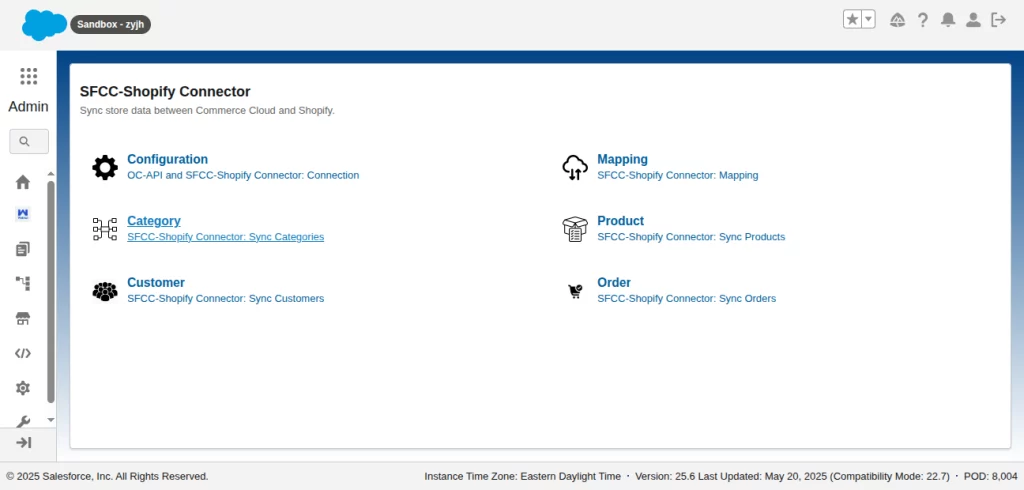
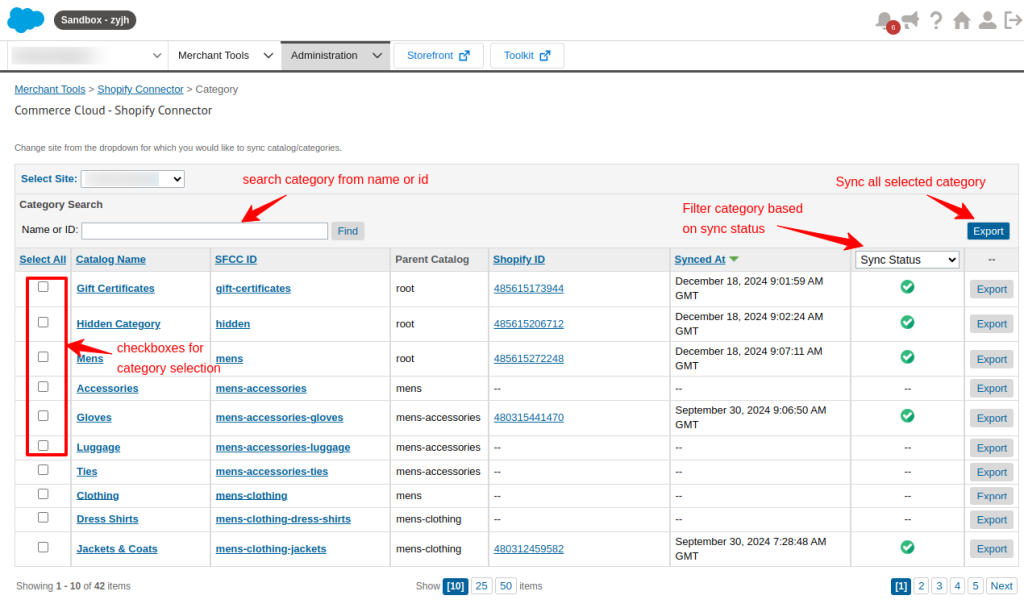
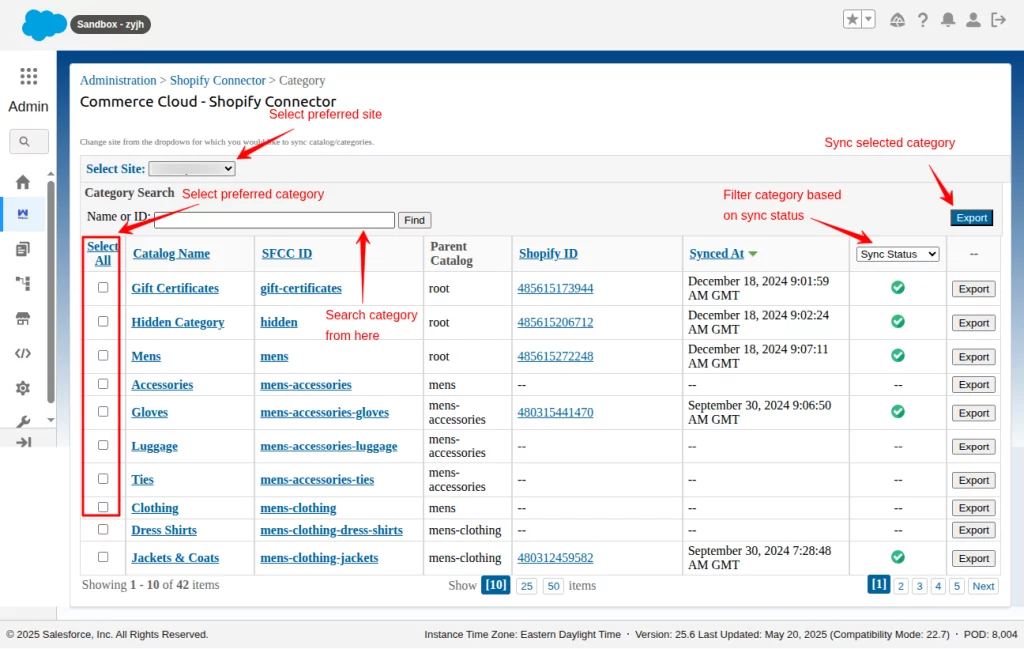
Here, you can sync data by Category, Customer, Product, and Order. We will explore each section one by one.
Open Category to sync the categories in the Salesforce B2C Commerce Cloud to the Shopify collection.


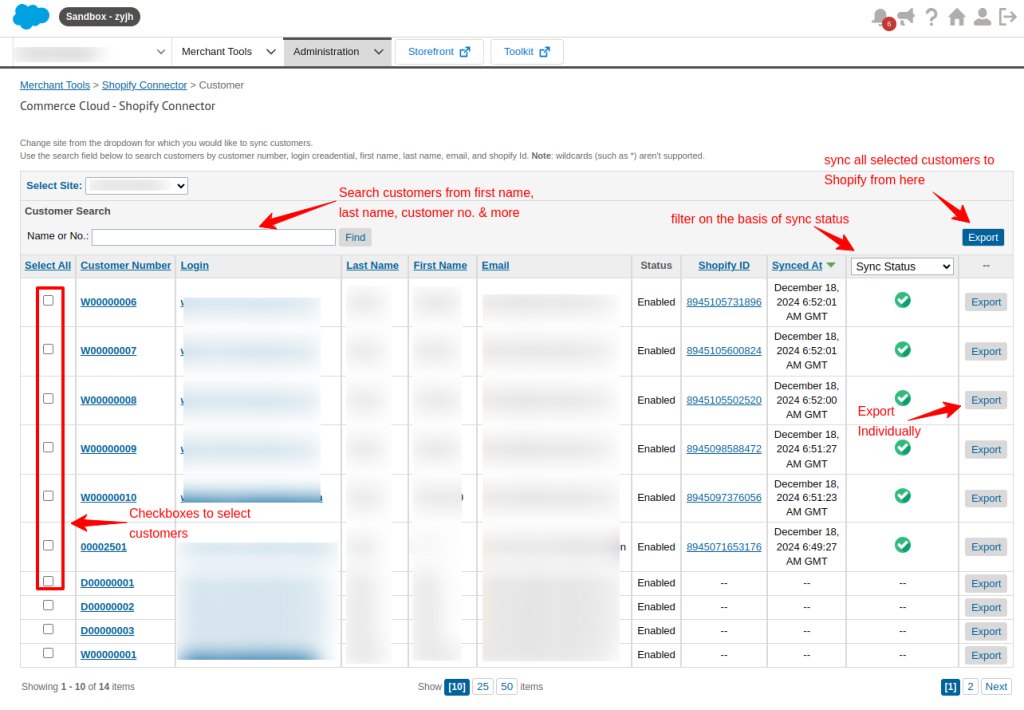
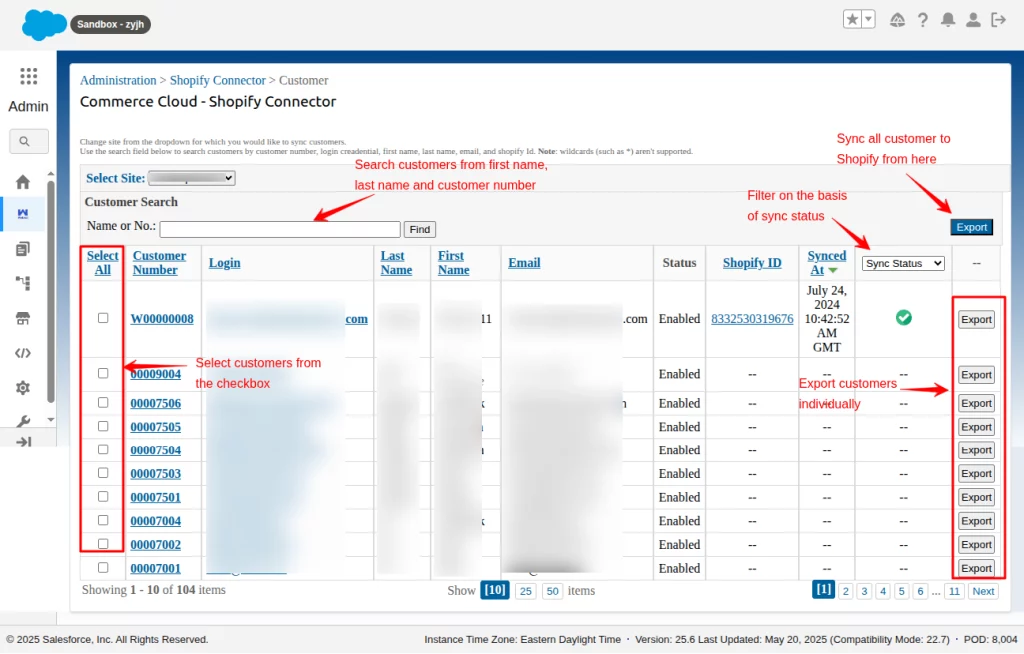
Next, click on the customer section to sync all the customer-related data to Shopify.
Note: Remember to refer to the image for more information on the various features to sync your data.


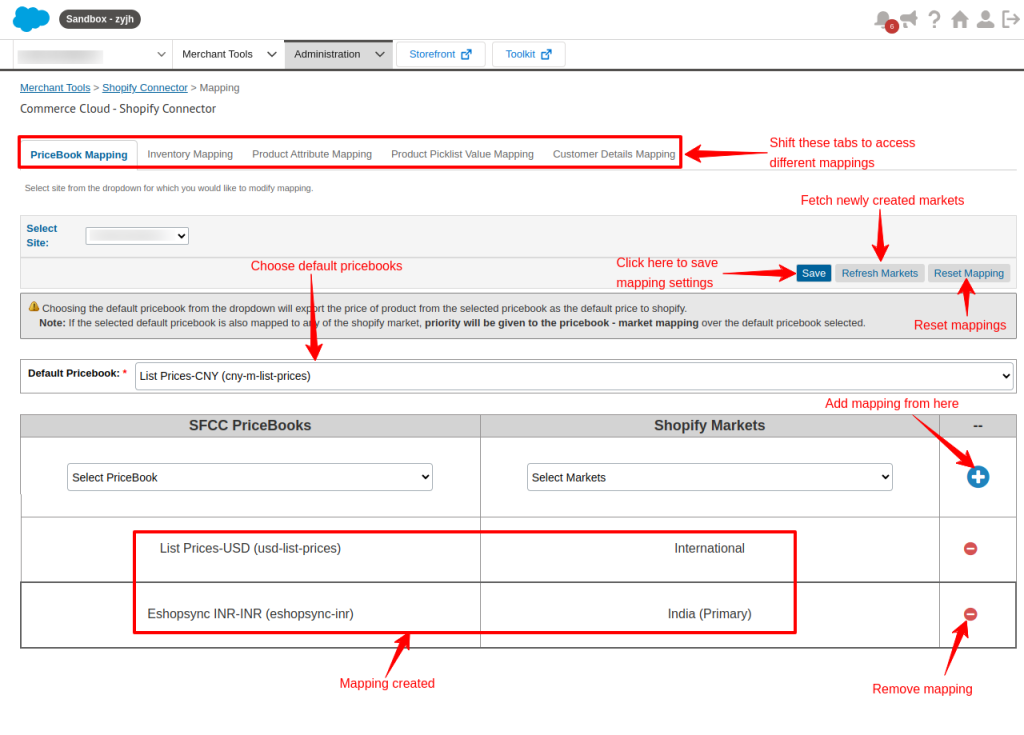
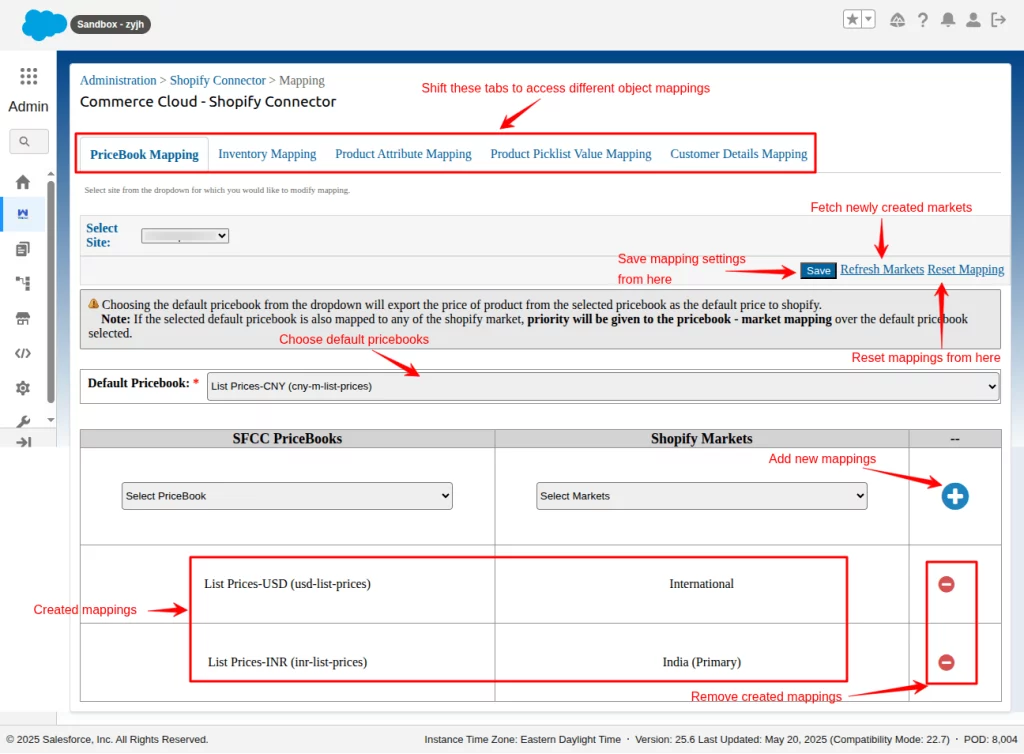
In the Mapping section, you can map the price books, Inventory, product attributes, product picklist values, and customer details.
All these Salesforce fields can be mapped to Shopify fields for a seamless sync process.


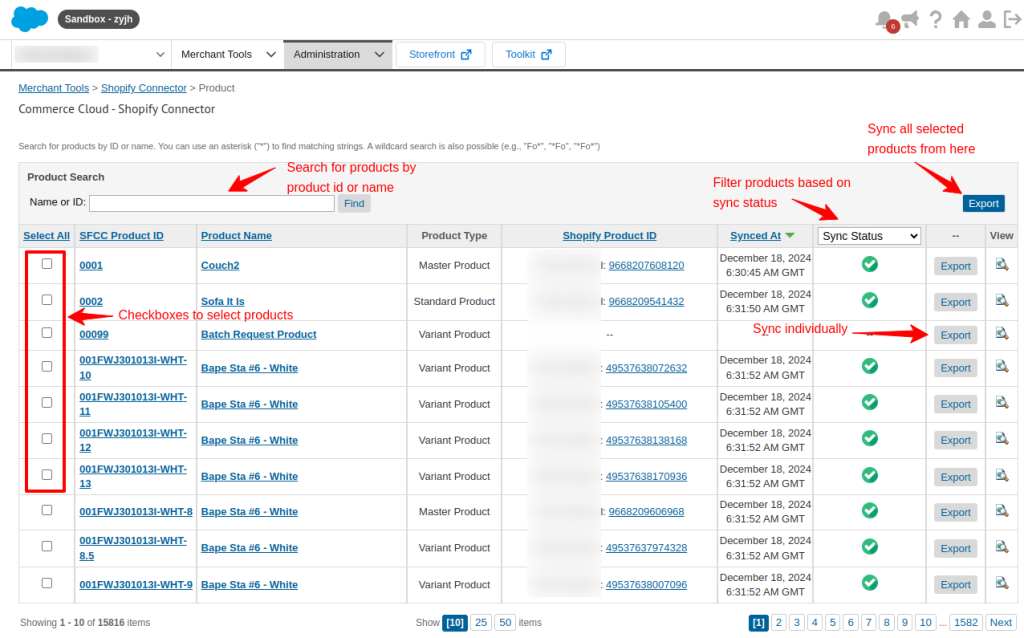
Further, sync Salesforce B2C Commerce Cloud products to the Shopify store by clicking on the Product option. This will help in keeping the consistency of the products.


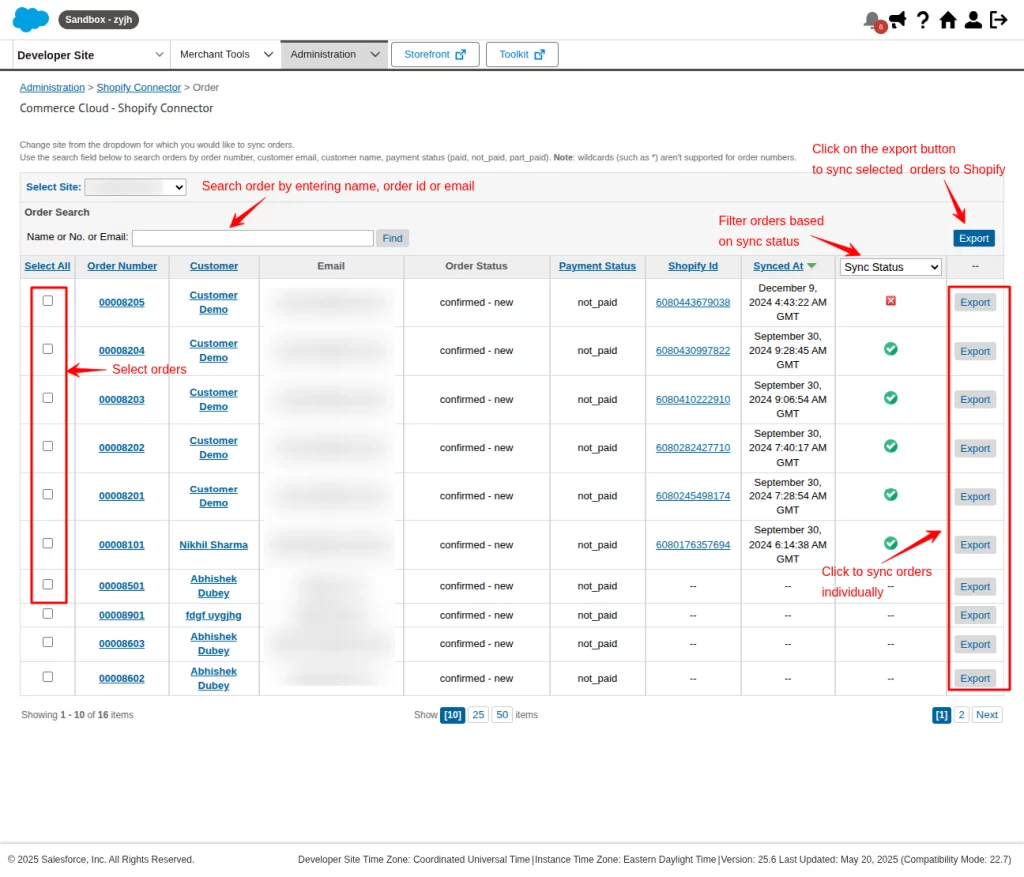
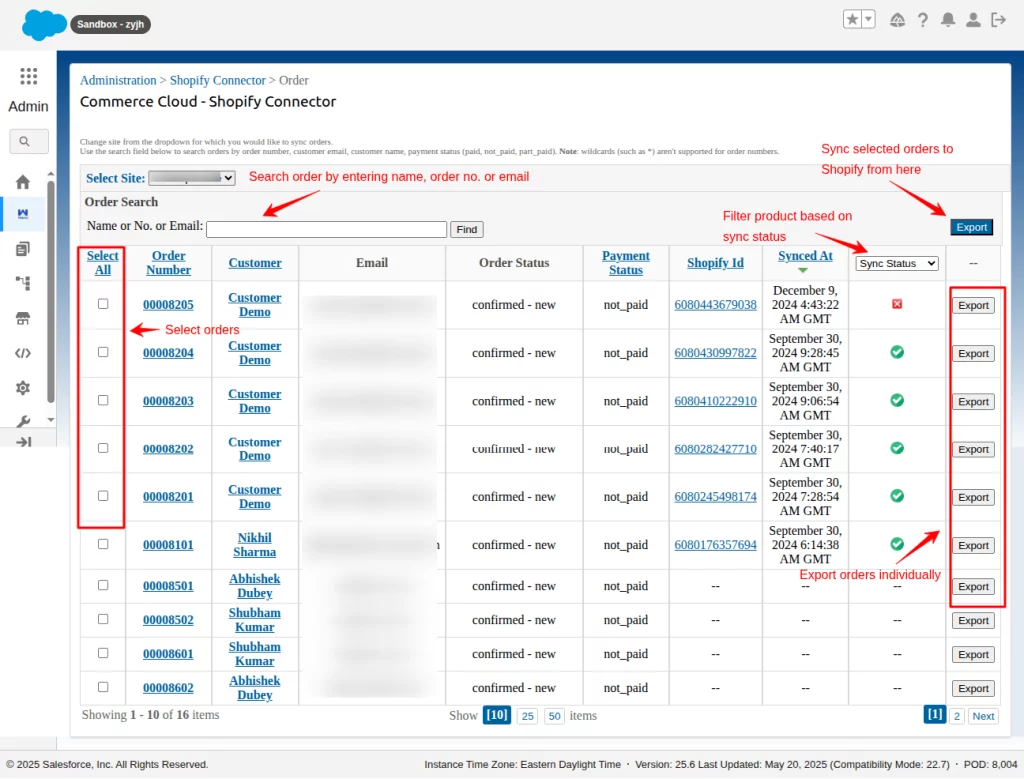
Lastly, sync Salesforce Commerce Cloud orders data with Shopify with the help of the order section.


Support
- Ready to unify your e-commerce presence? Schedule a personalized demo now!
- Learn more about our Salesforce Commerce Cloud services.