
In this blog we will learn Migration of packages through Force.com migration tool, i.e. migrating a package from one org to another with the use of force.com migration tool.
Prerequisites
You should have following software installed in your system
- Java version 1.7.0_21
- Apache Ant version 1.7.0
Steps to follow for force.com migration
Step 1: Download Force.com migration tool
You can download the tool from the following link: Force.com migration tool
extract it in the root folder, so that you can access it through terminal easily.
Step 2: Open the terminal
1) Open the salesforce_ant_38.0 folder.
2) Open the sample folder.

Retrieving the data of an org
Step 1: Open The build.properties folder through editor
1) Go to salesforce_ant_38.0 > sample > build.properties. Open with editor.
2) Insert your user name and password of the org which contains the package you want to migrate.
<!--
    /**
    * Webkul Software.
    *
    * @category Webkul
    * @author Webkul
    * @copyright Copyright © 2000-2016 salesforce.com, inc. All rights reserved.
    */
    -->
# Specify the login credentials for the desired Salesforce organization
sf.username = <Insert your Salesforce username here>
sf.password = <Insert your Salesforce password here>//password+securitytoken
Step 2: Open The build.xml folder through editor
1) Go to salesforce_ant_38.0 > sample > build.xml. Open with editor.
2) Insert your user name and password of the org which contains the package you want to migrate.
<!--
    /**
    * Webkul Software.
    *
    * @category Webkul
    * @author Webkul
    * @copyright Copyright © 2000-2016 salesforce.com, inc. All rights reserved.
    */
    -->

<condition property="sf.username" value="<Insert your Salesforce username here>"> <not> <isset property="sf.username"/> </not> </condition>
<condition property="sf.password" value="<Insert your Salesforce Password+token here>"> <not> <isset property="sf.password"/> </not> </condition>
Step 3: Retrive the data of package from org to system
1) Create a folder of the package name you want to migrate. For ex- “mypackage”
2) Now, in build.xml you will find a target tag mention below. Apply the changes as per your need.
      <!--
    /**
    * Webkul Software.
    *
    * @category Webkul
    * @author Webkul
    * @copyright Copyright © 2000-2016 salesforce.com, inc. All rights reserved.
    */
    -->
      <target name="test">
      <!-- Upload the contents of the "mypkg" package -->
      <!--<sf:deploy username="${sf.username}" password="${sf.password}" sessionId="${sf.sessionId}" serverurl="${sf.serverurl}" maxPoll="${sf.maxPoll}" deployRoot="mypkg" rollbackOnError="true"/>
      <mkdir dir="retrieveOutput"/>--><!--Comment the sf:deploy tag while you are retrieving data-->
      <!-- Retrieve the contents into another directory -->
      <!--Mention the name of your folder-->
      <sf:retrieve username="${sf.username}" password="${sf.password}" sessionId="${sf.sessionId}" serverurl="${sf.serverurl}" maxPoll="${sf.maxPoll}" retrieveTarget="mypackage" packageNames=""/>
</target>
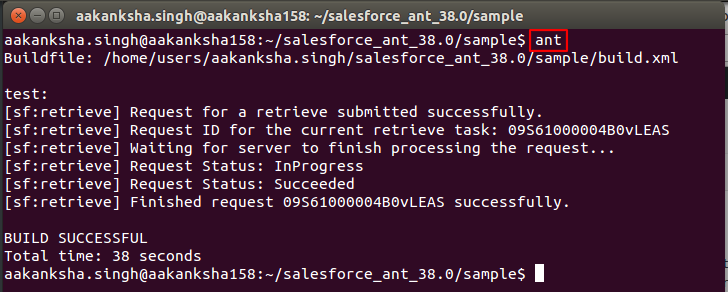
Step 4: Go to terminal. Write “ant” and press enter
Deploy the data to an org
Step 1: Open The build.properties folder through editor
1) Go to salesforce_ant_38.0 > sample > build.properties. Open with editor.
2) Insert your user name and password of the org in which you want to deploy the package.
<!--
    /**
    * Webkul Software.
    *
    * @category Webkul
    * @author Webkul
    * @copyright Copyright © 2000-2016 salesforce.com, inc. All rights reserved.
    */
    -->
# Specify the login credentials for the desired Salesforce organization
sf.username = <Insert your Salesforce username here>
sf.password = <Insert your Salesforce password here>//password+securitytoken
Step 2: Open The build.xml folder through editor
1) Go to salesforce_ant_38.0 > sample > build.xml. Open with editor.
2) Insert your user name and password of the org in which you want to deploy the package.
<!--
    /**
    * Webkul Software.
    *
    * @category Webkul
    * @author Webkul
    * @copyright Copyright © 2000-2016 salesforce.com, inc. All rights reserved.
    */
    -->
<condition property="sf.username" value="<Insert your Salesforce username here>"> <not> <isset property="sf.username"/> </not> </condition>
<condition property="sf.password" value="<Insert your Salesforce Password+token here>"> <not> <isset property="sf.password"/> </not> </condition>
Step 3: Remove the namespace from package.xml
1) Go to salesforce_ant_38.0 > sample > mypackage(The folder you mentioned in retrievetarget above) > package.xml. Open with editor.
2) You will find description of the package.
<!--
    /**
    * Webkul Software.
    *
    * @category Webkul
    * @author Webkul
    * @copyright Copyright © 2000-2016 salesforce.com, inc. All rights reserved.
    */
    -->
<fullName><Package Name></fullName>
<apiAccessLevel>Unrestricted</apiAccessLevel>
<description><Description></description>

<!--Remove the name space mentioned here, otherwise it will throw error-->
<namespacePrefix><namespace></namespacePrefix>
Step 4: Deploy the data of package from system to org
1) Now, in build.xml you will find a target tag mention below. Apply the changes as per your need.
<!--
    /**
    * Webkul Software.
    *
    * @category Webkul
    * @author Webkul
    * @copyright Copyright © 2000-2016 salesforce.com, inc. All rights reserved.
    */
    -->
<target name="test">
      <!-- Upload the contents of the "mypackage" package -->
      <sf:deploy username="${sf.username}" password="${sf.password}" sessionId="${sf.sessionId}" serverurl="${sf.serverurl}" maxPoll="${sf.maxPoll}" deployRoot="mypackage" rollbackOnError="true"/>
      <!comment the sf:retrieve tag while deploying-->
      <!--<mkdir dir="retrieveOutput"/>-->
      <!-- Retrieve the contents into another directory -->
      <!--<sf:retrieve username="${sf.username}" password="${sf.password}" sessionId="${sf.sessionId}" serverurl="${sf.serverurl}" maxPoll="${sf.maxPoll}" retrieveTarget="retrieveOutput" packageNames="MyPkg"/>-->
</target>
Step 5: Go to terminal. Write “ant” and press enter
Support
That’s all for Migration of packages through Force.com migration tool, still have any issue feel free to add a ticket and let us know your views to make the code better https://webkul.uvdesk.com/en/customer/create-ticket/


Leave a Comment
Comments (0)